AI Engineering Fluency — VS Code Extension

Track your AI Engineering Fluency — daily and monthly token usage, cost estimates, and productivity insights directly inside VS Code. Reads local session logs and displays today's and monthly usage in the status bar, with rich detail views and optional cloud sync.
Install

Search for "AI Engineering Fluency" in the VS Code Extensions panel, or install via the Marketplace link above.
Features
- Real-time Token Tracking: Displays current day and month token usage in the status bar
- Copilot Fluency Score: Maturity model dashboard with 4 stages across 6 categories to track your Copilot mastery
- Export Fluency Score: Export your Fluency Score as a PNG image or comprehensive multi-page PDF report
- Social Media Sharing: Share your Fluency Score achievements on LinkedIn, Bluesky, and Mastodon with #CopilotFluencyScore
- Usage Analysis Dashboard: Comprehensive analytics on how you use Copilot (modes, tool calls, context references, MCP tools)
- Fluency Level Viewer: Debug-only tool to explore all scoring rules and thresholds (requires active debugger)
- Local View Regression: Debug-only check that opens the main views with bundled sample data and reports whether each webview rendered non-empty output
- Automatic Updates: Refreshes every 5 minutes to show the latest usage
- Click to Refresh: Click the status bar item to manually refresh the token count
- Smart Estimation: Uses character-based analysis with model-specific ratios for token estimation
- Intelligent Caching: Caches processed session files to speed up subsequent updates
- Diagnostic Reporting: Generate comprehensive diagnostic reports to help troubleshoot issues
Cloud Backend (Opt-in)
- Cross-device analytics: Syncs daily aggregates from all machines into a user-owned Azure Storage account
- Azure Storage Tables backend: Stores/queries pre-aggregated rollups (not raw prompts)
- Secure by default: Uses Microsoft Entra ID (Azure RBAC) via
DefaultAzureCredential (no secrets in settings)
- Advanced auth option: Optional Storage Shared Key mode stored in VS Code SecretStorage (never in Settings Sync)
- Graceful fallback: If Azure is unavailable or permissions are missing, local-only mode keeps working
Reporting & Filtering
- Details view filters: Lookback window + Model + Workspace + Machine + (optional) User filters
- Export: Export the current filtered view as JSON (for spreadsheets / dashboards / scripts)
Team / Multi-user (Optional)
- Shared storage for teams: Multiple developers can write to the same Azure Storage account/dataset for centralized reporting
- Explicit consent gating: No per-user identifier is written unless you explicitly enable team sharing
- Governed identity modes: Pseudonymous hashing, validated team aliases, or Entra object IDs
- User filtering: When enabled, aggregates can be filtered by user in the details view
Status Bar Display
The extension shows token usage in the format: # <today> | <last 30 days> in the status bar:

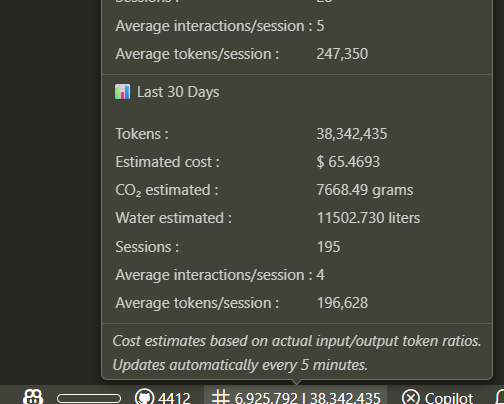
Hovering on the status bar item shows a detailed breakdown of token usage:
Clicking the status bar item opens a detailed view with comprehensive statistics:
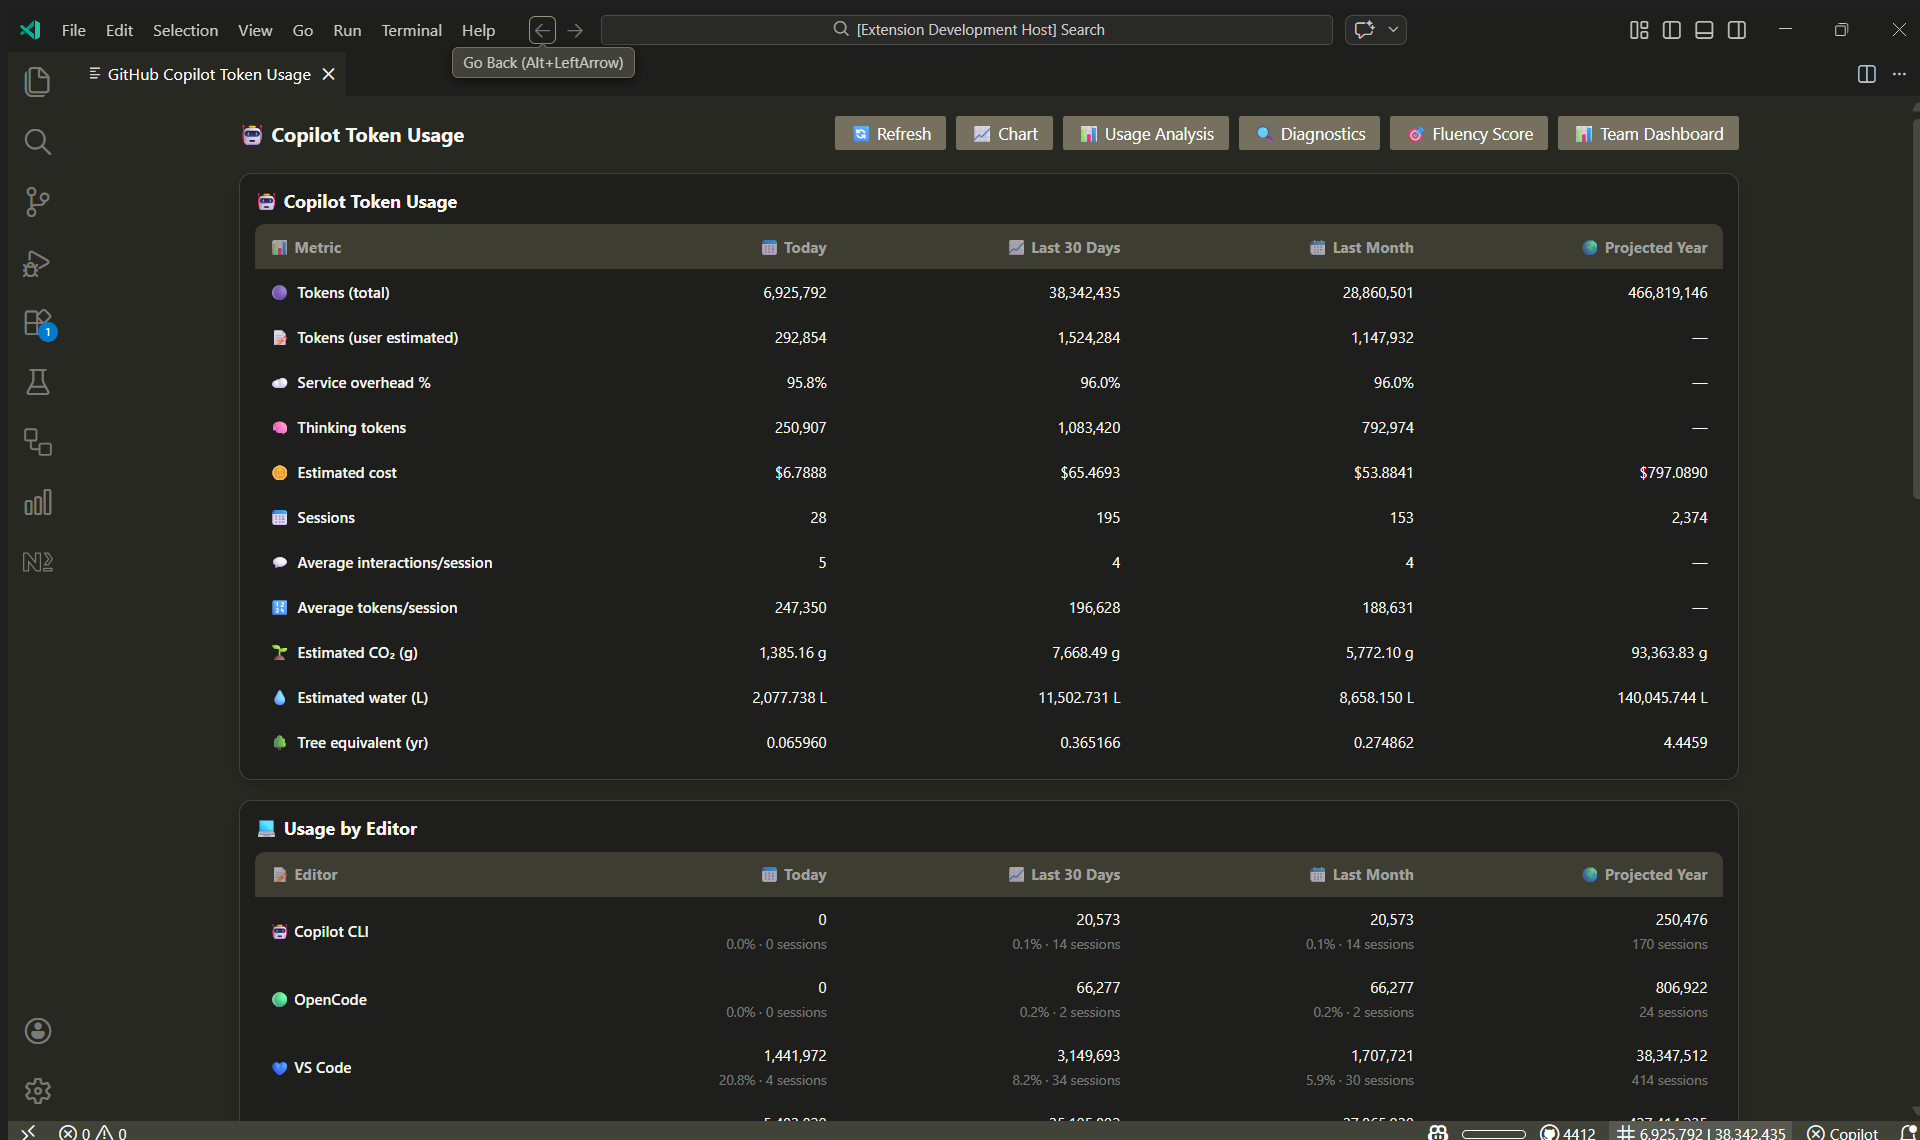
Chart overview per day, with option to view per model as well:

Or per supported editor:
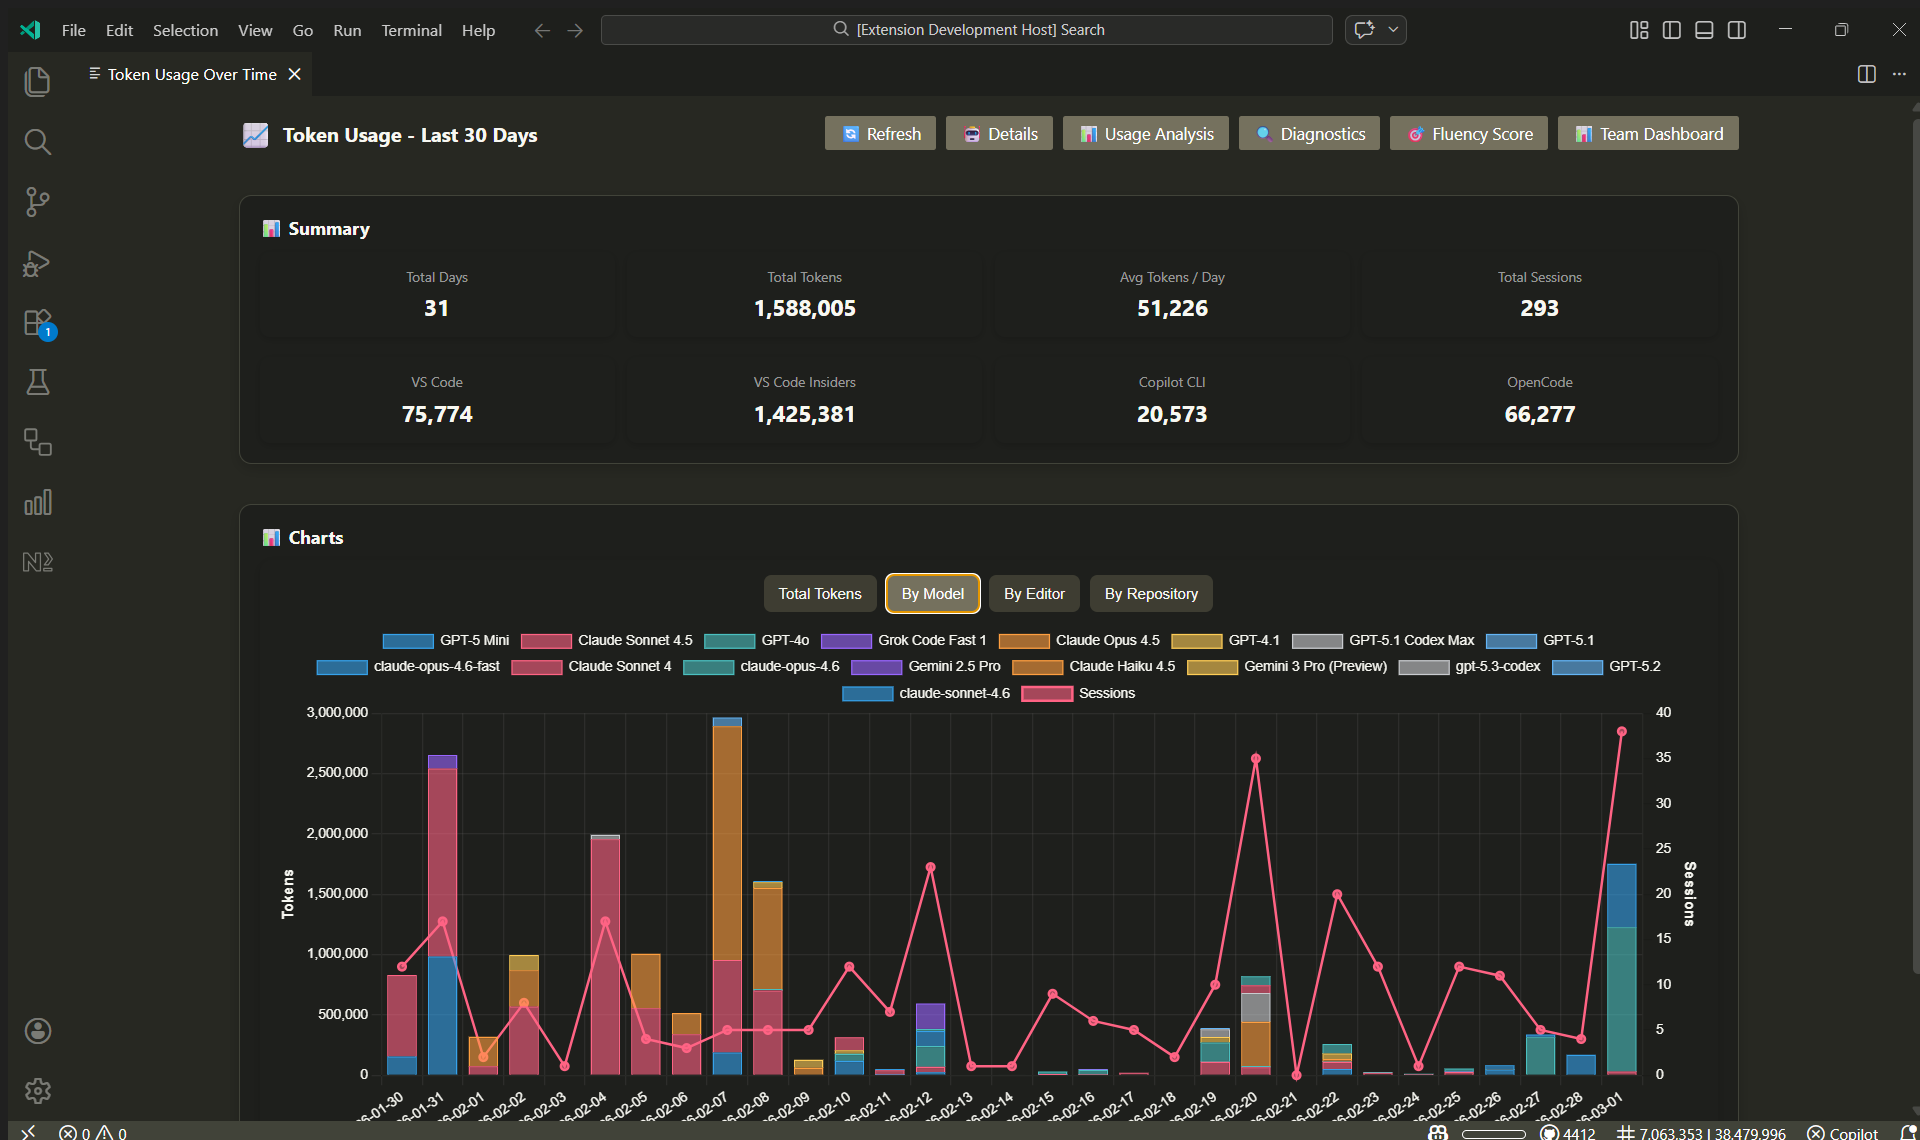
Supported editors shown in the chart:
Code — Stable VS Code releaseCode - Insiders — VS Code Insiders (preview) buildsCode - Exploration — Exploration/pre-release buildsVSCodium — Community-built VS Code distributionCursor — Cursor editorOpenCode — Terminal-based coding agentCrush — Terminal-based coding agentClaude Code — Anthropic CLI/IDE extension (actual API token counts, no estimation)Gemini CLI — Google's CLI coding agent (actual token counts from session JSONL)Visual Studio — Visual Studio IDE (2022+); token counts are estimated from prompt and response text length
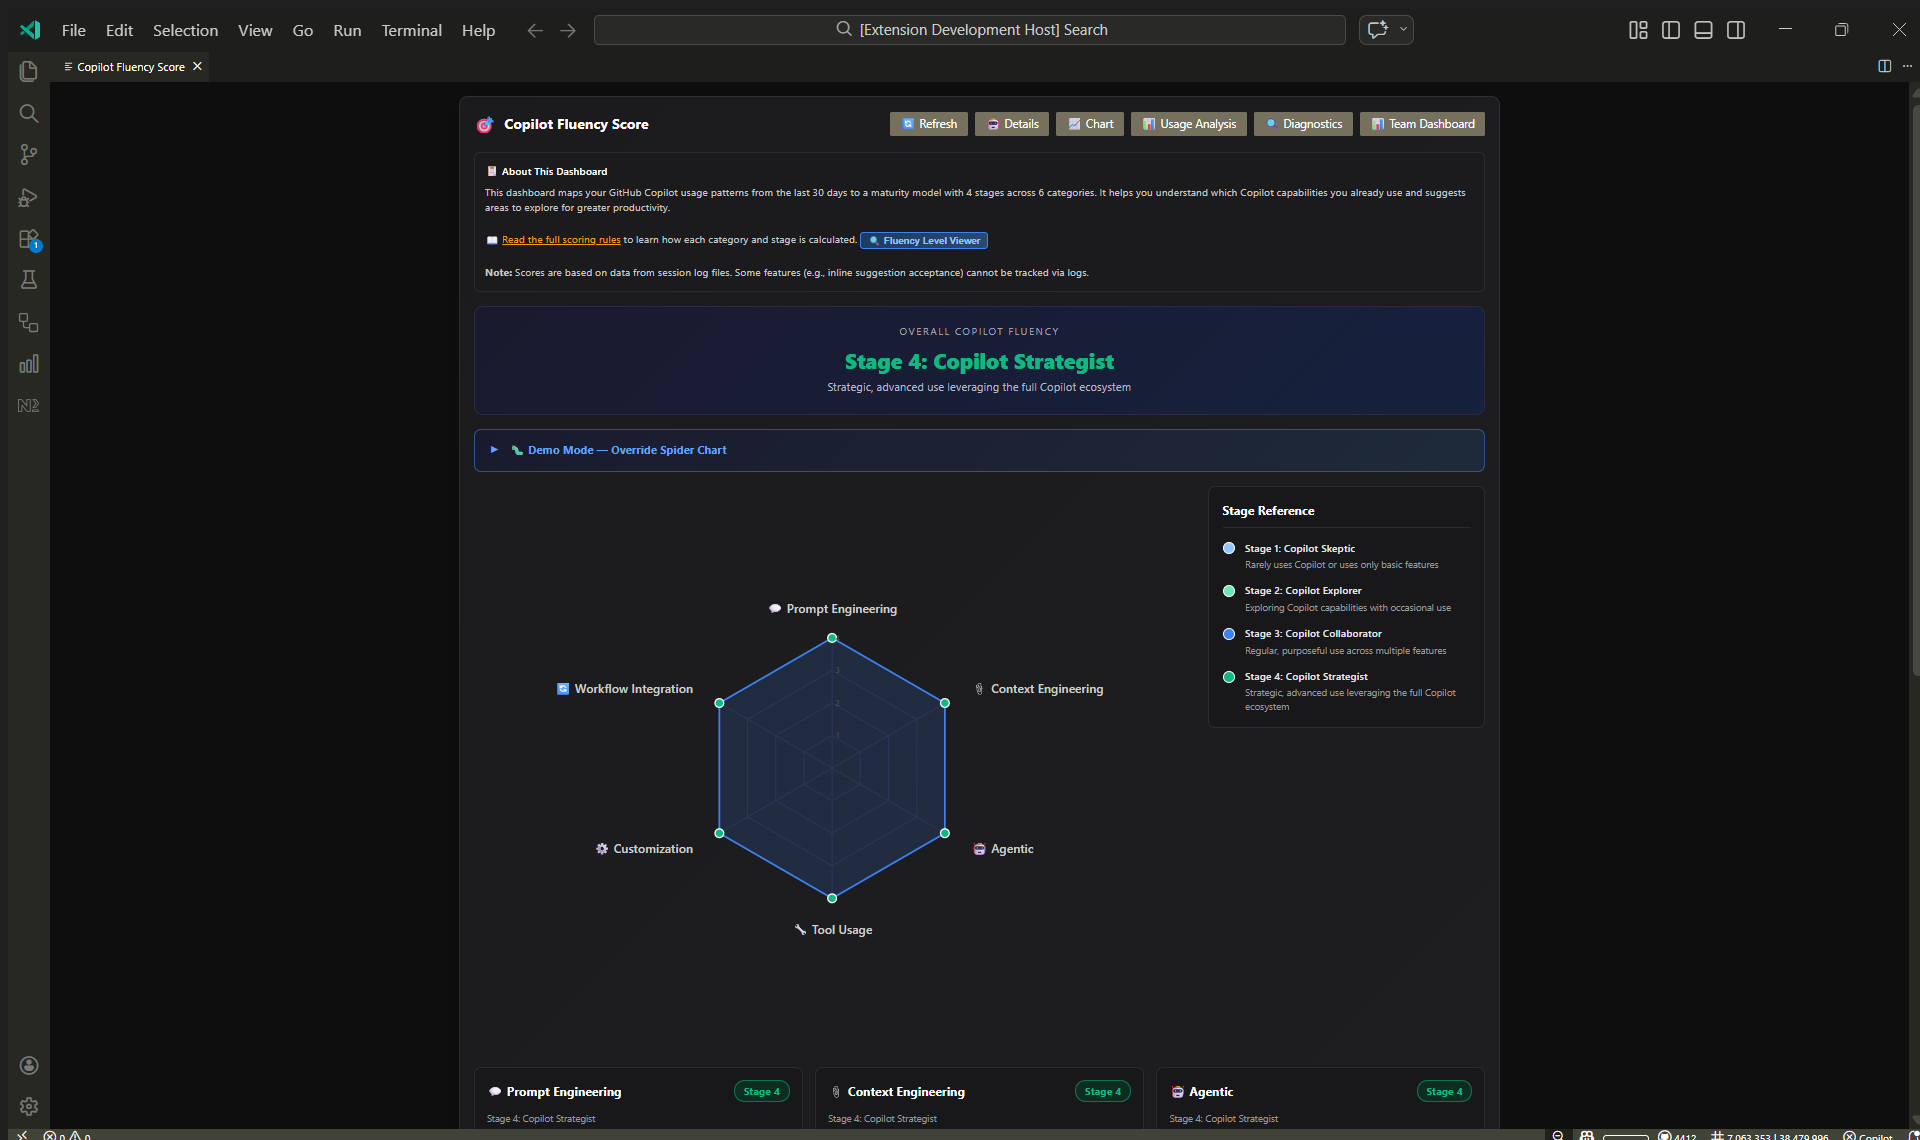
Copilot Fluency Score
The extension includes a Copilot Fluency Score dashboard that evaluates your GitHub Copilot proficiency across 6 categories with 4 stages each (Skeptic → Explorer → Collaborator → Strategist).
Categories Evaluated:
- 💬 Prompt Engineering: How you structure prompts and use modes
- 📎 Context Engineering: Your use of context references
- 🤖 Agentic: Agent mode and autonomous feature usage
- 🔧 Tool Usage: Built-in tools and MCP server integration
- ⚙️ Customization: Repository customization and model selection
- 🔄 Workflow Integration: Regular usage and mode diversity
Fluency Level Viewer (Debug Mode)
A debug-only tool that displays all fluency score rules, thresholds, and tips for each category and stage.
- Access: Only available when a VS Code debugger is active
- Features: View all stage requirements and advancement tips for each category
- Use Cases: Test scoring logic, debug scoring issues, plan improvements
For detailed scoring rules, see Fluency Levels Documentation.
Local View Regression (Debug Mode)
A debug-only regression helper that opens the main local views in the Extension Development Host and reports whether each webview rendered non-empty content.
- Access: Run
AI Engineering Fluency: Run Local View Regression (Debug Only) from the Command Palette while debugging the extension
- Data Source: Uses your real local session data first; if none is found, it falls back to the bundled sample session fixtures under
vscode-extension/test/fixtures/sample-session-data/chatSessions
- Coverage: Details, Chart, Usage Analysis, Fluency Score, Environmental Impact, Diagnostics, and Fluency Level Viewer
- Output: Shows a pass/fail summary in the extension output channel and leaves the opened views visible for quick manual inspection
- Note: Team Dashboard is intentionally skipped because it requires a configured backend
Usage Analysis Dashboard
The extension includes a comprehensive usage analysis dashboard that helps you understand how you interact with GitHub Copilot.
Tracked Metrics:
- Interaction Modes: Ask (chat), Edit (code modifications), Agent (autonomous tasks)
- Context References:
#file, #selection, #symbol, #codebase, @workspace, @terminal, @vscode
- Tool Calls: Functions and tools invoked by Copilot
- MCP Tools: Model Context Protocol server and tool usage
To access the dashboard:
- Click the status bar item to open the details panel
- Click the "📊 Usage Analysis" button
- Or use the Command Palette:
AI Engineering Fluency: Show Usage Analysis Dashboard
For detailed information about the metrics, see Usage Analysis Documentation.
Diagnostic Reporting
Generate a diagnostic report to help troubleshoot issues. The report includes:
- Extension and VS Code version information
- System details (OS, Node version, environment)
- GitHub Copilot extension status and versions
- Session file discovery results (locations only, no content)
- Aggregated token usage statistics
- Cache performance metrics
To generate a diagnostic report:
- Click the status bar item to open the detailed view
- Click the "Diagnostics" button at the bottom
- Review the report in the new panel
- Use the "Copy to Clipboard" button to copy the report for sharing
- Use the "Open GitHub Issue" button to submit an issue with the report
Alternatively, use the Command Palette:
- Press
Ctrl+Shift+P / Cmd+Shift+P
- Type
AI Engineering Fluency: Generate Diagnostic Report
Note: The diagnostic report does not include any of your code or conversation content. It only includes file locations, sizes, and aggregated statistics.
Cloud Backend (Azure Storage)
The cloud backend is disabled by default. When enabled, the extension periodically uploads daily aggregates to Azure Storage Tables and queries them for cross-device reporting.
Session Log Upload (Optional)
The extension can also upload your local session log files to Azure Blob Storage. This enables:
- Team collaboration: Share logs with your team for analysis
- Persistent storage: Keep logs beyond local VS Code limits
- Coding agent access: Make logs available to GitHub Copilot Coding Agent as reference material
To enable log file uploads:
{
  "copilotTokenTracker.backend.blobUploadEnabled": true,
  "copilotTokenTracker.backend.blobContainerName": "copilot-session-logs",
  "copilotTokenTracker.backend.blobUploadFrequencyHours": 24
}
See Blob Upload Guide for detailed setup instructions and security considerations.
Authentication
- Recommended: Entra ID (Azure RBAC) using
DefaultAzureCredential (Azure CLI / VS Code Azure Account / Managed Identity)
- Advanced: Storage Shared Key (stored in VS Code SecretStorage, per-machine, does not sync)
Required Azure Roles
Data-plane (tables):
- Storage Table Data Contributor (sync/write)
- Storage Table Data Reader (read-only reporting)
Management-plane (wizard/provisioning):
- Contributor (or a more scoped role) at subscription or resource group scope
Important: management roles do not automatically grant data-plane access.
Team Sharing
To share usage with team members, configure all participants to point at the same Azure Storage account and datasetId.
- Team lead / admins: provision the storage account and tables, and grant data-plane roles
- Contributors (writers): need Storage Table Data Contributor to upload aggregates
- Readers (reporting): can be granted Storage Table Data Reader for read-only reporting
- Privacy guardrail: per-user identity is only included when the developer has explicitly enabled team sharing
Commands
AI Engineering Fluency: Configure Backend — guided setup wizard for Azure resources and settingsAI Engineering Fluency: Copy Backend Config — copies shareable config without secretsAI Engineering Fluency: Export Current View — exports filtered backend/local view as JSON
Shared Key management (only if using shared-key auth):
AI Engineering Fluency: Set Backend Shared KeyAI Engineering Fluency: Rotate Backend Shared KeyAI Engineering Fluency: Clear Backend Shared Key
Other:
AI Engineering Fluency: Ask About Usage
Backend Settings Configurator
Use AI Engineering Fluency: Configure Backend to open the settings panel with five sections: Overview, Sharing, Azure, Advanced, and Review & Apply.
Privacy profiles (Sharing section):
- Off – All data stays local; nothing syncs to Azure
- Solo – Private cloud storage; only you can access your data
- Team Anonymized – Hashed workspace/machine IDs; no names stored
- Team Pseudonymous – Stable alias (e.g., "dev-001") with hashed IDs; no real names
- Team Identified – Team alias or Entra object ID included; full workspace names available
Guided setup workflow:
- Run AI Engineering Fluency: Configure Backend command
- Navigate to Sharing section to choose your privacy profile
- Go to Azure section, enable backend, and use Open configure walkthrough to provision Azure resources
- Advanced section sets dataset ID and lookback days (7/30/90)
- Review & Apply confirms your changes with explicit consent for privacy upgrades
- Click Save & Apply to enable backend sync
The extension uses intelligent caching to improve performance:
- File Modification Tracking: Only re-processes session files when they have been modified since the last read
- Efficient Cache Management: Stores calculated token counts, interaction counts, and model usage data for each file
- Memory Management: Automatically limits cache size to prevent memory issues (maximum 1000 cached files)
Known Issues
- Numbers shown use actual token counts from the LLM API when available (e.g. Copilot Chat JSONL sessions and OpenCode sessions). When actual token data is not available, the extension falls back to estimates computed from text in the session logs.
- If you use multiple machines (or multiple VS Code profiles/windows), local-only mode will only reflect what's on the current machine. The cloud backend improves cross-device coverage.
- Premium Requests are not tracked.
- Dev Containers: Copilot Chat session logs are written to the host machine's user profile (outside the container). The extension currently does not read from host paths, so token tracking will not work inside a Dev Container. Run VS Code locally (outside the container) or mount the host user data directories into the container at the expected locations.
- Windows with WSL: The extension can only show information when VS Code, Copilot CLI, and OpenCode run in the same environment as the VS Code host. To track usage properly, either run VS Code from within WSL using the Remote - WSL extension (recommended), or run all tools natively on Windows. See the VS Code WSL documentation for setup instructions.
⚠️ Warning
Some discovery paths for session logs can vary by OS and editor variant. If you run into missing session files on your platform, please open an issue with a diagnostic report.
