Quectel Pi
English | 简体中文
A VS Code extension that drives the whole Quectel Pi series SDK workflow from a graphical interface: download the SDK → connect → set up the build environment → build → connect the board → flash → debug.
Supported SDKs:
| SDK |
SoC |
Build system |
Output & flashing |
| M2 SDK |
RK3576 |
Native build.sh |
update.img, written with a flashing tool |
| H1 Simple SDK |
QCS6490 |
Native build.sh |
efi.bin + dtb.bin + system.img, whole-disk EDL flash |
| H1 Yocto SDK |
QCS6490 |
Yocto / BitBake |
Firmware folder, flashed with the SDK's own flash.sh |
The extension detects which SDK you are connected to and shows the matching buttons: a Yocto SDK shows "Build kernel / Flash kernel", a simple SDK shows "Build boot / Flash boot", and on the Qualcomm platform "Flash boot" explains that only whole-disk flashing is supported.
Part 1 · User Guide
This part is for users. Everything is done by clicking buttons in VS Code — no command line knowledge required.
1. Before you start
| You need |
Notes |
| A computer |
Linux (Ubuntu recommended) or Windows. On Windows the SDK must live inside WSL, because the SDK's build scripts are Linux shell scripts |
| The board |
Quectel Pi M2 (RK3576) or H1 (QCS6490), plus a USB data cable |
| Disk space |
An M2 / H1 simple SDK build needs a few GB; a full Yocto build needs tens of GB |
| VS Code |
Version 1.85 or newer |
| An SDK source |
Either download it inside the extension (step 1 below), or use an SDK directory you already have |
Optional: a remote Linux build machine. If you build on a server, install VS Code and this extension on your own computer and connect over SSH — see section 6.
What you do not need: Python, Node.js, or any command line tooling on your computer. The extension prepares everything it needs on first launch.
2. Install the extension
- Open VS Code, click the Extensions icon in the activity bar (or press
Ctrl+Shift+X).
- Search for Quectel Pi and click Install.
- Offline / intranet: click
... at the top of the Extensions view → Install from VSIX... and pick the .vsix file you were given.
- A Quectel Pi icon appears in the activity bar — click it to open the tool panel.
The first time you open the panel, the extension prepares its own runtime in the background (it creates a private, isolated environment for its helper service). This takes a moment on the first launch only; later launches are immediate. The status chip in the panel header shows Not connected until you connect to an SDK.
Language: the interface is available in Chinese and English. Click the 🌐 button in the panel header to switch. It follows your VS Code display language until you switch it manually, and remembers your choice afterwards.
3. Take a quick look around
Everything lives in three places:
| Place |
What is there |
| Side bar (the Quectel Pi icon) |
The main UI: collapsible card sections — Connection / SDK, Application, Build, Flash & Device, Logs / Debug, Multimedia, AI Assistant |
| Header buttons |
Three buttons to the right of the connection status: Refresh (re-check the connection and SDK platform), Restart backend (if the helper service gets stuck), Toggle language |
| Status bar (bottom edge of the window) |
Five one-click entries: connection status, build app, flash boot, full flash, dmesg (live kernel log) |
Below the card sections, the same side bar shows the Manage Resources view — five entries you use before you start: Documentation (pick the English or Chinese official site), Manage SDK, Open an existing application, Browse Samples (opens the Quectel-Pi GitHub organisation), Open terminal.
A few things open as a separate tab in the editor area: the connection form, the AT command console, the device info page, the performance monitor, the SDK info page and the Yocto build configuration. Each tab carries the same name as the card that opened it.
Some commands have no card and can only be reached from the command palette (Ctrl+Shift+P, then type QPi SDK:): tinymix audio control, environment check.
The connection status refreshes every 5 seconds, so plugging in a board is picked up automatically.
4. Do it once: build → flash in five steps
This is the shortest complete path, from an empty computer to a board running your own build.
Step 1 · Download the SDK
In the side bar, scroll to Manage Resources and click Manage SDK, then pick your SDK family:
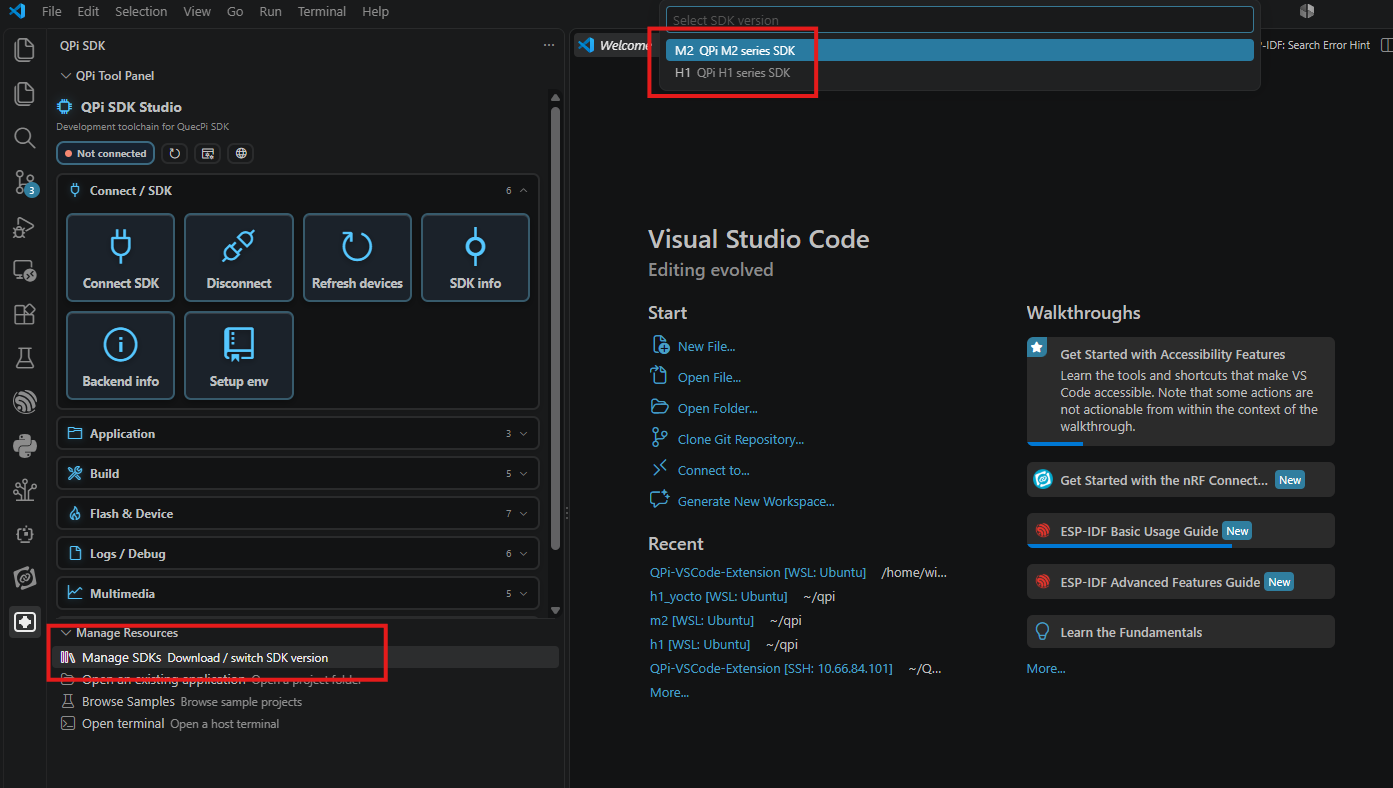
Pick the SDK family. If you pick H1, a second prompt asks whether you want the Simple SDK or the Yocto SDK; M2 has only one variant.
Next you are asked where to save it:
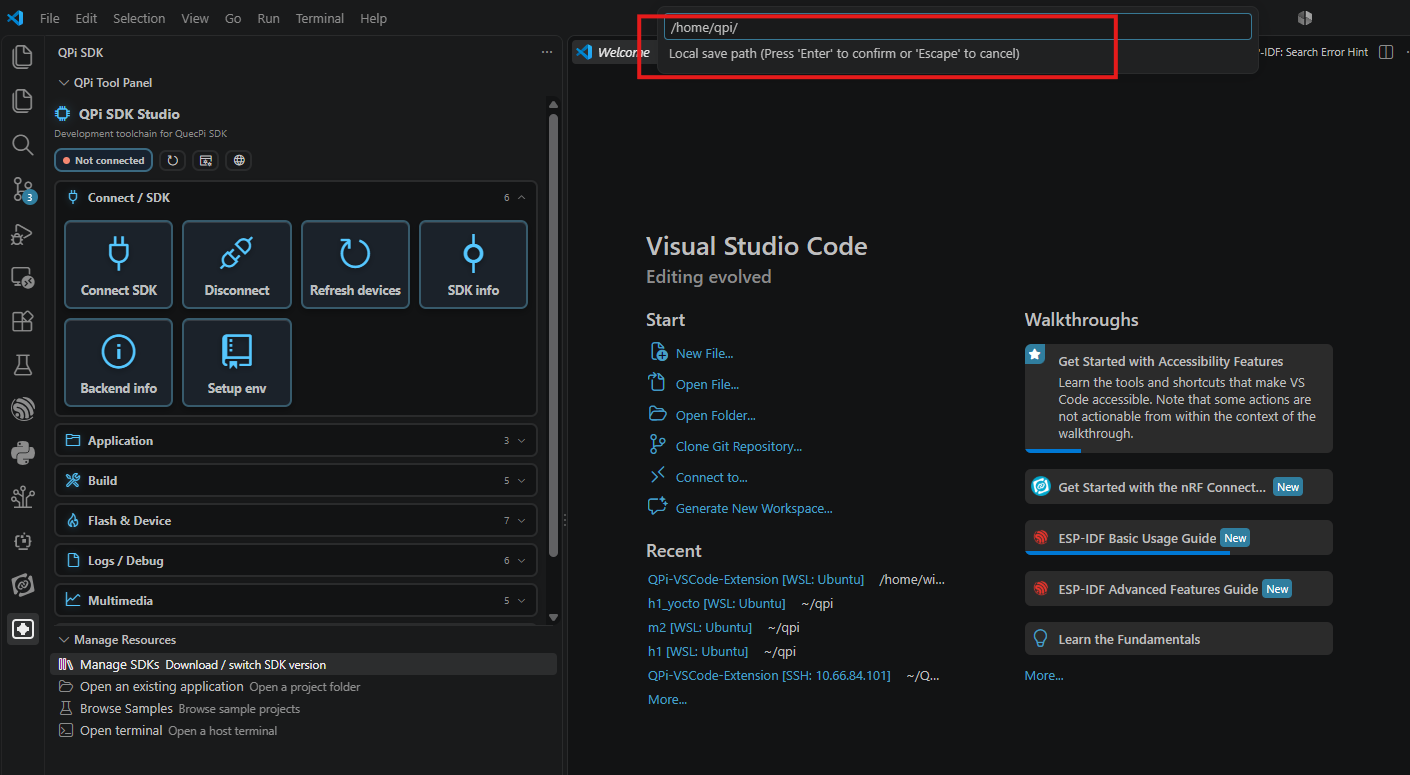
Type an absolute path and press Enter — the SDK is git cloned into that directory in a dedicated terminal, with live progress. Closing that terminal aborts the download.
- On Linux / WSL, use a path such as
/home/<username>/qpi-sdk.
- On Windows, the path must be inside WSL (e.g.
/home/<username>/qpi-sdk), see section 6.
- The download is a few GB and may take a while depending on your network.
Step 2 · Connect to the SDK
Click Connect SDK in the Connection / SDK section. A form opens in the editor area:
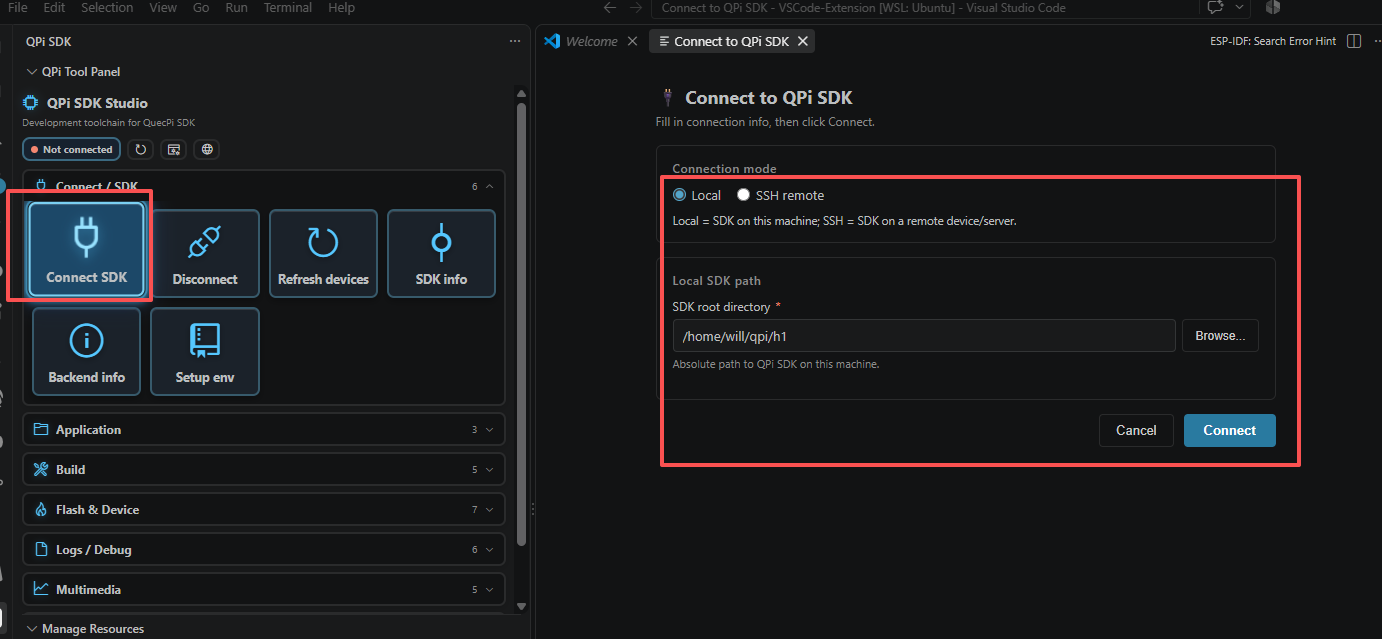
Leave the mode on Local and enter the SDK root directory (the folder you just cloned). If the SDK is on a remote build machine, choose SSH remote instead and fill in host / user / password. Click Connect.
When it succeeds, the status chip in the panel header changes from Not connected to the SDK type and path (for example Local @ /home/will/qpi/h1), and the buttons in the Build and Flash & Device sections adapt to the detected SDK.
Your connection settings are remembered, so the extension reconnects automatically the next time you start VS Code.
Step 3 · Set up the build environment
Click Configure build env... in the Build section:
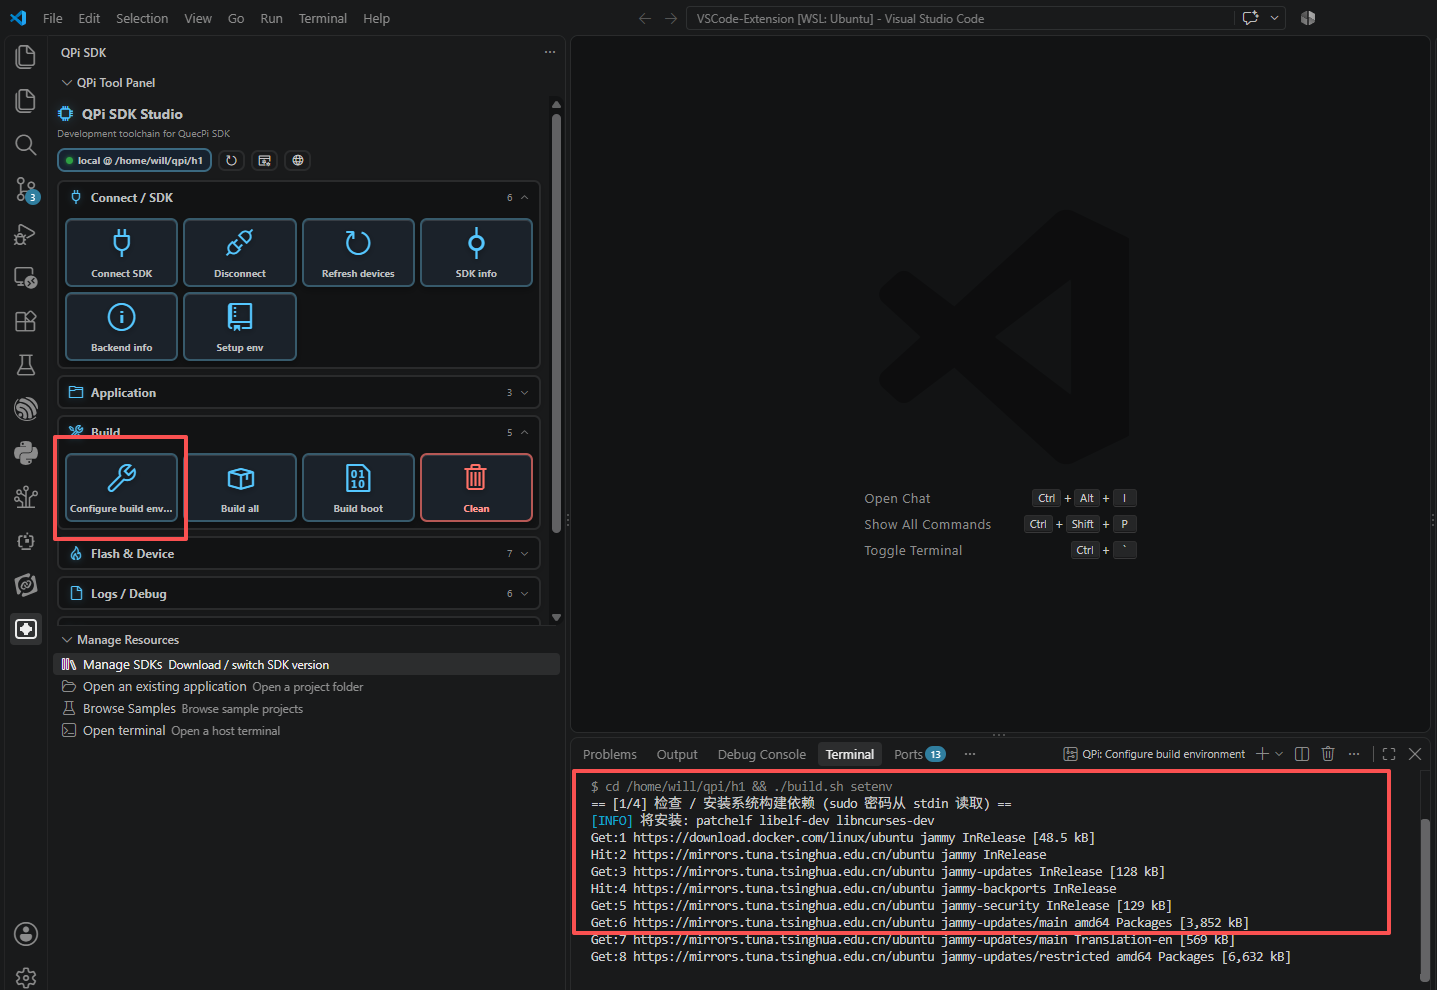
This runs the SDK's own environment script: it checks and installs the packages a build needs and downloads the prebuilt base images. Installation progress is streamed to the terminal.
- If system packages are missing, you are asked for your login password once (this is the normal
sudo password of the machine holding the SDK).
- Run this once per SDK — but re-run it if a build complains about missing tools.
Step 4 · Build
Click Build all in the Build section:
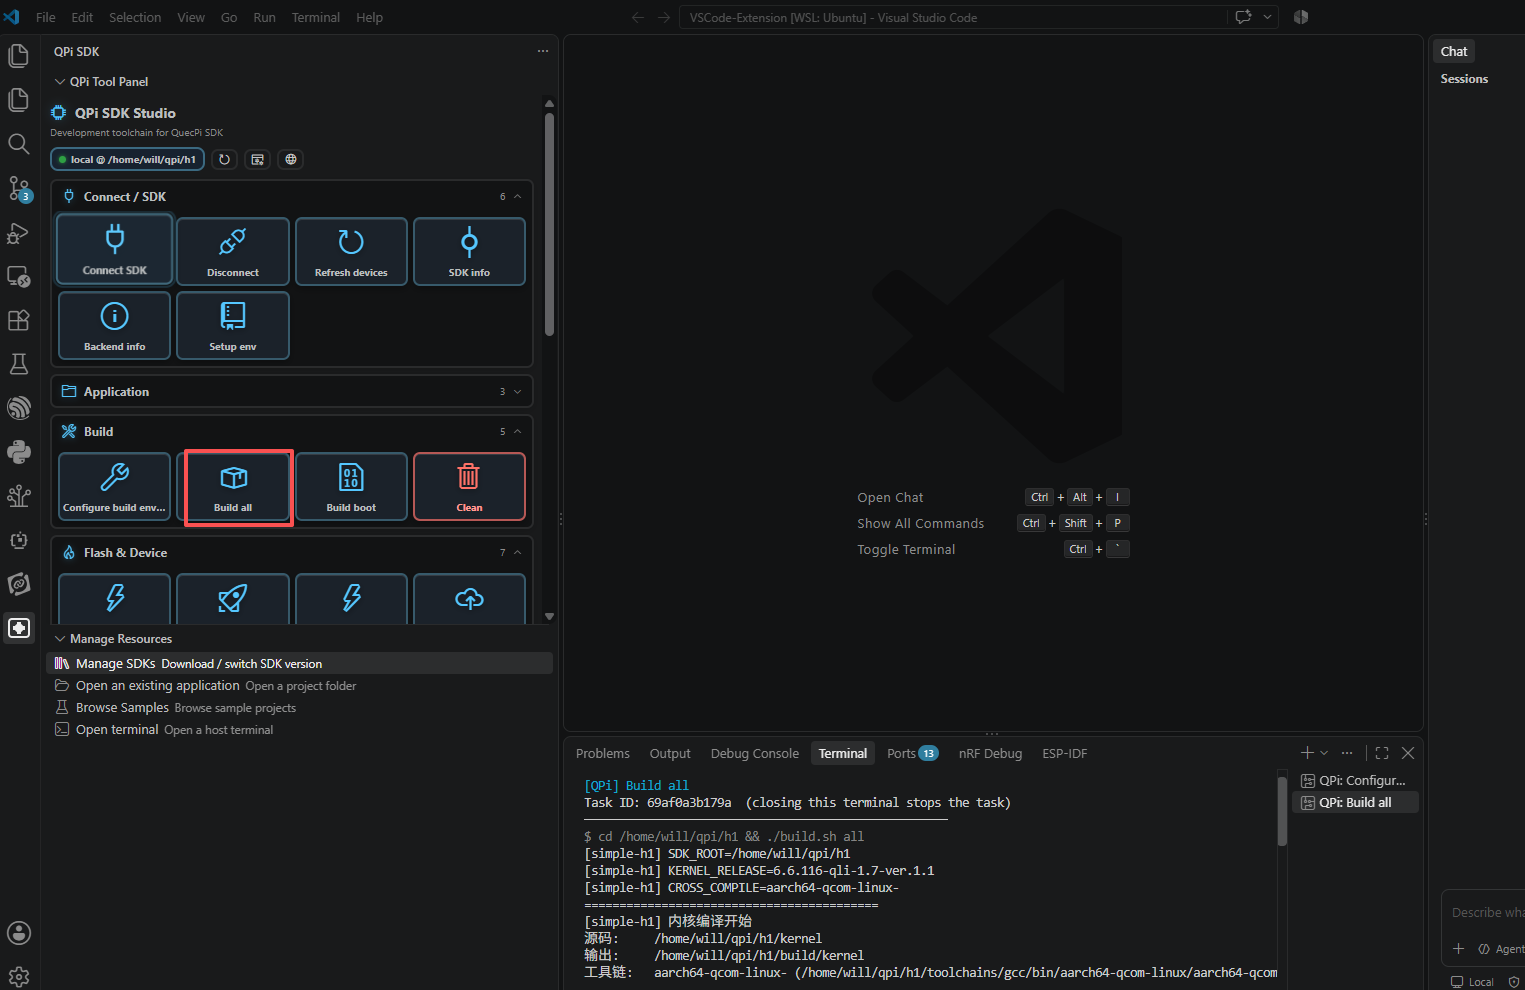
The build runs in its own terminal and streams the full log. The first build of a Yocto SDK takes a long time; later builds are incremental.
- You can also build just the bootloader (Build boot), or, on a Yocto SDK, build the bootloader and kernel together (Build kernel).
- Clean removes build intermediates if you want a build from scratch.
- Closing the terminal aborts the build — handy when you want to stop a long build.
Step 5 · Connect the board and flash
- Connect the board to your computer with a USB cable.
- Click Device info and check that the board is detected (model, OS version, memory, storage).
- Put the board into download mode:
- M2: click Enter Loader
- H1: click Enter EDL (Qualcomm 9008 download mode)
- Click Full flash and wait for it to finish. On M2 you are asked which flashing tool to use — the extension ships with the tools it needs, so there is nothing to install on Windows.
- Click Reboot device. The board boots into the system you just built.
5. The three SDKs in detail
5.1 M2 SDK (RK3576)
- Download: Manage Resources → Manage SDK → M2 → absolute path →
Enter.
- Connect: Connect SDK, mode Local (or SSH remote to build on a server).
- Configure build env...: install the build dependencies and prebuilt images.
- Build all: produces
update.img. Build boot builds only the bootloader.
- Device info: plug in the board over USB and confirm it is detected.
- Enter Loader: puts the board into the Rockchip loader mode.
- Full flash: pick a flashing tool (
upgrade_tool / rkdeveloptool / RKDevTool) and write update.img; the boot partition can also be flashed on its own with Flash boot.
- Reboot device.
5.2 H1 Simple SDK (QCS6490)
- Download: Manage Resources → Manage SDK → H1 → H1 Simple SDK → absolute path →
Enter.
- Connect: as above.
- Configure build env...: installs the dependencies and downloads the prebuilt base image.
- Build all: produces the partition images; Build boot builds only
efi.bin / dtb.bin.
- Device info: plug in the board over USB and confirm it is detected.
- Enter EDL: puts the board into Qualcomm EDL 9008 download mode.
- Full flash: runs the SDK's own
flash.sh and writes the whole disk. Single-partition flashing is not supported on the Qualcomm platform.
- Reboot device.
5.3 H1 Yocto SDK (QCS6490)
- Download: Manage Resources → Manage SDK → H1 → H1 Yocto SDK → absolute path →
Enter.
- Connect: as above.
- Configure build env...: you fill in the project ID, the OS (
LINUX / UBUNTU / DEBIAN) and the version (STD release / DBG debug), plus an optional secure-boot checkbox; the panel saves those parameters and every build applies them automatically. The same step installs missing system dependencies after you enter your sudo password.
- Build:
- Build all: produces the firmware folder used for flashing.
- Build kernel: produces
dtb.bin (bootloader) and efi.bin (kernel). This is much faster than a full build.
- Device info: plug in the board over USB and confirm it is detected.
- Flash:
- Full flash: enter EDL first, then the firmware is written to the whole disk.
- Flash kernel: no EDL needed — the kernel artifacts are written straight to the DTB and ESP partitions. If they do not exist yet, you are told to build first.
- Reboot device.
6. Connection modes
| Your computer |
Mode |
Where the SDK lives |
| Linux |
Local |
a directory on this Linux machine — the most common setup |
| Linux |
SSH remote |
a remote Ubuntu / Linux build machine |
| Windows |
Local |
inside WSL (e.g. /home/<user>/qpi-sdk) — the build scripts need Linux |
| Windows |
SSH remote |
a remote Ubuntu / Linux build machine; your computer is only the UI |
Notes:
- On Windows, the extension itself can run on Windows, but the SDK must be inside WSL. Connect with the WSL path, not with a
C:\... path.
- In SSH mode, if the board is plugged into your computer while the build artifacts live on the remote machine, the extension first copies the artifacts to a local temporary directory and then writes them to the board with the local flashing tools. You can also leave the board plugged into the remote machine.
- The remote machine needs its own copy of VS Code Server — the extension shows the connection log if the SSH session fails.
7. Feature reference
Everything the cards do, section by section.
Connection / SDK
- Connect SDK — connect to an SDK (Local or SSH). The form is described in step 2.
- Disconnect — drop the current connection. Nothing is deleted.
- Refresh devices — re-scan the boards connected over USB.
- SDK info — opens a tab showing the current branch, the current commit, whether your branch is behind the remote, and the recent commit history.
- Backend info — opens a tab with the address and state of the extension's helper service. Useful when something looks broken.
- Setup env — opens the environment bootstrap: it checks 8 components of your SDK directory (core SDK, kernel sources, build tools, prebuilt resources, cross toolchain, project templates, skill documents, device tree overlays) and tells you which ones are missing, with the option to clone them from a repository.
Application
- Create app — a wizard: pick a template → fill in the template variables (values that have a dropdown must be picked from it) → name the project. Letters, digits, underscores and hyphens, 1–64 characters. The project is created under the SDK's
projects/ directory.
- Templates come from the SDK itself (
docs/templates/). If your SDK ships no templates, the wizard says so and stops.
- App list — every project under
projects/, each with open folder / build / delete (deleting asks for confirmation).
- Skill docs — the documents shipped in the SDK's
skills/ directory, opened in a VS Code tab.
Build
- Configure build env... — the one-time (or after-update) environment preparation described in step 3.
- Build all — the full build, producing flashable images for your SDK.
- Build boot / Build kernel — only one of the two appears, depending on the SDK. On a simple SDK it builds the bootloader; on a Yocto SDK it builds the bootloader and the kernel together.
- Clean — delete build intermediates so the next build starts from scratch.
Building an application (the Build app entry in the status bar) lists the projects that already exist under the SDK's projects/ directory and builds the one you pick. If there is no project yet you are told so — create one first with Create app. A Yocto SDK does not take part in application builds: build applications with BitBake instead.
Flash & Device
- Full flash — write the whole disk. M2 asks which tool to use and ships its own; H1 runs the SDK's
flash.sh.
- Flash boot / Flash kernel — the counterpart of Build boot / Build kernel. On the Qualcomm platform a single partition cannot be flashed, so Flash boot explains that you should use Full flash; on a Yocto SDK Flash kernel writes the kernel artifacts to the DTB and ESP partitions.
- Enter Loader / Enter EDL — put the board into download mode (M2 → Loader, H1 → EDL 9008).
- Deploy file — copy a file from your computer to a directory on the board (default
/userdata/<file name>).
- Device info — model, OS version, memory, storage, network and more.
- Reboot device — reboot the board.
Logs / Debug
- adb command — a terminal already attached to the board, ready for
adb shell commands.
- dmesg — the live kernel log.
- journalctl — the live system log.
- AT command — a serial console: pick the port and baud rate and exchange AT commands with the module. It works over the board's own serial port, the computer's serial port, or the remote build machine's serial port.
- Shell — run shell commands in a terminal attached to the board.
- Audio capture — collect audio logs and configuration for troubleshooting.
- Audio playback / Video playback — play a file that is on the board.
- Screen record / Screenshot — capture the board's screen. The board needs a display attached with the desktop logged in.
- Performance monitor — a live chart tab showing frame rate, CPU usage and frequency, GPU usage and frequency and temperature, over adb. The sampling interval is adjustable and you can pause at any time. Metrics a board does not expose show as "no data".
AI Assistant
- AI assistant — opens GitHub Copilot Chat (and offers to install it if it is missing).
- API key settings — opens the settings page used to plug in a third-party AI service (base URL / API key).
8. FAQ
The panel keeps showing "Not connected".
Click Connect SDK and enter the SDK directory. After the first successful connection the extension remembers the settings and reconnects by itself.
It asks for my password.
Installing build dependencies and flashing need administrator rights on the machine that holds the SDK. Enter your login password. If passwordless sudo is configured, just press Enter.
My task stopped when I closed the terminal.
That is intentional: each task runs in its own terminal, and closing that terminal aborts the task. It is the quickest way to stop a long build.
"No usable flashing tool found".
On Windows the extension ships the tools it needs. On Linux, make sure your SDK provides them or install them (upgrade_tool, rkdeveloptool) — the extension tells you which ones it looked for.
How do I switch between Chinese and English?
The 🌐 button in the panel header. The side bar, the status bar and every open tab switch immediately.
How do I change the extension's own settings?
Search for qpiSdk in the VS Code settings:
| Setting |
Default |
Description |
qpiSdk.backend.python |
empty (auto-detect) |
path to the Python interpreter used by the helper service |
qpiSdk.backend.autoStart |
true |
start the helper service together with VS Code |
qpiSdk.backend.mode |
local |
local = helper service on this machine; remote = use a helper service on a remote machine |
qpiSdk.backend.remoteUrl |
http://127.0.0.1:8765 |
address of the helper service in remote mode |
qpiSdk.backend.remoteKey |
empty |
key of the helper service in remote mode |
qpiSdk.backend.pythonMirror |
empty (chosen by your network) |
mirror used to fetch the bundled Python runtime |
qpiSdk.backend.pipMirror |
empty (chosen by your network) |
package index used to install the helper service's dependencies |
Where are the screenshots in this document from?
They were taken on a Linux (WSL) setup with an H1 simple SDK. The layout is identical on other platforms; only the SDK-specific buttons differ, as described in section 5.
9. Feedback
Found a bug, or have a question or a feature request? Please open an issue:
https://github.com/Quectel-Pi/vscode-extension-quectelpi-issues/issues
It helps to include: your operating system (and whether the SDK lives under WSL), the SDK type (M2 / H1 simple / H1 Yocto), what you did, what you expected, and what actually happened. The log from the terminal that ran the task is the most useful thing to attach.
Part 2 · Development & Maintenance
This part is for developers and maintainers of the extension. You do not need it to use the extension.
1. Architecture
side bar / status bar / webview tabs ──postMessage──▶ extension.ts ──HTTP + SSE──▶ FastAPI (python)
              UI                                          │                            │
                                                 connection config              executor (local / SSH)
                                                 (workspaceState)                      │
                                                                 build.sh / bitbake / adb / qdl
- Frontend: TypeScript extension + webviews (plain HTML/CSS/JS, no framework, adapts to light and dark themes)
- Backend: Python FastAPI on a random
127.0.0.1 port; every request must carry an X-API-Key; the virtual environment and its dependencies are created on first start
- Executor: local (subprocess) or a remote Linux build machine over SSH (paramiko)
- Task model: each build / flash / log task opens a dedicated VS Code terminal and streams output over SSE; closing the terminal kills the backend task
2. Directory layout
src/                     extension frontend (TypeScript)
  extension.ts           entry point: registers commands, creates side bar / status bar / tabs
  sidebar.ts             side bar cards (sections + tile definitions)
  welcome.ts             the "Manage Resources" TreeView
  actions.ts             implementations of all commands
  api.ts                 HTTP client (mirrors the backend /api/*)
  backend.ts             backend process management (spawn / port / key / venv)
  statusbar.ts           status bar items
  i18n.ts                frontend strings (zh/en)
  *Panel.ts              webview tabs (connection / AT / device tree / device info / performance / SDK info)
  webview/               webview static assets (HTML/CSS/JS)
python/
  server.py              FastAPI entry point (prints READY port=<port> key=<key>)
  quecpi/                implementation: api.py routes / sdk_ops.py SDK operations / i18n.py backend strings
  requirements.txt       backend dependencies
tools/                   bundled binaries such as the flashing tools
images/                  screenshots used by this document
3. Development environment
| Dependency |
Version |
Notes |
| Node.js |
≥ 18 to compile, ≥ 20 to package |
TypeScript compilation and vsce |
| Python |
3.9+ (3.12 recommended) |
FastAPI backend; the venv is created automatically on first start |
| Git |
any |
the backend runs local git commands |
npm install                                   # 1. install TS dependencies
npm run compile                               # 2. compile TypeScript (into out/)
python3 -m venv python/.venv                  # 3. create the Python venv (optional, done automatically)
python/.venv/bin/python -m pip install -r python/requirements.txt
python/.venv/bin/python python/server.py      # 4. (optional) run the backend standalone to debug it
On success the backend prints READY port=<port> key=<key>; the extension uses that line to talk to it.
4. Build / package / install
npm run package        # recommended: wraps the vsce command below
# or
npx vsce package --no-dependencies --allow-missing-repository --skip-license --no-rewrite-relative-links
Two packaging details worth knowing:
--allow-missing-repository is required because package.json has no repository field.--no-rewrite-relative-links keeps the relative link of this document (README.zh-CN.md) as it is. The screenshots are absolute URLs hosted in the Quectel-Pi/vscode-extension-quectelpi-issues repository, so vsce no longer needs a repository field to resolve image paths.
The result is quectelpi-<version>.vsix, installed through Install from VSIX... in VS Code.
One-shot build and install (rewrites the version in package.json, compiles, packages, uninstalls the old build and installs the new one):
build-install.bat <version>       # Windows
./build-install.sh <version>      # Linux / macOS
The version argument is optional (you are prompted) and accepts vX.Y.Z or X.Y.Z.
5. Debugging
Press F5 in VS Code to launch the Extension Development Host. It starts the backend and opens the side bar; breakpoints work in both src/*.ts and python/quecpi/*.py.
6. Two conventions
Localization. Frontend strings live in src/i18n.ts, backend strings in python/quecpi/i18n.py. Switching language rebuilds the side bar, the status bar and every open tab; requests carry an X-QPi-Lang header and the backend answers in the matching language. Note that the %key% titles in package.json are resolved once when the extension loads, so a runtime switch must reset them in code (for example view.title).
Packaging notes. tools/fix_vsix.py and tools/sshrun.py are encrypted binaries (not plain Python); they cannot be executed and are not referenced by any script. npm run package used to call fix_vsix.py, which failed with SyntaxError: source code cannot contain null bytes; that step is gone, and the executable bits of the bundled Linux tools are set at runtime with os.chmod(..., 0o755).

