The Postman VS Code extension
The Postman VS Code extension supports version 1.74 and later of the Visual Studio Code, Visual Studio Code Insiders, and VSCodium applications. The VS Code extension supports all versions of Cursor and Windsurf.
The Postman VS Code extension enables you to develop and test your APIs in Postman directly from Visual Studio Code and Visual Studio Code Insiders. The VS Code extension also supports VSCodium, Cursor, and Windsurf.
Prerequisites
Before you begin, check the following prerequisites for using the VS Code extension:
- Override proxy support - Open your user settings, select Search settings, and enter "Proxy Support". Select the Proxy Support dropdown list, and select override.
- Use Postman behind a firewall - If you're using Postman behind a network firewall, you must allow specific domains to connect to Postman. To learn about the domains you need to allow, see Postman's documentation.
Sign in to Postman
Sign in to Postman, and select a team to access workspaces in the team. When you select a workspace, you'll be able to see the request history for that workspace in the sidebar. You must sign in to Postman to use the VS Code extension. You can create a Postman account if you don't already have one.
If this is your first time opening the VS Code extension, a tab opens in the extension where you can sign in to Postman or create an account.
- Open the VS Code extension.
- Select Sign In in the sidebar. The VS Code extension will open a new screen that directs you to sign in from your browser.
- In your browser, select a Postman team then sign in to Postman. After you sign in, you can close the browser tab and return to the VS Code extension.
To learn more about signing in to Postman, see Postman's documentation.
If you don't have a Postman account, create an account to sign in to use the VS Code extension:
- Open the VS Code extension.
- Select Create one in the sidebar. The VS Code extension will open a new screen that directs you to create an account from your browser.
- In your browser, enter your information then select Create Free Account.
To learn more about signing up for Postman, see Postman's documentation.
Send API requests
You can use the VS Code extension to create and send HTTP, raw WebSocket, and gRPC requests.
Send HTTP API requests
You can create and send HTTP requests.
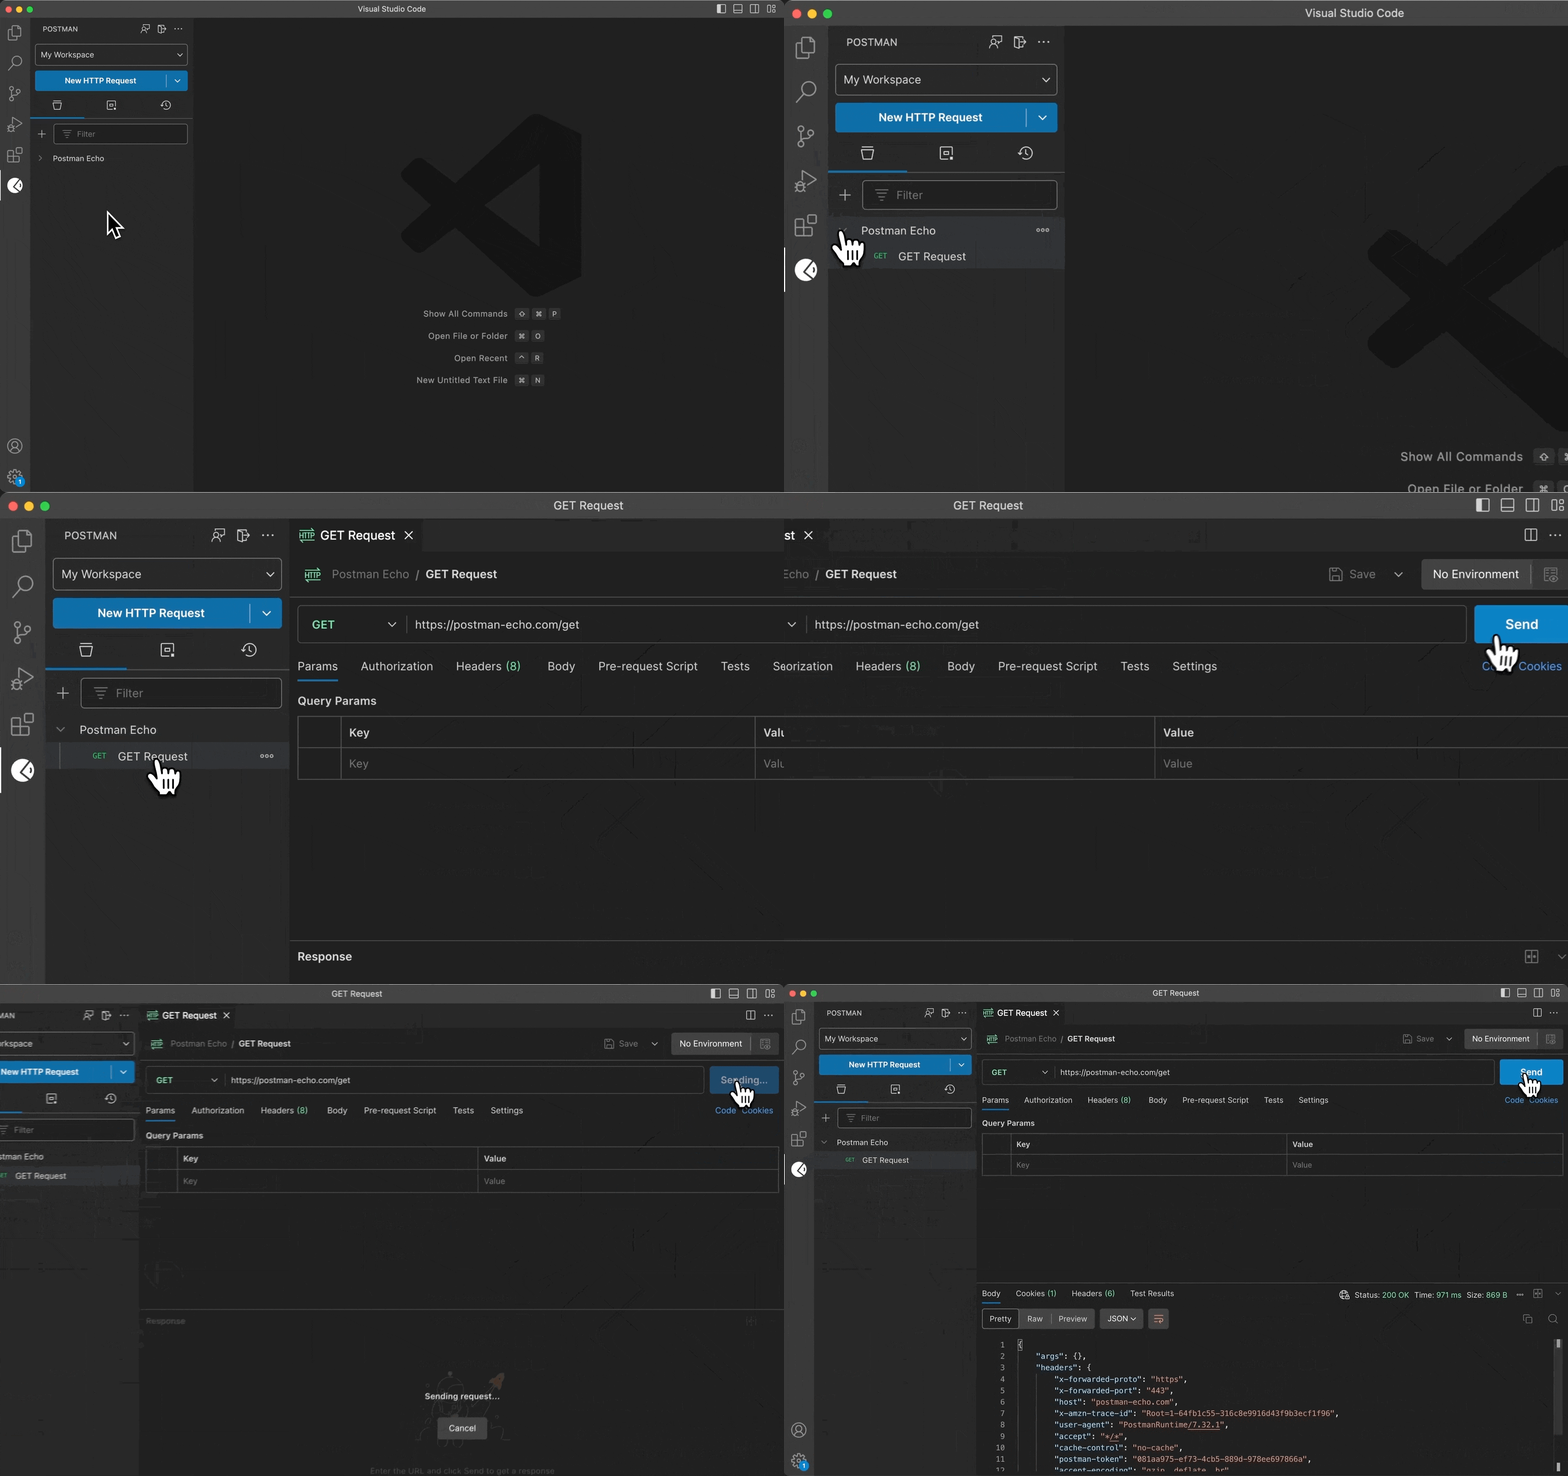
Select a workspace from the workspace dropdown menu in the sidebar.
You can also create a new workspace from the VS Code extension.
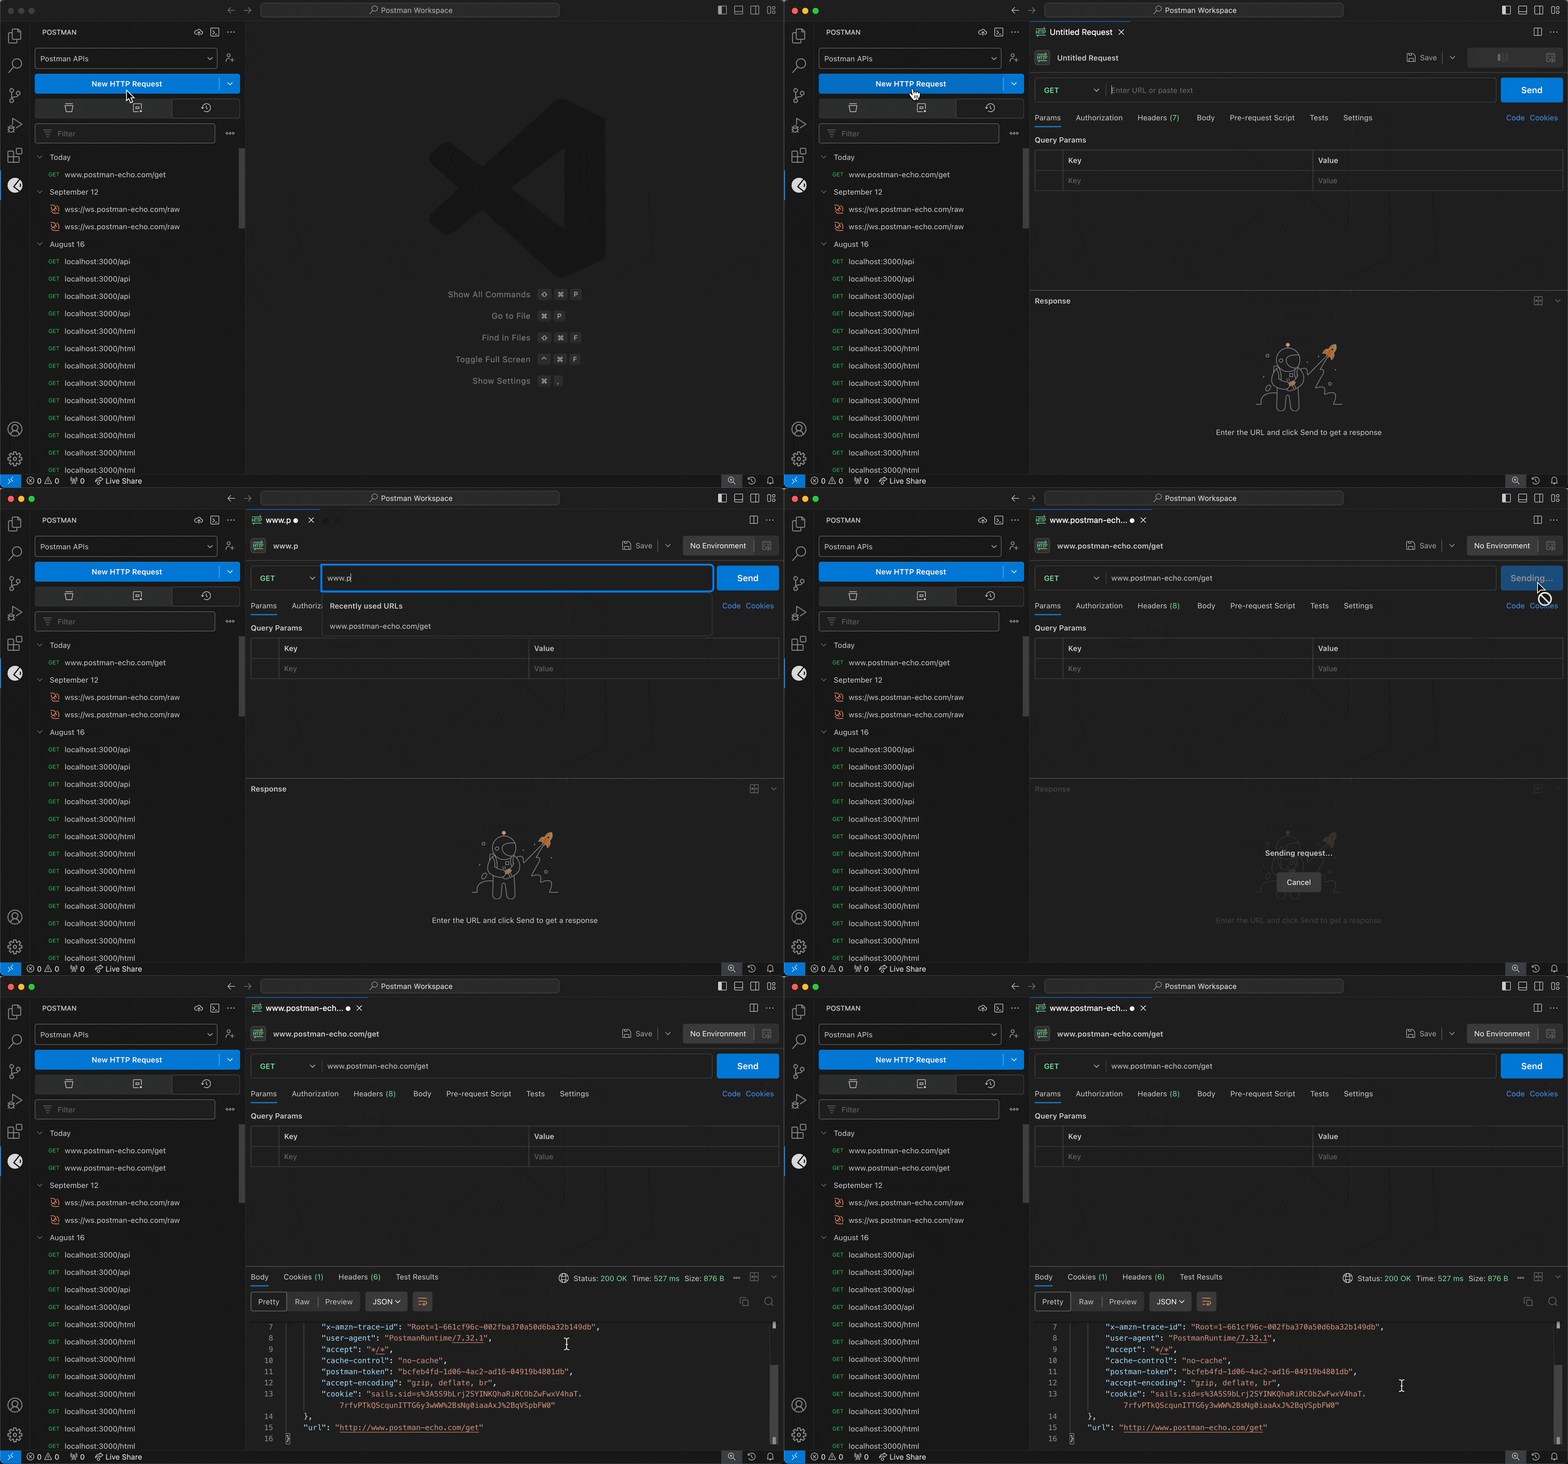
Select the request dropdown menu in the sidebar, then select HTTP to use Postman's REST client.
If you previously selected HTTP from the request dropdown menu, you can create another HTTP request by selecting New HTTP Request in the sidebar.
Specify the details you need for your request.
Select Send.
Requests sent in the VS Code extension appear in your workspace's request history in both the VS Code extension and the Postman app.
To learn more about creating and sending HTTP requests, see Postman's documentation.
You can also use the Postman: Create a new HTTP Request command from the Command Palette to create a request.
Add and manage CA and client certificates
You can add a custom CA certificate to connect to an API that uses a certificate registered with an internal certificate registry, without needing to turn off SSL verification in your request. You can also add a client certificate to connect to an API that uses Mutual TLS (mTLS) authentication. Certificates added to Postman are stored locally and aren't synced to the Postman cloud.
To access certificates, do the following:
- Select the Views and More Actions icon at the top of the sidebar.
- Select Settings > Certificates.
To learn about adding and managing certificates in Postman, see Postman's documentation.
Send multiprotocol API requests
You can create and send raw WebSocket and gRPC requests.
- When you create a request, select the request dropdown menu first, and select WebSocket or gRPC instead of HTTP.
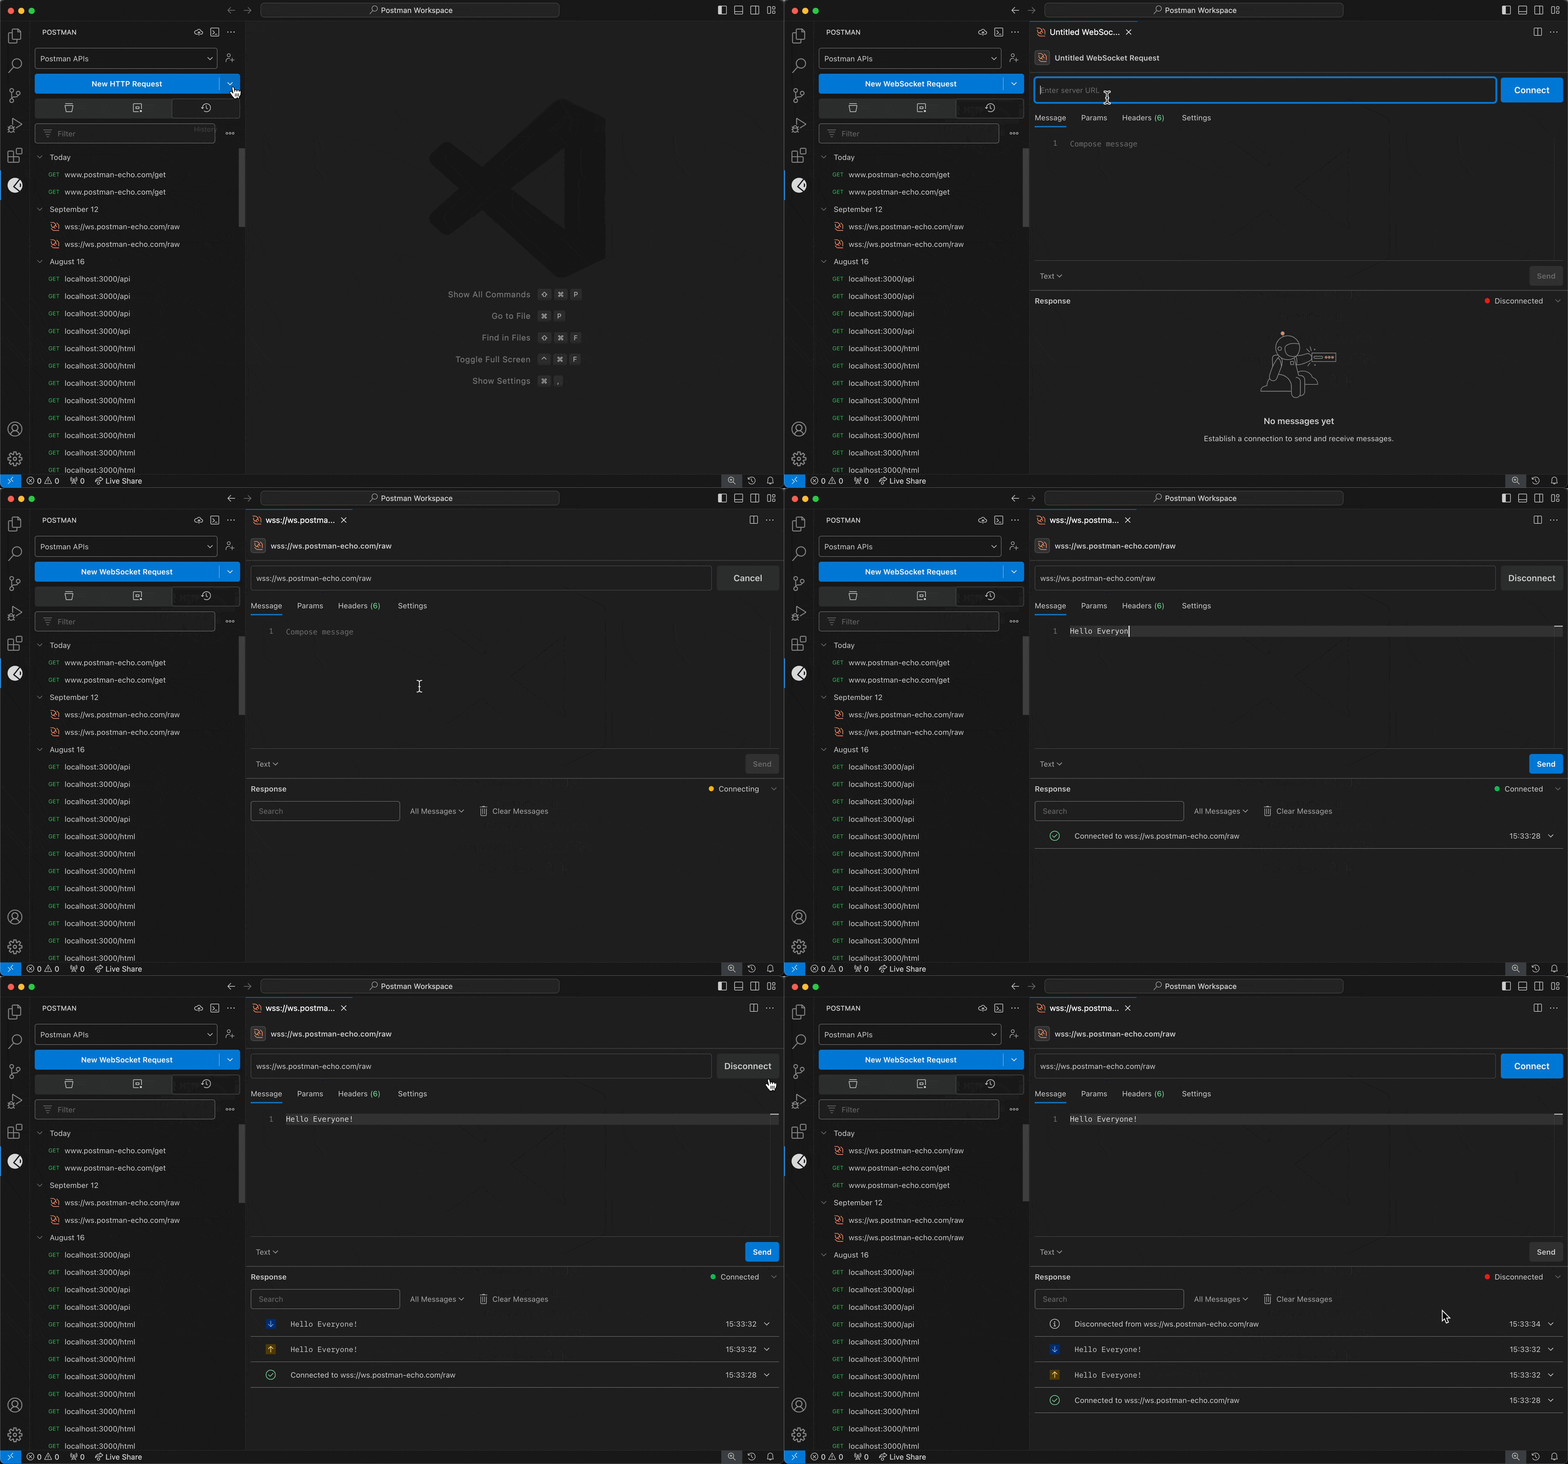
For Postman's WebSocket client:
- Enter the WebSocket server URL. A WebSocket URL begins with
ws:// or wss://.
- Select Connect.
- To disconnect your WebSocket request's connection, select Disconnect.
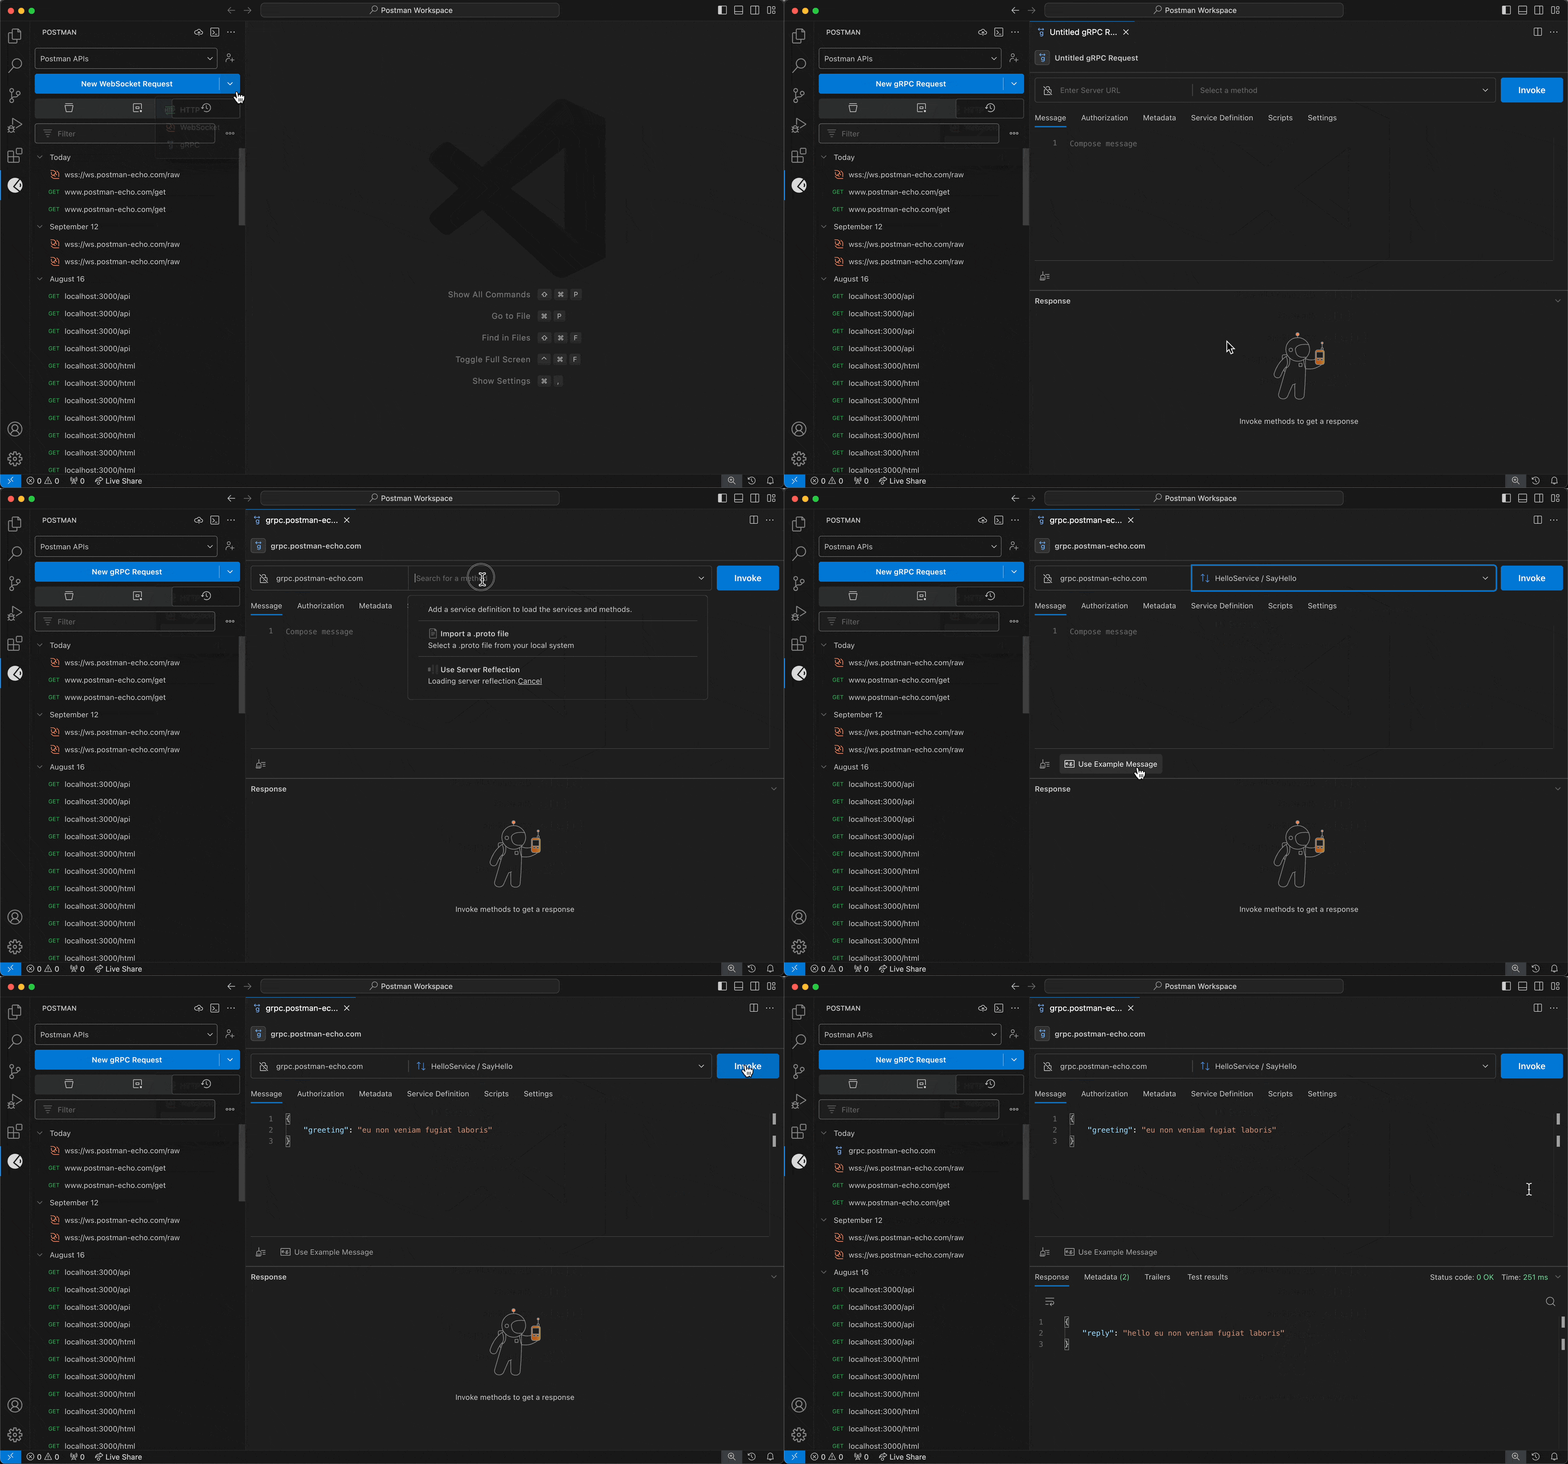
For Postman's gRPC client:
- Enter a URL into Server URL.
- Select the Method selection dropdown to select the method you want to invoke.
- Configure a service definition.
- Select Invoke.
To learn more about creating and sending WebSocket requests, see Postman's documentation.
To learn more about creating and sending gRPC requests, see Postman's documentation.
Send API requests from your history
You can send requests previously sent in a workspace using the VS Code extension and the Postman app.
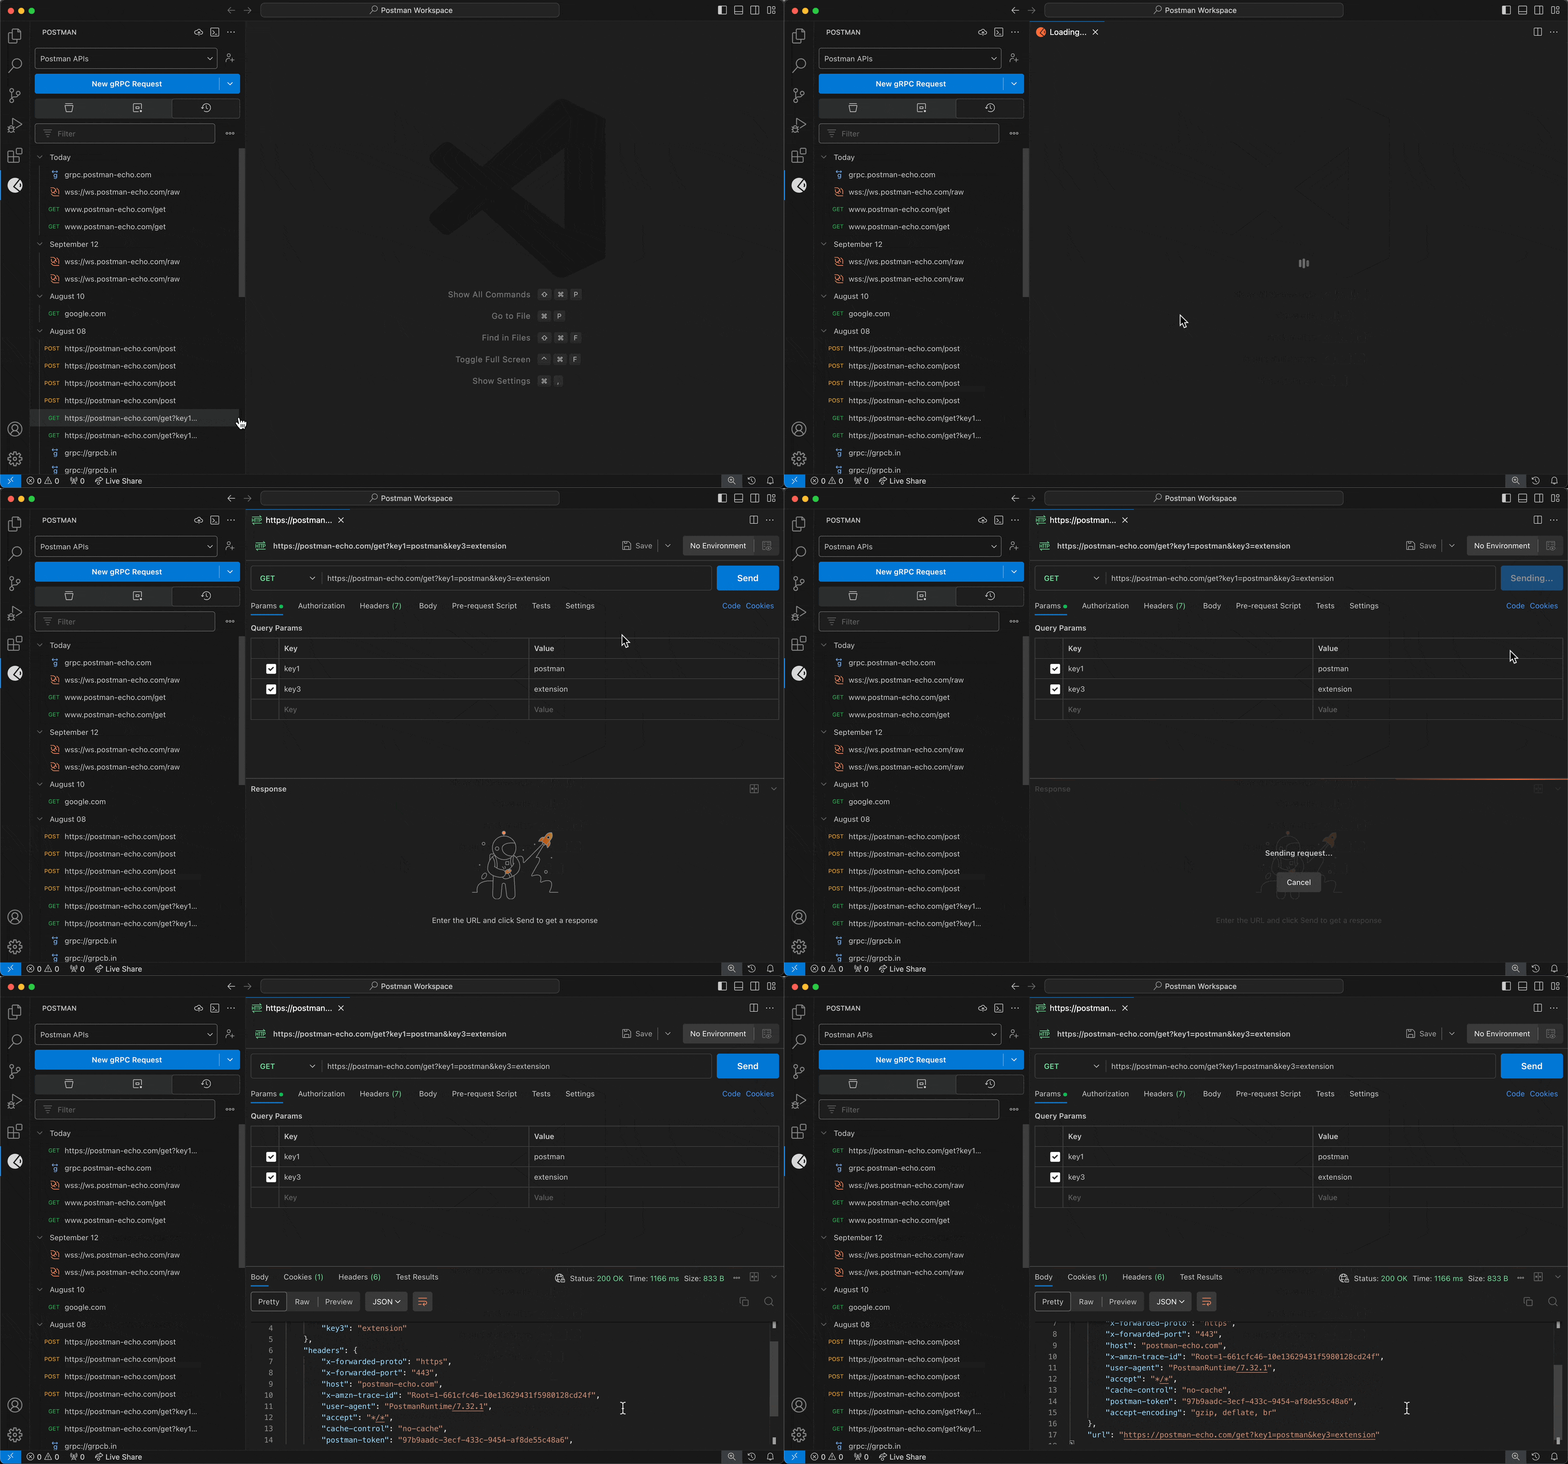
- Select a workspace from the workspace dropdown menu in the sidebar.
- Select the History tab.
- Select a request from your history, and edit the request if you'd like.
- Send the request.
Use collections
You can create new collections to group HTTP requests, and you can manage collections with HTTP requests.
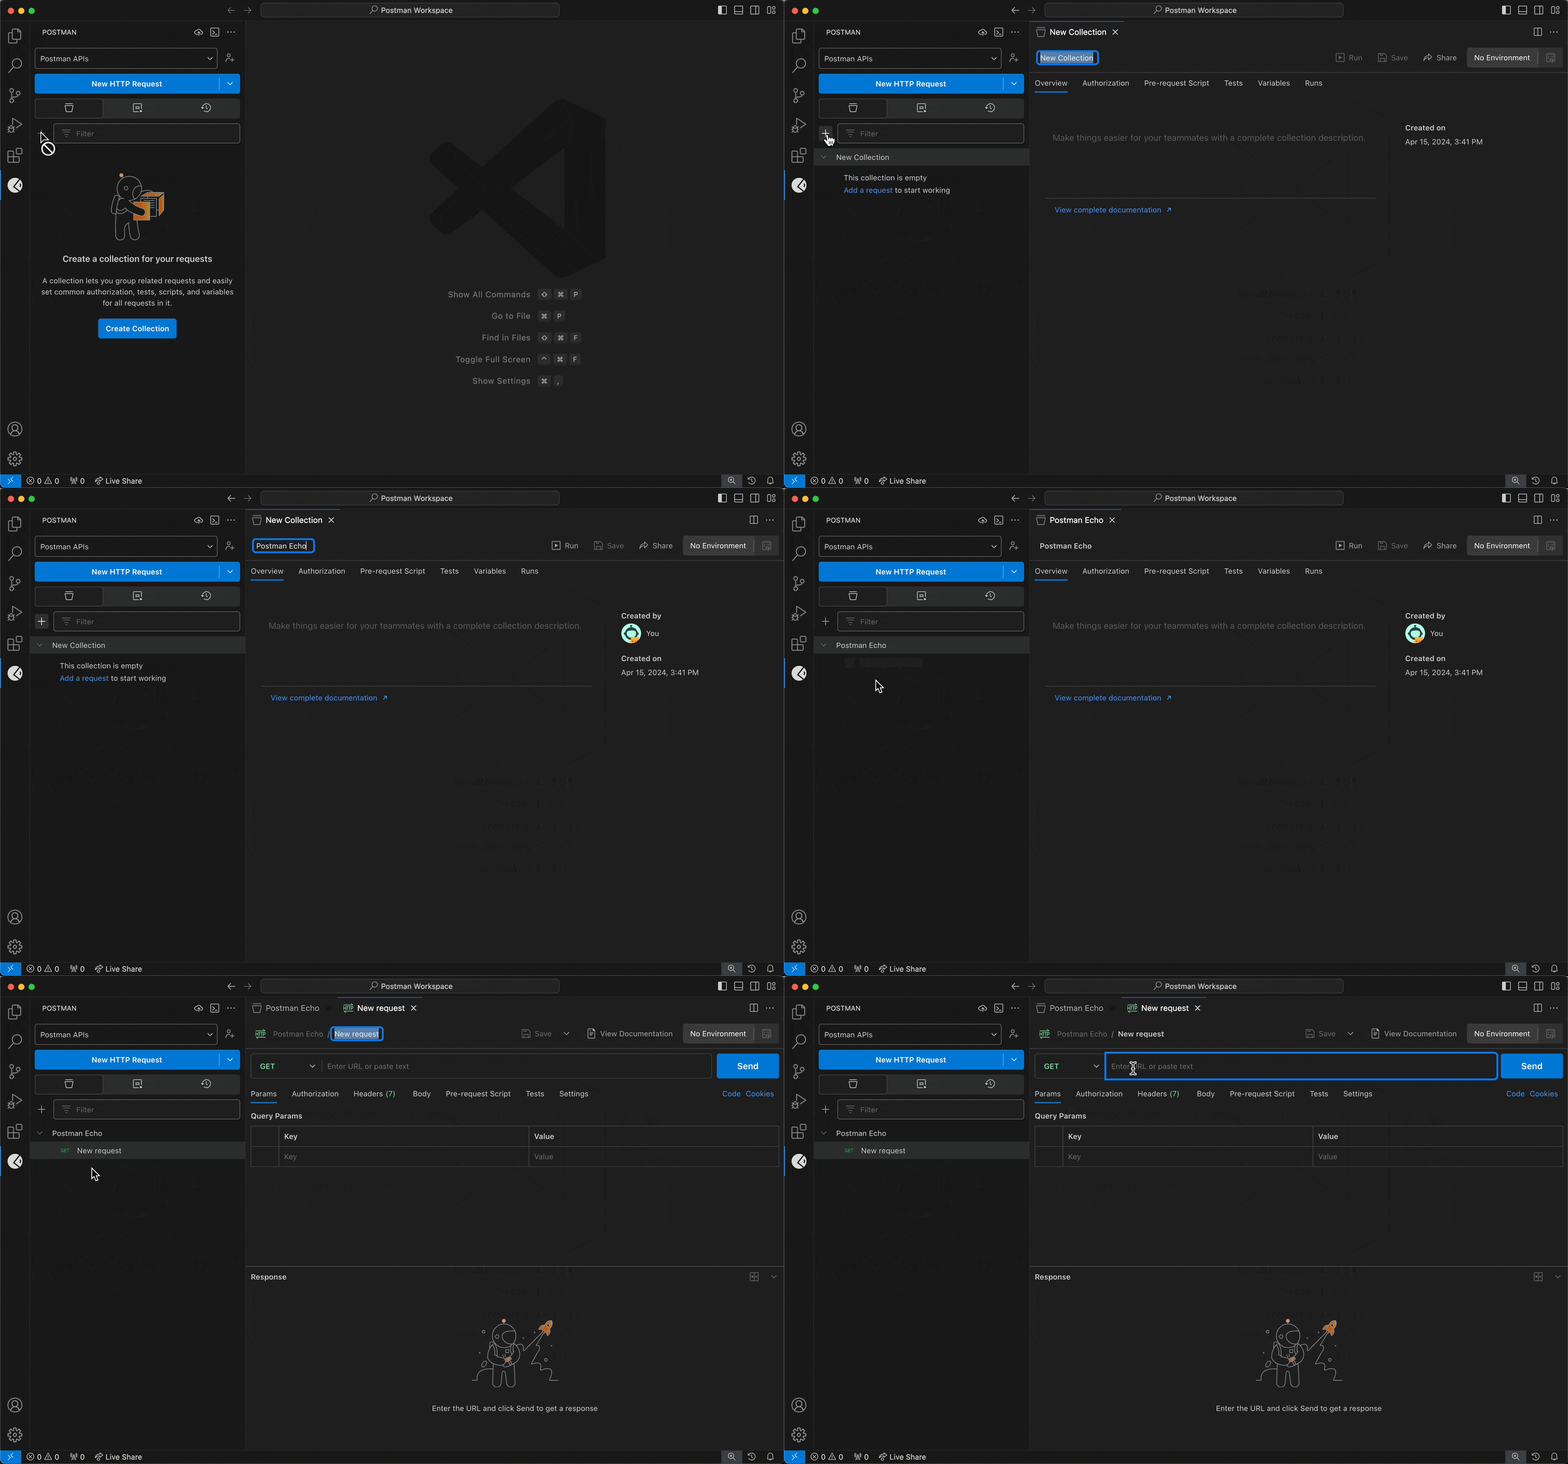
To create a collection and add an HTTP request to it, do the following:
- Select a workspace from the workspace dropdown menu in the sidebar.
- Select the Collections tab.
- To create a collection, select the + icon.
- To add an HTTP request to a collection, select the View more actions icon next to a collection, then select Add Request.
You can also use the Postman: Create a new Postman Collection command from the Command Palette to create a collection.
To customize and configure a collection with HTTP requests, do the following:
- Select a workspace from the workspace dropdown menu in the sidebar.
- Select the Collections tab.
- Select a collection.
- Select Authorization to configure authorization details for your collection.
- Select Scripts > Pre-request to define a pre-request script for your collection, which will run before requests are sent to the server.
- Select Scripts > Post-response to define a post-response script for your collection and the requests and folders in it, which will run after a response is received. Learn more about adding post-response scripts.
- Select Variables to define values for collection variables to share across all requests in the collection.
You can move an existing folder or request to a new collection. In the sidebar, select the folder or request you want to move, then drag it to a new collection
You can also save a copy of a request to a new collection. Select a request in the sidebar, select v > Save As at the top, then choose or create a collection to save it in.
To learn more about using collections, see Postman's documentation.
Manage environments
You can add a set of variables to an environment that you can use in your requests.
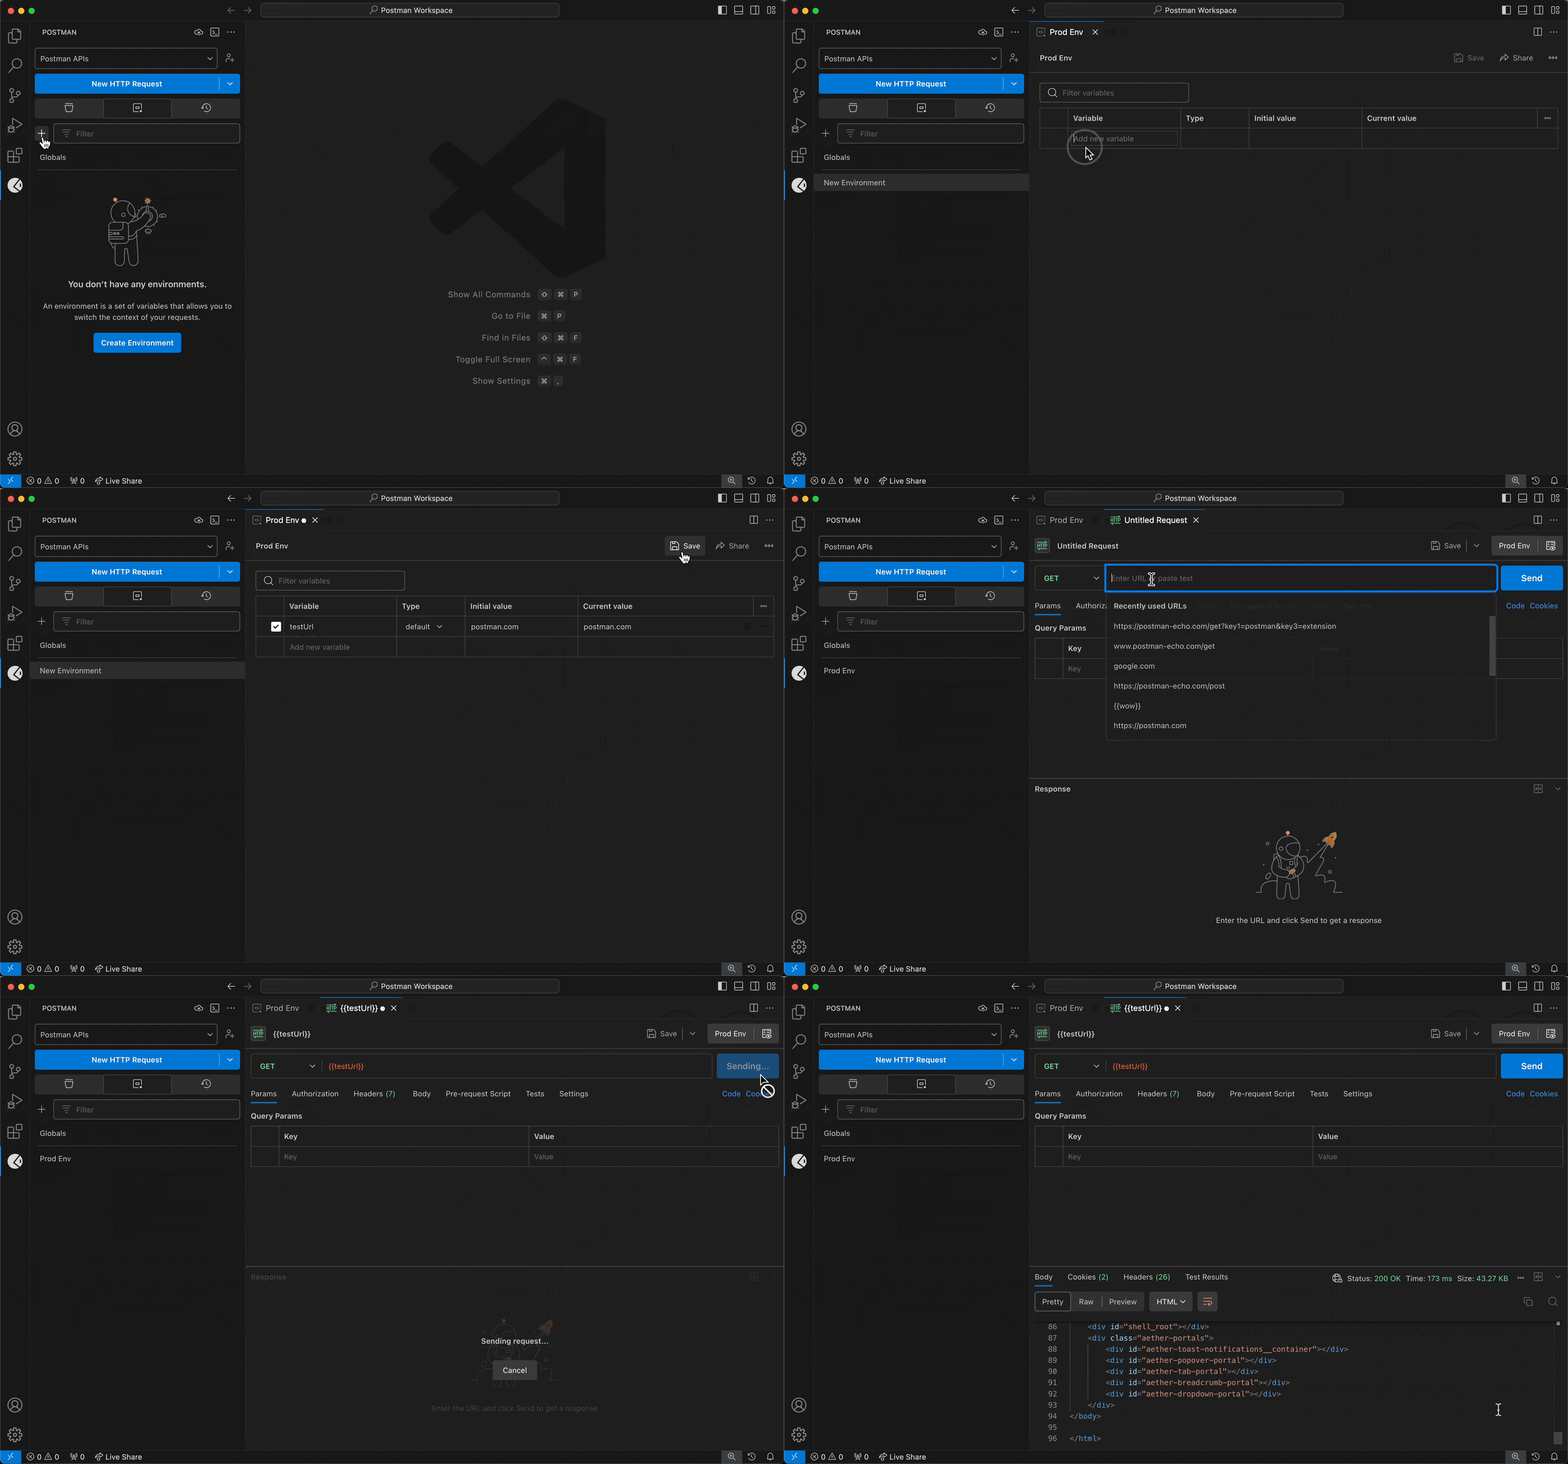
To create an environment and add variables to it, do the following:
- Select a workspace from the workspace dropdown menu in the sidebar.
- Select the Environments tab.
- To create an environment, select the + icon.
- Add variables to the environment.
- Select Save.
You can also use the Postman: Create a new Postman Environment command from the Command Palette to create an environment.
To use environment variables in a request, do the following:
- Select the Collections tab.
- Select a request.
- Select an environment from the environment selector in the top-right corner.
To learn more about managing environments, see Postman's documentation.
Collaborate in Postman
You can collaborate in Postman using the VS Code extension. You can share your collections, environments, and workspaces. You can also assign collection and environment roles to team members.
Share elements and manage access
You can share collections and environments directly with team members and groups. Team members with Admin access for the workspace or Editor access for the element can manage collection roles and environment roles assigned to team members.
If the element you want to share is in an interal workspace that only you and invited people can access, you'll need to choose one of the following:
- Move the element to a new internal workspace that everyone in your team can access.
- Allow everyone in your team to access the internal workspace.
To share an element with a team member or group, do the following:
- Select a collection or environment you want to share, then select Share.
- Enter the name, email address, or group name for the people you want to share the element with.
- If you have the Editor role for the collection or environment you're sharing, you can give your new collaborators the Viewer or Editor role on the element. If you have the Viewer role for the element, you can share it, but you won't be able to assign roles.
- If you're sharing a collection, you can optionally select an environment to be the active environment. This will be the active environment for the team members and groups you want to share with. Select the Share with Environment dropdown list and choose the environment.
- Select Share.
You can also select Copy Link to copy the collection or environment's URL to the clipboard, and share the URL with team members.
To manage collection and environment roles assigned to team members, do the following:
- Select a collection or environment you want to manage roles for, then select Share.
- Select the role next to a team member or group's name, then select a different role. You can also select Remove to remove a team member or user group from the element.
Share workspaces
You can use the VS Code extension to invite team members and groups to collaborate in a workspace.
When you invite collaborators to an internal workspace that only you and invited people can access, your entire team is given access to the workspace.
- Select the invite to workspace icon to the right of the workspace dropdown menu.
- Enter the name, email address, or group name for the people you want to invite to the workspace.
- If you're a Workspace Admin, give your new collaborators the Admin, Editor, or Viewer role. Workspace Editors and Workspace Viewers can't assign workspace roles. Learn more about workspace roles.
- Select Send Invite.
You can also invite collaborators by selecting Copy Invite Link and sharing the link with them directly. Postman will prompt them to either sign in or sign up.
To learn more about sharing workspaces, see Postman's documentation.
Document APIs
Postman automatically generates basic documentation for any collection you create, including details about requests and sample code in various client languages.
Write documentation
Teammates with the Editor role can add descriptions to collections, folders, and requests to make more valuable information available to your users. You can write your descriptions using the visual editor or you can enter Markdown syntax.
To add a description to a collection or folder, do the following:
- Select the Collections tab, and then select a collection or folder.
- Enter a description in the Overview tab.
- Select outside of the editor to save your description.
To add a description to a request, do the following:
- Select the Collections tab, and then select a request.
- Select View Documentation in the top right.
- Enter a description in the right sidebar.
- Select outside of the editor to save your description.
To learn more about writing documentation, see Postman's documentation.
View documentation
You can view complete documentation for your collection that includes a description of each request and details such as the method and URL, the required authorization type, and any headers or parameters. For each request, you can view sample code in various client languages, and example response bodies and headers.
To view the complete documentation for a collection, do the following:
- Select the Collections tab, then select a collection.
- In the Overview tab under the Description, select View complete documentation. The VS Code extension will open the complete documentation in a new tab.
You can customize the appearance of the documentation by selecting a language to use for sample code.
Import data
You can import collections and environments that were exported from Postman and requests from a cURL command. You can also import .env files with environment variables from your API project into new environments in Postman.
Postman no longer supports the collection v1 format. You can convert your collection's format from v1 to v2 to import it using the VS Code extension.
Import Postman data
To import data, do the following:
Select the import icon at the top of the sidebar.
Do one of the following:
Select cURL, then enter your cURL command. The VS Code extension opens the request in a new tab. To import the request, save it to a collection.
You can convert a Postman request to a cURL command, and import it using the cURL command.
Select File, then select collection or environment files. If you're importing a single file, the VS Code extension imports it after you select it.
Select Folder, then select a folder that has collection or environment files.
Select .env files, then the VS Code extension will detect .env files in your API project that haven't been imported into Postman. You'll receive an in-app notification if no new .env files are detected. Learn about importing environment variables into a new environment in Postman.
If you're importing multiple files or a folder, select the checkbox next to the files you want to import, then select Import.
You can also use the Postman: Import command from the Command Palette to import data.
Import environment variables stored in your project
You can bulk import .env files with environment variables from your API project into new environments in Postman. Before importing your .env files, make sure your project has at least one file with the filename extension .env that stores your project's environment variables in key-value pairs. Once your .env files are imported into environments in Postman, you can sync changes from your .env files to their respective environments in Postman.
When you open your API project in Visual Studio Code, you'll be notified by an in-app notification if the VS Code extension detects new .env files. Check for new .env files from the import icon at the top of the sidebar. You can also import a single .env file and its environment variables by selecting the link at the top of the file or right-clicking the file.
To import .env files and edit them before importing, do the following:
Open your API project in Visual Studio Code. The VS Code extension checks your API project for .env files you haven't imported into Postman.
In the in-app notification, select Import Now. You can also select the import icon at the top of the sidebar, and then select .env files.
In the Import Environments tab, review the detected .env files. You can enter text in the Search by name box to filter the list of .env files by name.
(Optional) Select Edit next to the .env file you'd like to edit before importing into Postman. You can take the following actions:
- Review the variables that will be imported into Postman.
- Enter text in the Filter variables box to filter the list of variables by name or value.
- Select the environment name and enter a new name.
- Clear the checkbox next to variables you want to make unavailable. You can select the checkbox after import to make them available again.
- Change the variable type for a variable.
- Persist one or all current values to their initial values, syncing them with Postman's servers after import. To persist all values, select the View more actions icon in the top-right of the environment, then select Persist all. To persist one value, hover over a variable, select the View more actions icon, then select Persist. Learn more about initial and current values.
- Reset one or all current values to reflect their initial values. To reset all values, select the View more actions icon in the top-right of the environment, then select Reset all. To reset one value, hover over a variable, select the View more actions icon, then select Reset.
- Hover over a variable you don't want to import, then select the delete icon.
- Select Reset to revert all of your changes.
- When you're done editing, select Done.
Select the checkbox next to one or more .env files you'd like to import into new environments in Postman. Each .env file is imported into its own environment in Postman.
Select Import.
To import a single .env file, do the following:
Open your API project in Visual Studio Code.
Open the .env file you'd like to import, and select Import to Postman at the top of the file. You can also right-click on the .env file, and select Import / Open in Postman.
You won't have the option to edit the environment variables before importing the .env file into Postman. You can edit the environment variables once they're imported, such as changing the variable type.
A new Postman environment opens in a new tab with the environment variables imported from your project. Review the imported environment variables.
Select Save if you make any changes to the environment.
Once environment variables are imported from a single .env file, you can select Open in Postman at the top of the previously imported file. You can also right-click on the .env file and select Import / Open in Postman. This opens the environment in a new tab with the environment variables you imported earlier. Note that if the environment is moved to a new workspace in Postman, these options will open the environment in the relevant workspace if you have permission to access.
Learn more about managing environments in the Postman VS Code extension.
Sync imported environment variables with Postman
You can sync changes made to your imported .env files with their respective environments in Postman. Make sure you've imported the .env files into Postman before syncing them.
Important: When you sync changes to imported .env files, both the initial and current values are updated in their respective environments in Postman. The initial value is synced to the Postman cloud, and is shared with your team when you share the environment.
To detect and sync changes in .env files, do the following:
Open your API project in Visual Studio Code, and edit .env files you've already imported into Postman.
You can take one of the following actions to sync changes to the .env file:
- Open the
.env file or its respective environment in Postman. Then select Sync Now in the in-app notification.
- Open the
.env file, and select Sync to Postman at the top of the file.
- Right-click on the
.env file, and select Sync to Postman.
Repeat these steps for each imported .env file you've made changes to.
Generate code snippets
You can convert an API request into a code snippet in the language of your choice. Available languages and frameworks include cURL, Node.js, Python, and more.
To generate a code snippet, open an HTTP request, then select Code (below Send). Select a language or framework from the dropdown list, then copy the code snippet to your clipboard.
Use cookies
You can view and edit cookies associated with different domains. You can then use the cookies stored in the cookie jar when sending HTTP requests in Postman.
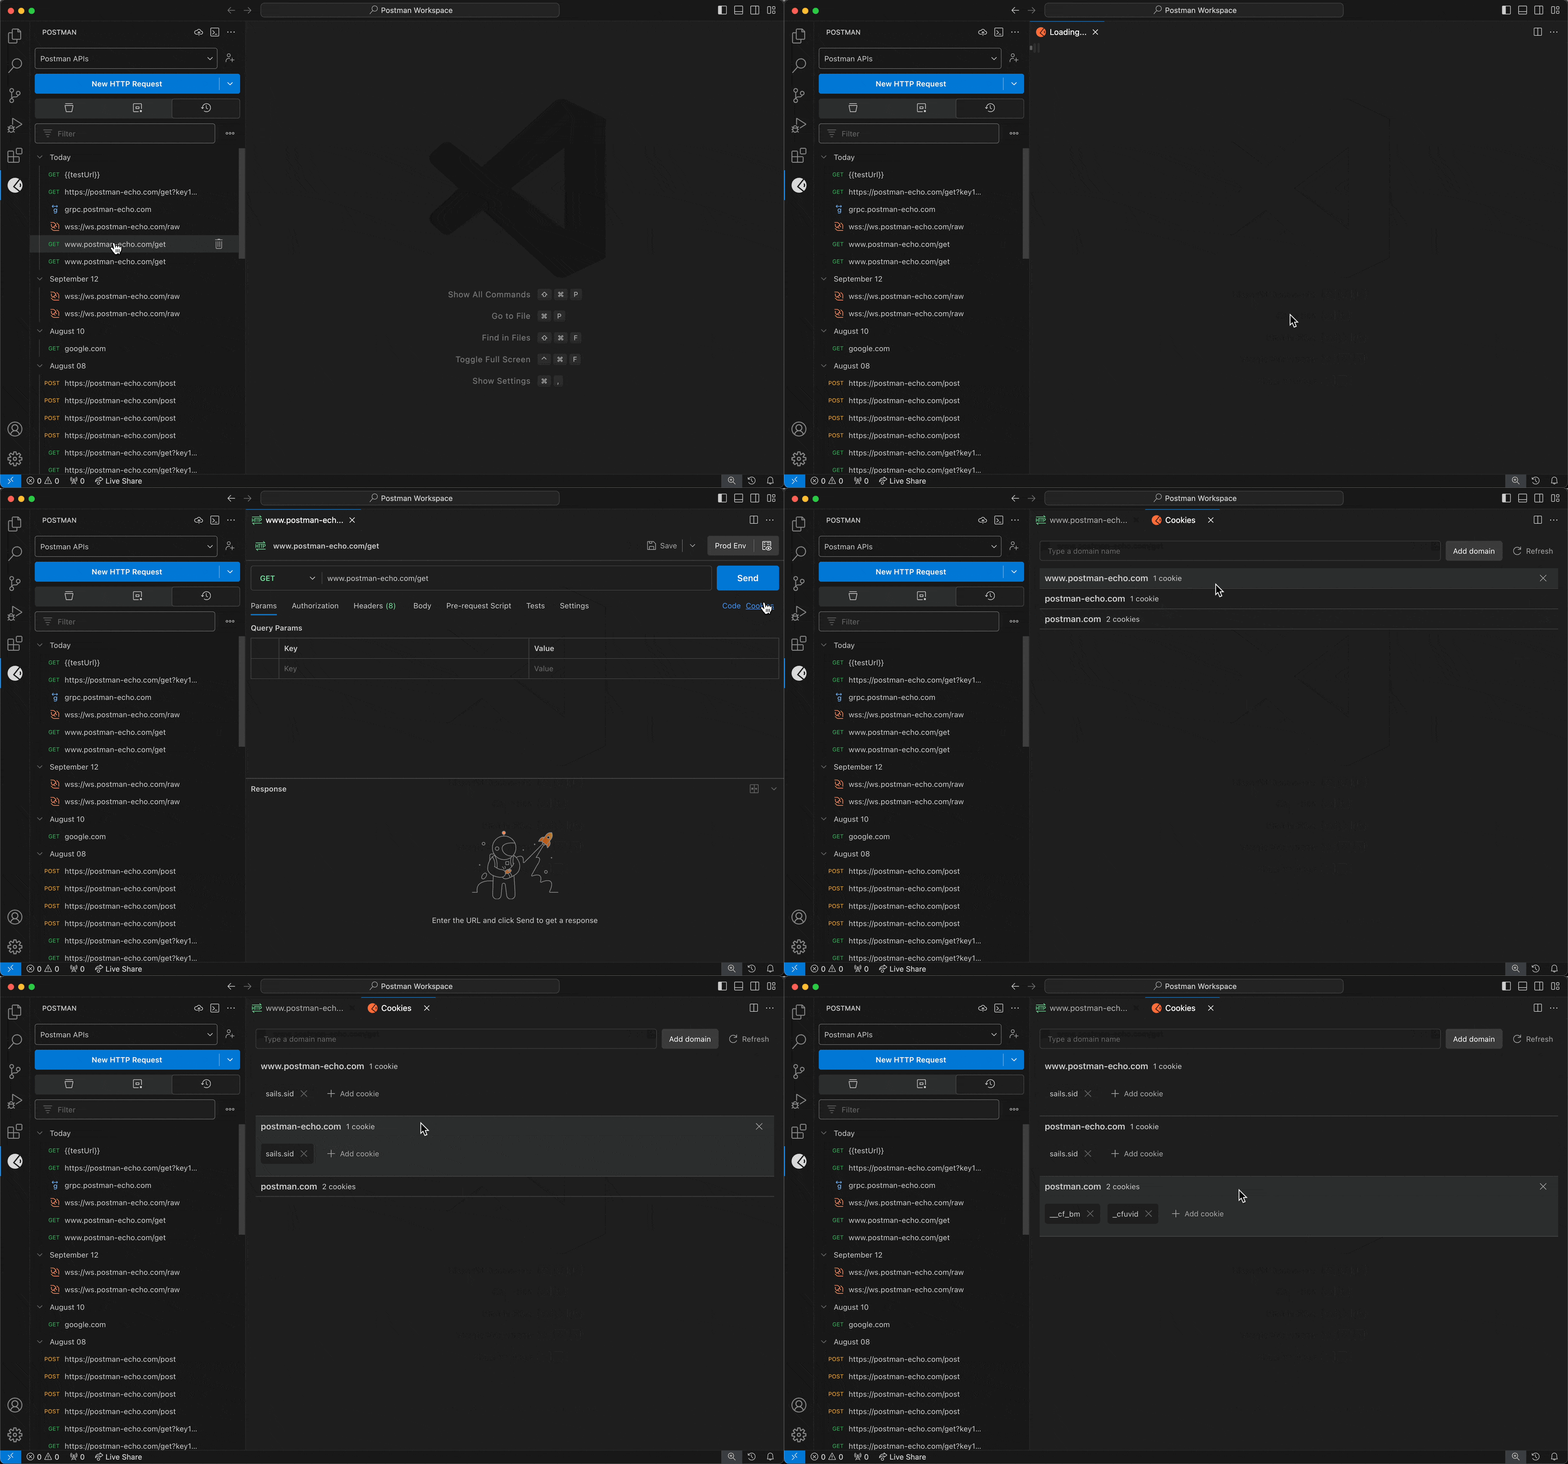
To manage cookies in the VS Code extension, open an HTTP request, then select Cookies (below Send).
You can also open the cookie editor with the Postman: Open cookies editor command in the Command Palette.
To learn more about using cookies, see Postman's documentation.
Test your API
You can use the VS Code extension to test an API's functionality. You can add post-response scripts to your collection, folders, and requests. You can also open pre-request and post-response scripts as a JavaScript file, giving you the full editing experience of your code editor. With the Collection Runner, you can run requests in a specific sequence and view the test results.
You can also add common tests to your team's Package Library and reuse them in internal workspaces.
Test your API using scripts
You can add post-response scripts to collections, folders, and requests that run after a response is received. Add tests to confirm that your API is working as expected, and help you debug your API if something goes wrong. Postman supports post-response scripts written in JavaScript.
To add post-response scripts to collections, folders, and requests, do the following:
Select a collection, folder, or request you'd like to add tests to.
To learn more about testing collections and folders, see Postman's documentation.
Select Scripts > Post-response, and add your tests. You can add your own post-response scripts and snippets of commonly-used test code. For test examples, see Postman's documentation.
Optionally, you can add log statements to your post-response scripts to help you debug your requests. Logged statements display in the Postman Console.
Select Send to run your request. The tests will run after a response is received. In the Response section, select the Test Results tab to review the results of your tests.
To learn more about writing tests scripts and using snippets of commonly-used test code, see Postman's documentation.
Edit scripts as a JavaScript file in your code editor
From the VS Code extension, you can open pre-request and post-response scripts as a JavaScript file in the application you're using to develop your APIs. Get the full editing experience of your code editor while you write test and scripts for your HTTP requests, collections, and folders. Editing in a JavaScript file enables you to leverage your application's AI agent, such as GitHub Copilot, to help you write and edit your test and scripts.
- Open an HTTP request, folder, or collection you'd like to add tests or scripts to.
- Select the Scripts tab, and then select the Pre-request or Post-response tab.
- In the upper right of the code editor, select the Open in native editor icon. A JavaScript file opens in a separate tab.
- Write and edit your test and scripts in the file. Changes to the file are synced to your script in the VS Code extension in real time.
- Save the file to preserve your changes in the VS Code extension.
Test your API using the Collection Runner
You can use the Collection Runner to manually run a collection's or folder's requests in a specific sequence, enabling you to test an API's functionality or performance. You can also automate collection runs in your CI/CD with the Postman CLI or Newman.
By default, your requests run in the sequence they're listed in the collection. If you need to change the order of execution, select and drag a request to its new location in the sequence. You can also remove an individual request from the run by clearing the checkbox next to its name. You can optionally use post-response scripts to pass data between requests and alter the request workflow. Learn how to customize a collection run with post-response scripts.
To manually run requests in a collection or folder, do the following:
Select a collection or folder with requests you want to run in sequence.
Select Run to configure the collection run.
If you want your collection to run with an environment, select it using the environment selector at the top right. You can also select Create New to create a new environment. Learn how to manage environments in the VS Code extension.
Choose any configuration options:
Iterations - The number of iterations for your collection run. You can also run collections multiple times with different data sets to build workflows.
Delay - An interval delay in milliseconds between each request.
Data - You can import a data file and use its values in the collection run. The data file must be in CSV or JSON format. Learn more about formatting a data file.
Persist responses for a session - Log the response headers and bodies so you can review them after running the collection. For large collections, persisting responses may affect performance.
Request and response details are persisted locally during your current Postman session and aren't saved permanently. Signing out of Postman, signing into another device with the same account, or refreshing your browser will end your session and remove the logged data.
Response and request details are available for the person who started the collection run. Other team members can't view details for collection runs that you start.
Advanced settings
- Stop run if an error occurs - By default, the collection run stops if an exception is encountered within a script or if there's a problem sending a request. Clear this checkbox if you want the collection run to continue after an error occurs.
- Keep variable values - Persist the variables used in the run, so any variables updated by the run will remain changed after it completes. If you don't persist variables, changes aren't saved after the run completes. Note that persisting variables in the collection run will update the current value only.
- Run collection without using stored cookies - If your requests use cookies, you can optionally deactivate them for a collection run.
- Save cookies after collection run - Save the cookies used in this session to the cookie manager. Any values changed by requests during the run will remain after it completes.
To run the collection with your completed configuration, select Run (collection name).
Your Postman plan gives you a limited number of collection runs you can use each month. This limit applies to collections you run manually. A collection run with multiple iterations counts as a single run.
When running collections manually, Postman displays the results of your request executions and test results in real time. To learn more about what happened during the collection run, you can:
- Select a request to view more details about it, including the response, headers, and request.
- Select the name of a request to open it in a new tab.
- Select the Passed, Failed, or Skipped tabs to filter the results by test status. To show all requests, select the All Tests tab. If any tests in a request script fail during a collection run, the whole request fails.
- Select View all runs to view the run history for your collection.
- Select Run Again to run the collection again using the same settings.
- Select + New Run to configure a new run for the collection. Make changes to any settings, and then select Run (collection name) to run the collection again.
You can also view the run history for your collection, including collections you ran using the Collection Runner and the Postman CLI. Select a collection or folder, then select the Runs tab. You can filter your run history by the number of collection runs to view, users who ran the collection, the test status of the collection runs, and the source of the collection run. To return to the results of the collection run, hover over a collection run and select the view report icon.
Reuse scripts with the Package Library
You can use the Package Library to store commonly-used scripts and tests as packages in your Postman team. You can maintain scripts and tests in one location and reuse them in your internal workspaces. Your Postman teammates can also access and import packages from the Package Library. The Package Library supports JavaScript code.
You can also import external packages into HTTP requests from npm or JSR package registries.
To create a new package, do the following:
Open an HTTP request, collection, or folder, then select the Scripts tab.
Select either the Pre-request or Post-response tabs.
Choose one of the following:
- Request - Select Packages in the lower right of the code editor, then select Open package library.
- Collection or folder - Select Open package library in the pane on the right.
Select New Package.
Enter the following:
Name - The name of the package. This is used in the import statement that adds the package to your scripts.
You can't use the name of a package that already exists or a package that was deleted. Also you can't change the name of a package later.
Summary - The summary of the package so your teammates understand what it does.
Code - Enter code in the package. Learn how to write code in a package.
Select Create.
Once you've created a package, you can learn how to write code in a package and import a package into your scripts.
Import packages from external registries
You can import public packages from external package registries into your scripts. Postman supports importing packages from npm and JSR registries in scripts. External packages are supported in HTTP requests in the VS Code extension. Private packages aren't supported in the VS Code extension.
To search and import an external package, do the following:
- Open an HTTP request, then select the Scripts tab.
- Select either the Pre-request or Post-response tabs.
- Select Packages in the lower right of the code editor.
- Search for a package in npm or JSR. To filter your search results by package registry, select NPM, JSR, or both. Search returns the top five results for each package registry.
- Select a package to import it into the code editor.
To learn more about importing packages from external registries, see Postman's documentation.
Troubleshoot with the Postman Console
You can use the Postman Console to troubleshoot your requests. You can also use the Console to debug pre-request scripts and tests scripts, logging output to the Console. To open the Postman Console, select the console icon at the top of the sidebar.
Keyboard shortcuts
| Action |
macOS |
Windows/Linux |
| Open the VS Code extension |
Cmd+Opt+P |
Ctrl+Win+P |
| Create a new collection |
Holding Cmd, press R then C |
Holding Ctrl, press R then C |
| Create a new environment |
Holding Cmd, press R then E |
Holding Ctrl, press R then E |
| Open a new request tab |
Holding Cmd, press R then N |
Holding Ctrl, press R then N |
| Open the Postman Console |
Holding Cmd, press R then P |
Holding Ctrl, press R then P |
View the extension log
The VS Code extension log displays events related to the VS Code extension.
- Select the Views and More Actions icon at the top of the sidebar.
- Select Open Extension Log. The VS Code extension log will open in a new tab.
View the version
To view the version of the VS Code extension you're using, do the following:
- Select the Views and More Actions icon at the top of the sidebar.
- Select Version.
Share feedback
You can create a bug or feature request for the VS Code extension.
- Select the Views and More Actions icon at the top of the sidebar.
- Select Report Bug / Share Feedback. The VS Code extension will open a new screen that directs you to GitHub in your browser.
- In your browser, select Get started to create a bug or feature request.
- Enter the bug or feature request details, then select Submit new issue.


