WxO Builder – IBM Watsonx Orchestrate for VS Code-Based IDEs


WxO Builder is the essential toolkit for developers building on IBM Watsonx Orchestrate from VS Code and other VS Code-based IDEs. Create, test, deploy, and manage AI agents, tools (OpenAPI, Python), flows, knowledge bases, evaluations, red-team assessments, and sync workflows directly from the editor. Export agents as MCP servers for Cursor, Claude Desktop, and other MCP clients. Import Langflow flows without relying on the Orchestrate CLI.
🔗 Looking for the Orchestrate ADK / CLI-based versions?
Author: markus.van.kempen@gmail.com
Version: 1.7.5
Date: 22-Apr-2026
🚀 Key Features
WxO Builder runs in VS Code, Cursor, Windsurf, Void, and other IDEs built on the VS Code extension host.
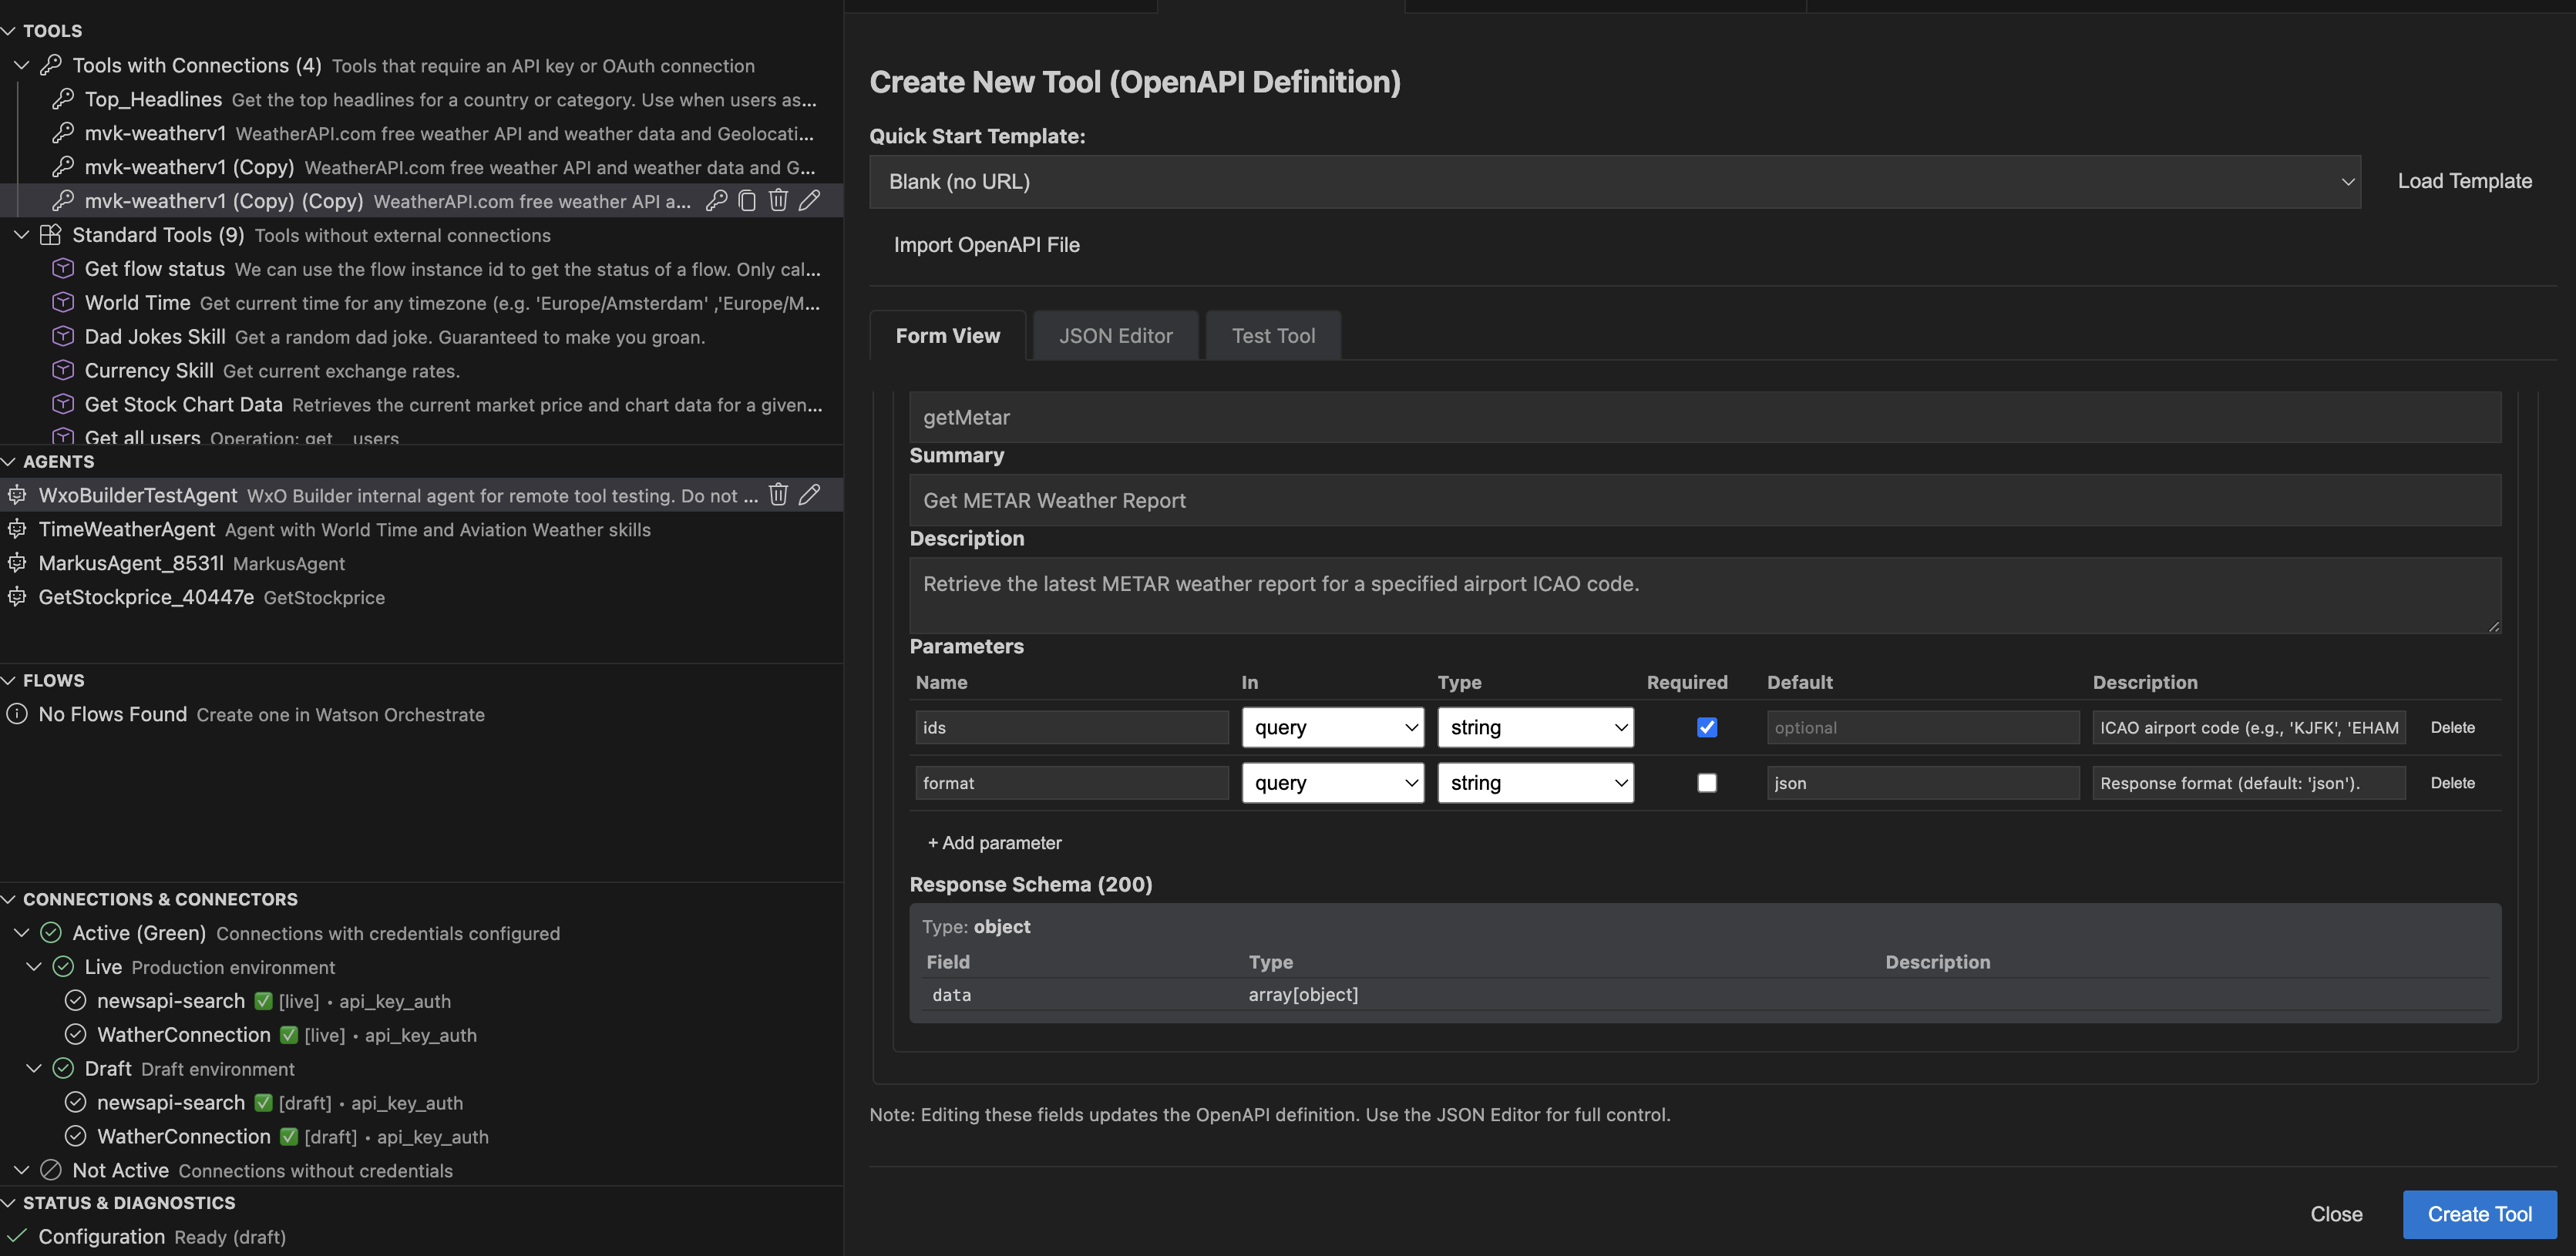
Build robust tools from scratch or templates.
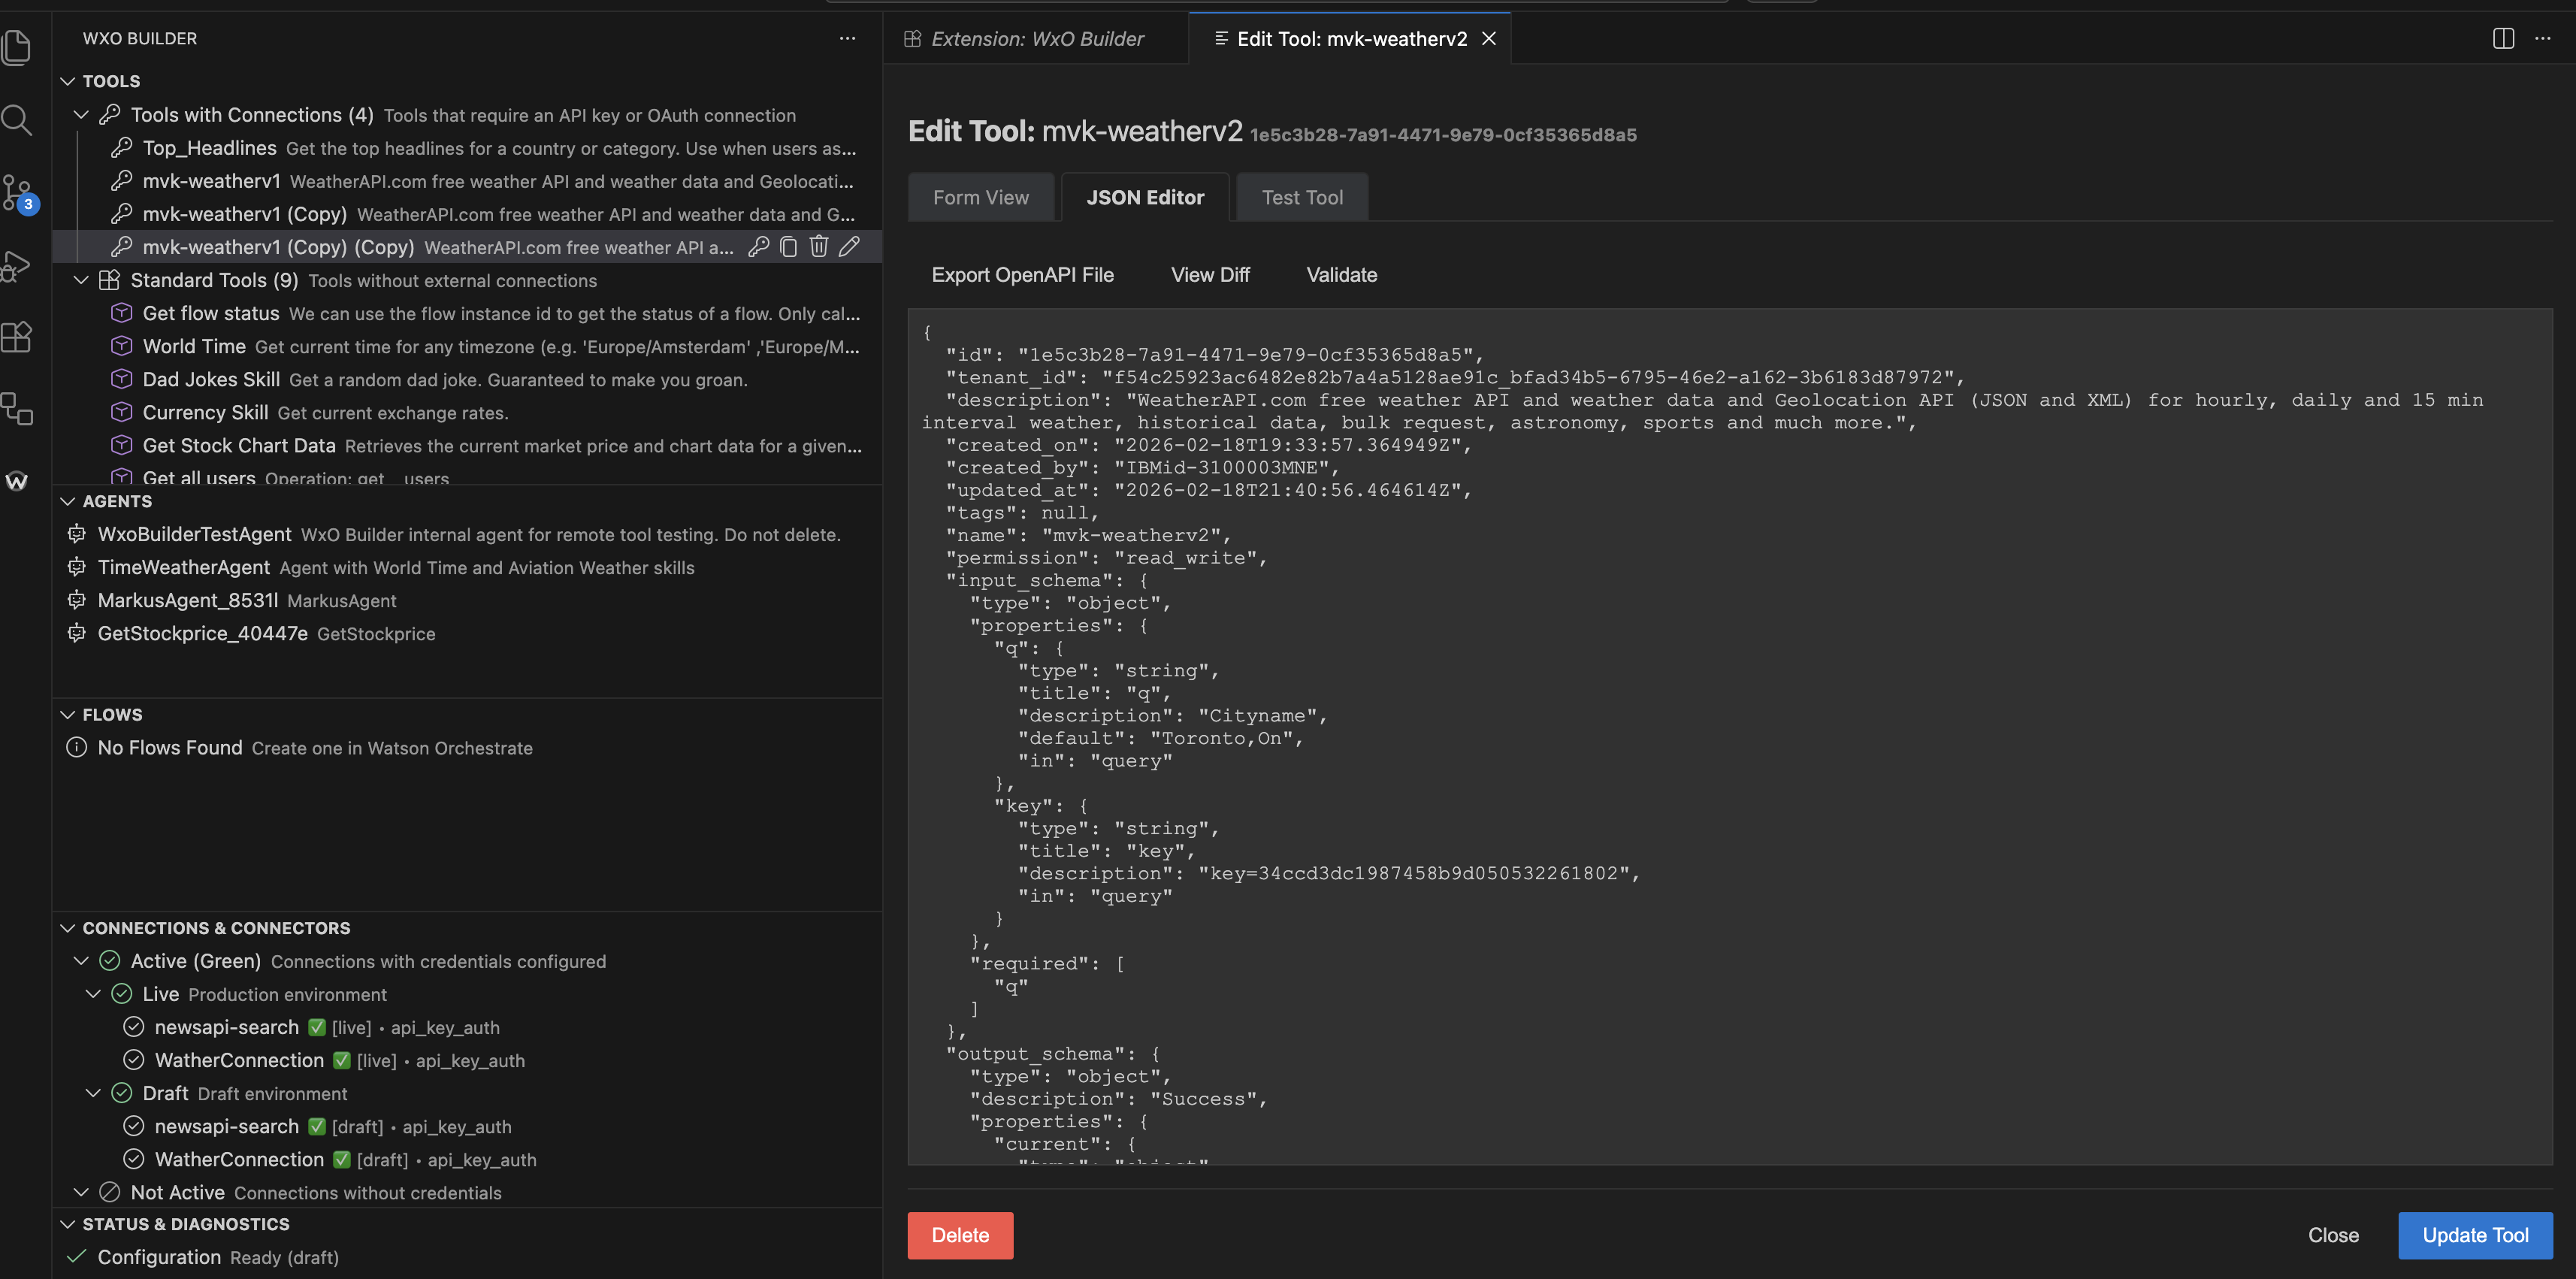
- Visual & Code Editors: Toggle between a user-friendly Form view and a powerful JSON editor for your OpenAPI specs.
- Python Tool Input/Output Schema: For Python tools, add, edit, and delete input parameters in a visual table (Name, Type, Description, Required). Use the output type selector (object / string / binary) or edit raw JSON.
Load parameters from JSON syncs JSON into the table.
- Start Fast: Use built-in templates (Weather, Finance, Time, etc.) or import existing OpenAPI files.
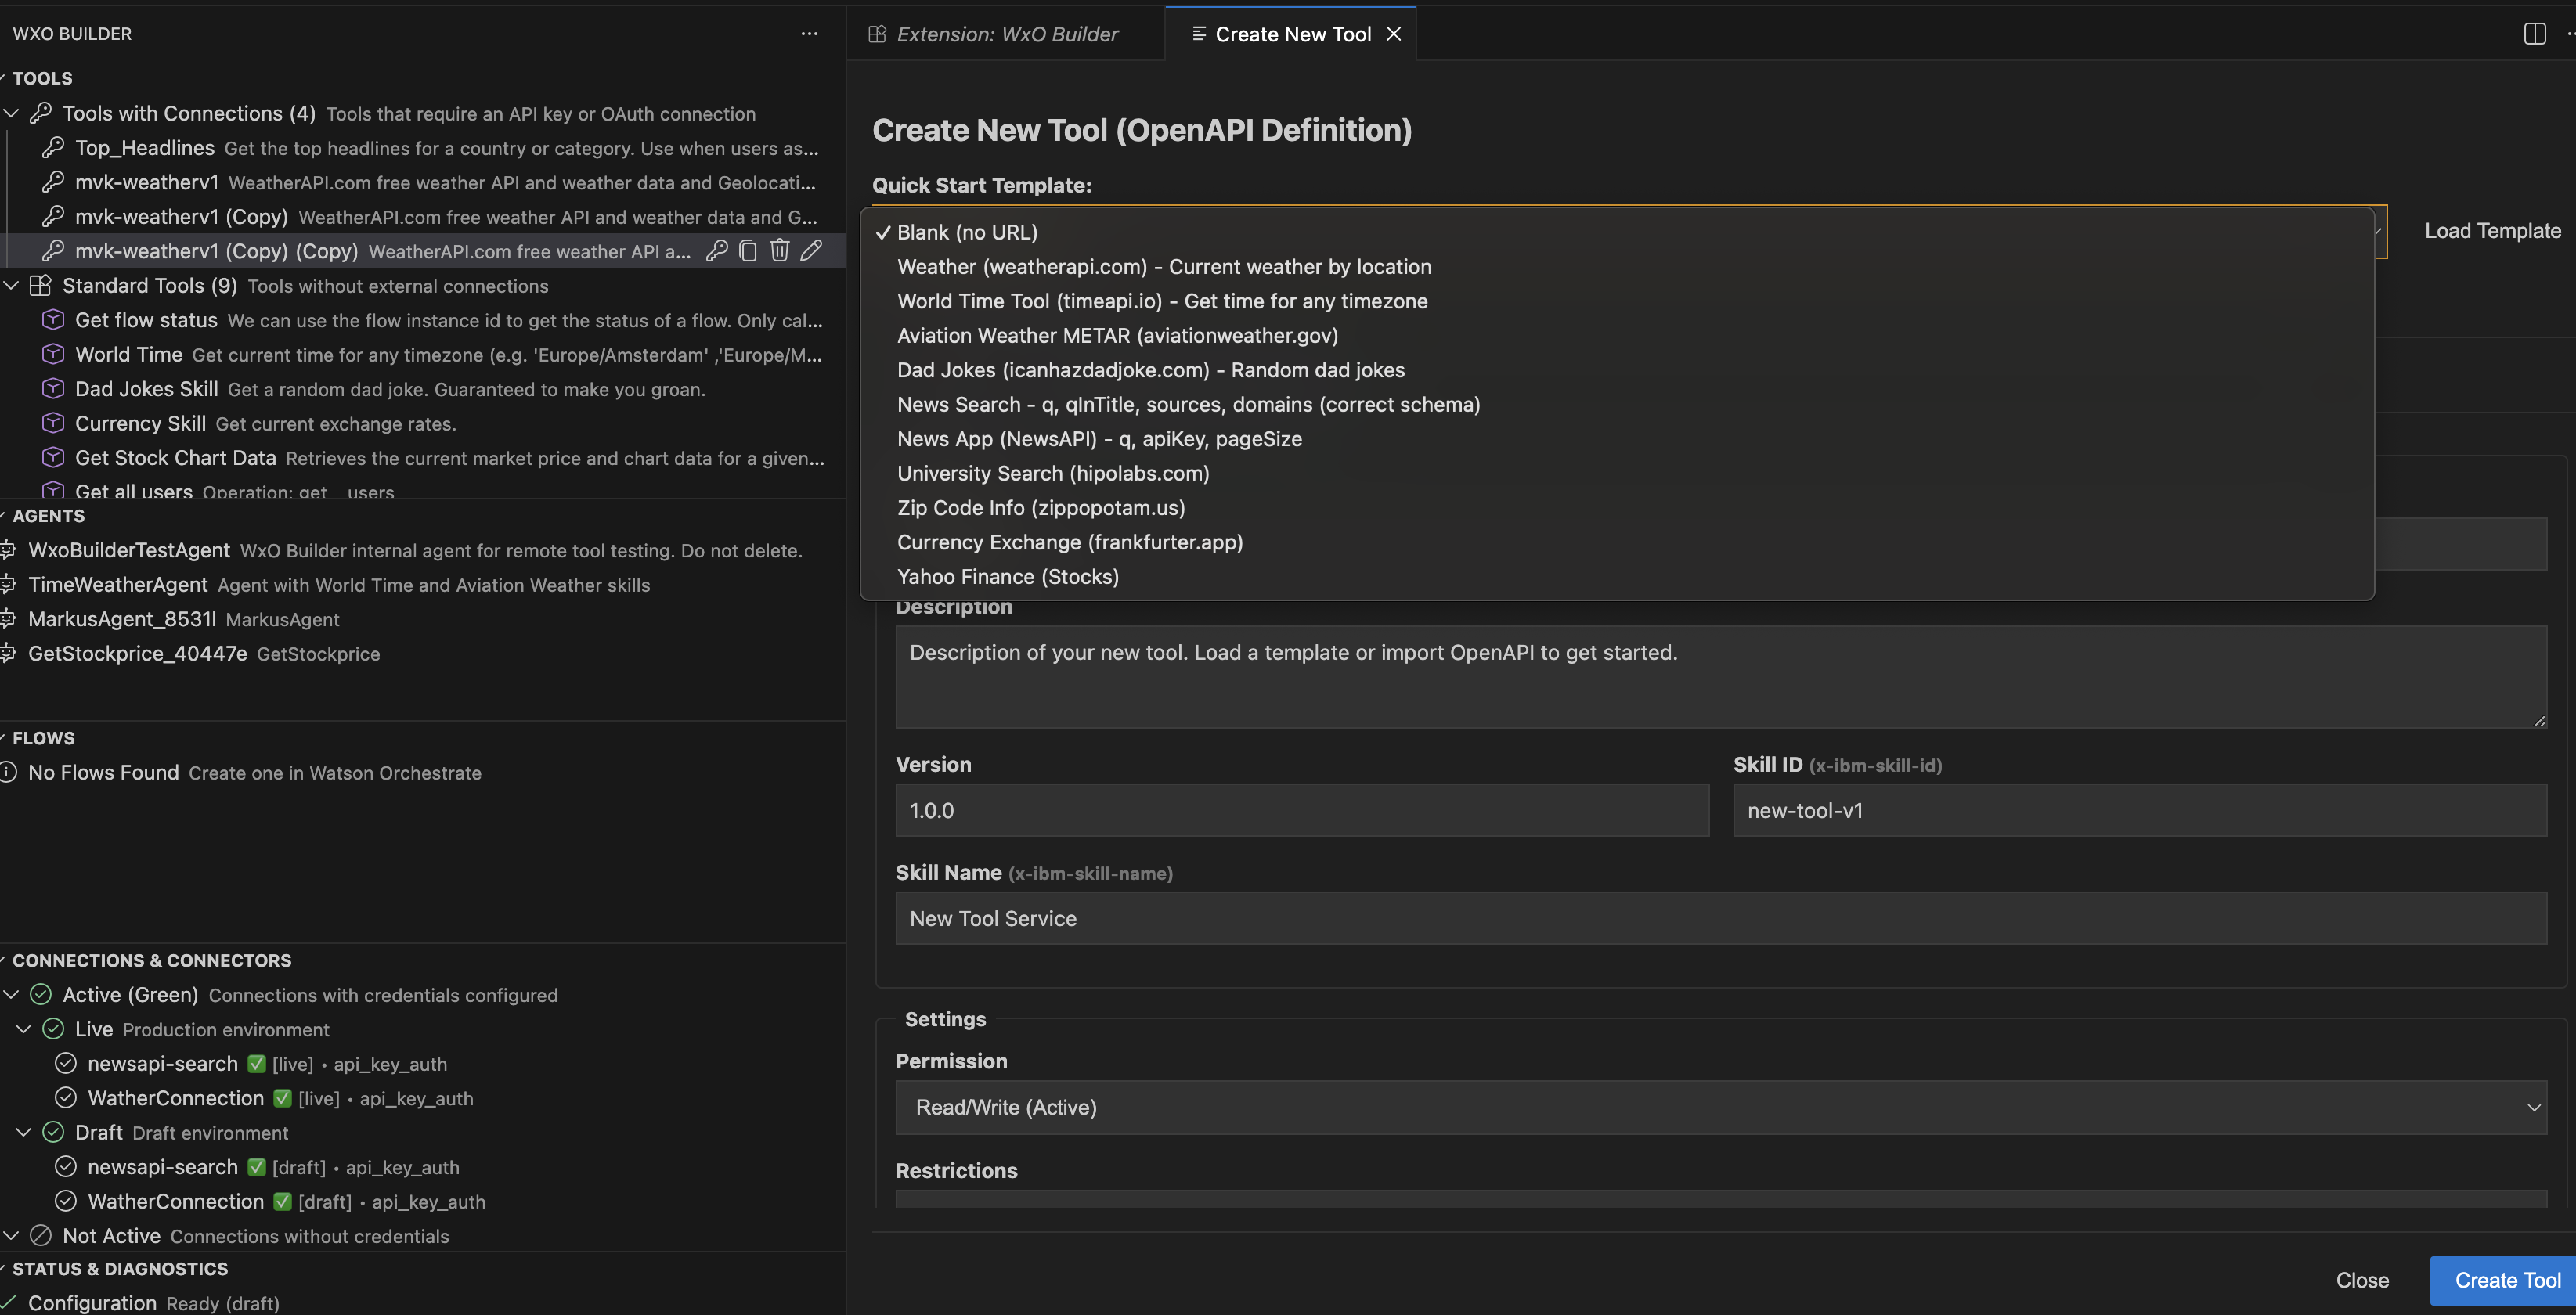
- Import from URL: Quickly onboard public APIs.
- Auto-create Connection: Paste a full URL with an API key (e.g.
...?key=xxx&q=London) and automatically create both the connection and the tool with proper binding. The Form view fills in servers, path, and API key param name from the URL.
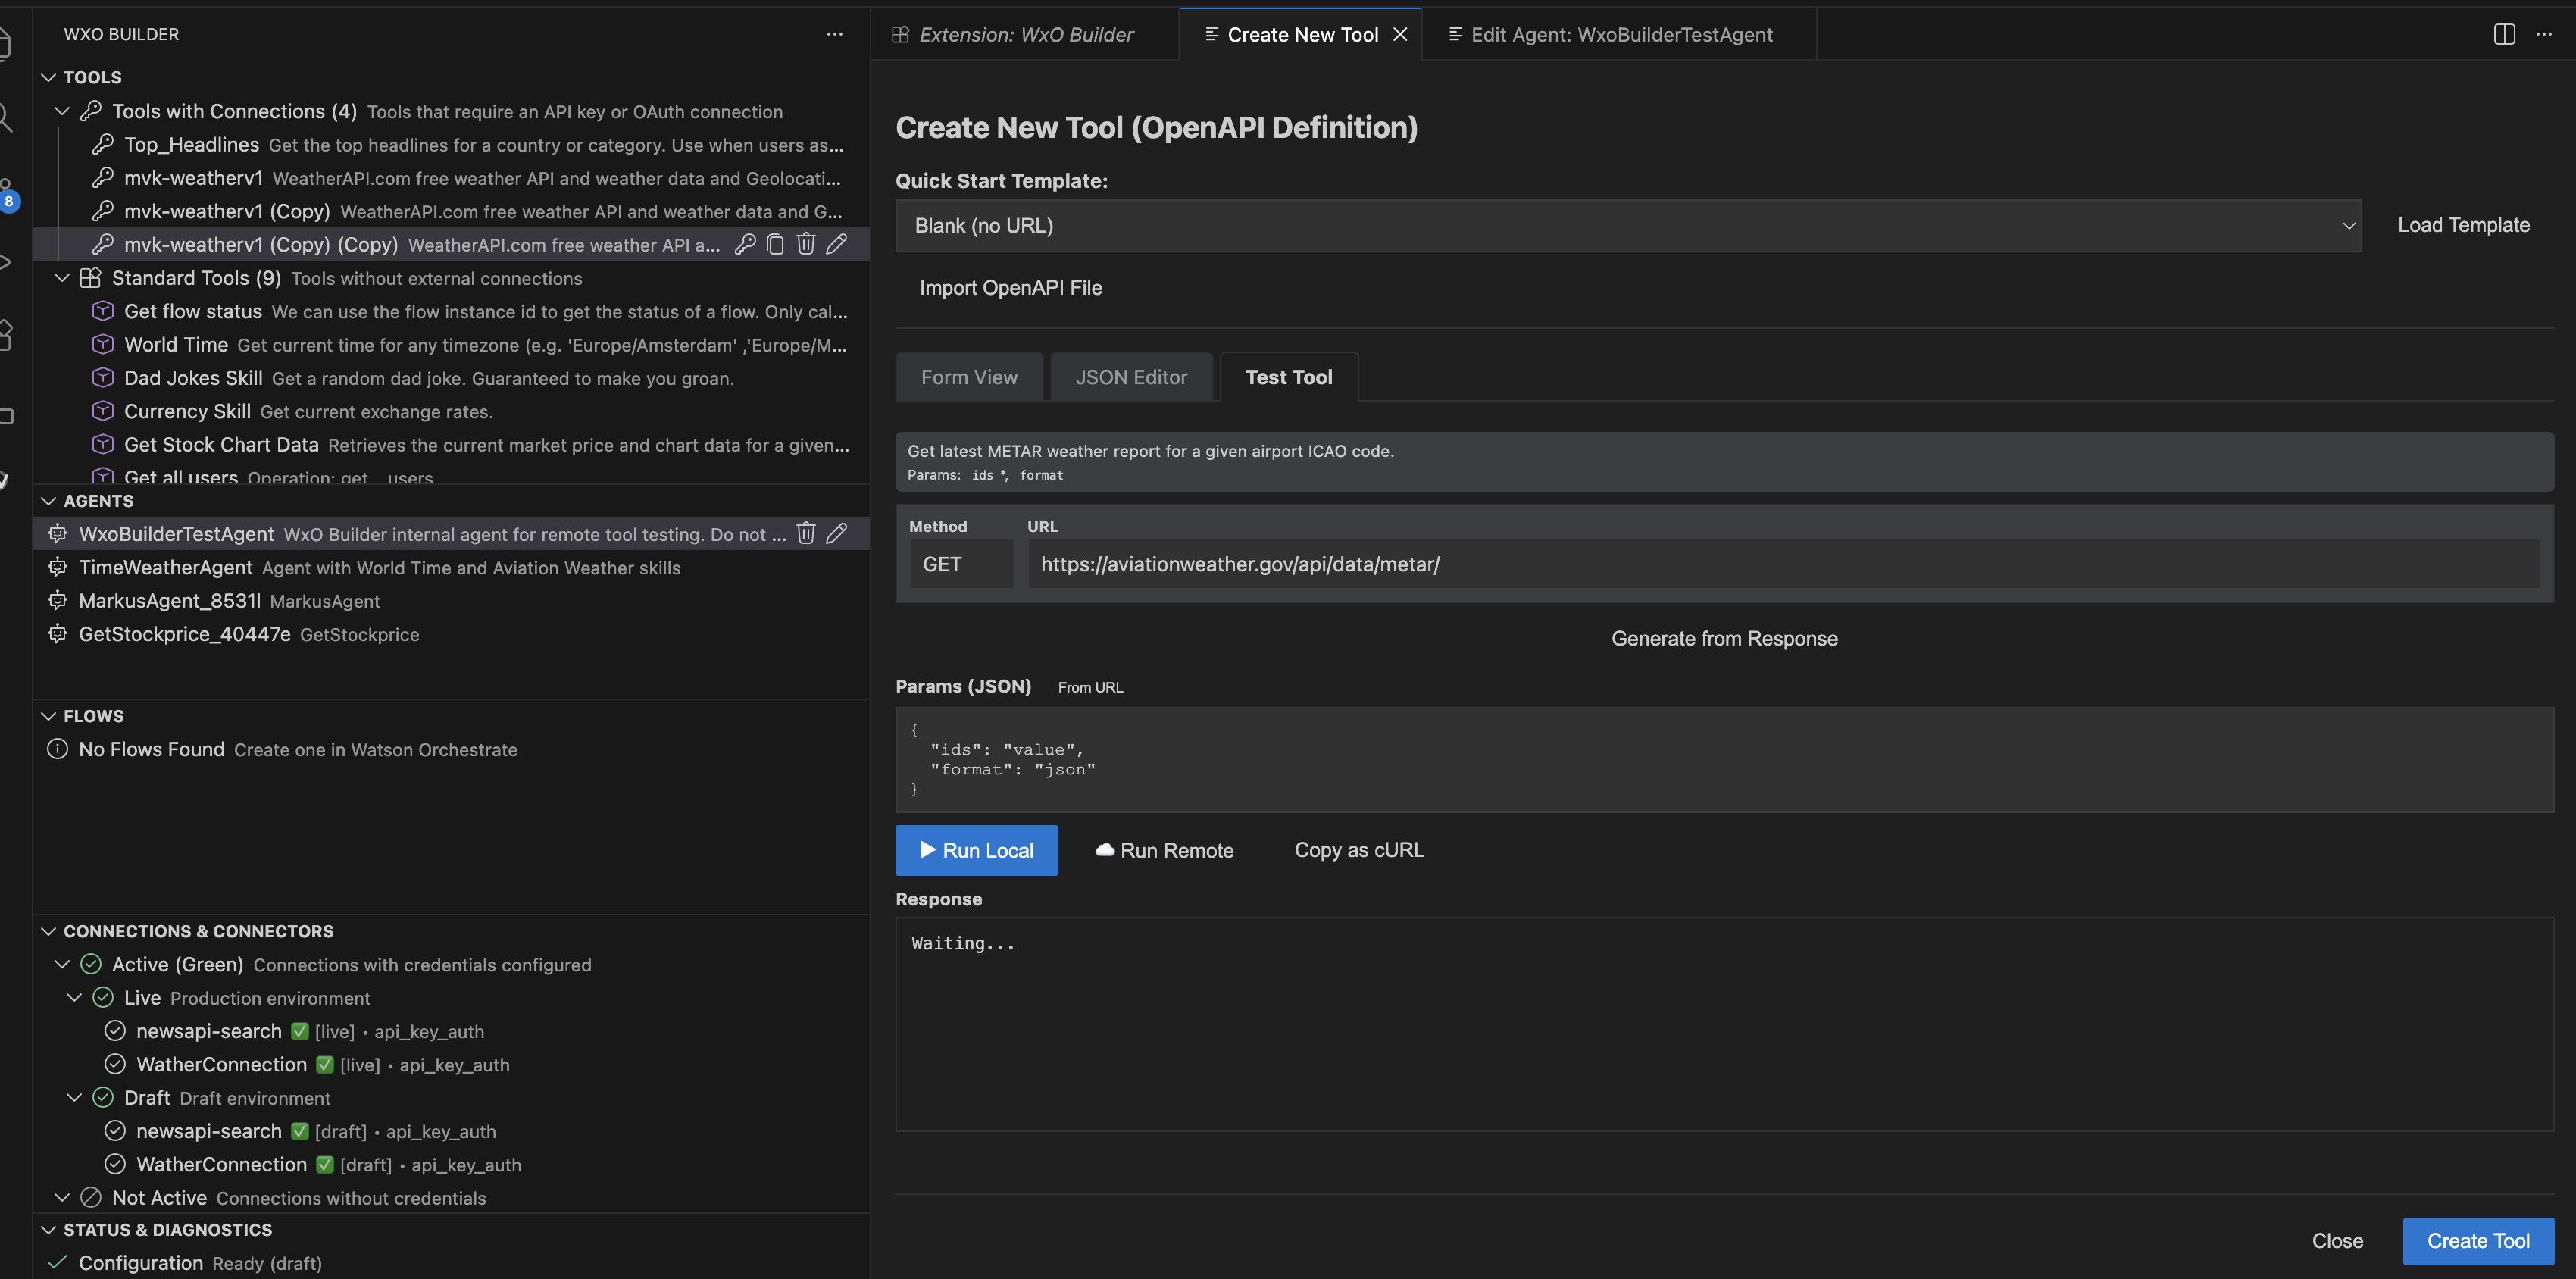
- Tool testing and generation: Run local API checks, execute remote runs through Watson Orchestrate, generate OpenAPI definitions from responses, and copy exact requests as cURL for debugging.
🧪 Advanced Testing (Local & Remote)
Verify your tools before deployment.
- Test and Generate Tool: Test endpoints and generate OpenAPI specs from responses. After generating, the view switches to Form View so you can review and edit.
- Run Local: Test the API endpoint directly from VS Code to ensure the backend is working.
- Run Remote: Execute the tool through Watson Orchestrate's engine. This verifies authentication, parameter mapping, and agent response generation.

- Copy as cURL: Debug easily by copying the exact request as a cURL command.

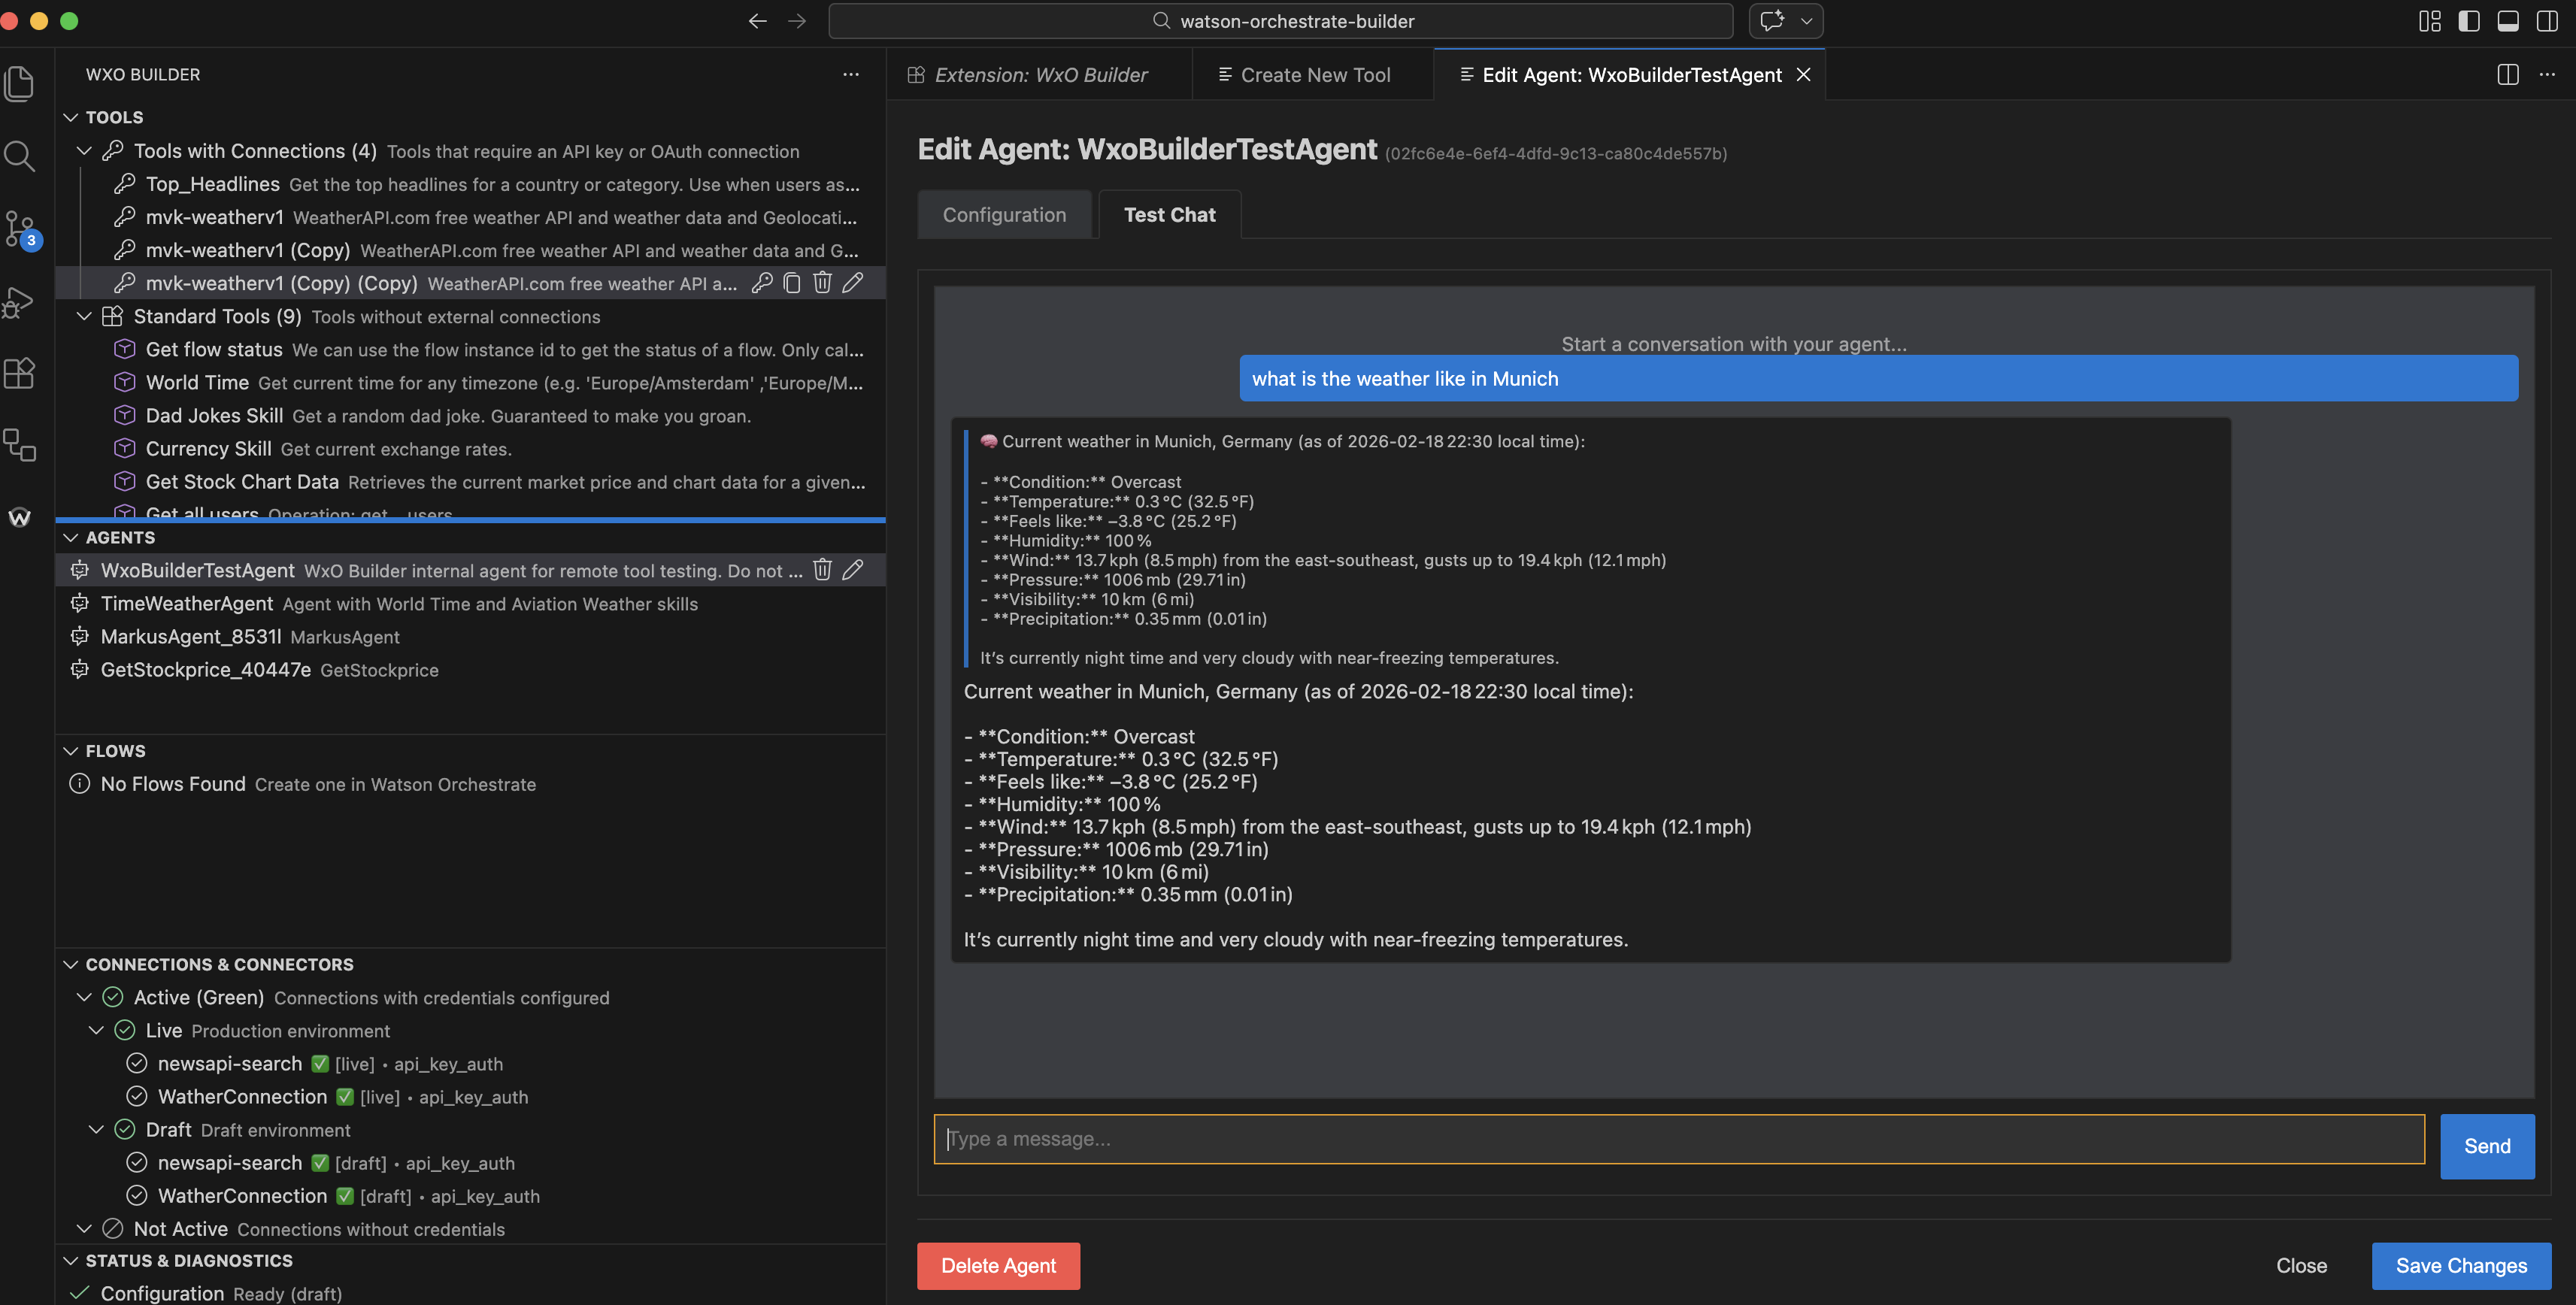
🤖 Agent Management
Create and orchestrate AI agents.
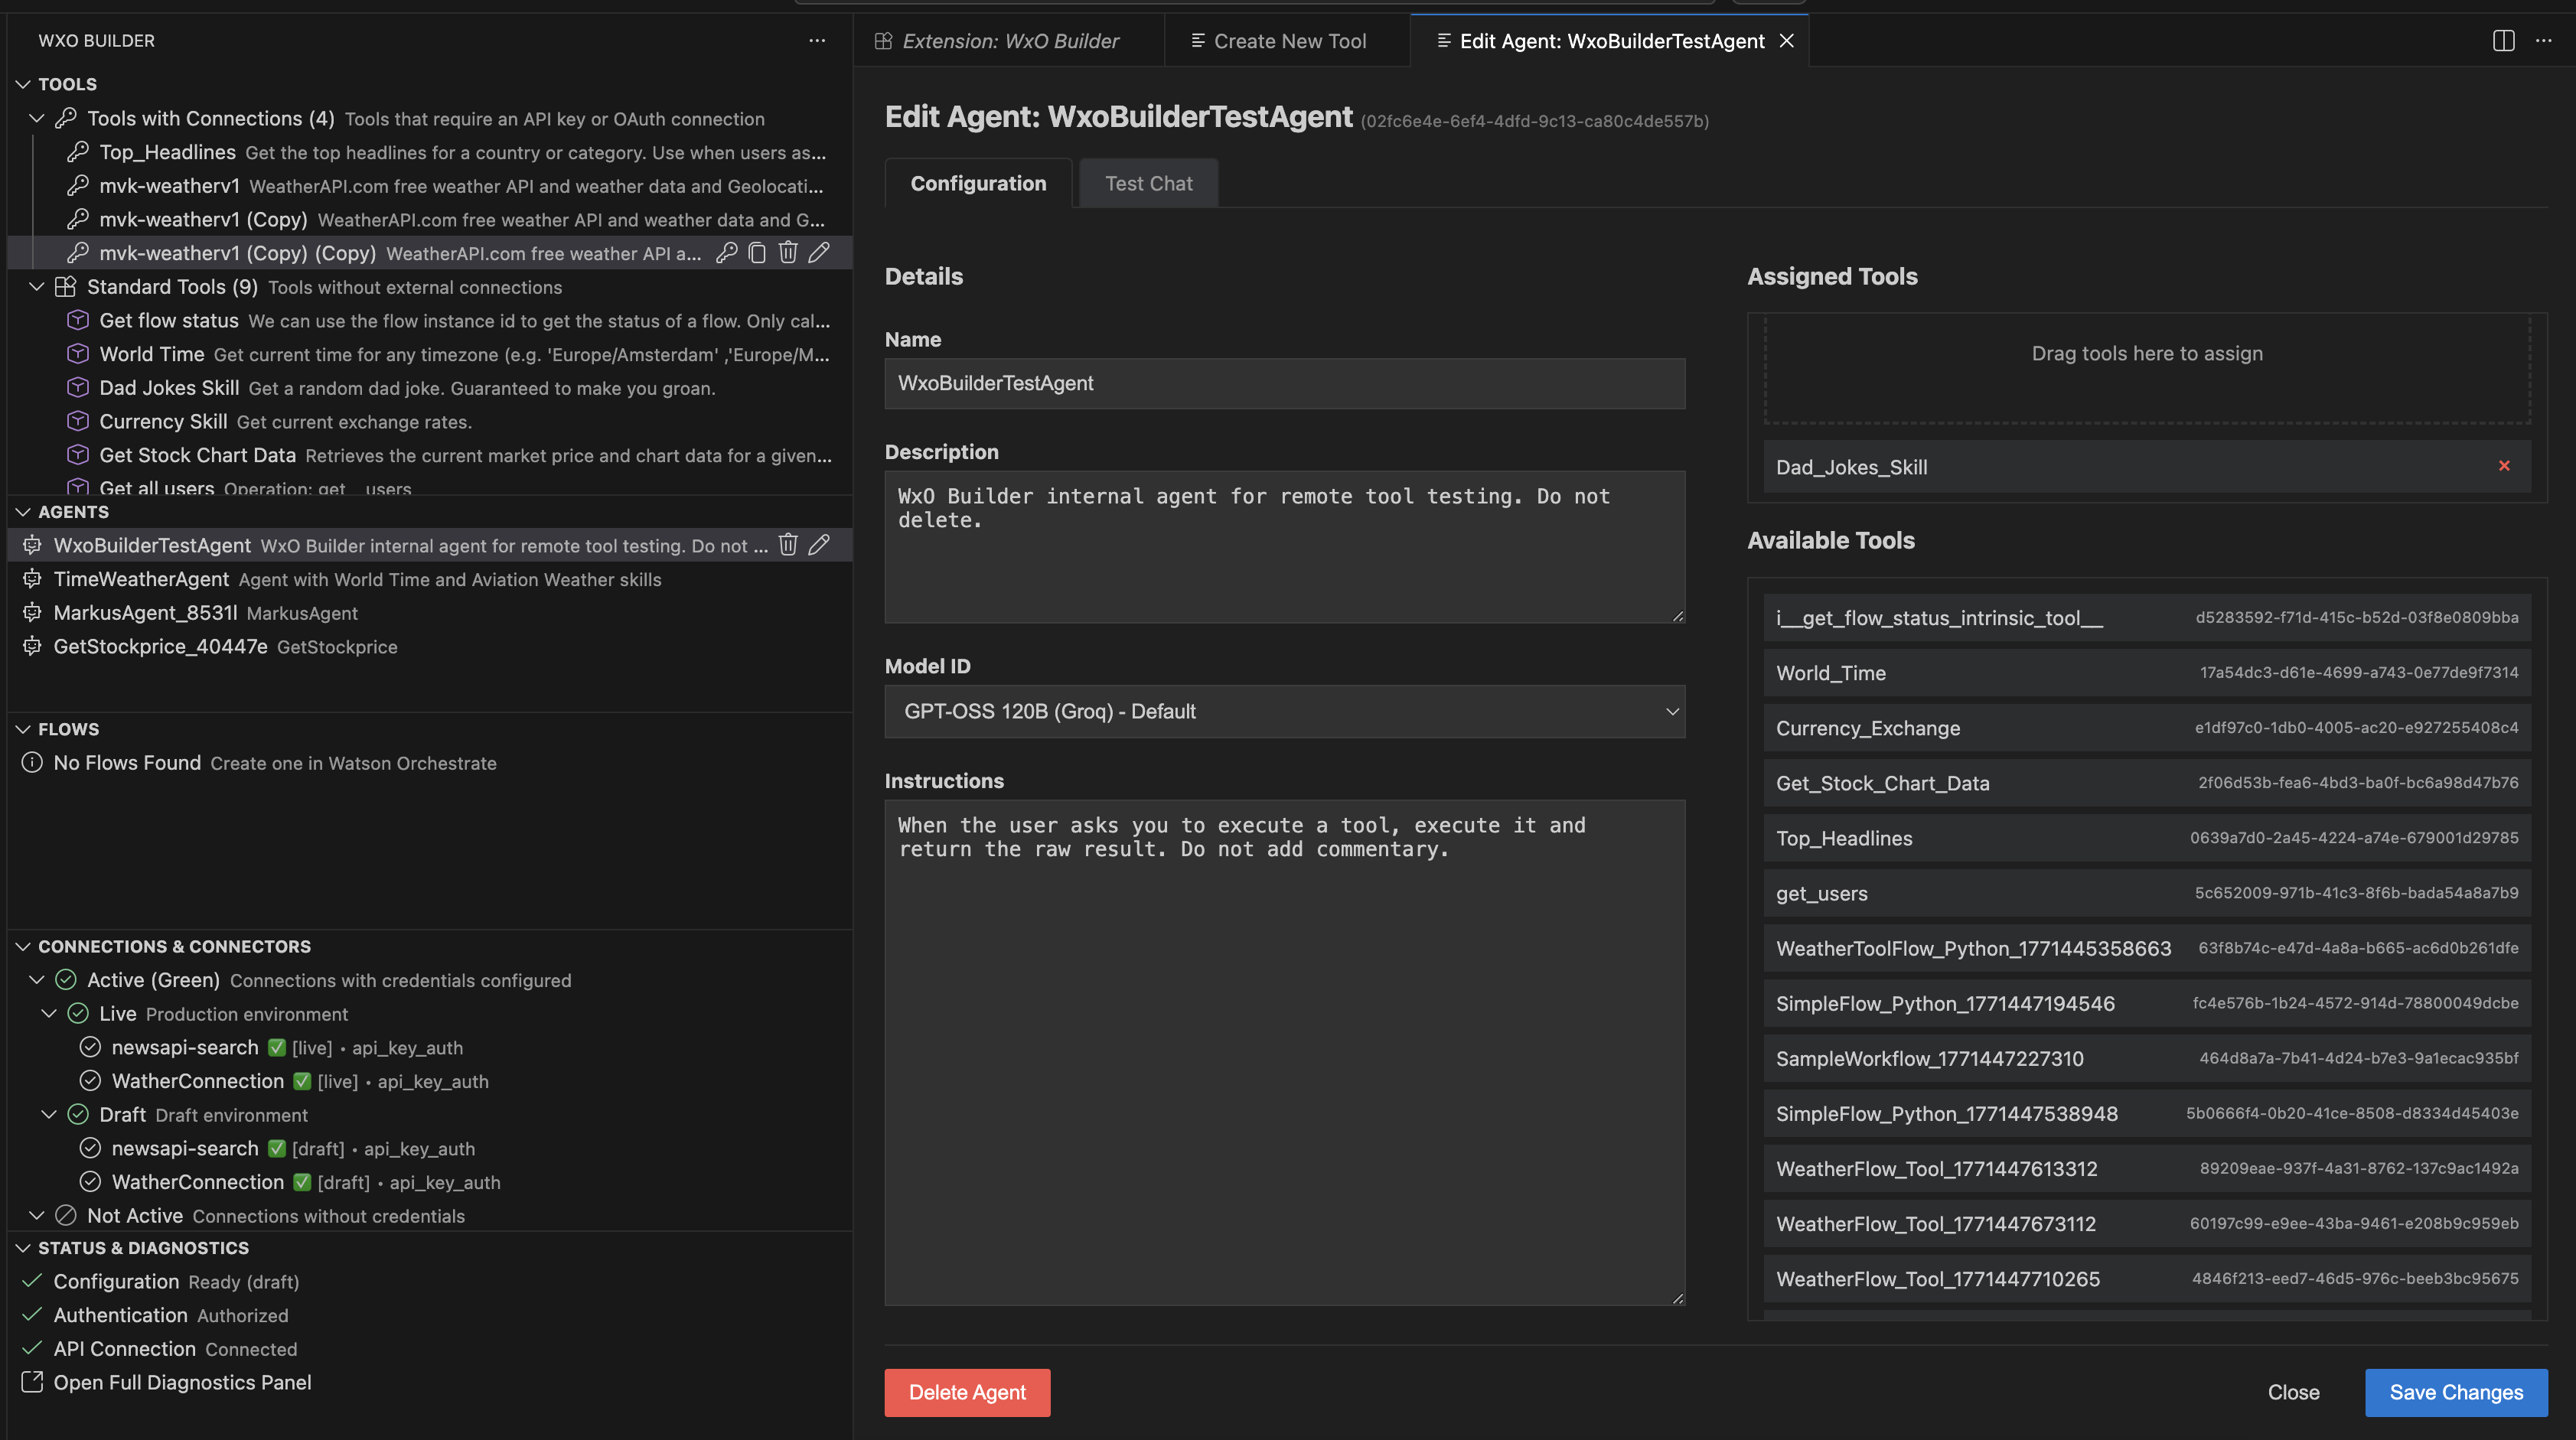
- Drag & Drop: Easily assign tools to agents.
- Export as MCP Server: Right-click an agent → Export as MCP Server to generate a self-contained MCP server project for Cursor, Claude Desktop, or other MCP clients. Includes
chat, run_tool, list_tools, and get_agent tools.
- Multiple Edit Agent tabs: Open several agents side by side; clicking the same agent again in the tree brings that editor to the front.
- ADK export feedback: After Export from the Agents view, the export report opens, WxO Project Dir refreshes, and the new export folder is highlighted in the sidebar (when under your WxO project root).
- Full Agent Config: Edit name, description, instructions, model, Agent style (
default, react, planner, react_intrinsic), Welcome message, Quick prompts (starter prompts), Tags, Hidden (hide from list), Hide reasoning.
- JSON Editor Tab: Edit the full agent JSON (including welcome_message, quick_prompts, tags, hidden, hide_reasoning) and save. Subset of API fields; note lists additional supported fields.
- Chat Interface: Interact with your agents and tools directly within VS Code to test the end-user experience.
🔀 Flow Management (Beta — WIP)
Flow features are currently work in progress and may change.
- Flows view: List and manage agentic workflows (flows) in the sidebar.
- Edit Flow: Open flows in Form view or JSON editor.
- Create Flow: Create new flows from scratch.
- Import Langflow Flow: Import Langflow flows as tools via REST (no orchestrate CLI required).
📚 Knowledge Bases & 📊 Evaluations
- Knowledge Bases: Browse RAG/document stores. Create and edit knowledge bases from a dedicated editor, upload local documents, add remote file URLs, export metadata, and delete. The editor includes structured JSON-backed fields, a connection dependency helper, direct JSON opening, live indexing feedback, tracked uploads, and a live document list that falls back across instance-specific API/status response shapes.
- Evaluations: Browse each agent's stored evaluation runs, test cases, attached tools, dependent objects, recent traces, trace debug info, and a live run inspector powered by the same cloud run/thread APIs used by the extension. Export results (CSV), inspect raw evaluation payloads, drill into attached tool definitions, and open the existing trace detail panel directly from the Evaluations activity.
🛡️ Red Teaming
- Native red-team console: Open the Red Teaming activity to run adversarial prompt attacks against a selected agent directly from the extension.
- Built-in attack library: Includes on-policy and off-policy attack categories inspired by the Watson Orchestrate LLM vulnerability guidance, such as instruction override, role playing, encoded input, prompt leakage, and tool/functionality misuse.
- Structured reports: Each run is summarized in the UI and automatically written to
WxO/Red-Teaming/<ENV>/<Agent>/<timestamp>/report.json and report.md for later review and sharing.
- Manual export options: Red-team runs can also be exported on demand as JSON, Markdown, or HTML.
🔄 Unified Sync Panel
- Export / Import / Sync: A single, powerful panel for managing all your Watsonx Orchestrate resources.
- Export completion: Successful exports open the text report, refresh WxO Project Dir, and reveal the export folder in the tree (for paths under the WxO root), same as ADK agent export.
- Systems tab and Select System: Manage named environments inside the extension, keep workspace settings separate from saved systems, and switch instances without editing credentials every time.
- Dependency Awareness: Choose with or without dependencies when exporting:
- Tools: "Tools + connections" vs "Tools only"
- Agents: "Agents + tools + connections" vs "Agents only"
- Object Types: Export tools, connections, agents, flows, plugins, toolkits, and knowledge bases.
- Bulk Operations: Streamlined workflow for synchronizing local and remote configurations.
🧪 CRUD & UI Test Coverage
- CRUD tests (
tests/scripts/crud/): Executable tests for Create, Read, Update, Delete on agents, connections, tools, toolkits, knowledge bases, evaluations, and flows. Run with npm run test:crud:all or per-object.
- UI operation tests (
tests/scripts/ui-operations/): UI-mirrored scripts for export/import flows and Knowledge Base editor operations, including npm run test:ui:knowledge-base-editor for create → edit → export → delete.
📦 Installation
- From Repository:
- Clone the repository.
- Run
npm install and npm run compile.
- Press F5 to launch the Extension Development Host.
- From VSIX: Build with
npm run package and install via "Install from VSIX..." in VS Code.
⚡ Getting Started Workflow
Open the Status & Diagnostics view.
- Click Configure.
- Enter your IBM Cloud API Key or trial API key and Watson Orchestrate Instance URL.
- Select your scope:
draft (for development) or live (for production).
(Tip: Use draft to avoid affecting production users.)
For workspace-mode API calls, the extension resolves credentials from the workspace .env first, then VS Code settings.
Use WO_API_KEY for standard instances or WO_TRIAL_API_KEY for trial instances. Trial keys typically start with azE6.
Use VS Code Settings for the default workspace instance. If you want to save multiple named environments or switch instances from the extension UI, use the Sync Panel → Systems tab instead of editing wxo-builder.apiKey and wxo-builder.instanceUrl each time.
- Go to the Tools view.
- Click the + (Create Tool) icon.
- Choose OpenAPI Tool or Python Tool (for Python code upload).
- OpenAPI: Pick a template (e.g., "World Time"), import from URL/file, or use Auto-create connection from URL — paste a full URL with API key to auto-fill servers, path, and API key param, then create connection and tool in one step.
- Python: Add input parameters in the visual table (+ Add parameter), set output type (object/string/binary), or load from
tool-spec.json.
- Edit the specification in Form view or JSON editor.
- Click Create Tool to register with Watson Orchestrate.
- Right-click your new tool and select Test Tool (or use the Test and Generate Tool tab when creating).
- Generate: Paste a URL and params, run "Run Local", then click Generate from Response to infer an OpenAPI spec. The view switches to Form View for editing.
- Local Test: Click "Run Local" to hit the API directly.
- Remote Test: Click "Run Remote" to have Watson Orchestrate invoke it. (Requires an Agent ID configured in settings).
- Go to the Agents view.
- Click + (Create Agent).
- Drag your tool from the Tools view and drop it onto the Agent.
- Start a chat to test the agent's ability to use the tool.
🌐 Embedding Web Chat in Your App
You can embed your Watson Orchestrate agent into a web application using the official embed chat. See the IBM watsonx Orchestrate Web Chat documentation for full details.
Requirements
- HTML: Add
<!DOCTYPE html> and a mount point: <div id="root"></div>.
- Configuration: Set
window.wxOConfiguration with your orchestrationID, hostURL, crn, deploymentPlatform, and chatOptions.agentId before loading the script.
- JWT token: Security is enabled by default. You must fetch a JWT from a backend and set
window.wxOConfiguration.token before calling wxoLoader.init(). Without a valid token, the chat will not initialize.
- Server-side JWT creation: A backend is required to store your RSA private key, sign JWTs with RS256, and optionally encrypt
user_payload with IBM’s public key.
Minimal embed script example
<!DOCTYPE html>
<html>
    <head>
        <script>
            window.wxOConfiguration = {
                orchestrationID: 'your-orgID_orchestrationID',
                hostURL: 'https://us-south.watson-orchestrate.cloud.ibm.com',
                rootElementID: 'root',
                deploymentPlatform: 'ibmcloud',
                crn: 'your-org-crn',
                chatOptions: { agentId: 'your-agent-id' },
            };

            async function getIdentityToken() {
                const response = await fetch('https://your-server.com/createJWT', {
                    method: 'GET',
                    credentials: 'include',
                });
                const token = await response.text();
                window.wxOConfiguration.token = token;
            }

            getIdentityToken().then(() => {
                const script = document.createElement('script');
                script.src = `${window.wxOConfiguration.hostURL}/wxochat/wxoLoader.js?embed=true`;
                script.addEventListener('load', () => wxoLoader.init());
                document.head.appendChild(script);
            });
        </script>
    </head>
    <body>
        <div id="root"></div>
    </body>
</html>
Backend setup
Your server must expose an endpoint (e.g. /createJWT) that:
- Loads your RSA private key and IBM’s public key.
- Signs a JWT with RS256 containing claims such as
sub, user_payload, and context.
- Returns the signed JWT as plain text.
IBM provides a full Node.js/Express example with key generation, JWT signing, and encryption in Getting Started.
Optional configuration
agentEnvironmentId: Add to chatOptions for environment-specific agents.layout: Control display with form (float | fullscreen-overlay | custom), width, height, and showOrchestrateHeader.
🔧 Configuration Reference
| Setting |
Description |
wxo-builder.apiKey |
Your IBM Cloud API Key for Watson Orchestrate authentication. |
wxo-builder.instanceUrl |
The base URL of your Watson Orchestrate instance. |
wxo-builder.scope |
draft or live. Controls where resources are created. |
wxo-builder.agentId |
(Optional) The ID of an agent to use for "Run Remote" tests. |
wxo-builder.debug |
Enable verbose logging to the "WxO Builder" output channel. |
Named systems added in the Sync Panel are stored separately from workspace credentials. System names and URLs are saved in WxO/Systems/systems.json, while system API keys are stored in VS Code SecretStorage.
Use Settings for one default workspace configuration. Use the Sync Panel → Systems tab when you need multiple named systems, per-system credentials, or quick switching through Select System.
❓ Troubleshooting
| Issue |
Solution |
| Tools list is empty |
Check your API Key and Instance URL in Settings. Click the Refresh icon. |
| 403 Forbidden |
Ensure your API Key has the correct permissions for the selected environment (draft/live). |
| 500 Error on Create |
Validate your OpenAPI spec. Use the "Validate" button in the editor. |
If a named system works in the Sync Panel but not in the activity views, re-select the system from Select System and reload the window once so all views pick up the active override.
🧪 Testing (CRUD & UI Operations)
The repo includes executable test scripts that verify WxO API operations used by the UI.
- CRUD tests (
tests/scripts/crud/): Create, Read, Update, Delete for agents, connections, tools, toolkits, knowledge bases, evaluations, and flows. Run with npm run test:crud:all or per-object (e.g. npm run test:crud:agents).
- UI operation tests (
tests/scripts/ui-operations/): Export agent/tool/toolkit/knowledge-base, import toolkit, activate/deactivate skill. Run with npm run test:ui:all.
- Full suite:
npm run test:object-operations runs all CRUD and UI tests.
Requires .env at project root with WO_API_KEY or WO_TRIAL_API_KEY and WO_INSTANCE_URL. See tests/scripts/crud/README.md and tests/scripts/ui-operations/README.md.
📚 Documentation
📝 License
Apache-2.0 — See LICENSE for details.
👨💻 Author
Markus van Kempen — markus.van.kempen@gmail.com
31-Mar-2026
| |