notion-cli, what is it ?
notion-cli is designed to automate certain tasks that can be tedious on Notion.
Requirements
You will need at least :
- A
.env file in your project root folder as notion-cli will load environment variables through dotenv and this file. We expect to have your notion api keys in this file. For example :
NOTION_CODIGO_KEY="secret_xxxxxxxxxxxxxxxxxxxxxxxx"
NOTION_OTHER_KEY="secret_xxxxxxxxxxxxxxxxxxxxxxxx"
- A json config file. You will say in that file what key you want to use. His content will depend on the actions you want to perform. See below.
Caution when trying to access users in Notion
Careful with your notion api key, if you want to use data with users, even if it's just a technical id, you need to set your connection/integration to have access to notion workspace users.
Go to your connection/integration settings in notion.
Caution when trying to access other databases
Careful if you want to read/edit data with relations on other databases, you have to add the Connection to theses databases too. If you don't do that, Notion api will not throw an error but will return an empty data.
For example, if you get data with a relation type property and don't have access to it, you can receive something like that :
      "My property name": {
        "id": "xxxxx",
        "type": "relation",
        "relation": [],
        "has_more": false
      },
instead of something like that...
      "My property name": {
        "id": "xxxxx",
        "type": "relation",
        "relation": [
          {
            "id": "6b756a09-7502-43a1-8efa-c308eb7d5c23"
          },
          {
            "id": "1513cc27-80a2-4c54-9234-f281f1b53cd6"
          }],
        "has_more": false
      },
So, check this before reading the next lines :)
Features
Duplicate a week on your database many times
You can prepare a week in your database following some requirements, then duplicate this week on a given period. Very practical if you want to set up a recurring schedule over several months.
Demo
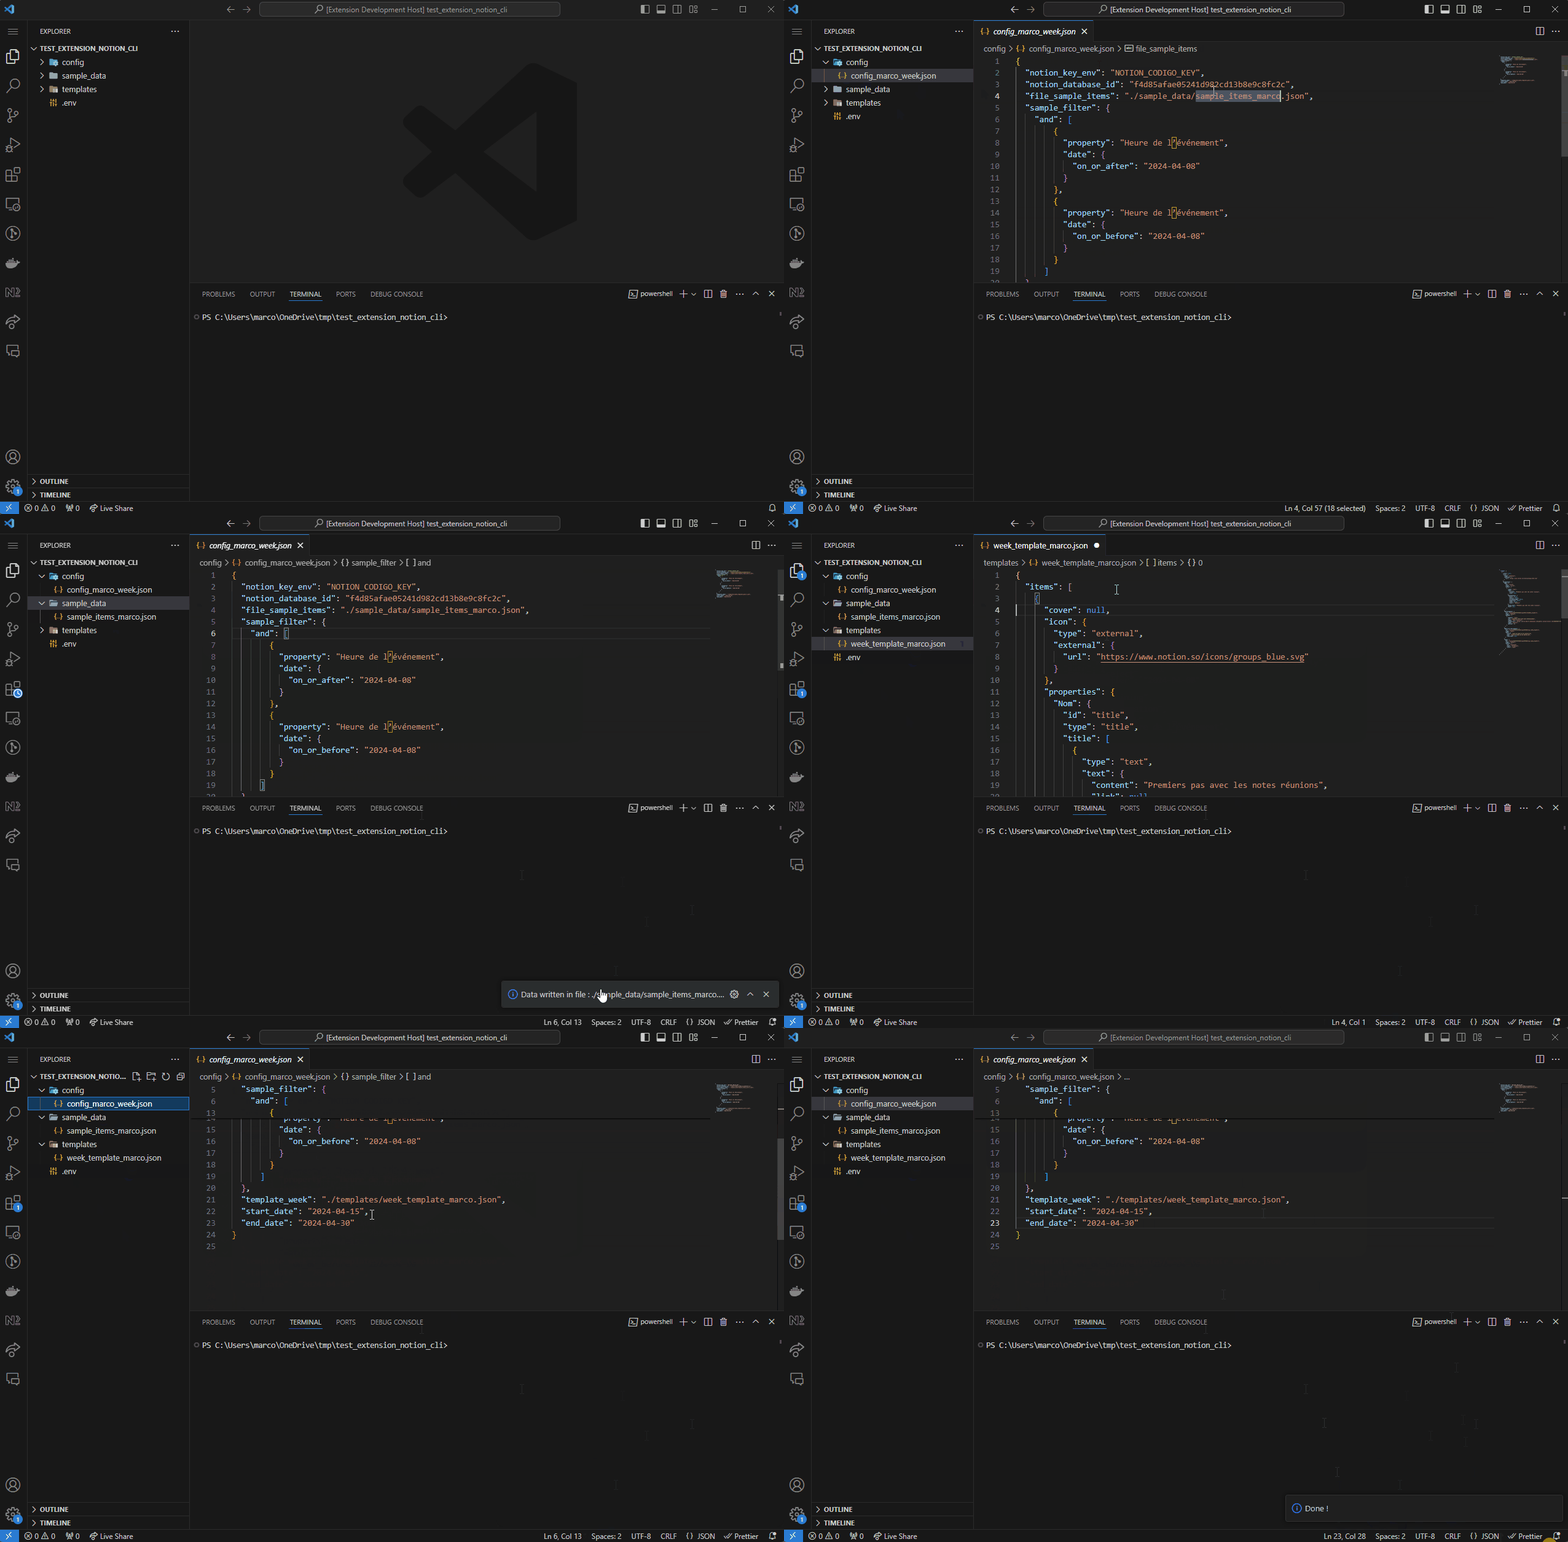
Get file sample, use it to make a template, set days_add and easily duplicate on Notion

Step 1
First you will need a config file like this :
{
  "notion_key_env": "NOTION_CODIGO_KEY",
  "notion_database_id": "xxxxxxxxxxxxxxxxxxxxxxxxxxxxxxxx",
  "file_sample_items": "./sample_items_marco.json",
  "sample_filter": {
    "and": [
        {
          "property": "MyDateTimeProperty",
          "date": {
            "on_or_after": "2024-04-08"
          }
        },
        {
          "property": "MyDateTimeProperty",
          "date": {
            "on_or_before": "2024-04-08"
          }
        }
      ]
  },
  "template_week": "./week_template_marco.json",
  "start_date": "2024-04-15",
  "end_date": "2024-04-30"
}
For convenience, we will call this file CFG.
By now, the only things you need to know is :
- notion_key_env: this is the name of the environment variable you created earlier in your .env file. This is how we say what API key to use.
- notion_database_id: this is the id of the database concerned.
- file_sample_items: this is the worskpace path to the sample file. This file will be created automatically.
- sample_filter: this is the retrieval filter for the week that will serve as our model, the famous sample that will go later into the file_sample_items file. Change the name of the MyDateTimeProperty to your datetime property on which we'll filter the data. You can find this name in Notion, on your database properties. Modify the two dates that make up the period. Please note that the dates are in YYY-MM-DD format and the start and end dates are inclusive (on_or_after and on_or_before).
Step 2
So we'll first (and only) create the first week we want to duplicate on Notion. This will be the reference week. However, keep in mind that for an event, you'll be able to specify which days to duplicate. So it's not necessary to enter every single occurrence.
For example, let's imagine an event on Monday, Tuesday, Wednesday and Friday from 9am to 10am. You just need to create it once a week, on Monday for example, with the right times and the right information. There's no need to create the other occurrences. Later, you can tell via the template to duplicate it on Monday, Tuesday, Wednesday and Friday (see days_add below).
Note that the event will be duplicated in its entirety, with only the start and end dates changing. So, if any information changes (a manager's name, for example), a dedicated occurrence is required.
Warning: Processing will only modify dates if there is a start and end date. When you create the data, make sure you specify a date field with an end date and time.
Once you're ready, you can go to step 3.
Step 3
Open CFG file, and hit F1 then write nocli-cal and choose the sample action.
If everything is fine, you will see your file_sample_items file appears in your workspace with your database items on it.
Step 4
Create a json file with this content :
{
  "items": []
}
Copy paste the sample items content to replace items value ([]).
Now, for every items, add a days_add property like below.
This property is an array of days on which to copy the item. 0 being the first day. In the example below, this item will be created on monday and thursday (0=monday, 3=thursday).
{
  "items":
    [
      {
        "days_add": [0, 3],
        "cover": null,
        "icon": {
          "type": "external",
          "external": {
            "url": "https://www.notion.so/icons/groups_blue.svg"
          }
        },
        "properties": {
          "Nom": {
            "id": "title",
            "type": "title",
            "title": [
    ...
Then set those values on CFG file.
- template_week: this is the worskpace path of the template file you just created.
- start_date: this is the date on which we'll start creating elements, so in general it'll be the Monday of the week in question.
- end_date: this is the date on which we stop creating elements.
Step 5
Open the CFG file, and hit F1 then write nocli-cal and choose the template action.
When process runs, you have a progress bar below, and it is over, you can check on Notion your items created. API is kind of slow, so it can take one to three minutes to create items for 4 months for example. Depends on your week items.
Edit text on your database
Let's say you have a database with a text value that you want to change, based on some criteria. With the nocli-db commands you can achieve this.
Here are the fields type we can handle so far (hope so) :
- title
- rich_text
- email
- phone_number
- url
- checkbox
- number
- select
- multi_select
- status
- relation
- people
You have a full configuration example at the end of this chapter.
Demo
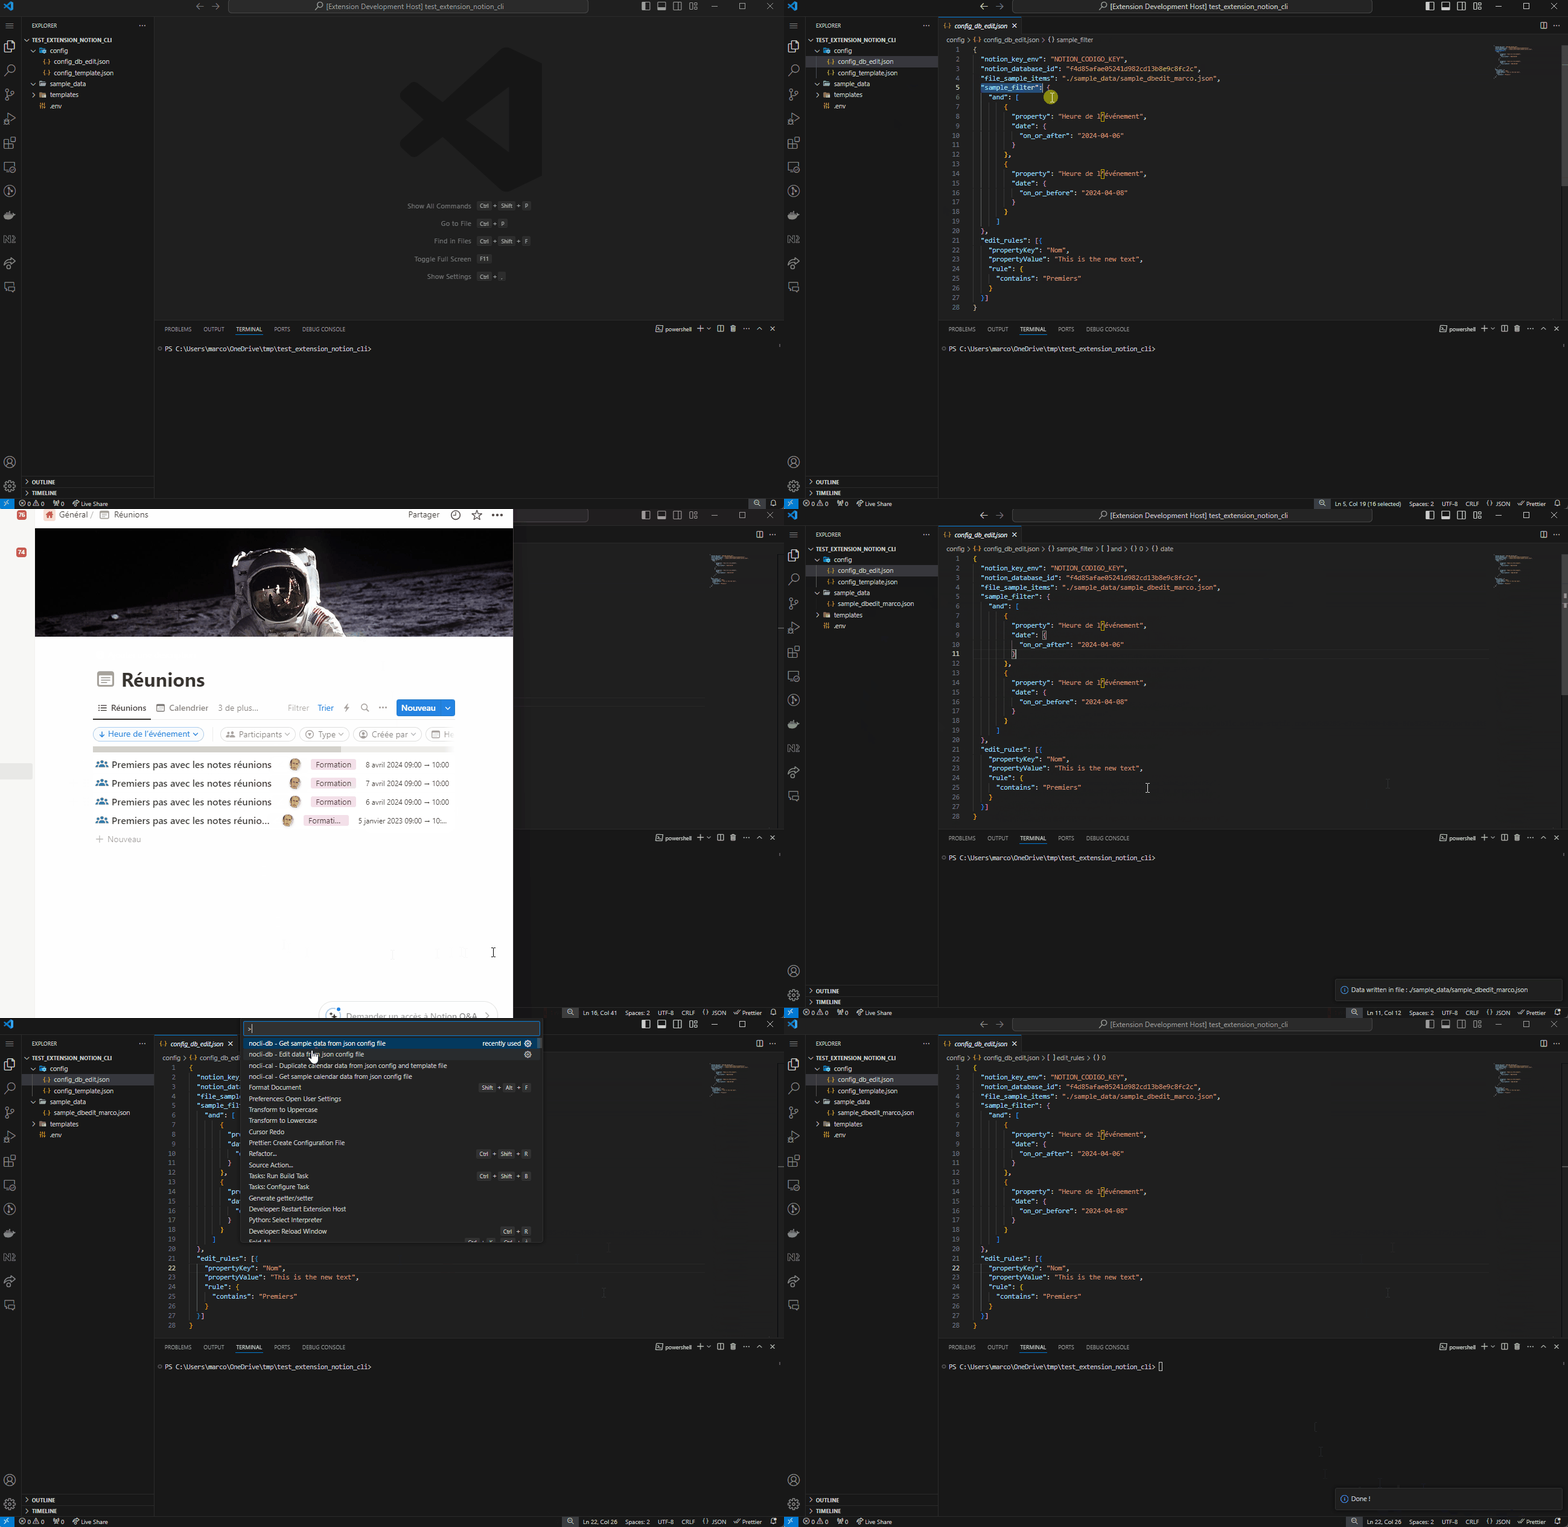
Get file sample, use it to check if data is ok then run edit to apply on Notion.

Step 1
First you will need a config file like this :
{
  "notion_key_env": "NOTION_CODIGO_KEY",
  "notion_database_id": "f4d85afae05241d982cd13b8e9c8fc2c",
  "file_sample_items": "./sample_data/sample_dbedit_marco.json",
  "sample_filter": {
    "and": [
        {
          "property": "MyDateTimeProperty",
          "date": {
            "on_or_after": "2024-04-08"
          }
        },
        {
          "property": "MyDateTimeProperty",
          "date": {
            "on_or_before": "2024-04-08"
          }
        },
        {
          "property": "Nom",
          "title": {
            "contains": "notes"
          }
        }
      ]
  },
  "edit_rules": [{
    "propertyKey": "Nom",
    "propertyValue": "This is the new text",
    "rule": {
      "contains": "notes"
    }
  }]
}
For convenience, we will call this file CFG.
By now, the only things you need to know it's :
- notion_key_env: this is the name of the environment variable you created earlier in your .env file. This is how we say what API key to use.
- notion_database_id: this is the id of the database concerned.
- file_sample_items: this is the worskpace path to the sample file. This file will be created automatically.
- sample_filter: this is the retrieval filter for database items you want to modify. You can change the filter to ease your needs. This filter will be used to get data for the edit command, that's why it is recommanded to test it... follow step 2.
Step 2
So we want to modify database data based on some criteria. It is a good practice to test our filter before running the nocli-db edit command.
Once, you have wrote your CFG file with the right values (keep edit_rules has it is for now), open it and hit F1 then write nocli-db and choose the sample action.
If everything is fine, you will see your file_sample_items file appears in your workspace with your database items on it.
Check that this is the data you wanted or add some more filtering.
Step 3
We need to set the rules for editing. So, we go in CFG file and set edit_rules property.
edit_rules is an Array where you can put your rules.
A rule is defined by :
- a propertyKey : the key name of your property. You can find it in Notion, in database properties.
- a propertyValue : the new value to set
- a rule : an object that define the condition. If true, we set the new value.
Rule object can have one of these properties :
- eq : means that value must be equal to xxx
- neq : means that value must not be equal xxx
- contains : means that value must contain xxx
Better to understand with an example :)
Let's say we have this edit_rules configuration :
  "edit_rules": [{
    "propertyKey": "Nom",
    "propertyValue": "This is the new text",
    "rule": {
      "contains": "notes"
    }
  }]
It means that if we process a database item with a property named "Nom", with a text that contains notes, all his text will be replaced by This is the new text.
If the rule is not met, nothing is done.
If one of the rules is satisfied, the modification applies.
Step 4
Once, you are done with your edit rules, you can launch the process.
Note, that you should test it on a small set before running in the real scope.
Open the CFG file, and hit F1 then write nocli-db and choose the edit action.
When process runs, you have a progress bar below, and it is over, you can check on Notion your items updated.
Config example for different type of fields
Here is an example of configuration for different type of fields
{
      notion_key_env: "NOTION_CODIGO_KEY",
      notion_database_id: "f4d85afae05241d982cd13b8e9c8fc2c",
      file_sample_items: "./sample_data/sample_dbedit_marco.json",
      sample_filter: {
        and: [
          {
            property: "xxx",
            date: {
              on_or_after: "2024-04-08",
            },
          },
          {
            property: "xxx",
            date: {
              on_or_before: "2024-04-08",
            },
          },
        ],
      },
      edit_rules: [
        {
          propertyKey: "title field",
          propertyValue: "This is the new text",
          rule: {
            contains: "premiers",
          },
        },
        {
          propertyKey: "rich_text field",
          propertyValue: "Travail sur le sprint",
          rule: {
            eq: "Travail sur la roadmap",
          },
        },
        {
          propertyKey: "email field",
          propertyValue: "john.doe@gmail.com",
          rule: {
            eq: null,
          },
        },
        {
          propertyKey: "phone_number field",
          propertyValue: "XX XX XX XX",
          rule: {
            contains: "01 22 33 44 55",
          },
        },
        {
          propertyKey: "checkbox field",
          propertyValue: false,
          rule: {
            eq: true,
          },
        },
        {
          propertyKey: "url field",
          propertyValue: "https://azure.microsoft.com/fr-fr/products/devops",
          rule: {
            eq: "https://www.codigo.best",
          },
        },
        {
          propertyKey: "relation field",
          propertyValue: "cc155270-9d15-41a5-93b8-b1a6e2af4952",
          rule: {
            eq: "7431aee3-8e8b-48fc-9eee-14fb9583a954",
          },
        },
        {
          propertyKey: "select field",
          propertyValue: {
            id: "training",
            name: "Réunion",
            color: "red",
          },
          rule: {
            eq: {
              id: "training",
              name: "Formation",
              color: "pink",
            },
          },
        },
        {
          propertyKey: "number field",
          propertyValue: 456,
          rule: {
            eq: 123,
          },
        },
        {
          propertyKey: "status field",
          propertyValue: {
            id: "xxxxxxxxxxxxxxxxx",
            name: "Terminé",
            color: "yellow",
          },
          rule: {
            eq: {
              id: "106e0828-d896-438b-82e9-b4f635804d8d",
              name: "En cours",
              color: "blue",
            },
          },
        },
        {
          propertyKey: "people field",
          propertyValue: {
            object: "user",
            id: "yyyyyyyyyyyyyyyyyyyyyyyyyyyyy",
            name: "alan smithee",
            avatar_url: "xxxxxxxxxxxxxxx.png",
            type: "person",
            person: {},
          },
          rule: {
            eq: {
              object: "user",
              id: "xxxxxxxxxxxxxxxxxxxxxxxxxxxxxx",
              name: "marc flausino",
              avatar_url: "xxxxxxxxxxxxxxx.png",
              type: "person",
              person: {},
            },
          },
        },
        {
          propertyKey: "Multisel",
          propertyValue:   {
            id: "xxxxxxxx-xxxx-xxxx-xxxx-xxxxxxxxxx",
            name: "tutu",
            color: "yellow",
          },
          rule: {
            eq: {
              id: "43b0b618-8386-4b0b-83b8-c6b7283dc1be",
              name: "toto",
              color: "pink",
            },
          },
        },
      ],
    }
Extension Settings
No extension settings by now.
*
Known Issues
No issues by now.
Release Notes
0.0.1
- Initial release of notion-cli
0.0.2
- Minor bug fix on date check
0.0.3
- Added nocli-db commands to get sample and 'batch' edit data
0.0.4
- Fix progress bar view
- Added auto-refactor of notion uuid (auto add dash if there are not)
Author
Marc Flausino


