LoreLore source control inside Visual Studio. Onboard a solution or folder, see file status glyphs, commit, and manage a local Lore server without leaving the IDE. |

Lore for Visual Studio
Download this extension from the Visual Studio Marketplace or get the latest CI build from Open VSIX Gallery. Bring Lore source control directly into Visual Studio. Onboard a solution or folder, see file status at a glance, and commit - all without leaving the IDE or dropping to a terminal. Add a solution to LoreOpen the solution or folder, then click the Add to Source Control button on
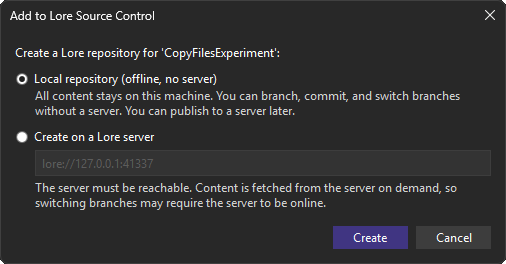
the Visual Studio status bar (bottom-right) and choose Lore. Choose Local repository (the default)
to create a fully offline repository where all content stays on your machine, so
you can branch, commit, and switch branches without a server. Choose Create on
a Lore server and enter a server URL (e.g.
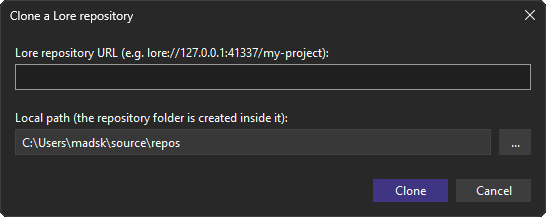
Clone an existing repositoryRight-click the solution node and choose Lore > Clone Lore Repository....
Paste a repository URL (e.g.
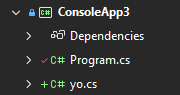
See status at a glanceOnce a solution is controlled, Visual Studio shows Lore status glyphs next to files in Solution Explorer. Saving a document refreshes its glyph automatically, and you can force a refresh any time with the Refresh button in the Lore Changes window.
Right-click a file under Lore for Undo Changes (revert edits to the
committed version), Compare with Unmodified (diff against the committed
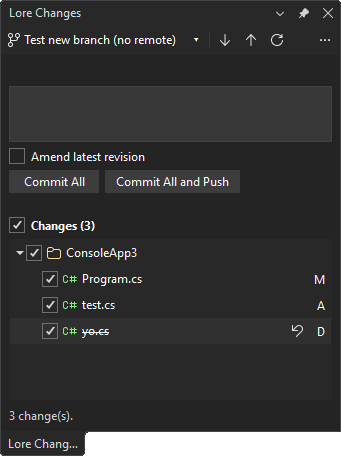
version), and Ignore and Untrack Item (adds it to Review and commit in the Lore Changes windowChoose Lore > Commit to Lore... to open a dedicated panel, similar to the built-in Git Changes window.
The window shows the current branch with incoming/outgoing indicators and arranges every changed file in a folder tree back to the repository root, each file showing a status badge (M, A, D, R, C) on the right. Renamed or moved files show an R badge, and hovering it reveals the path the file was moved from. Renames performed in Solution Explorer are tracked automatically. Changes made outside Visual Studio are detected through Visual Studio's shared file-change service and automatically refresh the window and editor status glyphs. From here you can:
Browse revision historyChoose Lore > View History... to open the Lore History tool window - a read-only log of the repository bound to the open solution or folder. It works fully offline against a local Lore repository and never changes your working tree. The window loads the newest revisions first, a page at a time, so a repository with thousands of revisions stays responsive. Each row shows the first line of the commit message, the short revision hash, the author, and the local commit time; hover a row to see the full message, revision number, branch, and date. When more revisions are available, a Load more button appends the next page.
The window follows the open workspace: switching solutions or folders re-resolves the repository automatically. When the current solution or folder is not under Lore source control, the window says so. The log does not reload every time the window regains focus. It refreshes on its own after a Lore operation performed in the extension changes history - a commit, a pull, or a branch switch, create, or merge - and when the open workspace changes. To reload it yourself at any time, click Refresh on the Lore History toolbar. Sign in to a serverAuthentication happens automatically, only when it is needed. When a clone, push, pull, or server-backed create fails because the Lore server requires sign-in (or a saved session has expired), Lore asks whether you want to sign in. Confirm and your default browser opens to complete sign-in; when it finishes, the original operation is retried. The session is stored by Lore, so later operations against the same server do not prompt again. There is no separate sign-in command - just run the operation you want, the same way Git prompts through its credential manager. Work with branchesClick the branch button (showing the current branch name) on the Lore Changes toolbar to open the branch picker. From there you can:
Switching and merging are offline-first: when the target branch's content is already cached locally they complete without a network round trip. Lore's local store is an LRU cache, so content can be evicted; if a switch or merge needs content that is no longer cached, it is fetched from the Lore server. When that content is missing and the server is unreachable, the operation reports a clear message asking you to start (or reconnect to) your Lore server and try again. SettingsConfigure everything under Tools > Options > Lore:
Get involvedFound a bug? Have an idea? Head to the issue tracker - pull requests are always welcome. |