Infracost Azure Pipelines integration
Try the Azure Repos App
👉👉 We recommend using the free Infracost Azure Repos App as it's much simpler to setup and faster to run
This project provides the Azure Pipeline integration for Infracost, so you can see cloud cost estimates and FinOps best practices for Terraform in pull requests 💰
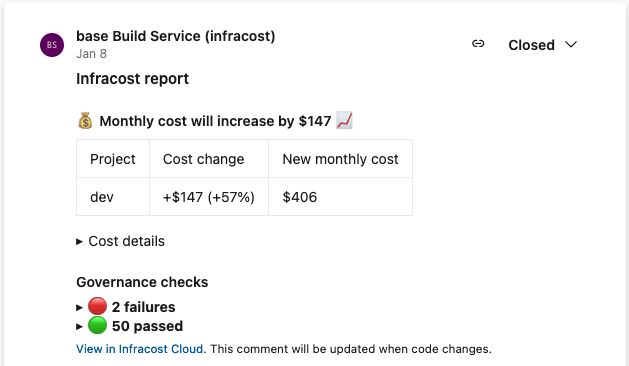
Table of contents
Quick start
The Azure Pipelines Infracost tasks can be used with either Azure Repos (only git is supported) or GitHub repos.
- In the Azure DevOps Marketplace, add the Infracost tasks to your organization by clicking 'Get it free', selecting your organization and clicking Install. If you do not have permission to install the task, you can submit a request to your organization's admin who will get emailed the details of the request.
- If you haven't done so already, download Infracost and run
infracost auth login to get a free API key.
- Retrieve your Infracost API key by running
infracost configure get api_key.
- If you are using an Azure Repos repositories follow the Azure Repos quick start. Currently this only supports Git repositories.
- If you are using a GitHub repository follow the GitHub Repos quick start
Azure Repos Quick start
Create a new pipeline, selecting:
- Azure Repos Git when prompted in the "Connect" stage
- Select the appropriate repo you wish to integrate Infracost with in the "Select" stage
- Choose "Starter Pipeline" in the "Configure" stage
- Replace the Starter Pipeline yaml with the following.
- select "Save" from the "Save and run" dropdown and add the appropriate commit message
# Infracost runs on pull requests and posts PR comments.
# If you use Infracost Cloud, Infracost also runs on main/master branch pushes so the dashboard is updated.
# The Azure Pipelines docs (https://docs.microsoft.com/en-us/azure/devops/pipelines/process/tasks) describe other trigger options.
pr:
- '*'
trigger:
  branches:
    include:
    - main
    - master

variables:
  # If you use private modules you'll need this env variable to use
  # the same ssh-agent socket value across all steps.
  - name: SSH_AUTH_SOCK
    value: /tmp/ssh_agent.sock
  # If you store Terraform variables or modules in a 3rd party such as (e.g. TFC or Spacelift),
  # specify the following so Infracost can automatically retrieve them.
  # See https://www.infracost.io/docs/features/terraform_modules/#registry-modules for details.
  # - name: INFRACOST_TERRAFORM_CLOUD_TOKEN
  #   value: $(tfcToken)
  # - name: INFRACOST_TERRAFORM_CLOUD_HOST
  #   value: app.terraform.io

jobs:
  # Run Infracost on pull requests
  - job: infracost_pull_request_checks
    condition: and(succeeded(), eq(variables['Build.Reason'], 'PullRequest'))
    displayName: Run Infracost on pull requests
    pool:
      vmImage: ubuntu-latest # This pipeline works on windows-latest too

    steps:
      # If you use private git SSH modules, add a base 64 encoded secret
      # called gitSshKeyBase64 with your private key, so Infracost can access
      # private repositories (similar to how Terraform/Terragrunt does).
      # - bash: |
      #     ssh-agent -a $(SSH_AUTH_SOCK)
      #     mkdir -p ~/.ssh
      #     echo "$(echo $GIT_SSH_KEY_BASE_64 | base64 -d)" | tr -d '\r' | ssh-add -
      #     # Update this to github.com, gitlab.com, bitbucket.org, ssh.dev.azure.com or your source control server's domain
      #     ssh-keyscan ssh.dev.azure.com >> ~/.ssh/known_hosts
      #   displayName: Add GIT_SSH_KEY
      #   env:
      #     GIT_SSH_KEY_BASE_64: $(gitSshKeyBase64)

      # Install the Infracost CLI, see https://github.com/infracost/infracost-azure-devops#infracostsetup
      - task: InfracostSetup@2
        displayName: Setup Infracost
        inputs:
          apiKey: $(infracostApiKey)

      # Clone the base branch of the pull request (e.g. main/master) into a temp directory.
      - bash: |
          git -c http.extraheader="Authorization: Bearer $(System.AccessToken)" clone $(Build.Repository.Uri) --branch=$(System.PullRequest.TargetBranchName) --single-branch /tmp/base
        displayName: Checkout base branch

      # Generate an Infracost cost estimate baseline from the comparison branch, so that Infracost can compare the cost difference.
      - bash: |
          cd /tmp/base
          infracost breakdown --path=. \
            --format=json \
            --out-file=/tmp/infracost-base.json
        displayName: Generate Infracost cost estimate baseline
        env:
          SYSTEM_ACCESSTOKEN: $(System.AccessToken)

      # Generate an Infracost diff and save it to a JSON file.
      - bash: |
          cd -
          infracost diff --path=. \
            --format=json \
            --compare-to=/tmp/infracost-base.json \
            --out-file=/tmp/infracost.json
        displayName: Generate Infracost diff
        env:
          SYSTEM_ACCESSTOKEN: $(System.AccessToken)

      # Add a cost estimate comment to a Azure Repos pull request.
      - bash: |
          infracost comment azure-repos \
            --path=/tmp/infracost.json \
            --azure-access-token=$(System.AccessToken) \
            --pull-request=$(System.PullRequest.PullRequestId) \
            --repo-url=$(Build.Repository.Uri) \
            --behavior=update
        displayName: Post PR comment
        env:
          SYSTEM_ACCESSTOKEN: $(System.AccessToken)

  # The following job is needed when using Infracost Cloud
  - job: infracost_cloud_update
    displayName: Update Infracost Cloud
    condition: and(succeeded(), in(variables['Build.Reason'], 'IndividualCI', 'BatchedCI'))
    pool:
      vmImage: ubuntu-latest # This pipeline works on windows-latest too

    steps:
      # If you use private git SSH modules, add a base 64 encoded secret
      # called gitSshKeyBase64 with your private key, so Infracost can access
      # private repositories (similar to how Terraform/Terragrunt does).
      # - bash: |
      #     ssh-agent -a $(SSH_AUTH_SOCK)
      #     mkdir -p ~/.ssh
      #     echo "$(echo $GIT_SSH_KEY_BASE_64 | base64 -d)" | tr -d '\r' | ssh-add -
      #     # Update this to github.com, gitlab.com, bitbucket.org, ssh.dev.azure.com or your source control server's domain
      #     ssh-keyscan github.com >> ~/.ssh/known_hosts
      #   displayName: Add GIT_SSH_KEY
      #   env:
      #     GIT_SSH_KEY_BASE_64: $(gitSshKeyBase64)

      # Install the Infracost CLI, see https://github.com/infracost/infracost-azure-devops#infracostsetup
      - task: InfracostSetup@2
        displayName: Setup Infracost
        inputs:
          apiKey: $(infracostApiKey)

      - bash: |
          PATTERN="Merged PR ([0-9]+):"
          if [[ "$(Build.SourceVersionMessage)" =~ $PATTERN ]]; then
            PR_ID=${BASH_REMATCH[1]}
            echo "Updating status of $PR_ID"
            curl \
              --request POST \
              --header "Content-Type: application/json" \
              --header "X-API-Key: $(infracostApiKey)" \
              --data "{ \"query\": \"mutation {updatePullRequestStatus( url: \\\"$(Build.Repository.Uri)/pullrequest/${PR_ID}\\\", status: MERGED )}\" }" \
              "https://dashboard.api.infracost.io/graphql";
          else
            echo "Nothing to do as the commit message did not contain a merged PR ID."
          fi
        displayName: 'Update PR status in Infracost Cloud'

      - bash: |
          infracost breakdown \
            --path=. \
            --format=json \
            --out-file=/tmp/infracost.json

          infracost upload --path=/tmp/infracost.json || echo "Always pass main branch runs even if there are policy failures"
        displayName: 'Run Infracost on default branch and update Infracost Cloud'
        env:
          SYSTEM_ACCESSTOKEN: $(System.AccessToken)
Enable pull request build triggers. Without this, Azure Pipelines do not trigger builds with the pull request ID, thus comments cannot be posted by the integration.
- From your Azure DevOps organization, click on your project > Project Settings > Repositories
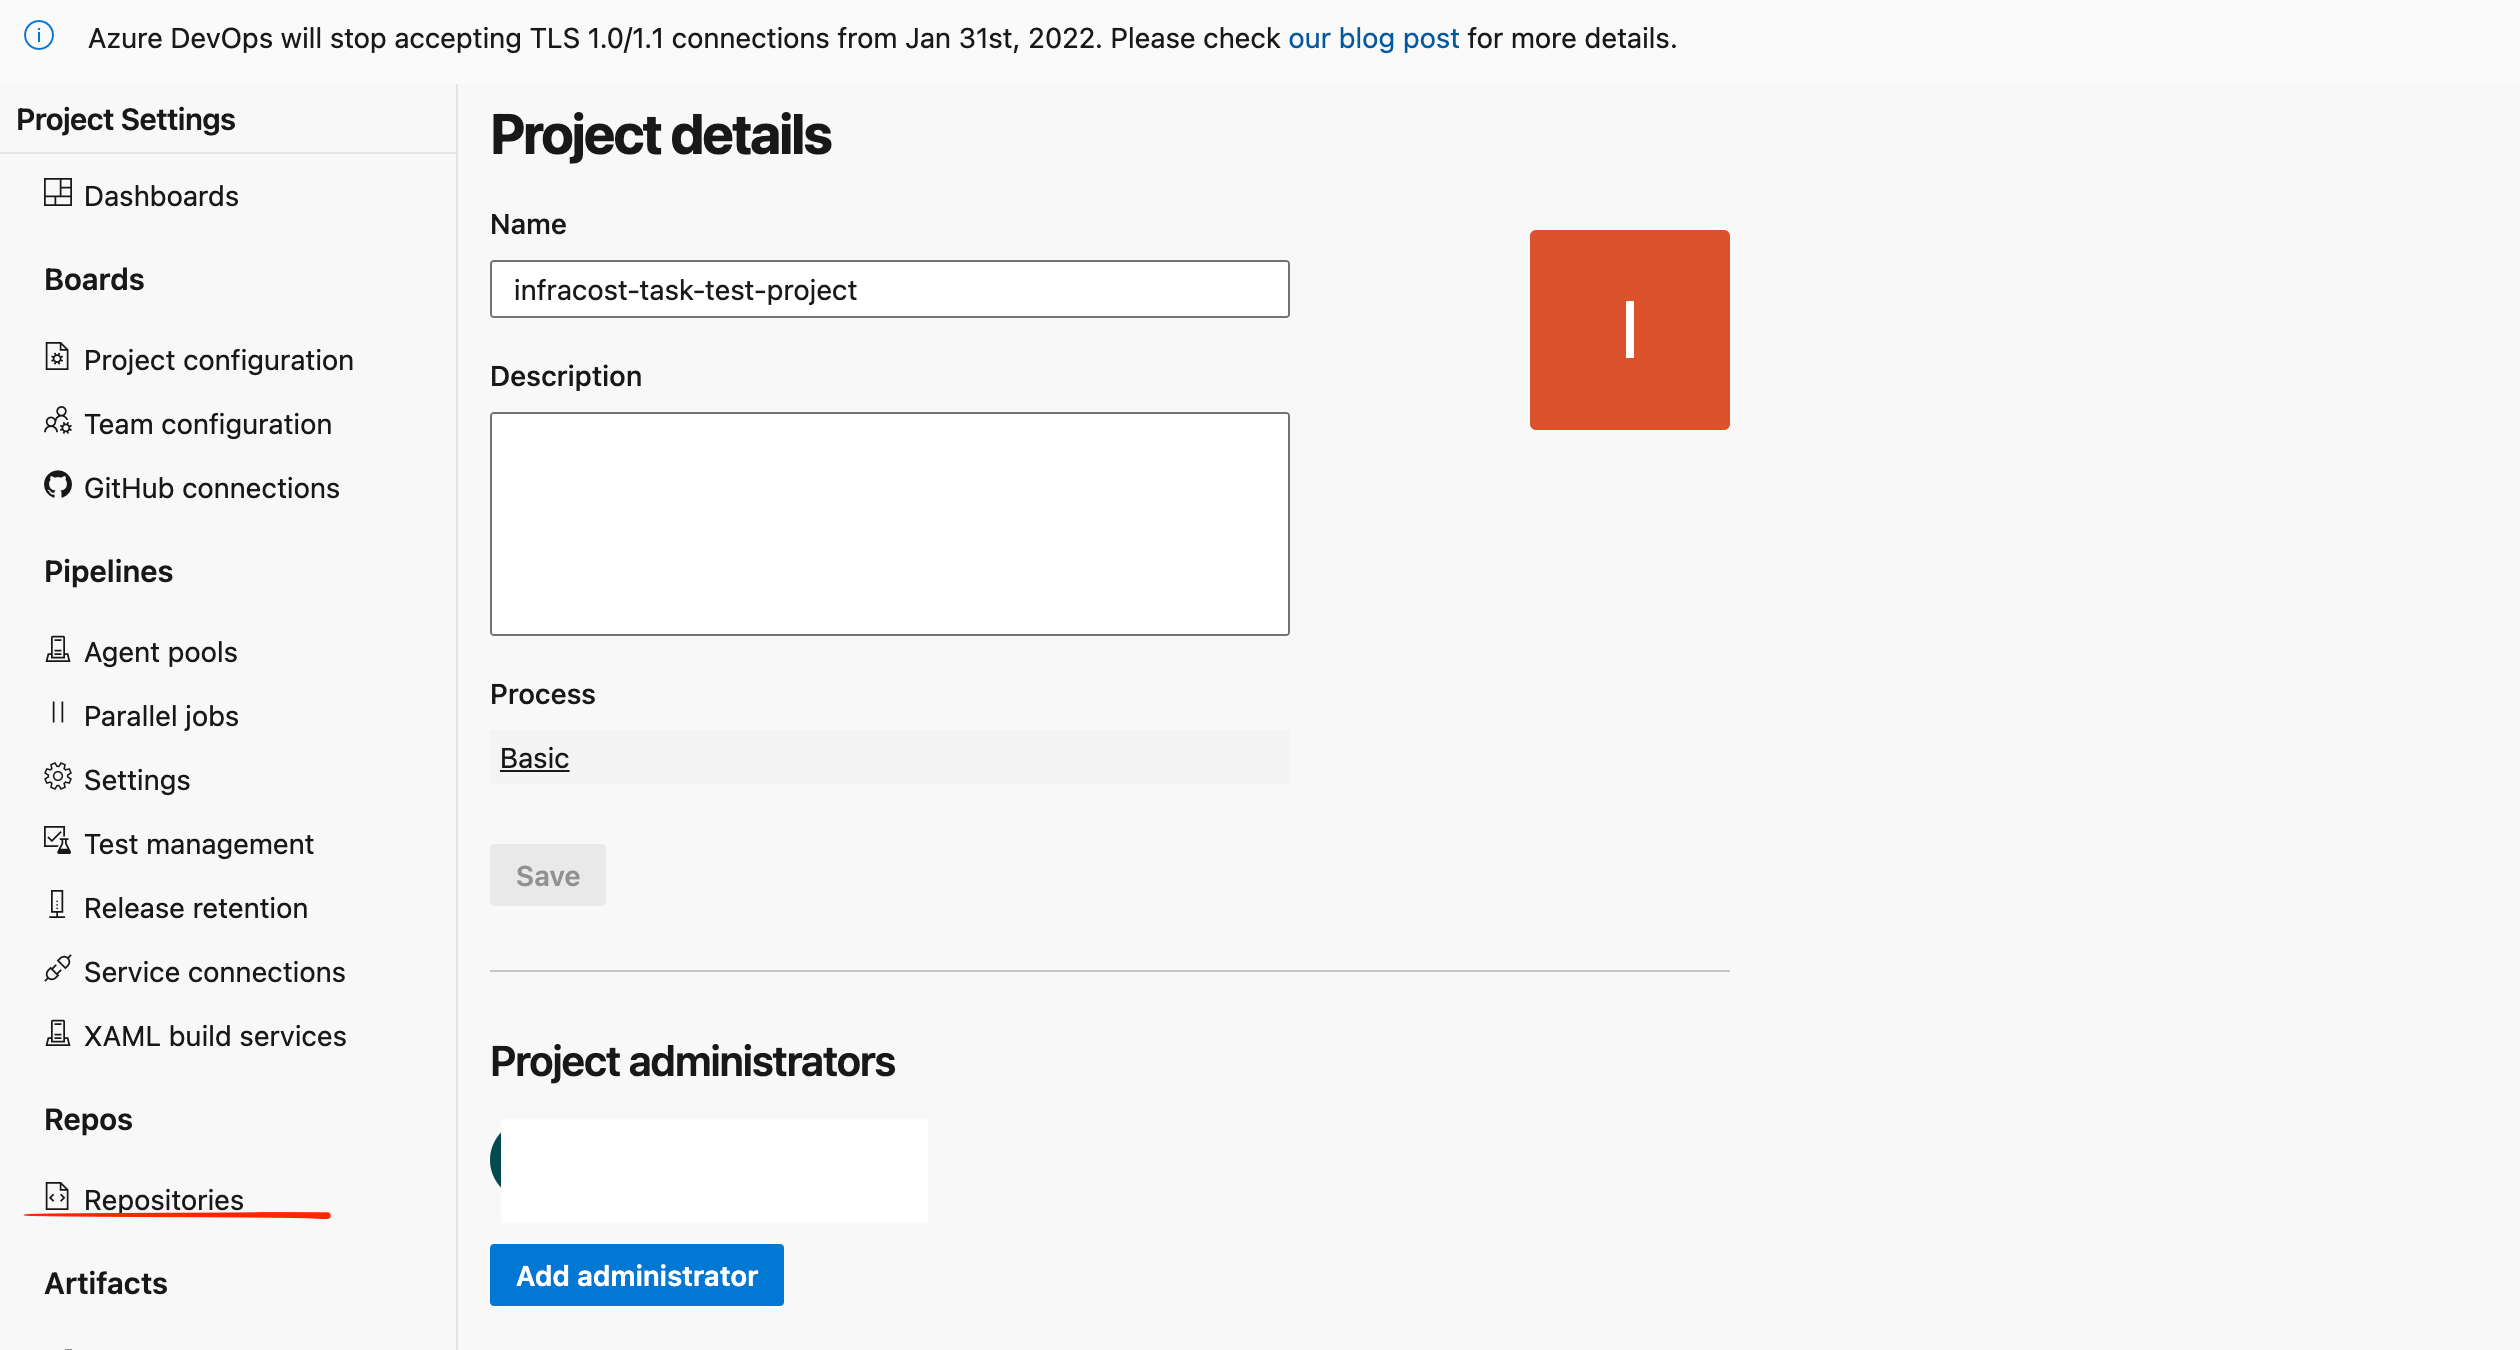
- Select the repository that your created the pipeline for in step 1

- Select the Policies tab and under the Branch Policies select on your default branch (master or main)
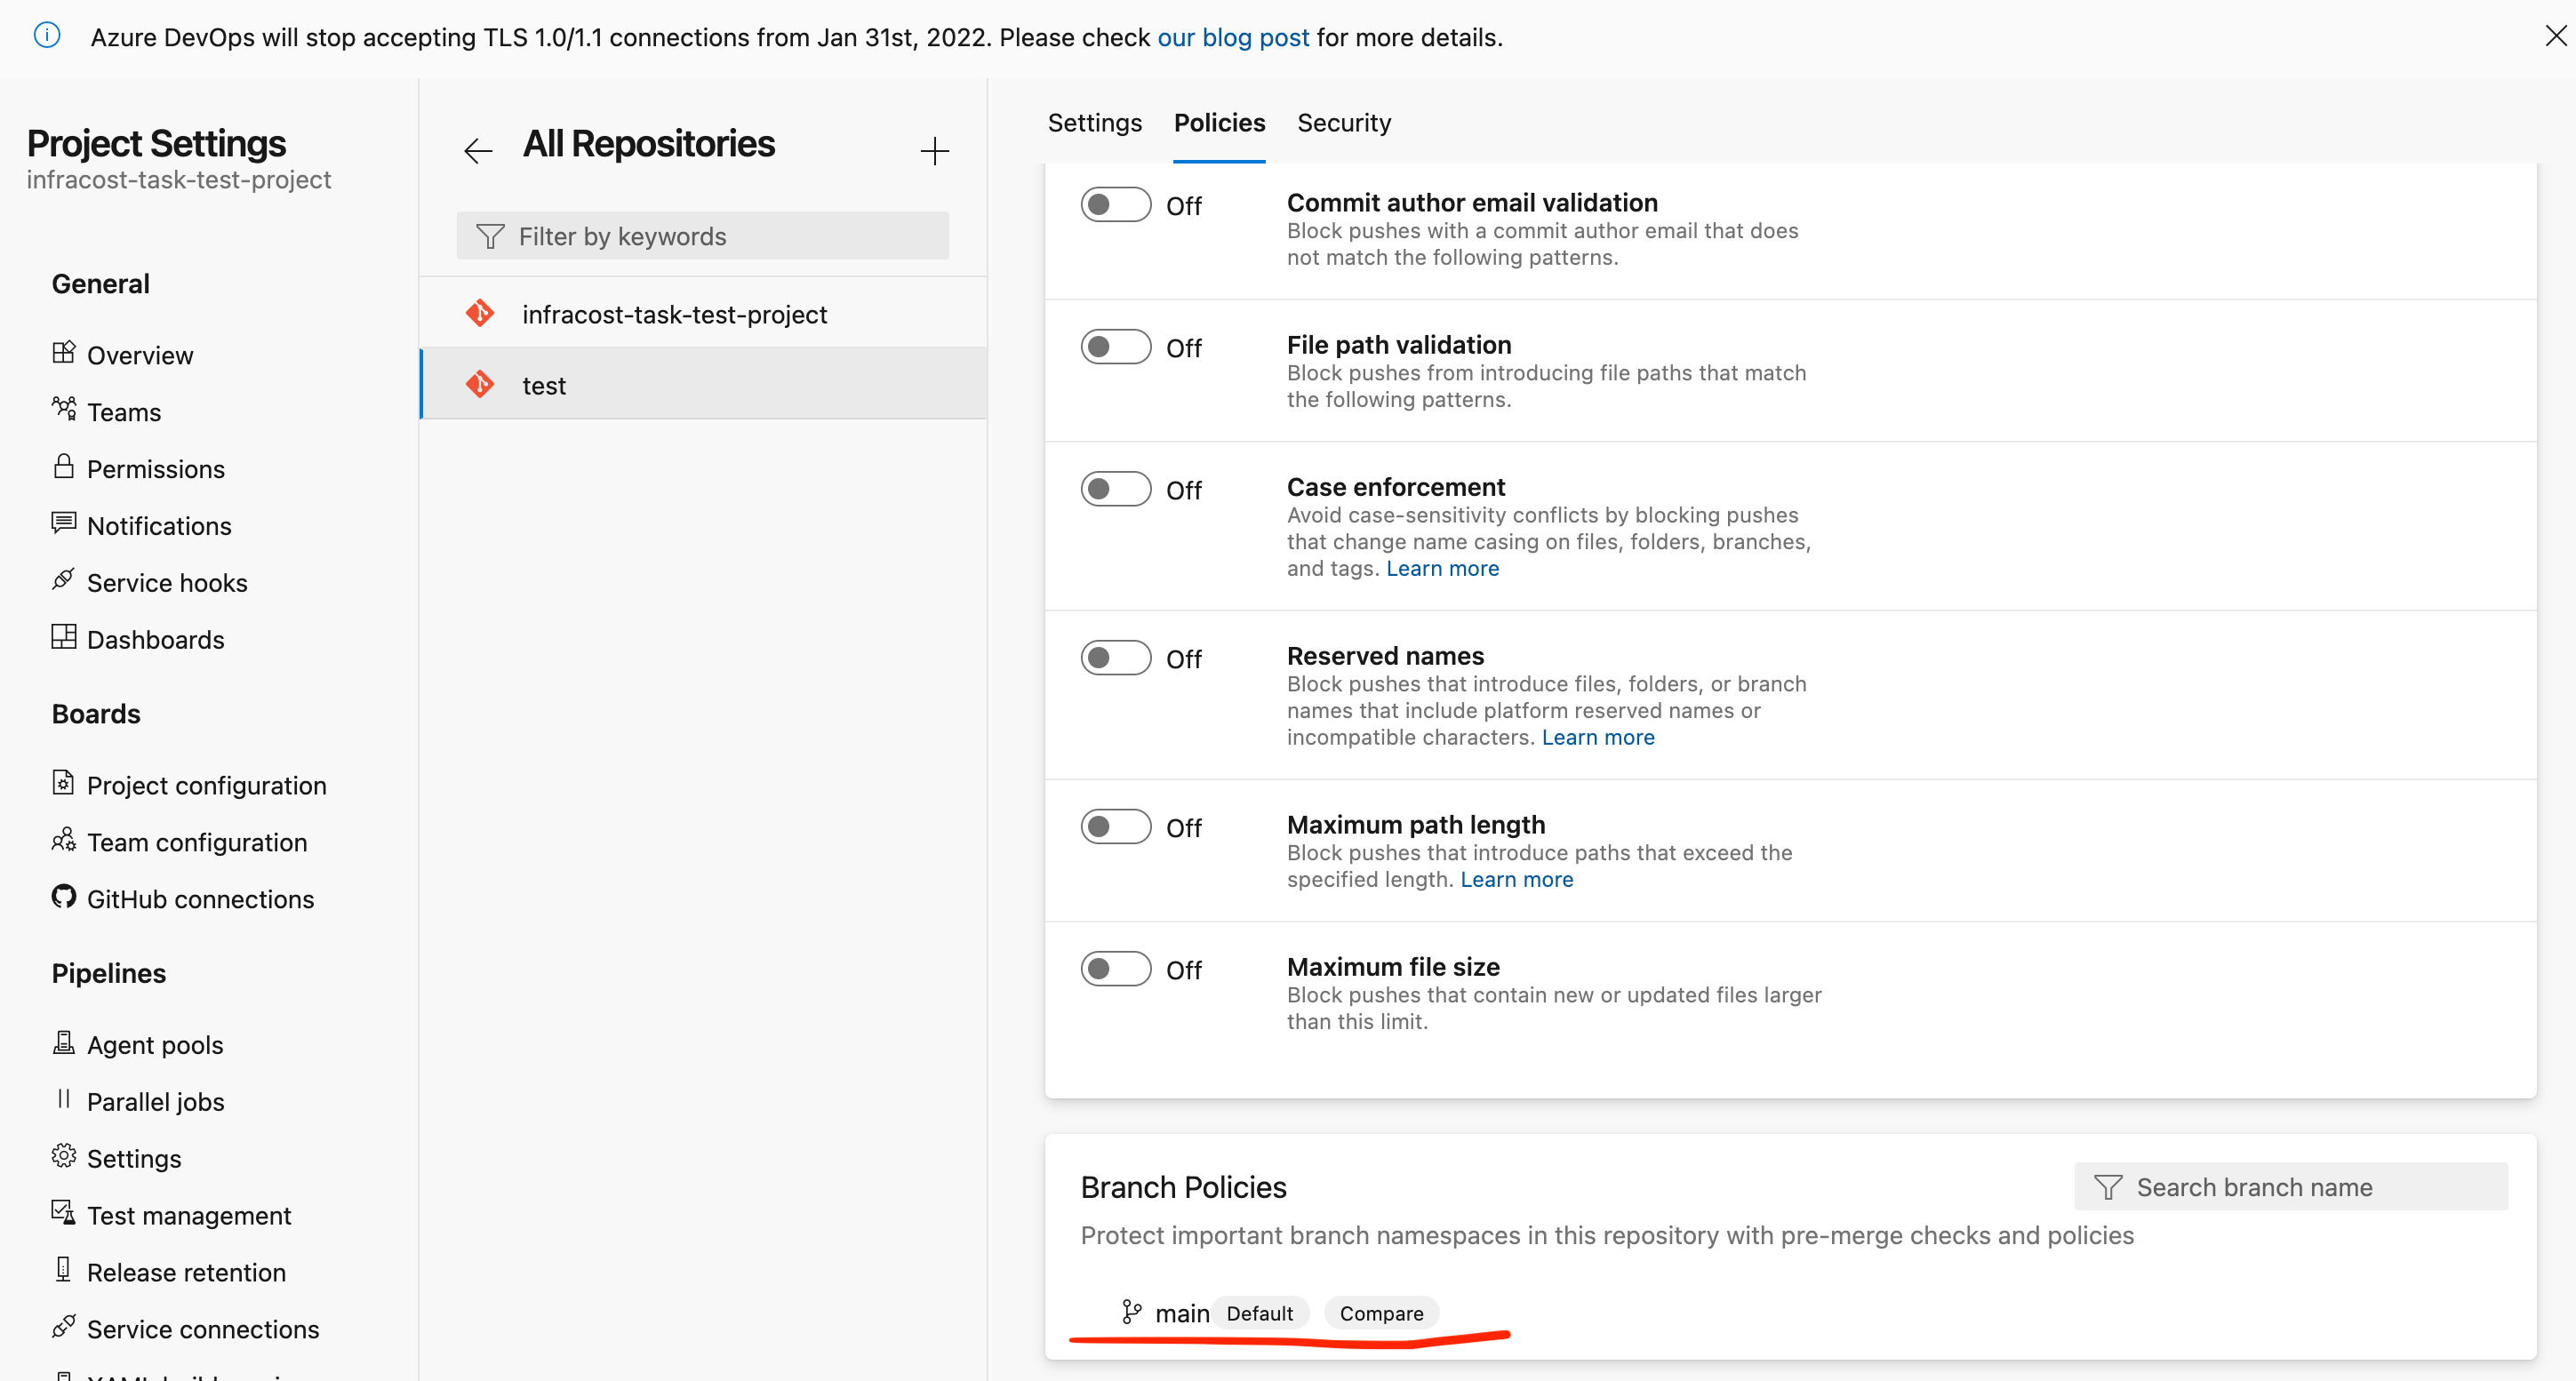
- Scroll to Build Validation and click + sign to add one if you don't have one already
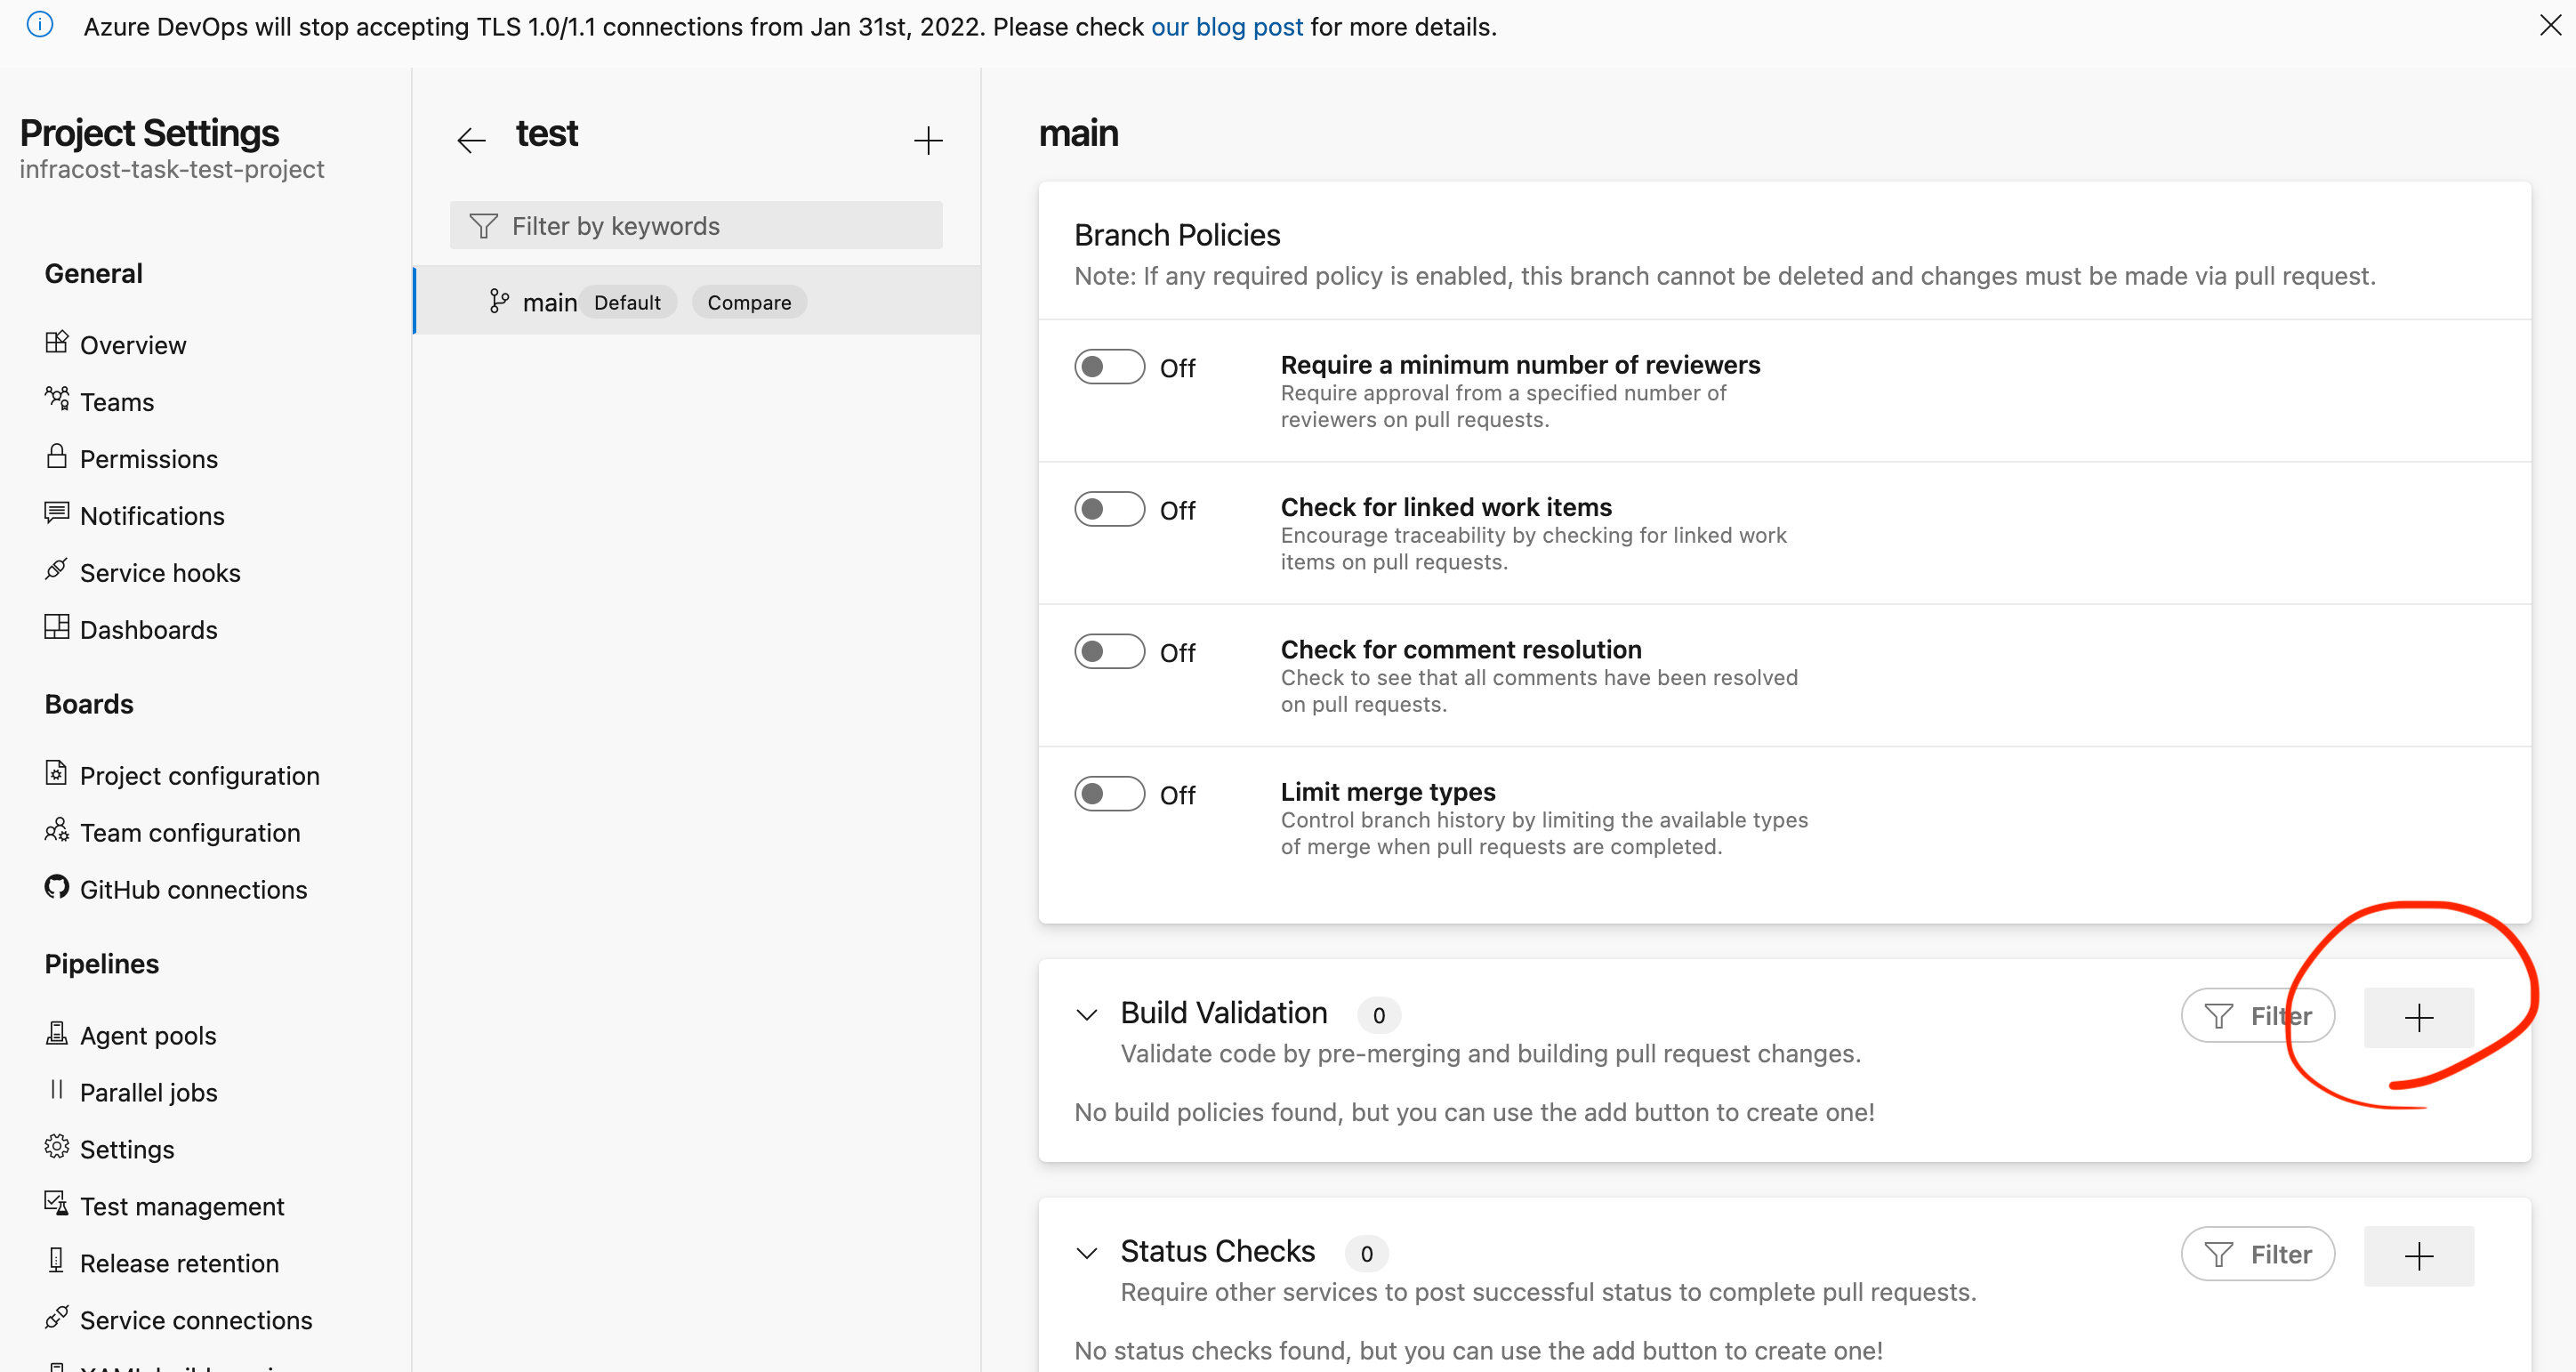
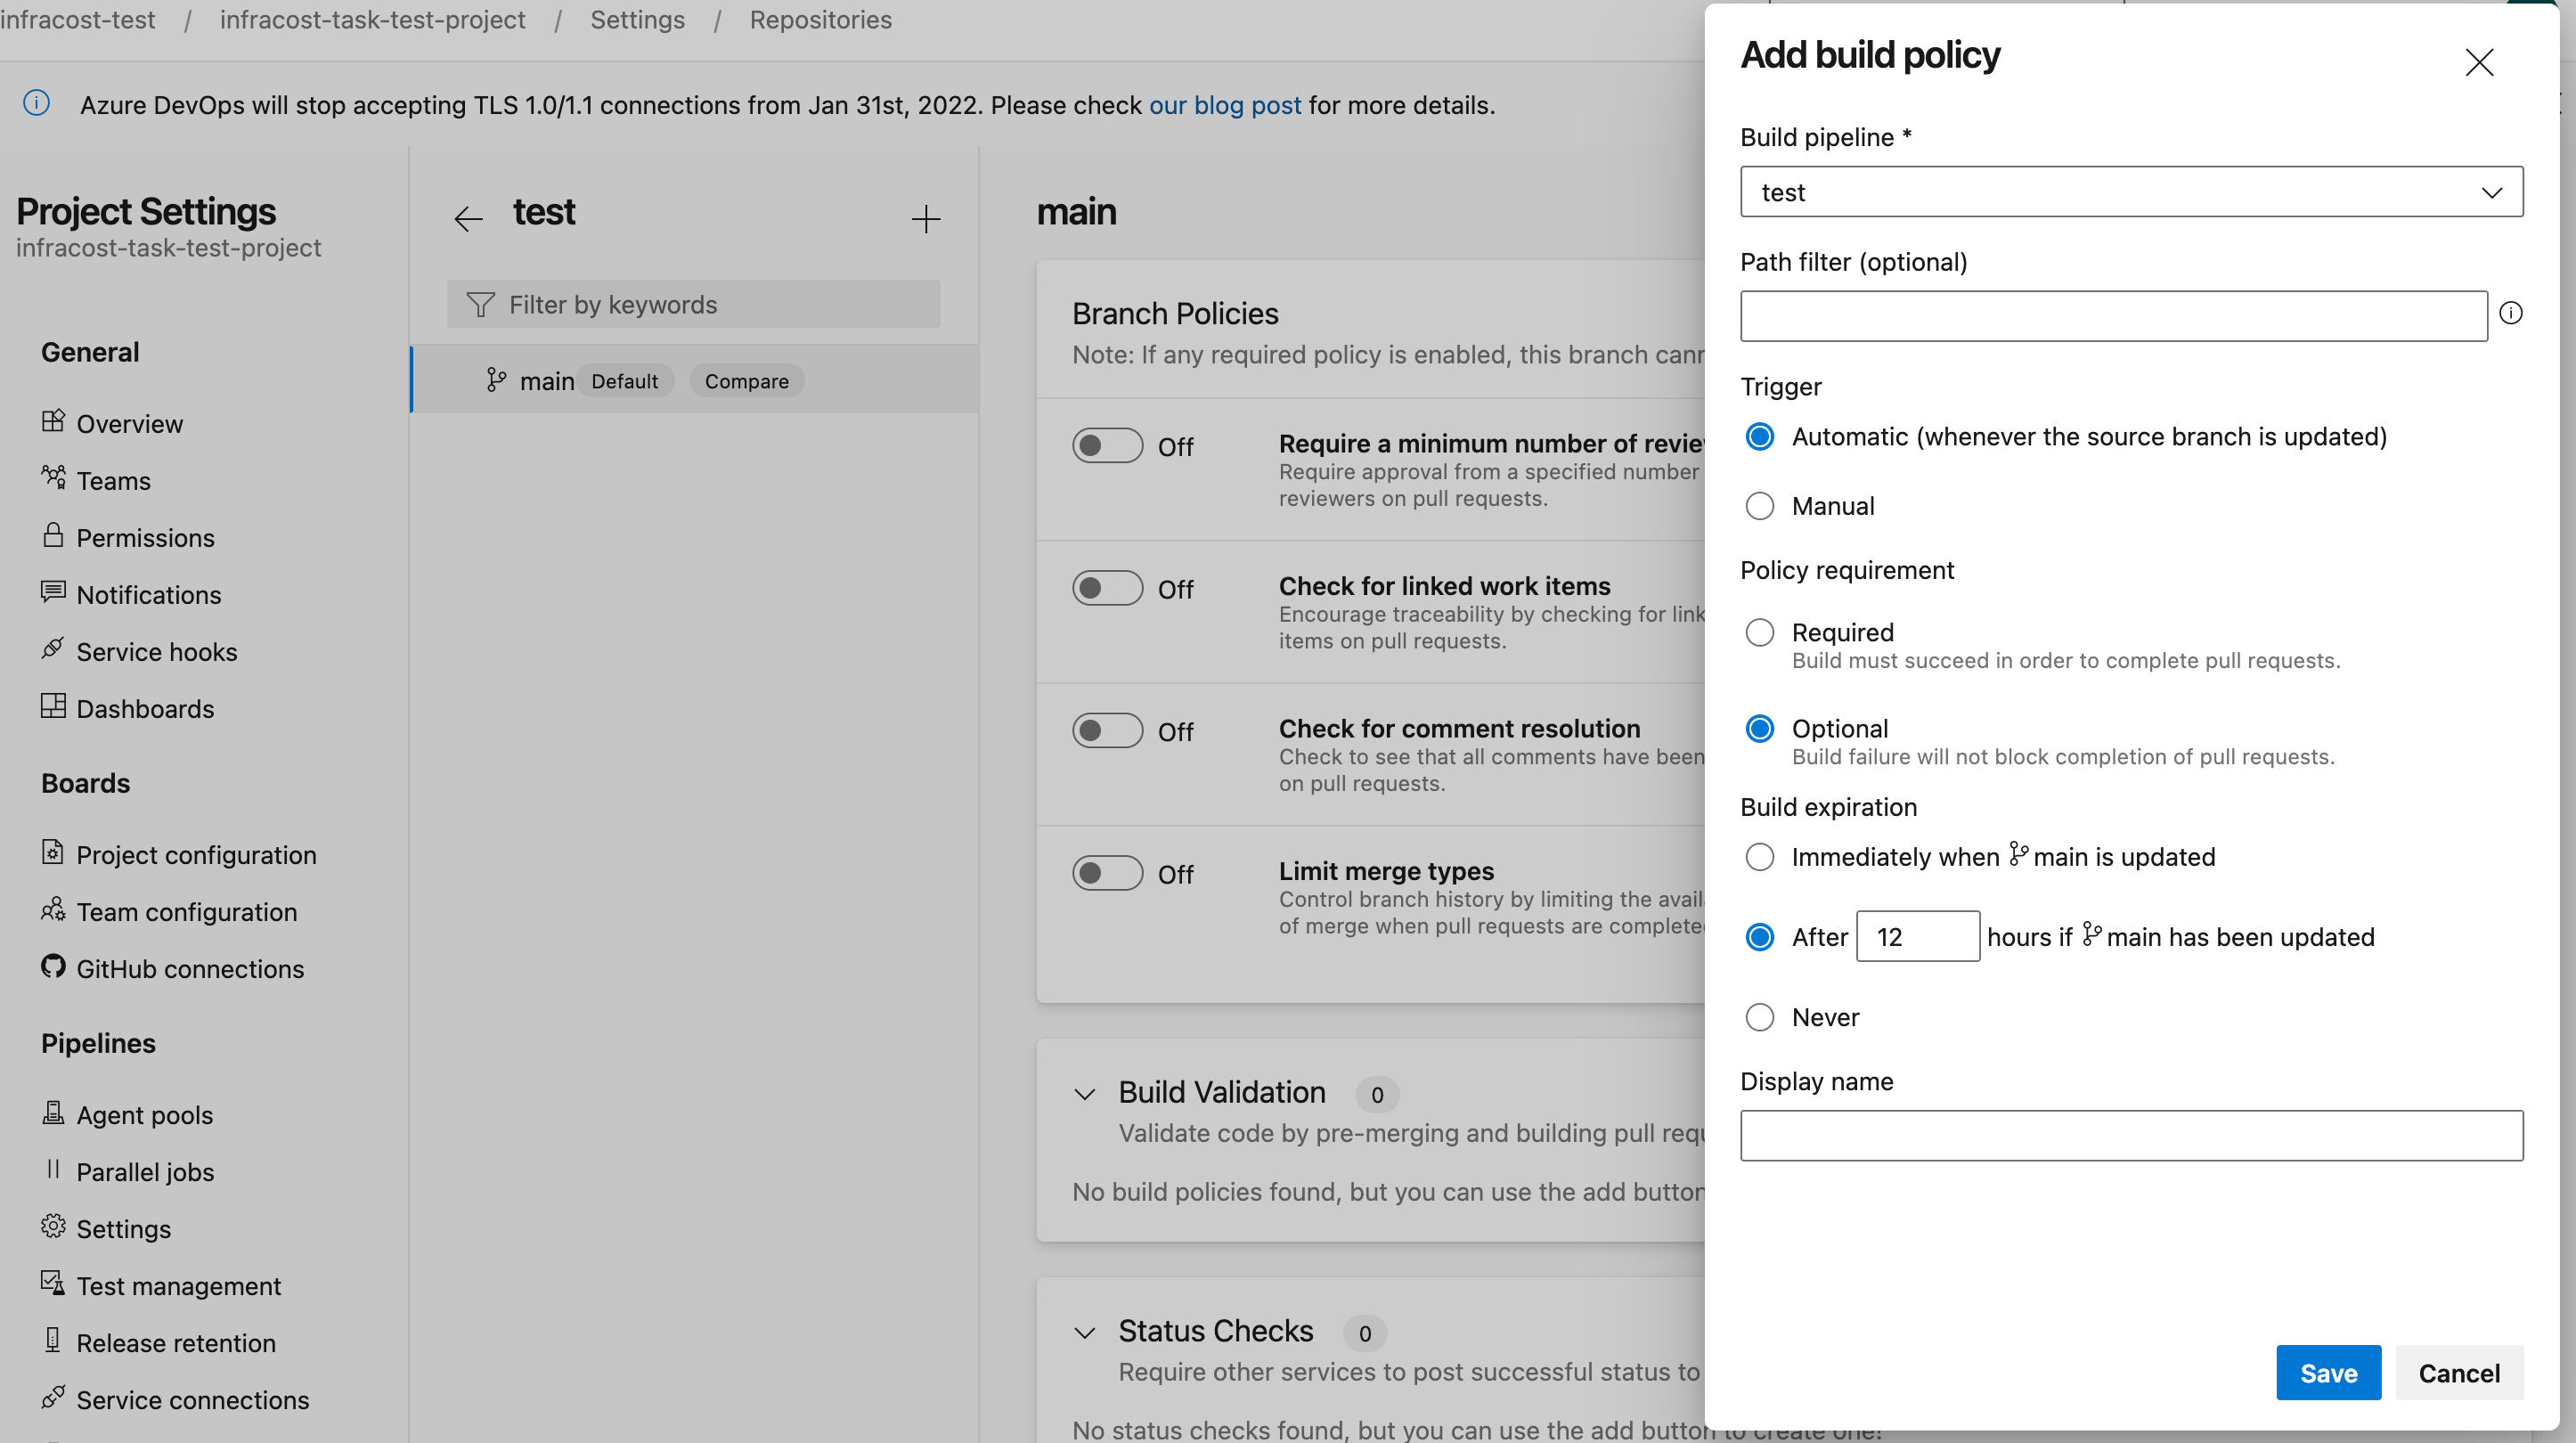
- Set your 'Build pipeline' to the pipeline you created in step 1, leave 'Path filter' blank, set 'Trigger' to Automatic, and 'Policy requirement' to Optional (you can also use Required but we don't recommend it).
Enable Azure Pipelines to post pull request comments
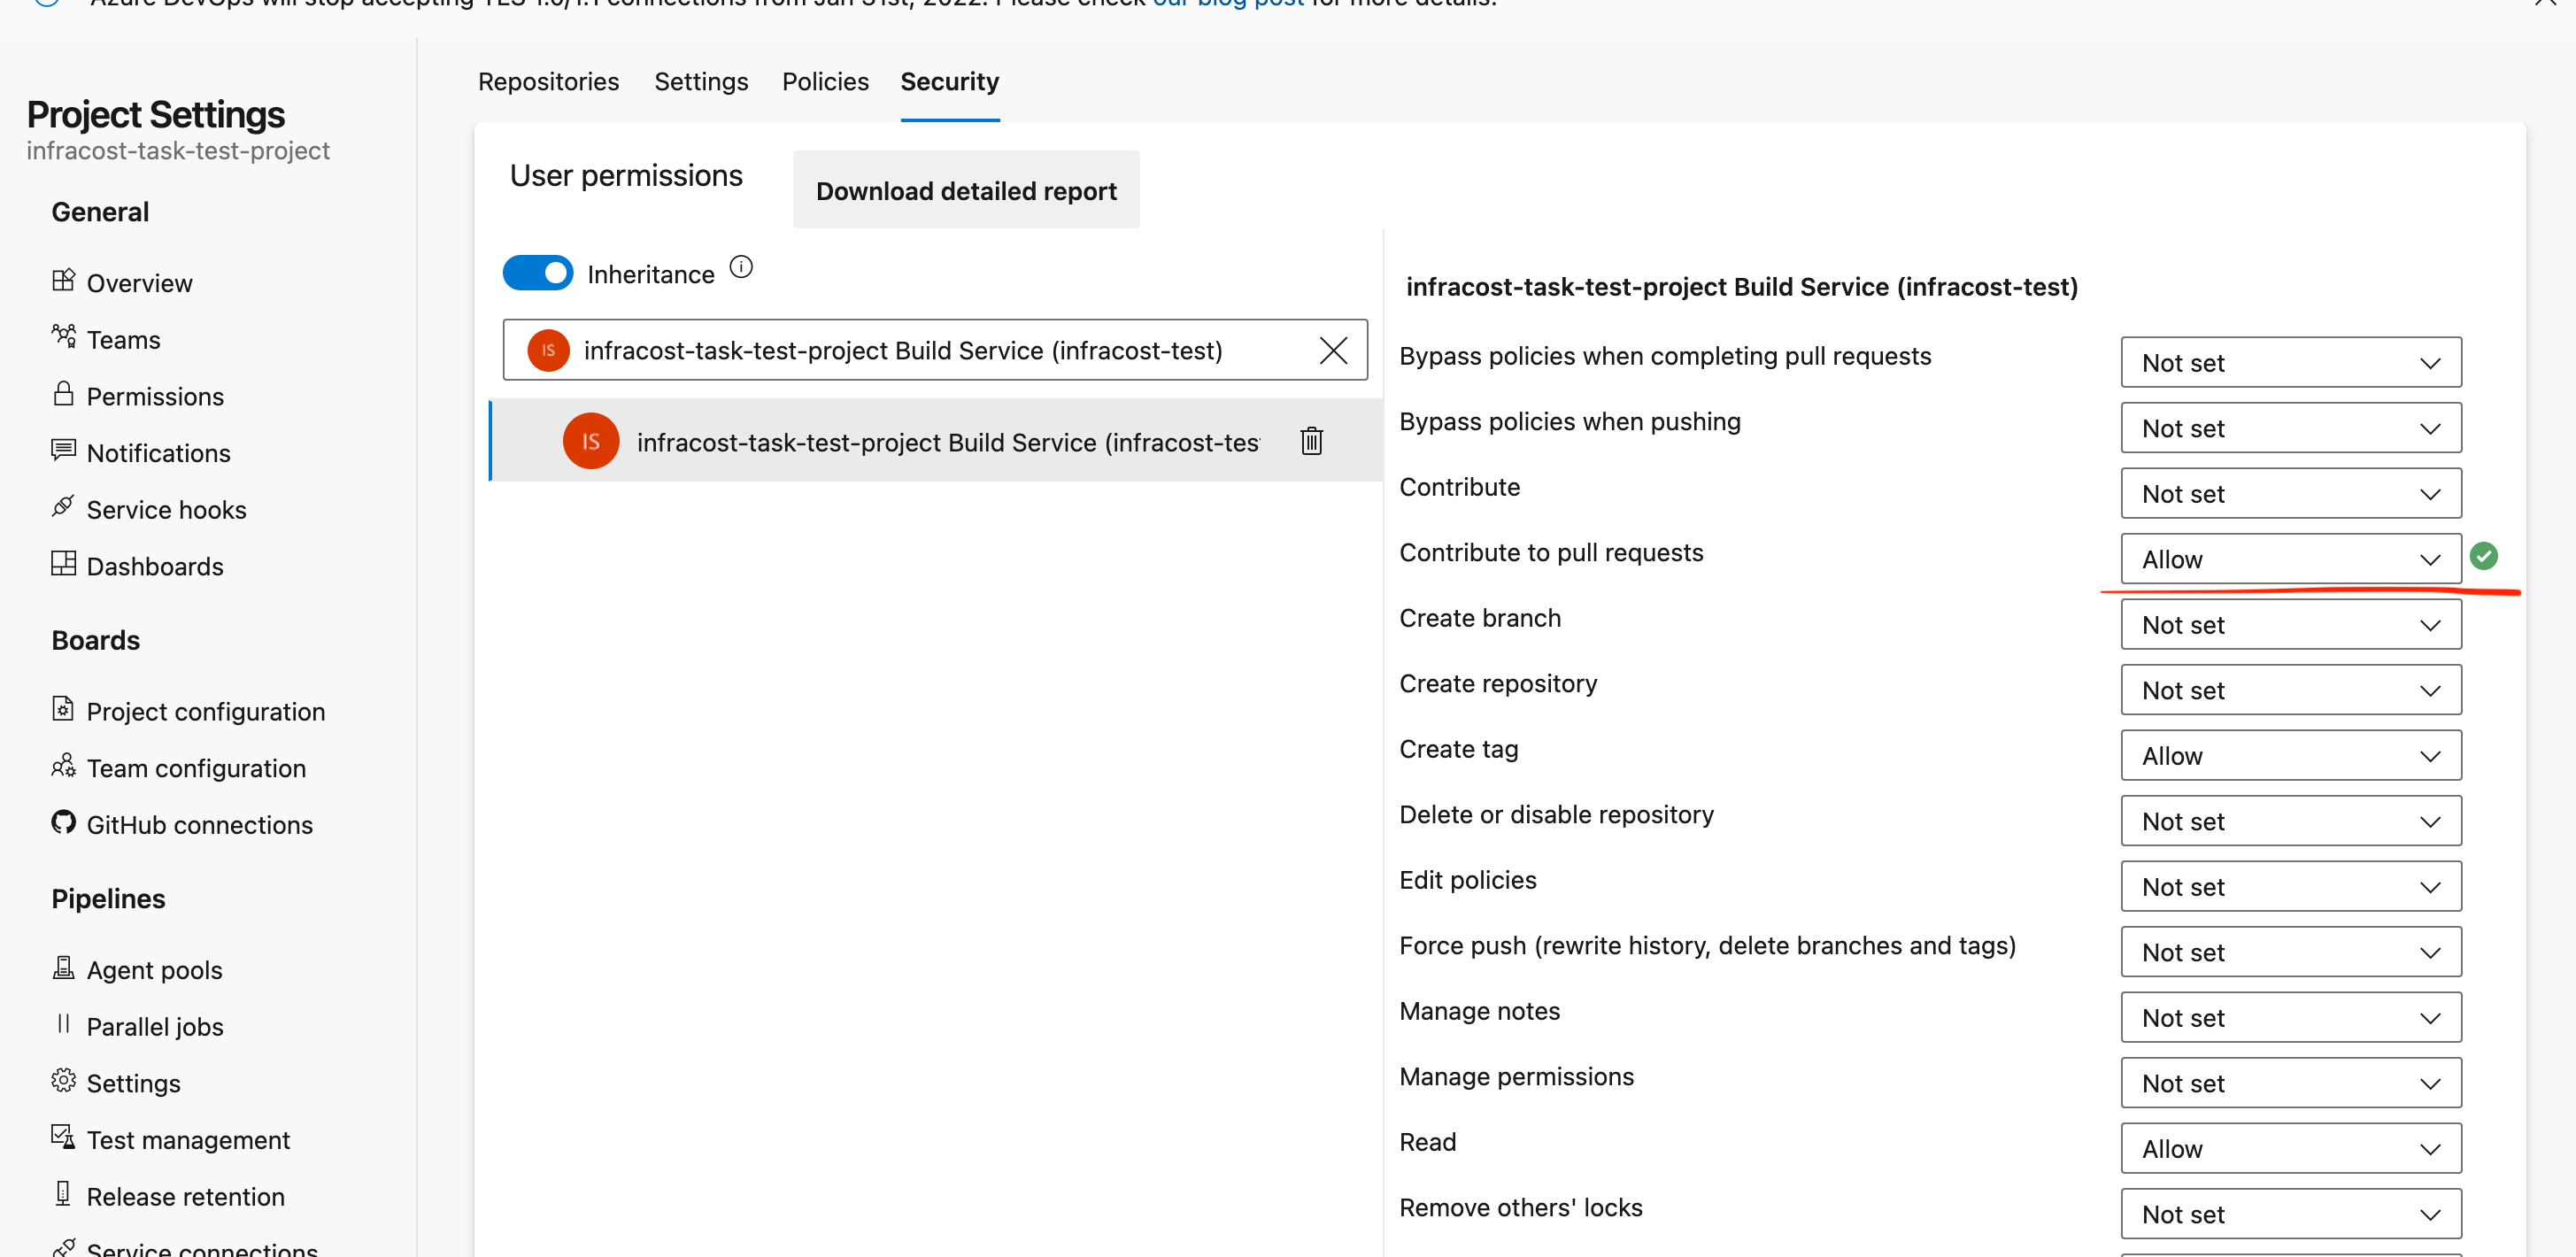
- From your Azure DevOps organization, click on your project > Project Settings > Repositories > your repository.
- Click on the Securities tab, scroll down to Users and click on the '[project name] Build Service ([org name])' user, and set the 'Contribute to pull requests' to Allow.
Add secret variables: from your Azure DevOps organization, click on your project > Pipelines > your pipeline > Edit > Variables, and click the + sign to add variables for the following. Also tick the 'Keep this value secret' option.
infracostApiKey: with your Infracost API key as the value, and select 'Keep this value secret'.
Follow these simple steps to test the integration. This is important as it ensures the CLI commands are running correctly in your workflow 👌
Infracost Cloud is our SaaS product that builds on top of Infracost open source. It enables team leads, managers and FinOps practitioners to setup tagging policies, guardrails and best practices to help guide the team. For example, you can check for required tag keys/values, or suggest switching AWS gp2 volumes to gp3 as they are more performant and cheaper.
If you do not want to use Infracost Cloud, go to Org Settings and disable the dashboard. This causes the CLI not to send its JSON output to your dashboard; the JSON does not contain any cloud credentials or secrets, see the FAQ for more information.
If there are issues, you can enable the 'Enable system diagnostics' check box when running the pipeline manually or for more options see this page.
GitHub Repos Quick Start
👉👉 We recommend using the free Infracost GitHub App as it's much simpler to setup and faster to run
Create a new pipeline, selecting
- Github when prompted in the "Connect" stage
- Select the appropriate repo you wish to integrate Infracost with in the "Select" stage
- Choose "Starter Pipeline" in the "Configure" stage
- Replace the Starter Pipeline yaml with the following.
- select "Save" from the "Save and run" dropdown and add the appropriate commit message
# Infracost runs on pull requests and posts PR comments.
# If you use Infracost Cloud, Infracost also runs on main/master branch pushes so the dashboard is updated.
# The Azure Pipelines docs (https://docs.microsoft.com/en-us/azure/devops/pipelines/process/tasks) describe other trigger options.
pr:
- '*'
trigger:
  branches:
    include:
    - main
    - master

variables:
  # If you use private modules you'll need this env variable to use
  # the same ssh-agent socket value across all steps.
  - name: SSH_AUTH_SOCK
    value: /tmp/ssh_agent.sock
  # If you store Terraform variables or modules in a 3rd party such as (e.g. TFC or Spacelift),
  # specify the following so Infracost can automatically retrieve them.
  # See https://www.infracost.io/docs/features/terraform_modules/#registry-modules for details.
  # - name: INFRACOST_TERRAFORM_CLOUD_TOKEN
  #   value: $(tfcToken)
  # - name: INFRACOST_TERRAFORM_CLOUD_HOST
  #   value: app.terraform.io

jobs:
  # Run Infracost on pull requests
  - job: infracost_pull_request_checks
    condition: and(succeeded(), eq(variables['Build.Reason'], 'PullRequest'))
    displayName: Run Infracost on pull requests
    pool:
      vmImage: ubuntu-latest # This pipeline works on windows-latest too

    steps:
      # If you use private git SSH modules, add a base 64 encoded secret
      # called gitSshKeyBase64 with your private key, so Infracost can access
      # private repositories (similar to how Terraform/Terragrunt does).
      # - bash: |
      #     ssh-agent -a $(SSH_AUTH_SOCK)
      #     mkdir -p ~/.ssh
      #     echo "$(echo $GIT_SSH_KEY_BASE_64 | base64 -d)" | tr -d '\r' | ssh-add -
      #     # Update this to github.com, gitlab.com, bitbucket.org, ssh.dev.azure.com or your source control server's domain
      #     ssh-keyscan github.com >> ~/.ssh/known_hosts
      #   displayName: Add GIT_SSH_KEY
      #   env:
      #     GIT_SSH_KEY_BASE_64: $(gitSshKeyBase64)

      # Install the Infracost CLI, see https://github.com/infracost/infracost-azure-devops#infracostsetup
      - task: InfracostSetup@2
        displayName: Setup Infracost
        inputs:
          apiKey: $(infracostApiKey)

      # Clone the base branch of the pull request (e.g. main/master) into a temp directory.
      - bash: |
          REPO_URL=$(Build.Repository.Uri)
          REPO_URL_WITH_TOKEN=${REPO_URL/https:\/\//https:\/\/x-access-token:$(githubToken)@}
          git clone $REPO_URL_WITH_TOKEN --branch=$(System.PullRequest.TargetBranchName) --single-branch /tmp/base
        displayName: Checkout base branch

      # Generate an Infracost cost estimate baseline from the comparison branch, so that Infracost can compare the cost difference.
      - bash: |
          cd /tmp/base
          infracost breakdown --path=. \
            --format=json \
            --out-file=/tmp/infracost-base.json
        displayName: Generate Infracost cost estimate baseline
        env:
          SYSTEM_ACCESSTOKEN: $(System.AccessToken)

      # Generate an Infracost diff and save it to a JSON file.
      - bash: |
          cd -
          infracost diff --path=. \
            --format=json \
            --compare-to=/tmp/infracost-base.json \
            --out-file=/tmp/infracost.json
        displayName: Generate Infracost diff
        env:
          SYSTEM_ACCESSTOKEN: $(System.AccessToken)

      # Add a cost estimate comment to a Azure Repos pull request.
      - bash: |
          infracost comment github \
            --path=/tmp/infracost.json \
            --github-token=$(githubToken)\
            --pull-request=$(System.PullRequest.PullRequestNumber) \
            --repo=$(Build.Repository.Name) \
            --behavior=update
        displayName: Post PR comment
        env:
          SYSTEM_ACCESSTOKEN: $(System.AccessToken)

  # The following job is needed when using Infracost Cloud
  - job: infracost_cloud_update
    displayName: Update Infracost Cloud
    condition: and(succeeded(), in(variables['Build.Reason'], 'IndividualCI', 'BatchedCI'))
    pool:
      vmImage: ubuntu-latest # This pipeline works on windows-latest too

    steps:
      # If you use private git SSH modules, add a base 64 encoded secret
      # called gitSshKeyBase64 with your private key, so Infracost can access
      # private repositories (similar to how Terraform/Terragrunt does).
      # - bash: |
      #     ssh-agent -a $(SSH_AUTH_SOCK)
      #     mkdir -p ~/.ssh
      #     echo "$(echo $GIT_SSH_KEY_BASE_64 | base64 -d)" | tr -d '\r' | ssh-add -
      #     # Update this to github.com, gitlab.com, bitbucket.org, ssh.dev.azure.com or your source control server's domain
      #     ssh-keyscan github.com >> ~/.ssh/known_hosts
      #   displayName: Add GIT_SSH_KEY
      #   env:
      #     GIT_SSH_KEY_BASE_64: $(gitSshKeyBase64)

      # Install the Infracost CLI, see https://github.com/infracost/infracost-azure-devops#infracostsetup
      - task: InfracostSetup@2
        displayName: Setup Infracost
        inputs:
          apiKey: $(infracostApiKey)

      - bash: |
          PATTERN1="Merge pull request #([0-9]+) from"
          PATTERN2=".* \(#([0-9]+)\)"

          if [[ "$(Build.SourceVersionMessage)" =~ $PATTERN1 || "$(Build.SourceVersionMessage)" =~ $PATTERN2 ]]; then
            PR_ID=${BASH_REMATCH[1]}
            echo "Updating status of $PR_ID"
            curl \
              --request POST \
              --header "Content-Type: application/json" \
              --header "X-API-Key: $(infracostApiKey)" \
              --data "{ \"query\": \"mutation {updatePullRequestStatus( url: \\\"$(Build.Repository.Uri)/pulls/${PR_ID}\\\", status: MERGED )}\" }" \
              "https://dashboard.api.infracost.io/graphql";
          else
            echo "Nothing to do as the commit message did not contain a merged PR ID."
          fi
        displayName: 'Update PR status in Infracost Cloud'

      - bash: |
          infracost breakdown --path=. \
            --format=json \
            --out-file=/tmp/infracost.json

          infracost upload --path=/tmp/infracost.json || echo "Always pass main branch runs even if there are policy failures"
        displayName: 'Run Infracost on default branch and update Infracost Cloud'
        env:
          SYSTEM_ACCESSTOKEN: $(System.AccessToken)
Create a GitHub token (such as Personal Access Token) that can be used by the pipeline to post comments. The token needs to have repo scope so it can post comments. If you are using SAML single sign-on, you must first authorize the token.
Add secret variables to the pipeline you created in step 1. From your Azure DevOps organization, click on your project > Pipelines > your pipeline > Edit > Variables, and click the + sign to add variables for the following:
infracostApiKey: with your Infracost API key as the value, and select 'Keep this value secret'.githubToken with your GitHub access token as the value, and select 'Keep this value secret'.
Follow these simple steps to test the integration. This is important as it ensures the CLI commands are running correctly in your workflow 👌
Infracost Cloud is our SaaS product that builds on top of Infracost open source. It enables team leads, managers and FinOps practitioners to setup tagging policies, guardrails and best practices to help guide the team. For example, you can check for required tag keys/values, or suggest switching AWS gp2 volumes to gp3 as they are more performant and cheaper.
If you do not want to use Infracost Cloud, go to Org Settings and disable the dashboard. This causes the CLI not to send its JSON output to your dashboard; the JSON does not contain any cloud credentials or secrets, see the FAQ for more information.
Troubleshooting
If there are issues, you can enable the 'Enable system diagnostics' check box when running the pipeline manually or for more options see this page.
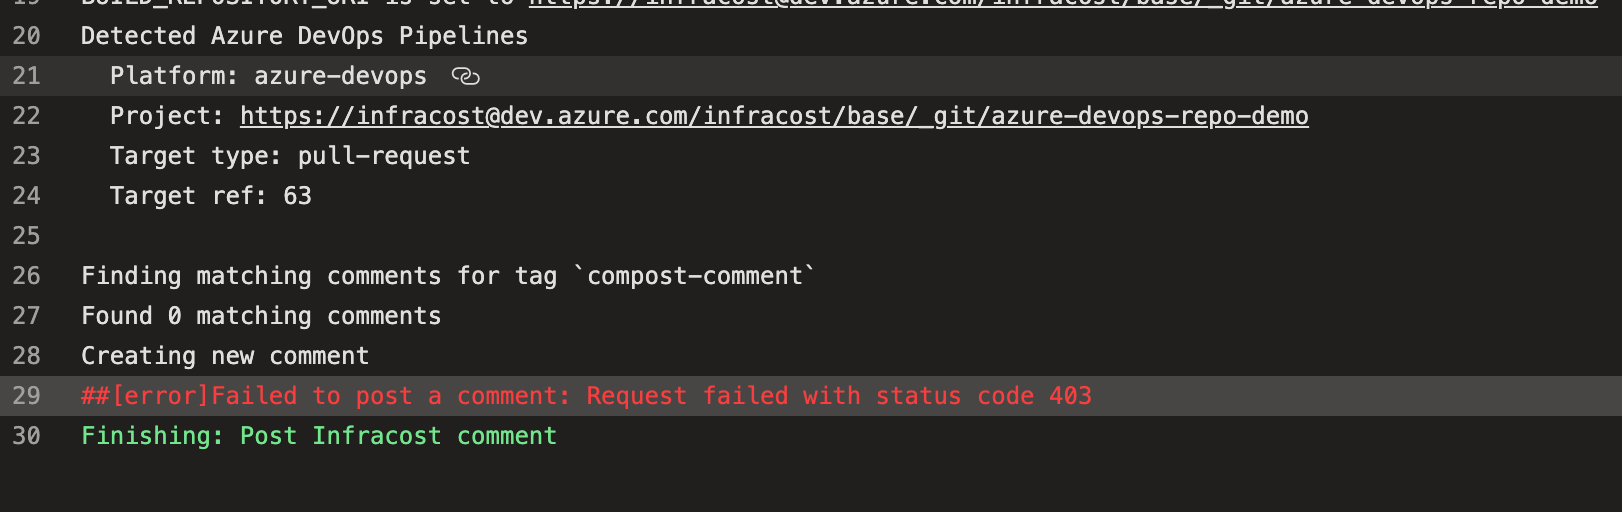
403 error when posting to Azure Repo
If you receive a 403 error when running the infracost comment command in your pipeline:
Try the following steps:
This is normally because the build agent does not have permissions to post to the Azure Repo. Make sure step 3 (Enable Azure Pipelines to post pull request comments) of the Azure Repos Quick start is complete.
If the above step does not fix the issue, change the "Post Infracost comment" task to the following format so instead of using $(System.AccessToken) directly, you pass it in via an environment variable. Also add the SYSTEM_ACCESSTOKEN env lines to the git clone, infracost breakdown and infracost diff steps as they use that token to get pull request metadata such as the pull request title.
- script: |
    infracost comment azure-repos \
      --path=/tmp/infracost.json \
      --azure-access-token=$SYSTEM_ACCESSTOKEN \
      --pull-request=$(System.PullRequest.PullRequestId) \
      --repo-url=$(Build.Repository.Uri) \
      --behavior=update
  displayName: Post Infracost comment
  env:
    SYSTEM_ACCESSTOKEN: $(System.AccessToken)
If you're using the "Limit job authorization scope to current project for non-release pipelines" option in Azure Repos, see this article: this changes the Build Service Identity that will be performing the task. So rather than the usual Build Service for the project, you are now using a Build Service for the Organization.
If none of the above steps work, create a new Azure DevOps Personal Access Token (PAT) with full permissions so you can test that the pull request comment can be posted using your PAT. Add the token as a secret variable called personalAccessToken in your Azure pipeline; so go to project > Pipelines > your pipeline > Edit > Variables, and click the + sign to add it. Also tick the 'Keep this value secret' option. Once you have tested that the pull request comments work fine with your PAT, contact Microsoft Azure Support to see if they can help you troubleshoot why your built-in System.AccessToken does not have permission to post pull request comments.
  - script: |
      infracost comment azure-repos \
        --path=/tmp/infracost.json \
        --azure-access-token=$PERSONAL_ACCESS_TOKEN \
        --pull-request=$(System.PullRequest.PullRequestId) \
        --repo-url=$(Build.Repository.Uri) \
        --behavior=update
    displayName: Post Infracost comment
    env:
      PERSONAL_ACCESS_TOKEN: $(personalAccessToken)
Task
We recommend you use the above quick start guide and examples, which uses the following task.
InfracostSetup
This task installs and configures the Infracost CLI.
steps:
  - task: InfracostSetup@v2
    inputs:
      apiKey: $(infracostApiKey)
It accepts the following inputs:
apiKey: Required. Your Infracost API key. It can be retrieved by running infracost configure get api_key. We recommend using your same API key in all environments. If you don't have one, download Infracost and run infracost auth login to get a free API key.version: Optional, defaults to 0.10.x. SemVer ranges are supported, so instead of a full version string, you can use 0.10.x. This enables you to automatically get the latest backward compatible changes in the 0.10 release (e.g. new resources or bug fixes).currency: Optional. Convert output from USD to your preferred ISO 4217 currency, e.g. EUR, BRL or INR.
Contributing
Issues and pull requests are welcome! For development details, see the contributing guide. For major changes, including interface changes, please open an issue first to discuss what you would like to change. Join our community Slack channel, we are a friendly bunch and happy to help you get started :)
License
Apache License 2.0
| |
