SpecViber for VS Code
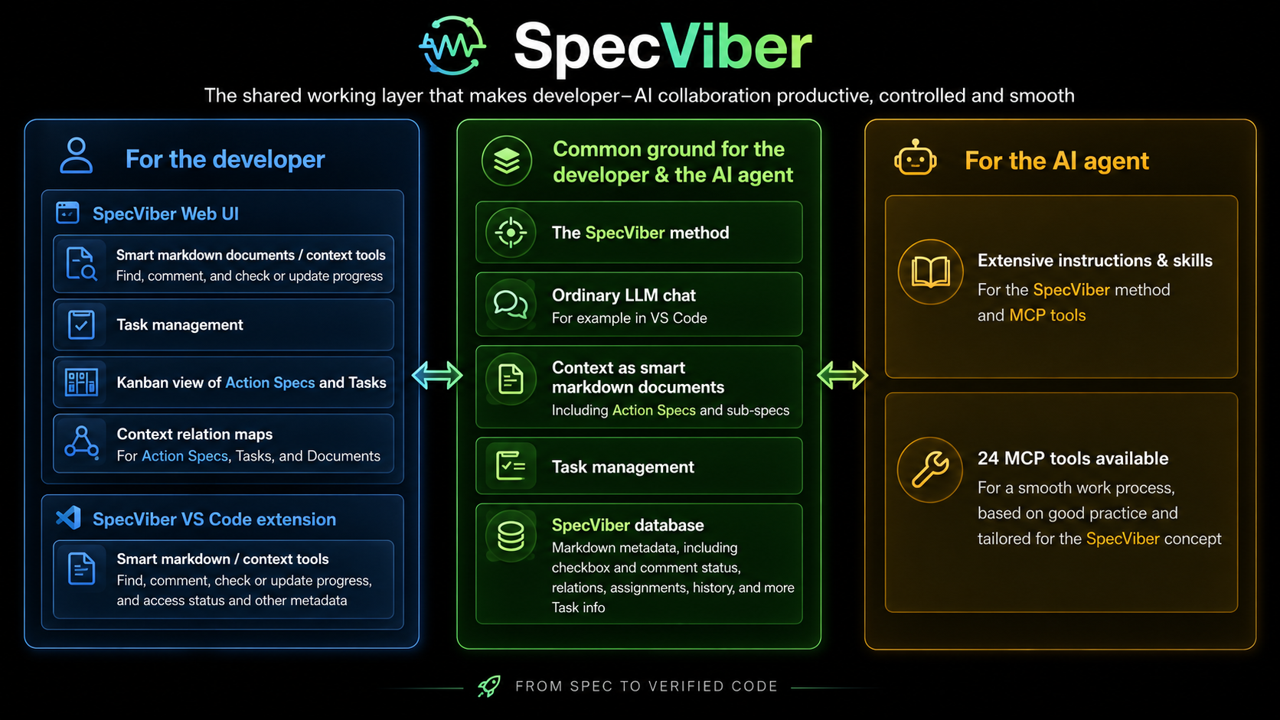
This extension is the VS Code surface of SpecViber — a shared working layer for spec-driven AI development. The extension brings SpecViber's document-related features directly into your editor. It is not a standalone tool — you need an active SpecViber workspace to use it.
Vibe coding that actually holds together
AI gets you moving fast — until the work scatters. The agent forgets what you decided, "done" turns out not to be done, and every session starts with rebuilding context by hand.
SpecViber closes that gap by giving the developer and the AI agent one shared working layer for the work itself: planning, context, tasks, progress, relations and verification. Same documents. Same task objects. Same state. The agent stops working from a loose snapshot of the project and starts working against the same live reality as you.
It does this without taking over your setup. Your code stays in your repo, your markdown stays in your project, your git workflow and AI assistant stay where they are. SpecViber adds the working layer around them.
The full loop, on one shared layer
The core unit is the action spec — a living markdown document that carries the work from the first problem statement to a checked, documented delivery.
- Planning, in the document. The agent drafts problem, goal, context, related docs, plan and verification criteria. You steer with inline
@comments where the decisions belong. The agent responds and sharpens the spec until it is ready to execute.
- Execution, with the spec as a live map. As work moves, the agent keeps the spec current: checkboxes change state (
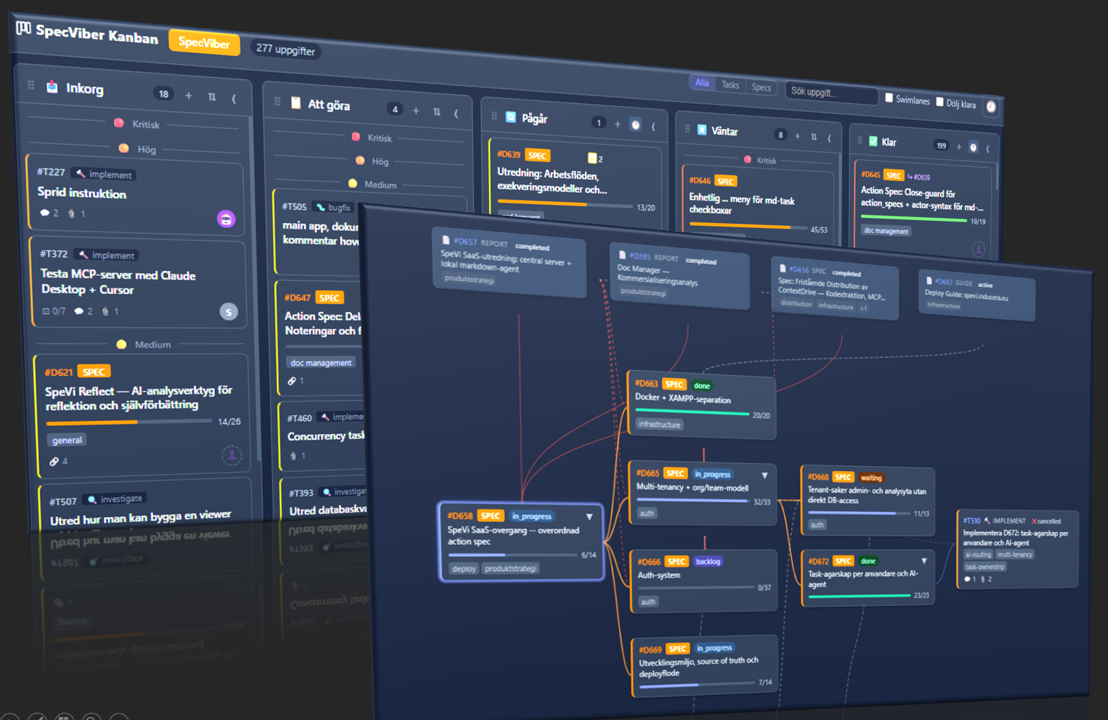
todo, in_progress, done, dropped, blocked, needs_research), blockers are flagged, missing steps appear. You follow it in real time — in the document, on the Kanban, or through the relation graph.
- Verification before close. Every action spec ends with explicit checks. The agent runs what it can itself (terminal, syntax, tests, API). A close-guard prevents the spec from being marked done while open steps or failed checks remain. Done means verified — not "the chat said so."
What makes the layer work
- Markdown that does the work. Ordinary
.md files become structured work objects with status, progress, comments, relations, checkboxes and task connections — readable for you, actionable for the agent.
- Relations you can walk.
depends_on, supersedes, references, part_of, conflicts — explicit and explorable in a relation graph. The agent loads the right context before acting; you stop tracking impact by hand.
- Kanban as a live cockpit. Tasks and action specs share one board. Assign work to the agent, follow the card, watch progress update as the work moves.
- MCP-native. Works with Copilot, Claude Code, Cursor and other MCP clients. No vendor lock-in.
- Privacy by design. Your code and markdown never leave your machine. Only the coordinating metadata lives in SpecViber.
SpecViber drops into an existing project — no greenfield required — and is built to keep working as the project grows.
Learn more at specviber.com.
SpecViber is a web app — this is its VS Code surface
The full SpecViber product is a web app: Kanban, relation graphs, workspace management, classification, audit, registration of new documents, AI MCP integration, the whole working method.
This extension makes SpecViber's document-related features available directly inside VS Code, so you do not have to switch to the browser every time you edit a tracked markdown file. It is a thin surface on top of the same SpecViber backend and the same workspace you already use on the web.
For board work, cross-workspace navigation, full relation graphs, onboarding and governance, use the web app.
What the extension brings into VS Code
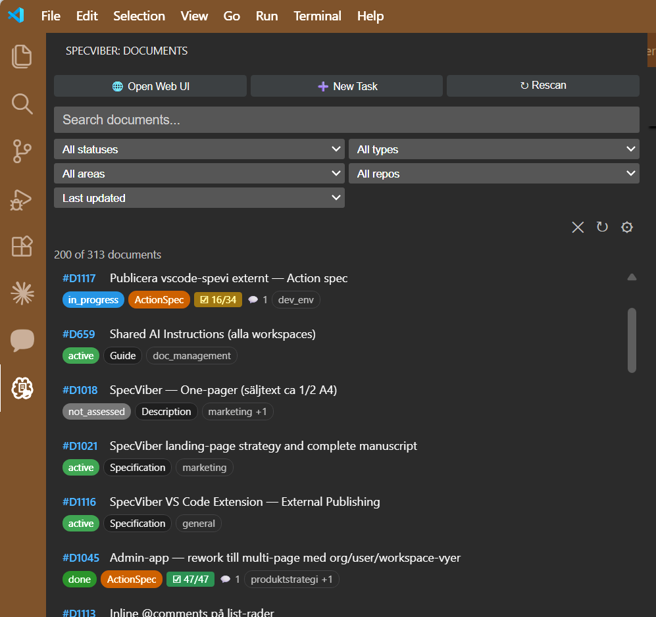
Browse, search and open documents in your SpecViber workspace from a dedicated activity-bar view. Jump by document ID (#D123), filter by status or area, and open straight into the viewer or properties panel.
The sidebar has two tabs: Documents and Tasks. The Tasks tab lists your workspace tasks with search and filters (status, priority, type); clicking a task opens a task properties panel — editable status, type, priority, area, title and description, plus tags, linked documents and comments — mirroring the task detail view in the web UI. Open Web UI sits on the panel title bar (globe icon) and opens the full web app (Kanban, relation graph and more) for whichever workspace you're in.
Document viewer
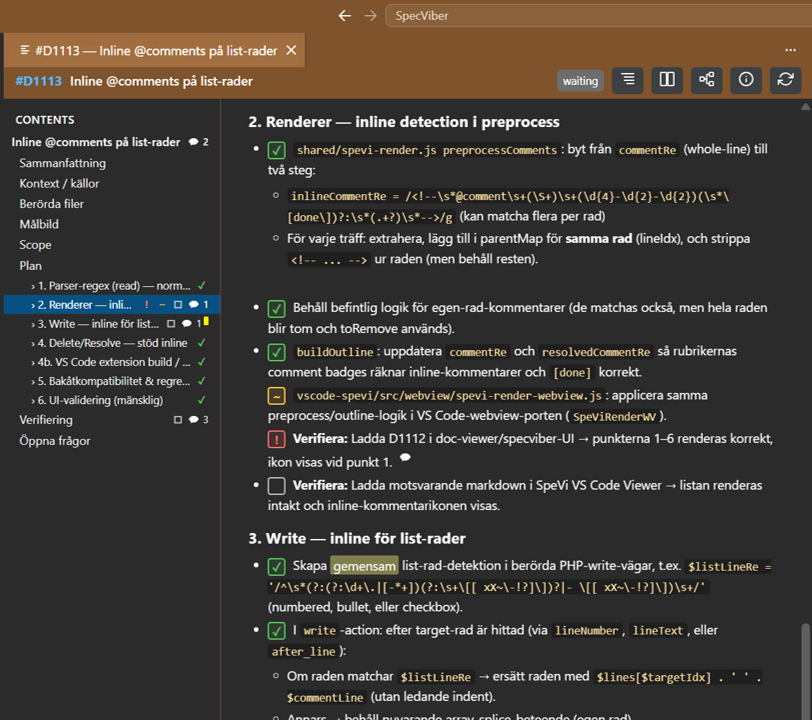
Open any tracked markdown as a SpecViber-aware document: rendered content, multi-state checkboxes, inline @comments, metadata and outline — all in one reading view. Switch to edit mode with instant preview and all tools available when needed.
Document Properties
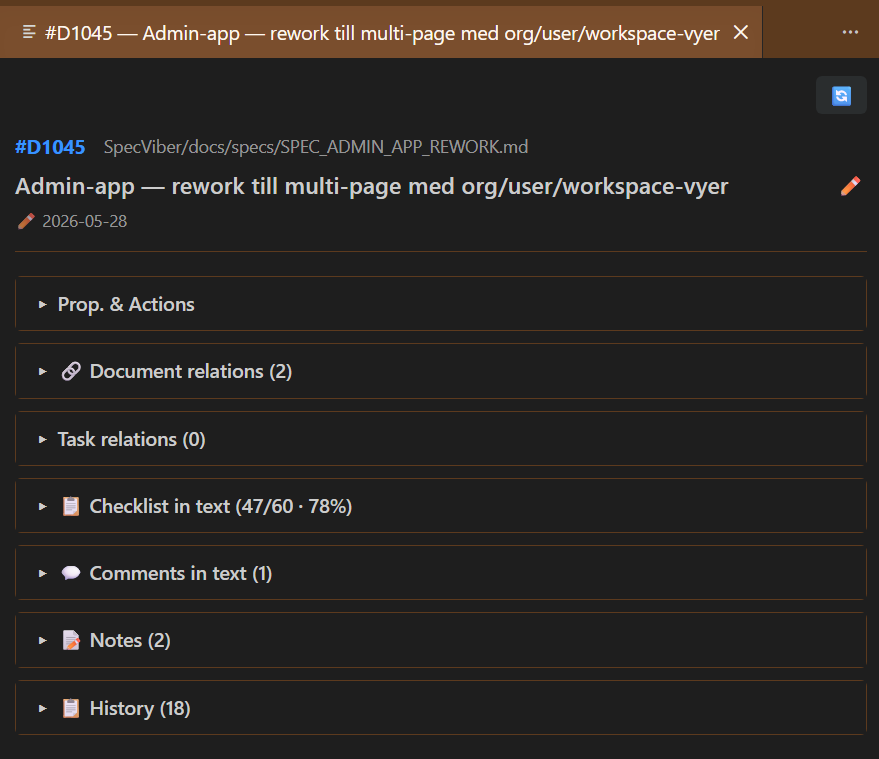
Open the SpecViber properties panel for the current markdown file: status, type, areas, quality, summary, checklist, relations, comments, notes, and history — all in one panel next to your code.
What you can do without leaving the editor
- update document metadata while editing the source
- toggle multi-state checkboxes without losing your place in the file
- read and write inline
@comments exactly where they belong in the document
- jump between related documents through the same relations your action specs use
- navigate large workspaces by ID, area, or search instead of by filesystem path
For board work, relation graphs, workspace administration and the broader SpecViber workflow, use the web app at specviber.com.
Requirements
- An active SpecViber SaaS account and workspace — start at specviber.com
- A local SpecViber SaaS client (ZIP downloaded from your SpecViber account, unpacked into a folder served by a local web server such as XAMPP)
- Node.js 18+ (for the bundled MCP server)
- VS Code 1.85+ with GitHub Copilot
The extension is a thin VS Code surface on top of the SaaS client. The client provides the local content API and the MCP server that the extension and Copilot talk to.
Getting Started
The extension works against any VS Code project once that project is connected to your SpecViber workspace through the local SaaS client.
Install the extension from the Marketplace.
Install the SaaS client — download the ZIP from your SpecViber account, unpack it to a path your local web server serves (for example C:/xampp/htdocs/specviber_saas_client/), then install MCP dependencies:
cd path/to/specviber_saas_client/mcp-server
npm install
Create or reopen a workspace in the SpecViber web UI and run its local setup action. It writes the gitignored .vscode/mcp.json directly; the token is never copied into project settings or a prompt.
Verify the generated local registration. Its non-secret shape is:
{
  "servers": {
    "specviber": {
      "type": "stdio",
      "command": "node",
      "args": ["<absolute-path>/specviber_saas_client/mcp-server/index.js"],
      "env": {
        "specviber_API_URL": "https://app.specviber.com/api/docs",
        "specviber_CONTENT_URL": "http://localhost/<your-client-path>/api/docs/content",
        "specviber_API_TOKEN": "<your-token>",
        "specviber_DEFAULT_WORKSPACE": "<workspace-id>",
        "specviber_ALLOWED_WORKSPACES": "<workspace-id>"
      }
    }
  }
}
specviber_API_URL points at the SaaS metadata API. specviber_CONTENT_URL points at the local SaaS client — your .md files stay on disk and never leave your machine.
Reload VS Code (or run SpecViber: Reload Workspace Connection). That is the whole configuration step — the extension reads the API URL, the content URL, the workspace ID and the token from the same .vscode/mcp.json. There is nothing to fill in under Settings. In Copilot Chat, run specviber_dashboard to confirm the MCP side too.
Open any tracked .md file and use Document Properties, Document Viewer or Edit with Preview from the editor title bar or right-click menu.
Switching workspace
Do it in the SpecViber web app, then reload. A workspace token belongs to the workspace that issued it, so the extension deliberately does not offer a list of workspaces to switch between — picking one the current token may not use would only produce an authentication failure. Re-running Generate token & configure locally for the other workspace rewrites the whole configuration, and the extension picks it up on the next reload.
If something is wrong
The sidebar names which of four things it is, because they have four different fixes:
| What it says |
What to do |
| Not connected for this folder |
Run Generate token & configure locally in the web app |
| Local configuration is incomplete |
The named fields are missing from .vscode/mcp.json — re-run the same web app action |
| Authentication was refused |
The token belongs to another workspace — generate the connection again |
| The local SpecViber client did not respond |
Metadata is fine; start the web server that serves your SaaS client |
An incomplete .vscode/mcp.json is never silently topped up from VS Code Settings. Mixing the two could point a freshly generated token at a previously configured server, so the extension stops and says which field to regenerate.
Need a self-hosted SpecViber instead of SaaS? Point specviber_API_URL / specviber.apiUrl at your own instance and omit specviber_CONTENT_URL / specviber.contentUrl to use single-mode. (This mode is currently not available. Contact Inducera AB to get an update...)
Configuration
The normal installation has no configuration. .vscode/mcp.json, written by the web app, is the connection.
The settings below are an advanced fallback, used only when this folder has no generated specviber entry — self-hosted setups and local development. Set them under Workspace Settings: the connection belongs to the project, and in VS Code a workspace value overrides a user value, so a lingering user value can make a workspace value look ignored. The extension never writes these settings on your behalf.
| Setting |
Description |
specviber.apiUrl |
SpecViber metadata API. A host base (https://app.specviber.com) and a full base (https://app.specviber.com/api/docs) are both accepted. |
specviber.contentUrl |
Local content API for split-mode (http://localhost/<your-client-path>/api/docs/content). Required whenever the API URL is not a local installation. |
specviber.workspaceId |
Workspace ID used by extension commands. |
specviber.showSystemDocs is the one setting you may actually want day to day, and it has its own control: the gear at the right of the filter row in the Documents and All tabs. There is no gear in the title bar — the extension's settings page is reachable from the Command Palette when you need it.
The workspace token is never a setting. It comes from .vscode/mcp.json, or is prompted for once and kept in VS Code SecretStorage under a key derived from the API base and workspace ID — so a token stored for one project can never be sent to another project's server.
Commands
- SpecViber: Document Properties — open the metadata and workflow panel for the current markdown file
- SpecViber: Document Viewer — open the rendered SpecViber-aware document view
- SpecViber: Edit with Preview — split editor with raw markdown and live SpecViber-aware preview
- SpecViber: Open Document by ID — jump straight to a specific SpecViber document by
#D… ID
- SpecViber: Open Properties by ID — open the properties panel without first locating the file
- SpecViber: Reload Workspace Connection — re-read
.vscode/mcp.json and rebind the connection
- SpecViber: Open Local MCP Configuration — open this folder's
.vscode/mcp.json
- SpecViber: Open Workspace Settings (advanced) — the manual fallback route
- SpecViber: Settings — the extension's settings page (no longer a title-bar icon)
- SpecViber: Reset Stored Credentials — clear locally stored credentials and re-authenticate
Learn more about SpecViber
The extension shows one slice of SpecViber — the document-editing slice. The full working method, the kanban, the relation graphs, the AI MCP integration, the onboarding, governance, and licensing all live in the web app:
Development
Project Structure
vscode-spevi/
├── src/
│   ├── extension.ts          # Entry point — command registration, auth, config
│   ├── api-client.ts         # HTTP client (http/https, Bearer auth, 15s timeout)
│   ├── doc-resolver.ts       # Maps file URI → SpeVi doc_id (cache with 5-min TTL)
│   ├── properties-panel.ts   # WebviewPanel — all message handlers + HTML template
│   └── webview/
│       ├── properties.js     # Webview UI logic (runs in webview context)
│       └── properties.css    # VS Code theme-aware styles (--vscode-* variables)
├── dist/                     # esbuild output (bundled, not committed in dev)
├── out/                      # tsc output (for dev/debug, not in .vsix)
├── resources/
│   ├── icon.svg              # Command icon
│   ├── marketplace-icon.png  # Marketplace listing icon (256x256)
│   └── preview-*.png         # README / marketplace preview images
├── .vscode/
│   ├── launch.json           # F5 → Extension Development Host
│   └── tasks.json            # Default build task (npm compile)
├── package.json              # Extension manifest
├── tsconfig.json             # TypeScript config (ES2020, commonjs)
├── .vscodeignore             # Files excluded from .vsix
├── CHANGELOG.md
└── README.md
Setup
cd vscode-spevi
npm install
Build Commands
| Command |
Purpose |
npm run compile |
TypeScript → out/ (for dev/debug with F5) |
npm run watch |
TypeScript watch mode |
npm run lint |
Type-check without emitting |
npm run esbuild |
Bundle → dist/extension.js (27 KB, with sourcemap) |
npm run esbuild:watch |
Bundle watch mode |
npm run package |
Build .vsix (runs minified esbuild automatically) |
Development Workflow
npm run compile — or just press F5 (launch.json uses preLaunchTask)- An Extension Development Host window opens
- Open any
.md file → right-click → SpeVi: Document Properties
- After code changes: Ctrl+Shift+P → "Developer: Reload Window" in the host
Architecture Notes
- No runtime dependencies — only
devDependencies. The extension uses Node.js built-in http/https modules.
- esbuild bundles all TypeScript into a single
dist/extension.js (18 KB minified).
- Webview files (
src/webview/) are plain JS/CSS, loaded at runtime via asWebviewUri() — not bundled by esbuild.
- Auth uses VS Code SecretStorage, under a key derived from the normalised API base and the workspace ID. The workspace token comes from the local, gitignored
.vscode/mcp.json; it is never stored in tracked VS Code settings and never replayed against a different server or workspace.
- Doc resolver maps
vscode.Uri → doc_id by extracting the repo-relative path and querying list.php. Results are cached for 5 minutes.
Installation
From a packaged VSIX
# Build the package
cd vscode-spevi
npm install
npm run package
# → produces vscode-specviber-X.Y.Z.vsix

# Install in VS Code
code --install-extension vscode-specviber-X.Y.Z.vsix
Or in VS Code: Ctrl+Shift+P → "Extensions: Install from VSIX..." → select the .vsix file.
From source (development)
cd vscode-spevi
npm install
Then press F5 to launch the Extension Development Host.
Packaging and Release
Local or team distribution
- Build:
npm run package → vscode-specviber-X.Y.Z.vsix
- Share the
.vsix file (email, shared drive, git release)
- Recipients install via
code --install-extension <file>.vsix
Version bumping
# Update version in package.json, then:
npm run package
Follow semver: patch (0.1.1) for fixes, minor (0.2.0) for features, major (1.0.0) for breaking changes.
Visual Studio Marketplace
Requires a publisher account at https://marketplace.visualstudio.com/manage.
# One-time: login
npx vsce login specviber

# Publish
npx vsce publish
Open VSX
npx ovsx publish vscode-specviber-X.Y.Z.vsix -p <token>
Updating
After installing a new .vsix version, the old version is automatically replaced. Reload VS Code to activate.
code --install-extension vscode-specviber-X.Y.Z.vsix
# Replaces the older installed version automatically
Uninstalling
code --uninstall-extension specviber.vscode-spevi
Or: Extensions sidebar → find SpecViber → Uninstall.

