Smart Conda Workspace
Minimal VS Code extension for automated conda environment workspace configuration and project versioning."


Table of Contents
Features
- One-Click Workspace Configuration: Automatically configure VS Code workspace with conda environment integration
- Environment Selection: Choose from any available conda environment
- Multi-Platform Support: Works on Windows (PowerShell), macOS (zsh/bash), and Linux (bash)
- Shell Auto-Activation: Automatically activates conda environment when entering project directory
- Multi-Project Support: Works with Python, Node.js, and mixed projects
- Version Management: Integrated project version updates with changelog generation
- Zero Configuration: Works out of the box with existing conda setups
Quick Start
Prerequisites
- VS Code 1.70.0 or higher
- Conda (Miniconda/Anaconda) installed and configured
- At least one conda environment available
- Node.js 16.0.0 or higher (for version management)
Installation
Install the extension:
code --install-extension smart-conda-workspace-1.0.1.vsix
Open your project in VS Code
Configure workspace: Ctrl+Shift+P → "Smart Conda: Configure Workspace"
Project Structure Example
Minimal Python Project Structure
For the extension to work optimally, your Python project should have this basic structure:
my-python-project/
├── scripts/
│   └── update-version.js     # Required for version management
├── package.json              # Required for version tracking
├── pyproject.toml            # Alternative to package.json
├── environment.yml           # Conda environment definition
├── src/
│   └── my_package/
│       ├── __init__.py
│       └── main.py
├── tests/
│   └── test_main.py
├── README.md
└── .gitignore
Key files for extension functionality:
scripts/update-version.js - Version management scriptpackage.json - Version tracking and project metadataenvironment.yml - Conda environment specification (optional)
Commands
- Command:
Smart Conda: Configure Workspace
- Shortcut:
Ctrl+Shift+P → type "configure workspace"
- Description: Creates optimized VS Code workspace configuration with shell auto-activation
What it does:
- Scans available conda environments
- Lets you select the environment for your project
- Detects project type (Python/Node.js/Mixed)
- Generates
.code-workspace file with optimized settings
- Configures shell auto-activation
- Creates backup of shell configuration
Update Project Version
- Command:
Smart Conda: Update Project Version
- Shortcut:
Ctrl+Shift+P → type "update version"
- Description: Manages project versioning using existing scripts
Requirements:
scripts/update-version.js must exist in your projectpackage.json or pyproject.toml with version field
What it does:
- Reads current version from project files
- Shows version increment options (patch/minor/major)
- Executes your project's
scripts/update-version.js
- Updates version files and generates changelog
Create New Environment
- Command:
Smart Conda: Create New Environment
- Description: Creates a new Conda environment from a template or from
environment.yml
What it does:
- Prompts for environment name (or uses default from template)
- Creates the environment with
conda env create or conda create
- Optionally writes/updates
environment.yml
Create Requirements.txt
- Command:
Smart Conda: Create Requirements.txt
- Description: Generates
requirements.txt from the active environment or from environment.yml
What it does:
- Reads packages from the active Conda environment
- Normalizes versions and outputs a clean
requirements.txt
- Supports fallback to
environment.yml when environment is not active
Export Environment.yml
- Command:
Smart Conda: Export Environment.yml
- Description: Exports the environment definition to
environment.yml
What it does:
- Uses
conda env export --from-history when available
- Cleans metadata for portability
- Saves
environment.yml in the project root
Workflow Example
# 1. Open your project
cd /path/to/your/project
code .

# 2. Configure workspace (Ctrl+Shift+P)
Smart Conda: Configure Workspace
├── Select conda environment: "my-env"
├── Select project type: "Python"
├── ✅ Workspace file created
└── ✅ Shell auto-activation configured

# 3. Close and reopen from workspace file
# Environment now auto-activates when entering project directory

# 4. Update version when needed (Ctrl+Shift+P)
Smart Conda: Update Project Version
├── Current: 1.0.0
├── Select: "minor" → 1.1.0
└── ✅ Version updated + changelog
Shell Auto-Activation
The extension automatically configures your shell to activate the conda environment when you enter the project directory.
| Platform |
Shell |
Configuration File |
| Windows |
PowerShell |
~/Documents/PowerShell/Microsoft.PowerShell_profile.ps1 |
| macOS |
zsh |
~/.zshrc |
| macOS |
bash |
~/.bash_profile or ~/.bashrc |
| Linux |
bash |
~/.bashrc |
Example Configuration Added
For Unix systems (macOS/Linux):
# *my-project* - Auto-activation
# Generated by Smart Conda Workspace on [timestamp]
my_project() {
    if [[ "$PWD" == *"/path/to/my-project"* ]]; then
        conda activate my-env 2>/dev/null || true
    fi
}

# ZSH integration
if [[ -n "$ZSH_VERSION" ]]; then
    chpwd_functions+=(my_project)
    my_project  # Activate now
fi
For Windows PowerShell:
# *my-project* - Auto-activation
function my_project {
    $currentPath = Get-Location
    if ($currentPath.Path -like "*C:\path\to\my-project*") {
        conda activate my-env
    }
}
# Auto-trigger on directory change
Terminal Activation Message
After environment activation, the terminal displays a unified single-line status message across platforms:
🐍 Ambiente <env> attivato! : Python: <version>; Node: <version>; npm: <version>
Platform-specific behavior:
- Python is always displayed; Node and npm only appear if available in the active environment
- macOS/Linux use ANSI colors (green for environment name; cyan for versions)
- Windows PowerShell displays colors, while CMD uses a fallback without colors
- Verbose
conda activate output is suppressed on macOS/Linux to avoid duplicate messages while keeping the summary line
Generated Workspace Structure
After running "Configure Workspace", you'll get:
your-project.code-workspace
{
  "folders": [{ "path": "." }],
  "settings": {
    "python.defaultInterpreterPath": "/path/to/conda/envs/your-env/bin/python",
    "python.condaPath": "/path/to/conda/bin/conda",
    "python.terminal.activateEnvironment": true,
    "terminal.integrated.defaultProfile.osx": "conda-env"
  },
  "extensions": {
    "recommendations": [
      "ms-python.python",
      "ms-python.vscode-pylance"
    ]
  }
}
Project Type Configurations
Python Projects
- Settings: Black formatter, Pylint, pytest integration
- Extensions: Python, Pylance, Black formatter, Jupyter
- Terminal: Auto-activates conda environment
Node.js Projects
- Settings: Prettier, TypeScript support, auto-imports
- Extensions: Prettier, TypeScript, Tailwind CSS
- Terminal: Node.js + conda environment
Mixed Projects
- Settings: Combined Python + Node.js configuration
- Extensions: Both Python and Node.js development tools
- Terminal: Full stack development ready
Environment Detection
The extension automatically detects:
- Available conda environments via
conda env list
- Current active environment (shown first in selection)
- Python versions for each environment
- Project type based on files (
package.json, pyproject.toml, etc.)
- Platform-specific paths (Windows vs Unix)
Integration with Existing Scripts
This extension integrates with project scripts:
scripts/update-version.js: Called for version managementpackage.json: Read for current version and metadatapyproject.toml: Alternative version source for Python projectsenvironment.yml: Conda environment configuration
Note: The update-version.js script must exist in each project where you want version management, not in the extension itself.
Logging & Output
- The extension writes human-readable logs to the Output channel
Smart Conda Logs
- Open via
View → Output and pick Smart Conda Logs from the dropdown
- Typical entries include environment detection, command registration, and update events
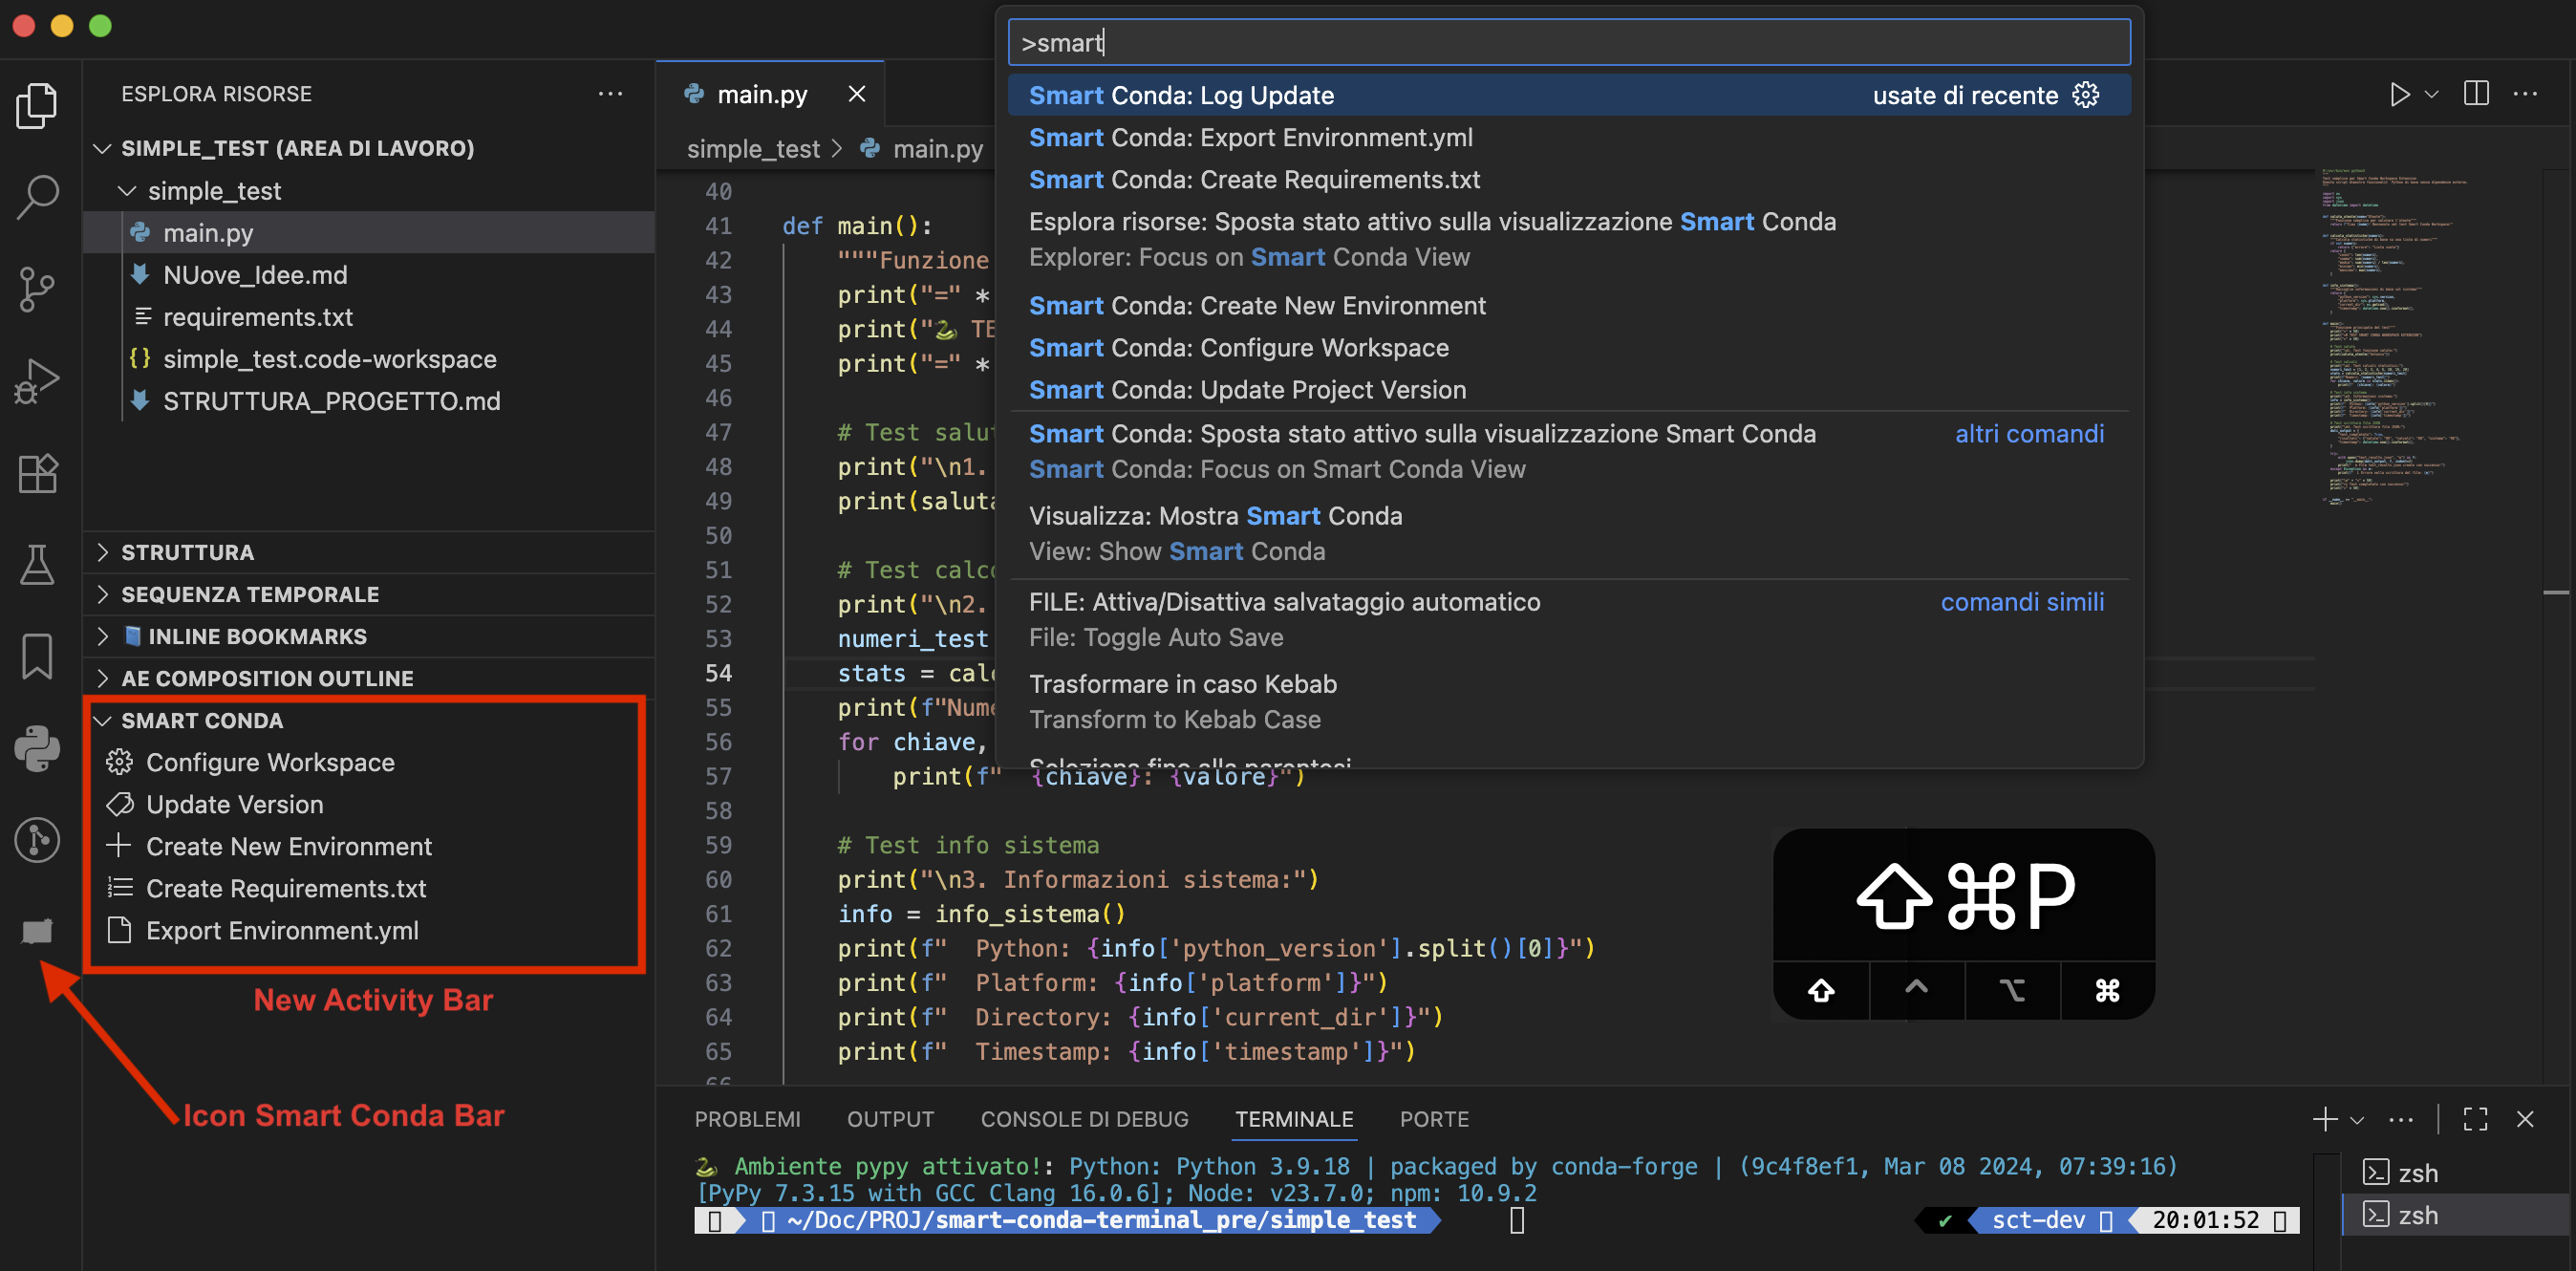
UI: Explorer + Activity Bar
- The "Smart Conda" view in Explorer is always visible when at least one workspace folder is open (
workspaceFolderCount > 0)
- The Activity Bar icon provides quick access without affecting Explorer section visibility
- Removed "Show/Hide in Explorer" button from TreeView and
smartConda:explorerVisible logic
- TreeView exposes 5 operational actions: Configure Workspace, Update Version, Create New Environment, Create Requirements.txt, Export Environment.yml
- Updated manifest (
vscode-extension/package.json): Explorer view when condition set to workspaceFolderCount > 0

Activation Notes (projects without environment.yml)
- The extension activates on startup and when a workspace folder is present
environment.yml is optional: if absent, you can still run Smart Conda: Configure Workspace and select a conda environment manually- Environment name inference in some features prefers
environment.yml if present; otherwise falls back to heuristic detection or prompts
Requirements
For Workspace Configuration
- Any conda environment available
- Write permissions in project directory
- Shell configuration file write permissions
For Version Updates
scripts/update-version.js script in your projectpackage.json or pyproject.toml with version field- Git repository (optional, for automatic commits)
Troubleshooting
"No conda environments found"
- Ensure conda is installed and in PATH
- Run
conda env list in terminal to verify
- Check conda initialization in shell configuration
"update-version.js not found"
- Ensure
scripts/update-version.js exists in your project root (not in the extension)
- Check file permissions
- Script must be executable Node.js file
"Extension commands not showing"
- Reload VS Code window:
Ctrl+Shift+P → "Developer: Reload Window"
- Check extension is enabled in Extensions panel
- Ensure you have a workspace folder open
- In the Output panel, select
Smart Conda Logs to see activation details
Shell auto-activation not working
- Restart your terminal or run:
source ~/.zshrc (Unix) or restart PowerShell (Windows)
- Check that the function was added to your shell configuration file
- Verify conda is properly initialized in your shell
Package.json Structure for Version Management
To use the "Update Project Version" command, your package.json must include:
{
  "name": "your-project-name",
  "version": "1.0.0",
  "description": "Your project description",
  "scripts": {
    "version:patch": "node scripts/update-version.js patch",
    "version:minor": "node scripts/update-version.js minor",
    "version:major": "node scripts/update-version.js major"
  },
  "author": "Your Name",
  "license": "MIT"
}
Required fields:
name: Project identifierversion: Current version (semantic versioning)description: Project description
Recommended fields:
scripts: npm scripts for version managementauthor: Project authorlicense: License type
Note: Even for Python-only projects, a minimal package.json is required for version management functionality.
Windows
- Requires PowerShell (PowerShell 5.x or 7.x supported)
- Creates PowerShell profile if it doesn't exist
- Uses Windows-style paths and commands
macOS/Linux
- Supports zsh and bash shells
- Uses Unix-style paths and conda activation
- Integrates with existing shell functions
Manual Configuration
If automatic detection fails, you can manually:
Check conda setup:
conda --version
conda env list
Verify project structure:
ls -la scripts/update-version.js
cat package.json | grep version
Test extension manually:
- Open Command Palette:
Ctrl+Shift+P
- Type: "Smart Conda"
- Select available commands
License
MIT License - feel free to modify and distribute.
Contributing
- Fork the repository
- Create feature branch
- Make changes in
vscode-extension/ directory
- Test with
F5 (Run Extension)
- Submit pull request
Support
For issues and feature requests:
- Check troubleshooting section above
- Verify prerequisites are met
- Create detailed issue report with:
- VS Code version
- Operating system
- Conda version
- Project structure
- Error messages
Smart Conda Workspace - Streamline your conda-based development workflow across all platforms!