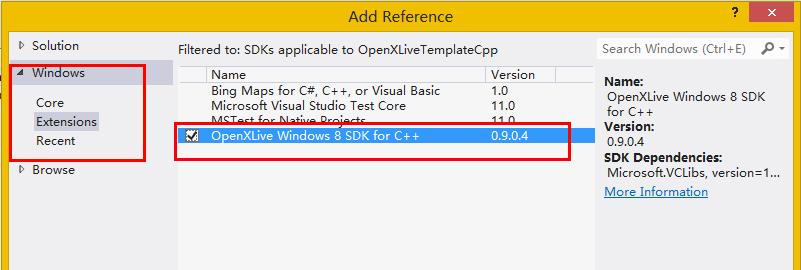
OpenXLive Windows 8 SDK Inheritance OpenXLive for Windows Phone Cloud services, support for developers Windows Store Style games or applications to increase the clouds and SNS Features help developers to minimize the workload in the cloud services integration into your game or application. These cloud services include: high scores, games, social networking, and cloud storage capabilities. You can call the API WinRT Components provide, to call the OpenXLive Cloud features, with a minimal amount of code to implement your social features of the game. Or you can use OpenXLive Windows 8 SDK which provides a set of WinRT UI Template, use the UI Templates, you can develop your own game system in the user interface by C#, DirectX/C++ and JS. 1. Adding a reference In Visual Studio 2012 Solution Explorer, select the Project Node, right-click, and from the pop-up menu, select "Reference..." and click the "Add New Reference..." button as below:
2. Adding OpenXLive Service First open the application entry file App.xaml.cpp , In the Top of the cs file add OpenXLive Reference:
C++ Edit|Remove cplusplususing namespace OpenXLive; using namespace OpenXLive;
Then in the function of App::OnLaunched add a GameSession at the bottom:
C++ Edit|Remove cplusplusGameSession^ session = XLiveGameManager::CreateSession(APISecretKey);Windows::Globalization::ApplicationLanguages::PrimaryLanguageOverride = "en-US";OpenXLivePages::XLiveUIManager::Background = "ms-appx:///Assets/Background.jpg";OpenXLivePages::XLiveUIManager::Initialize(this, session); auto op = session->OpenAsync();op->Completed = ref new AsyncOperationCompletedHandler<AsyncProcessResult^>([=](IAsyncOperation<AsyncProcessResult^>^ operation, AsyncStatus status){ if(operation->ErrorCode.Value == 0) { if(operation->GetResults()->ReturnValue) { // Create game session succeeded } else { // Create game session failed } }});GameSession^ session = XLiveGameManager::CreateSession(APISecretKey); Windows::Globalization::ApplicationLanguages::PrimaryLanguageOverride = "en-US"; OpenXLivePages::XLiveUIManager::Background = "ms-appx:///Assets/Background.jpg"; OpenXLivePages::XLiveUIManager::Initialize(this, session); auto op = session->OpenAsync(); op->Completed = ref new AsyncOperationCompletedHandler<AsyncProcessResult^>([=](IAsyncOperation<AsyncProcessResult^>^ operation, AsyncStatus status) { if(operation->ErrorCode.Value == 0) { if(operation->GetResults()->ReturnValue) { // Create game session succeeded } else { // Create game session failed } } });
Now, in one of yourevent handlers, you can show up an OpenXLive UI Page, such as:
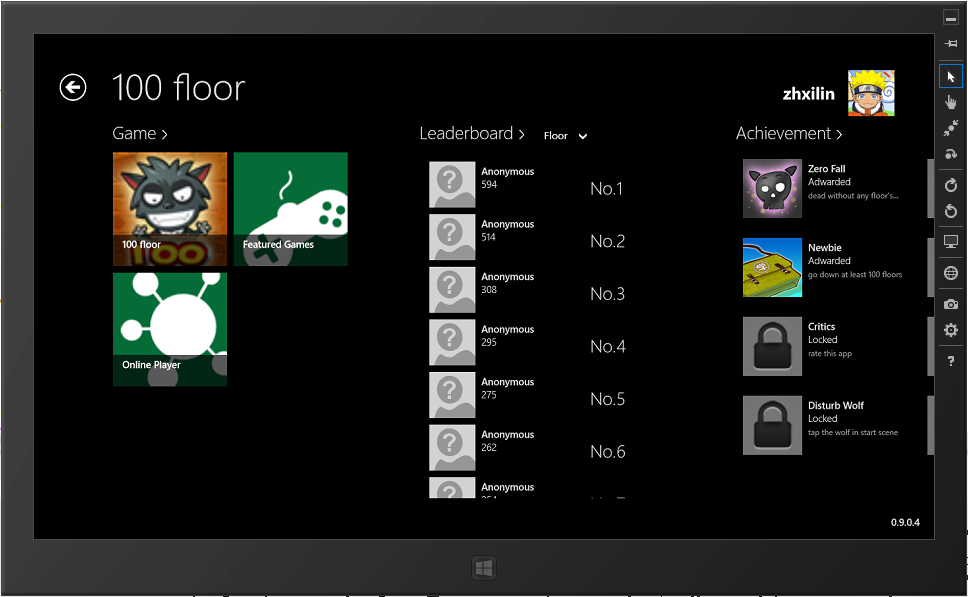
C++ Edit|Remove cplusplusXLiveUIManager::Show(XLivePagesType::HomePage); XLiveUIManager::Show(XLivePagesType::HomePage); And you will see the following UI:
3.References OpenXLive Website
OpenXLive Developer Website http://developer.openxlive.com/
Getting Started with OpenXLive http://wiki.openxlive.com/Getting-Started-with-Open-XLive.ashx
More questions, visit our Forum: Technical Support E-Mail: support@openxlive.com QQ Group: 149993869 Technical Support Forum: http://bbs.openxlive.net/ Facebook: http://www.facebook.com/openxlive Twitter: https://twitter.com/openxlive |


