🚀 Dynamic Data Table Extension for Azure DevOps


Transform your Azure DevOps work items with powerful, customizable data tables!
This extension provides a fully configurable data table control that can be added to any work item type. Create custom tables with your own columns, data types, and validation rules - all through simple JSON configuration.
📦 Source Code: https://github.com/shashankdhakated/dynamic-datatable-extension
🐛 Report Issues: https://github.com/shashankdhakated/dynamic-datatable-extension/issues
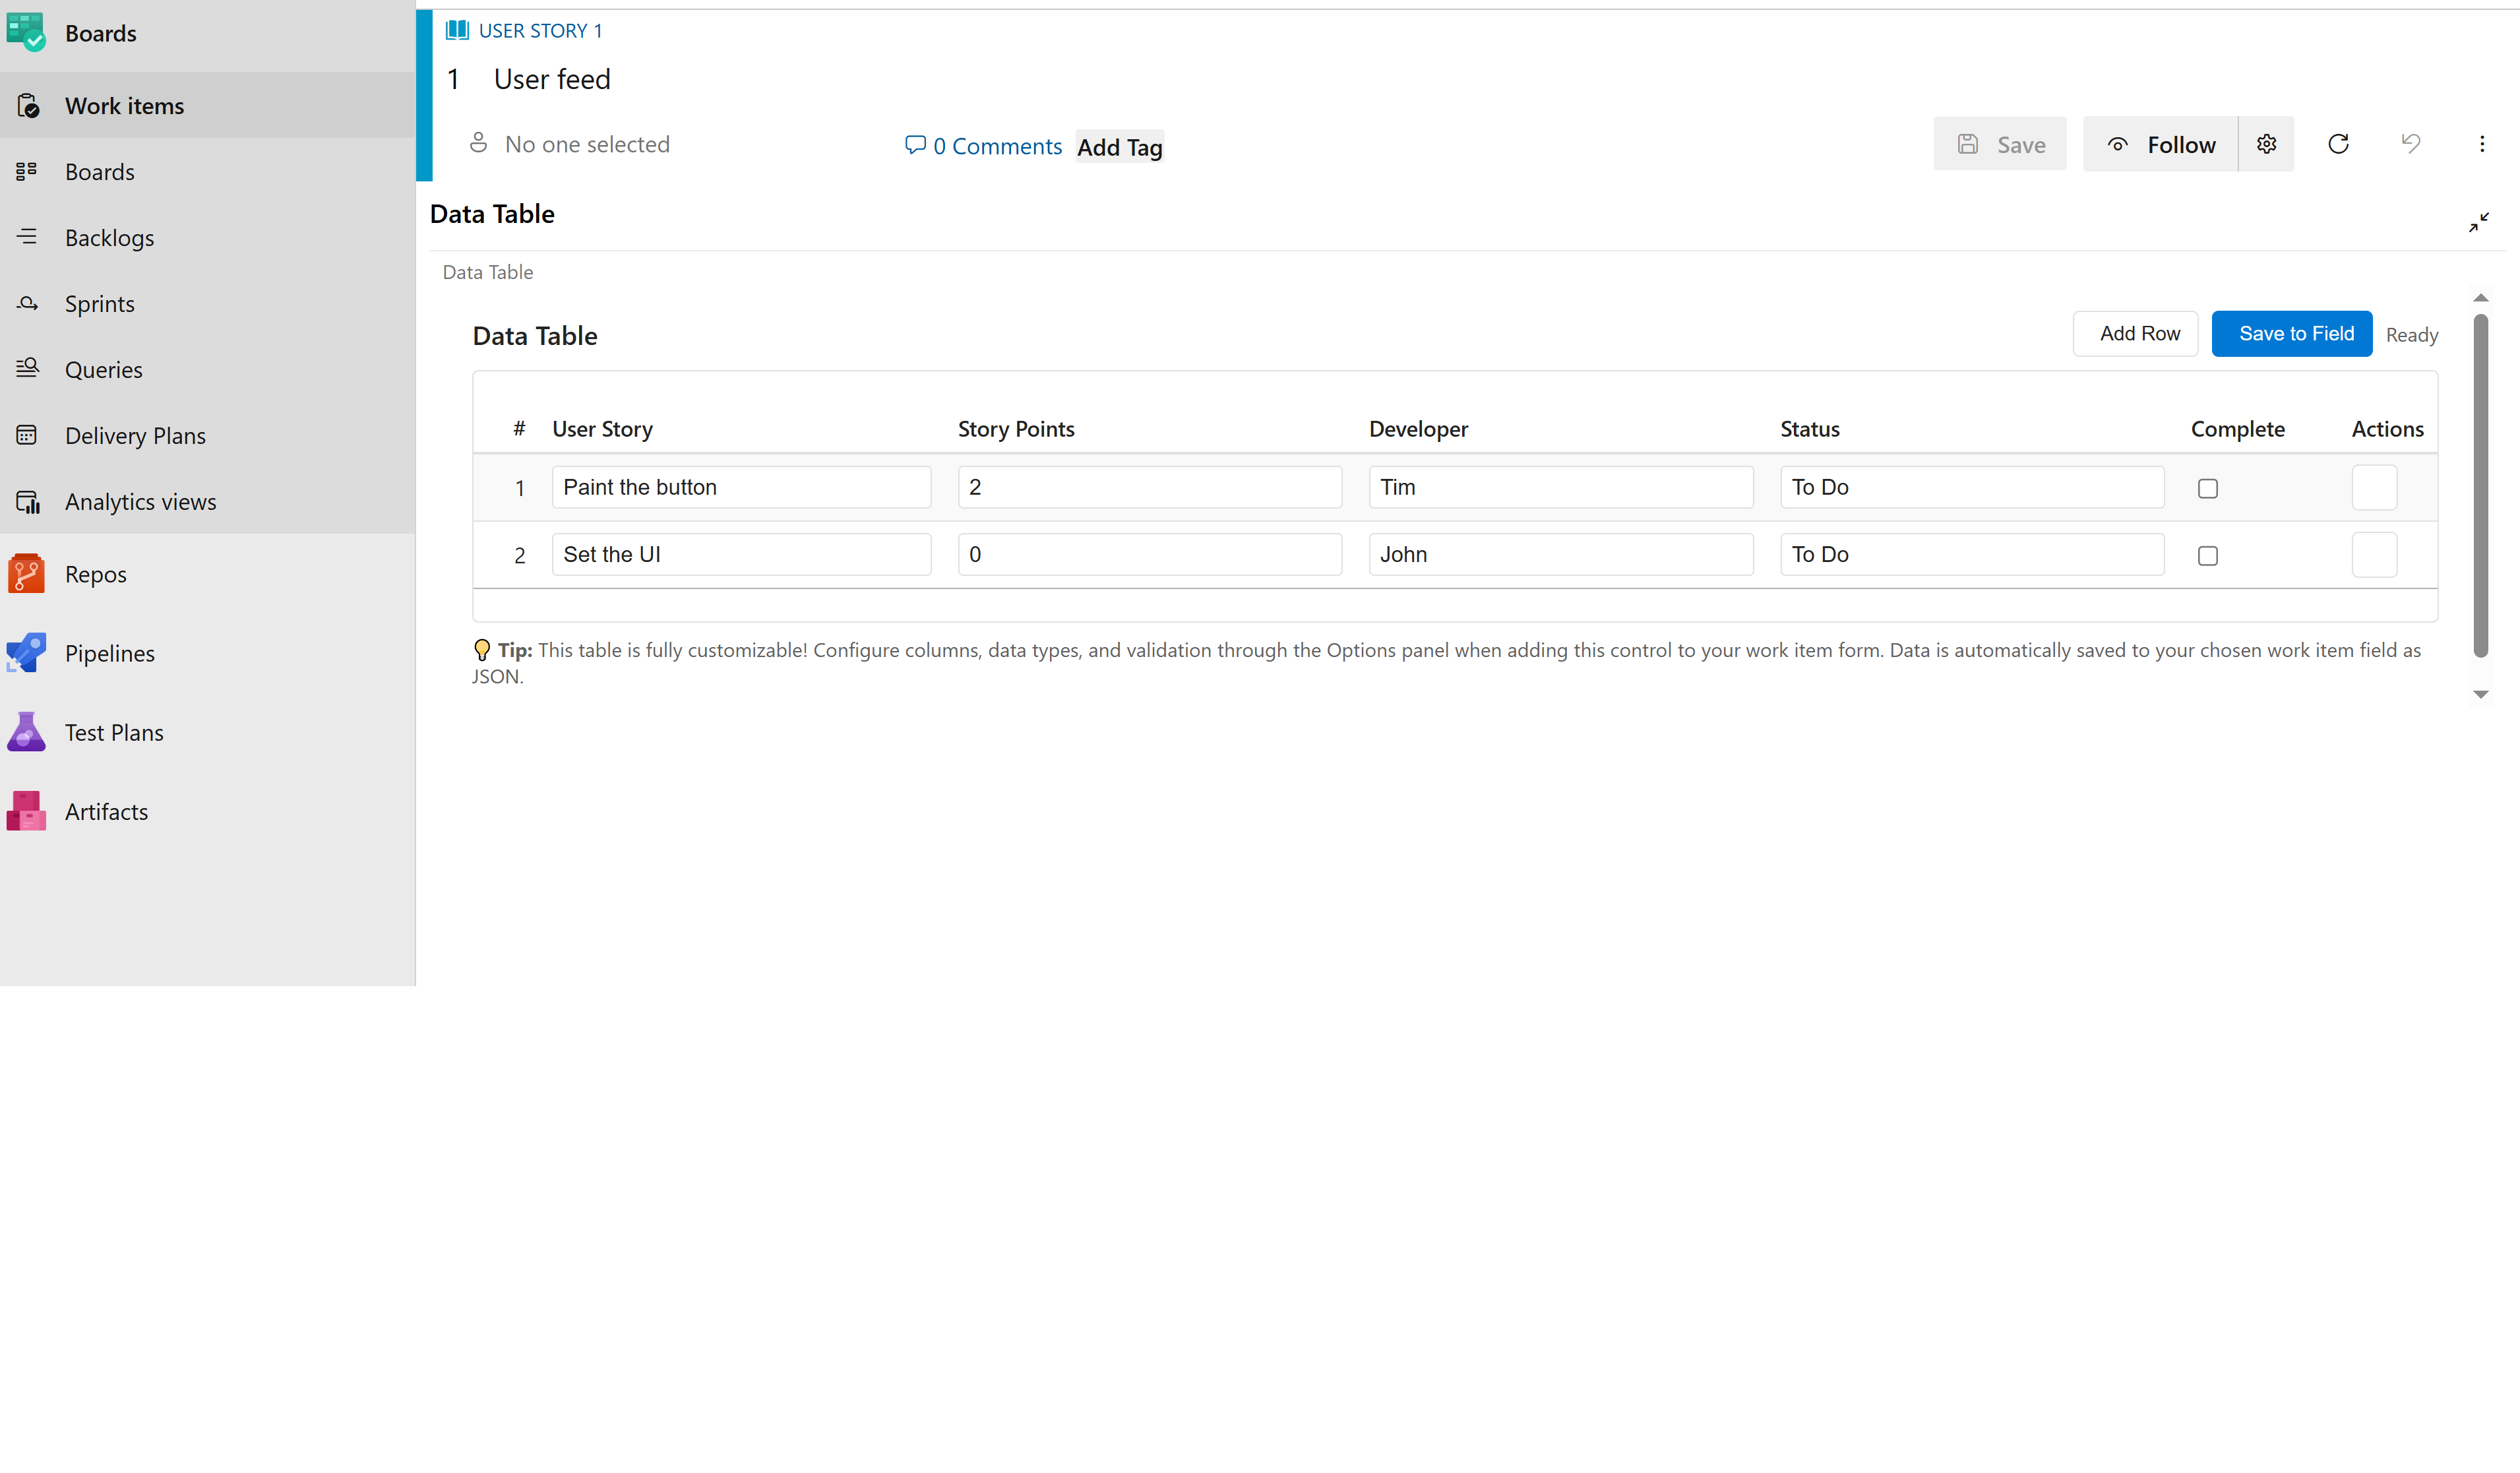 Dynamic Data Table Extension showing custom columns in a work item
✨ Key Features
🎯 Fully Dynamic & Configurable
- Custom Columns: Define any number of columns with custom names and data types
- Multiple Data Types: Support for text, numbers, booleans, dates, and more
- Flexible Configuration: Easy JSON-based configuration through Azure DevOps Options panel
- Real-time Validation: Built-in validation for required fields and data types
🛡️ Enterprise-Ready & Reliable
- Backward Compatible: Existing data automatically migrates to new configurations
- Auto-Save: Changes are automatically saved as you type (with smart debouncing)
- Field Detection: Automatically finds and uses the correct work item field
- HTML Sanitization: Safely handles HTML fields and extracts JSON data
- Error Recovery: Graceful fallbacks and clear error messages
🎨 Beautiful & User-Friendly
- Azure DevOps Native Styling: Seamlessly integrates with Azure DevOps theme (light/dark)
- Responsive Design: Works perfectly on all screen sizes
- Intuitive Interface: Add rows, edit data, and delete entries with ease
📋 Complete Setup Guide: From Organization to Working Extension
🏢 Phase 1: Install Extension to Organization
Step 1: Access Azure DevOps Marketplace
- Navigate to the Azure DevOps Marketplace
- Search for "Dynamic Data Table Extension" or browse extensions
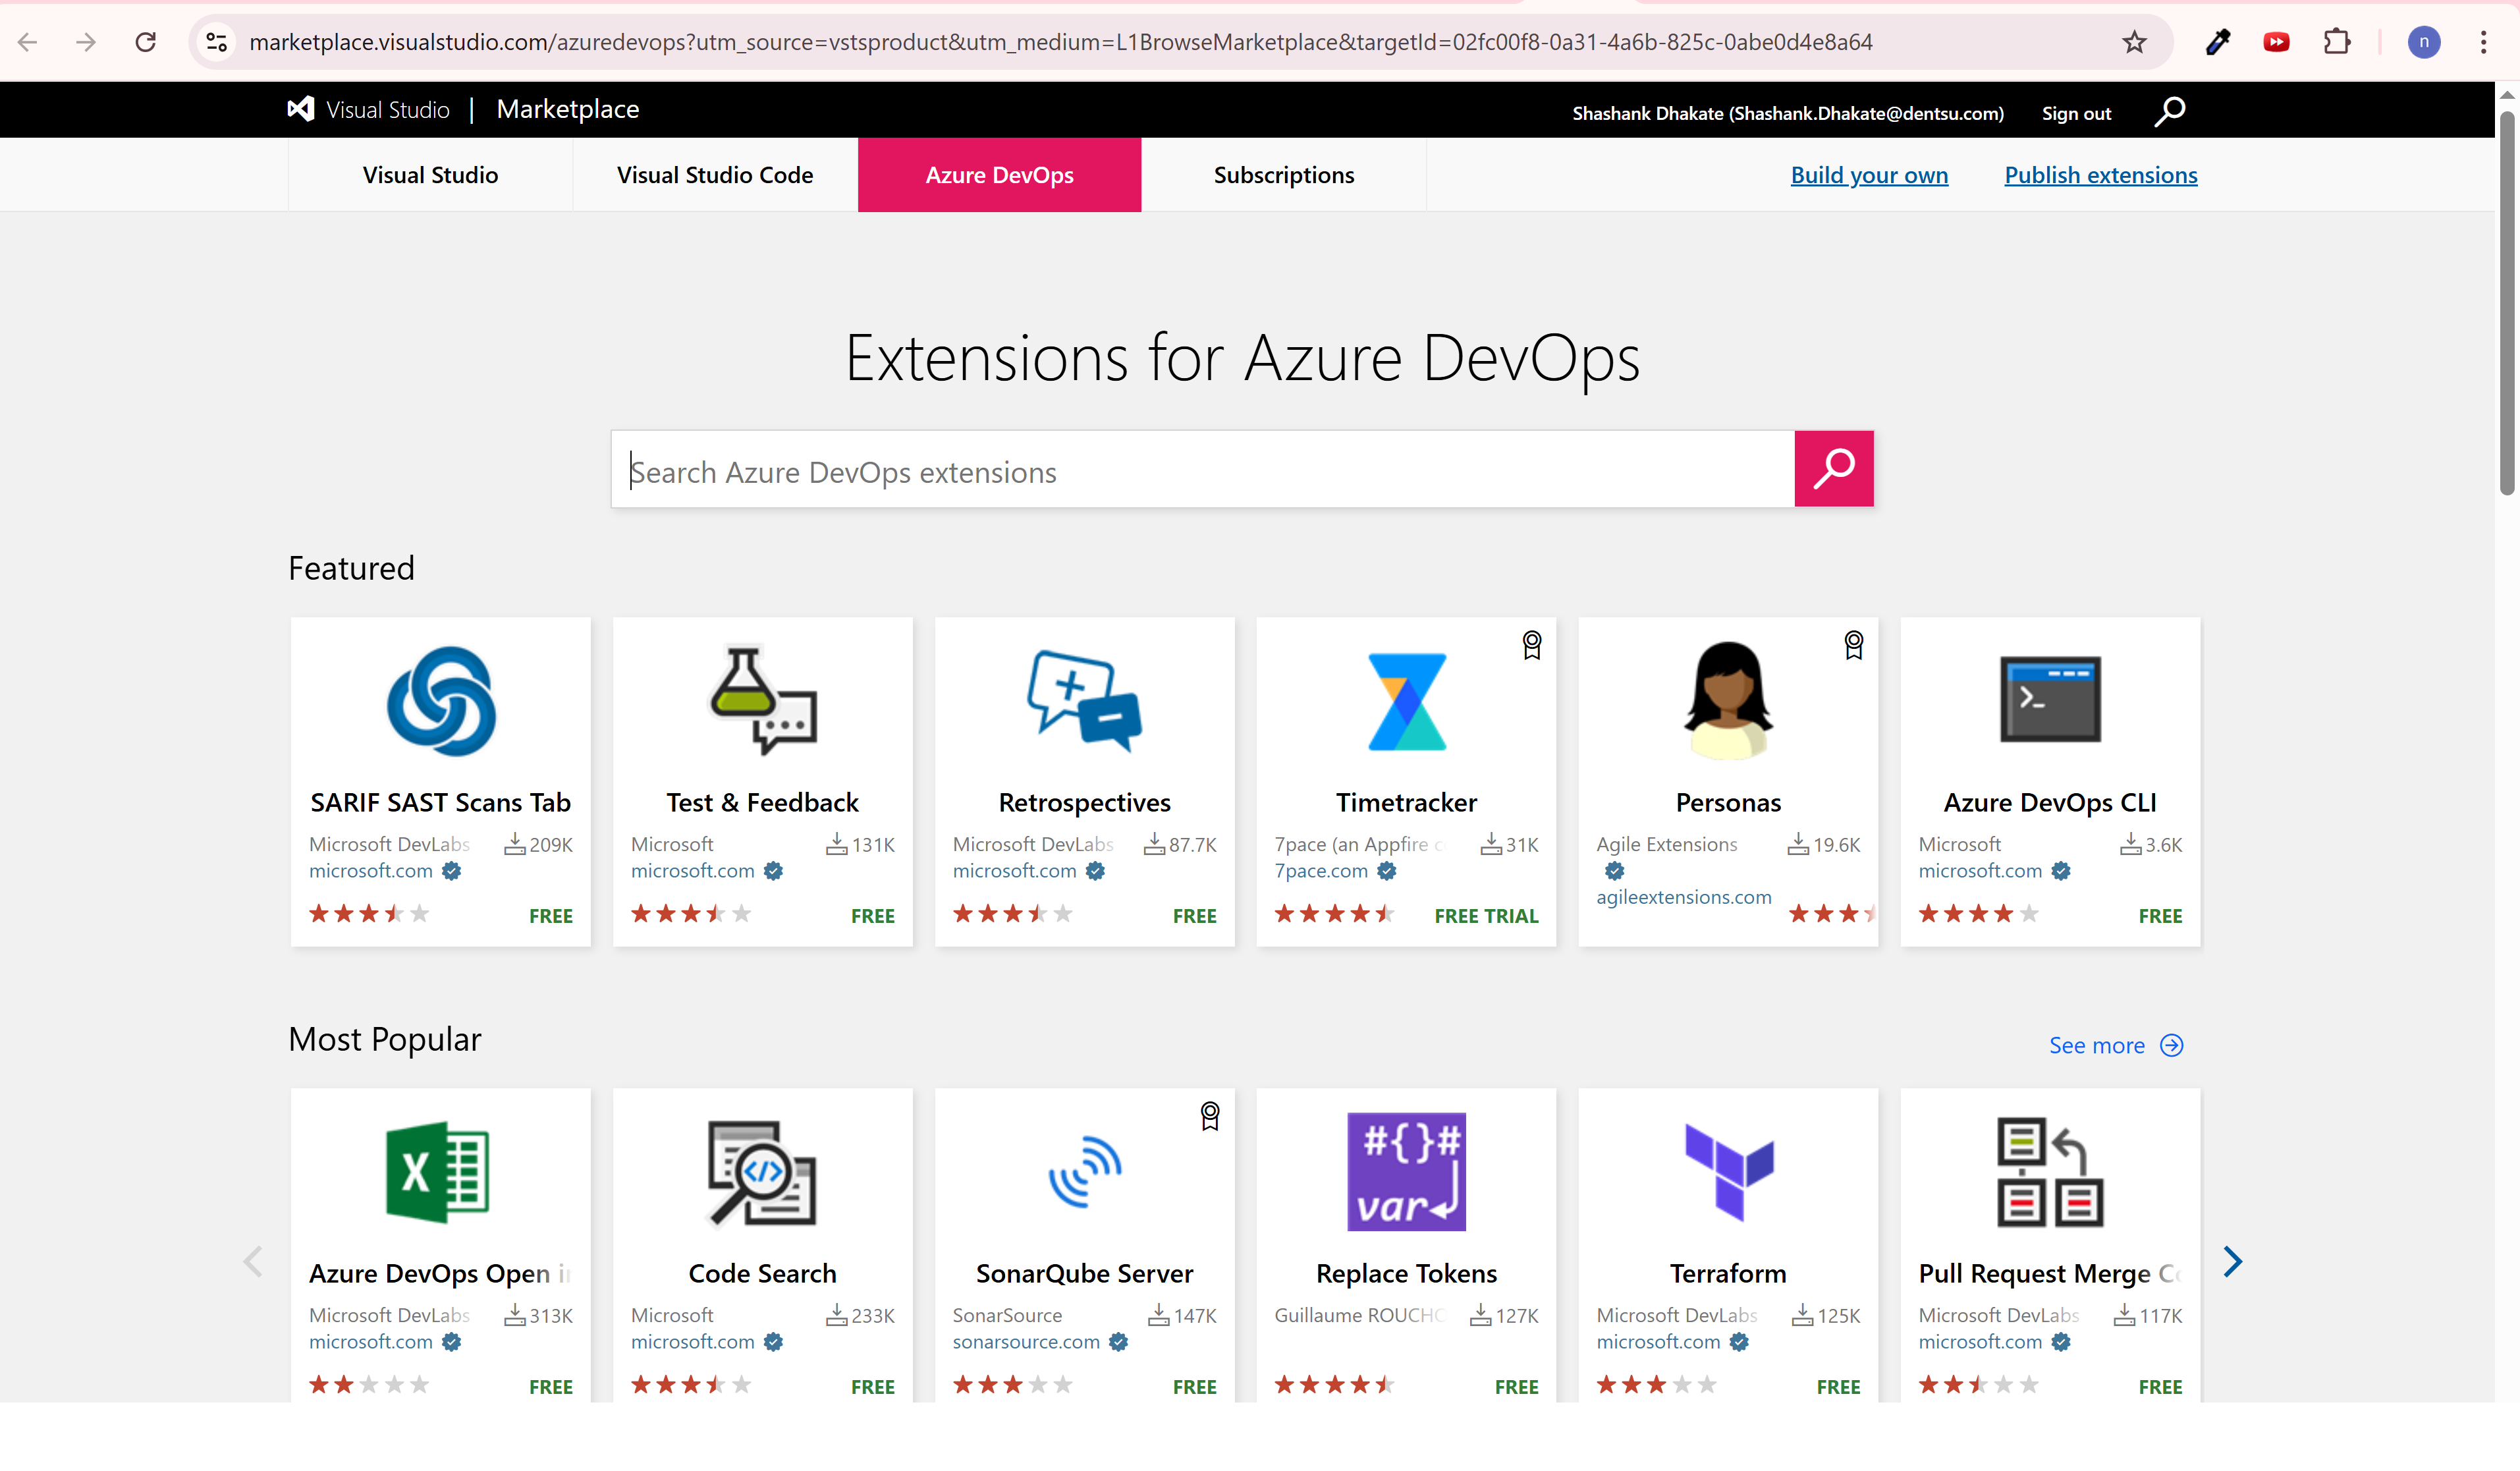 Azure DevOps Marketplace homepage
Step 2: Find and Install Extension
- Search for the extension in the marketplace
- Click on the extension to view details
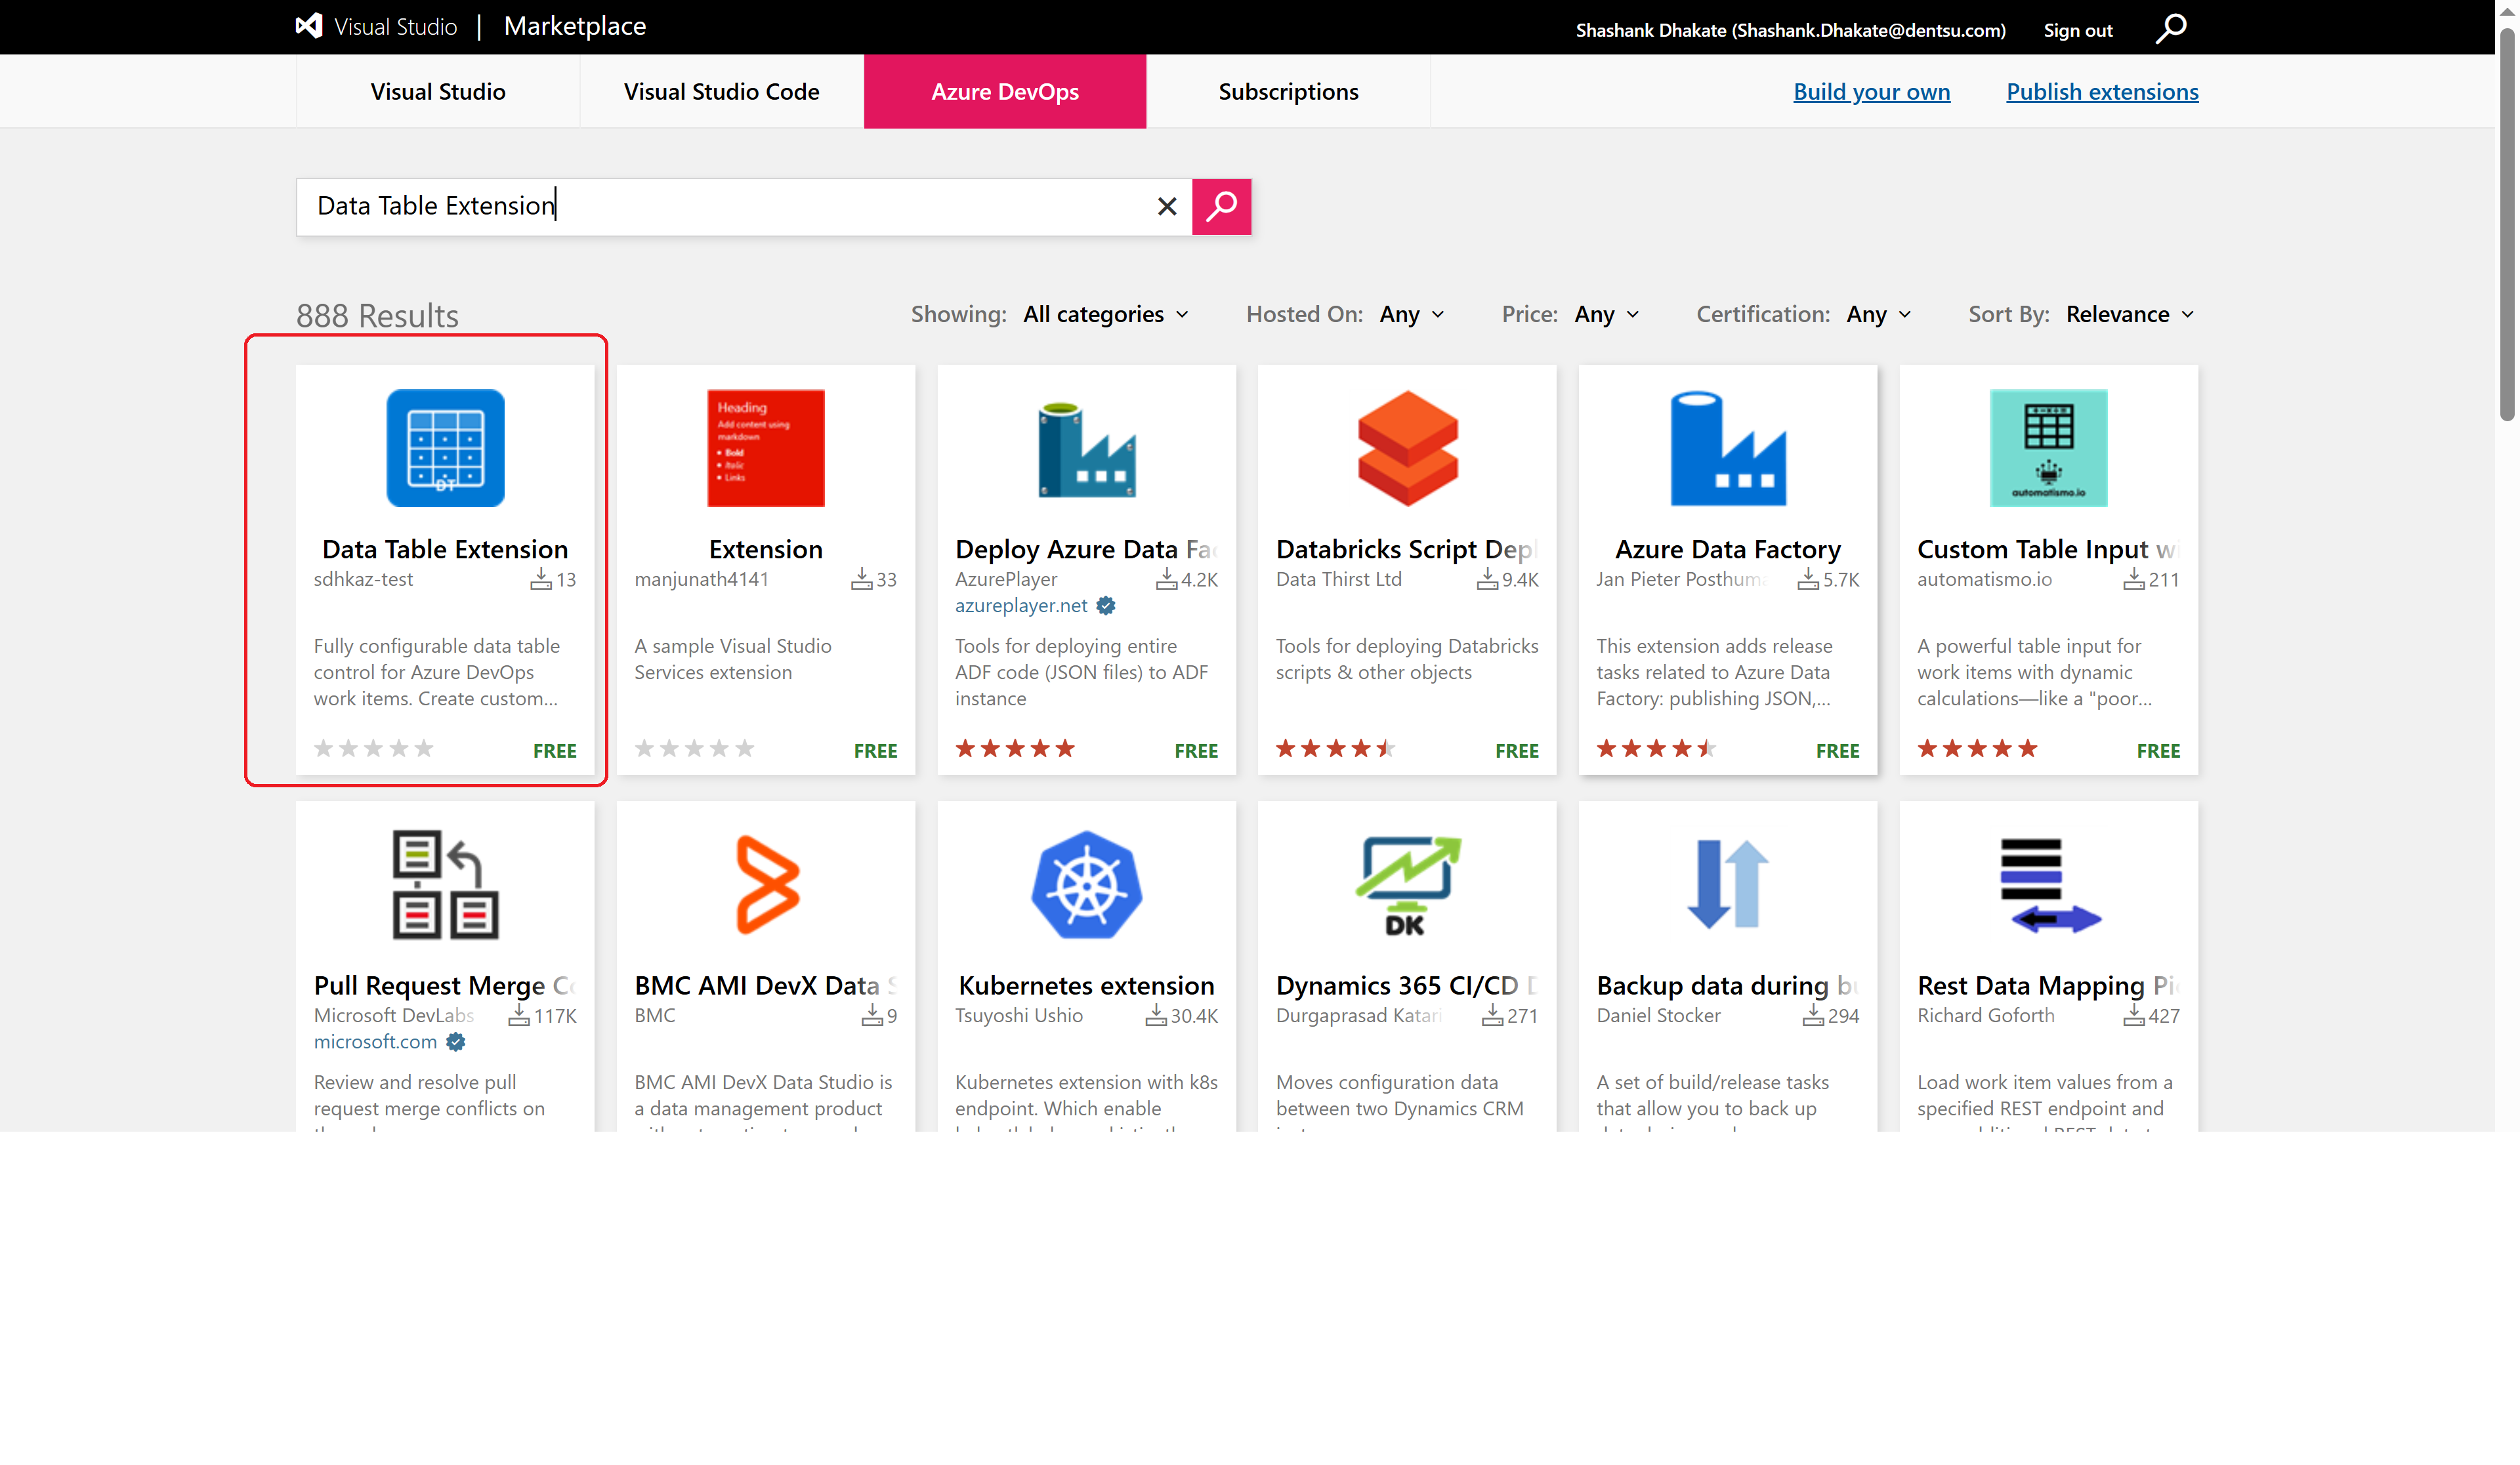 Searching for the extension in marketplace
- Click "Get it free" to start installation
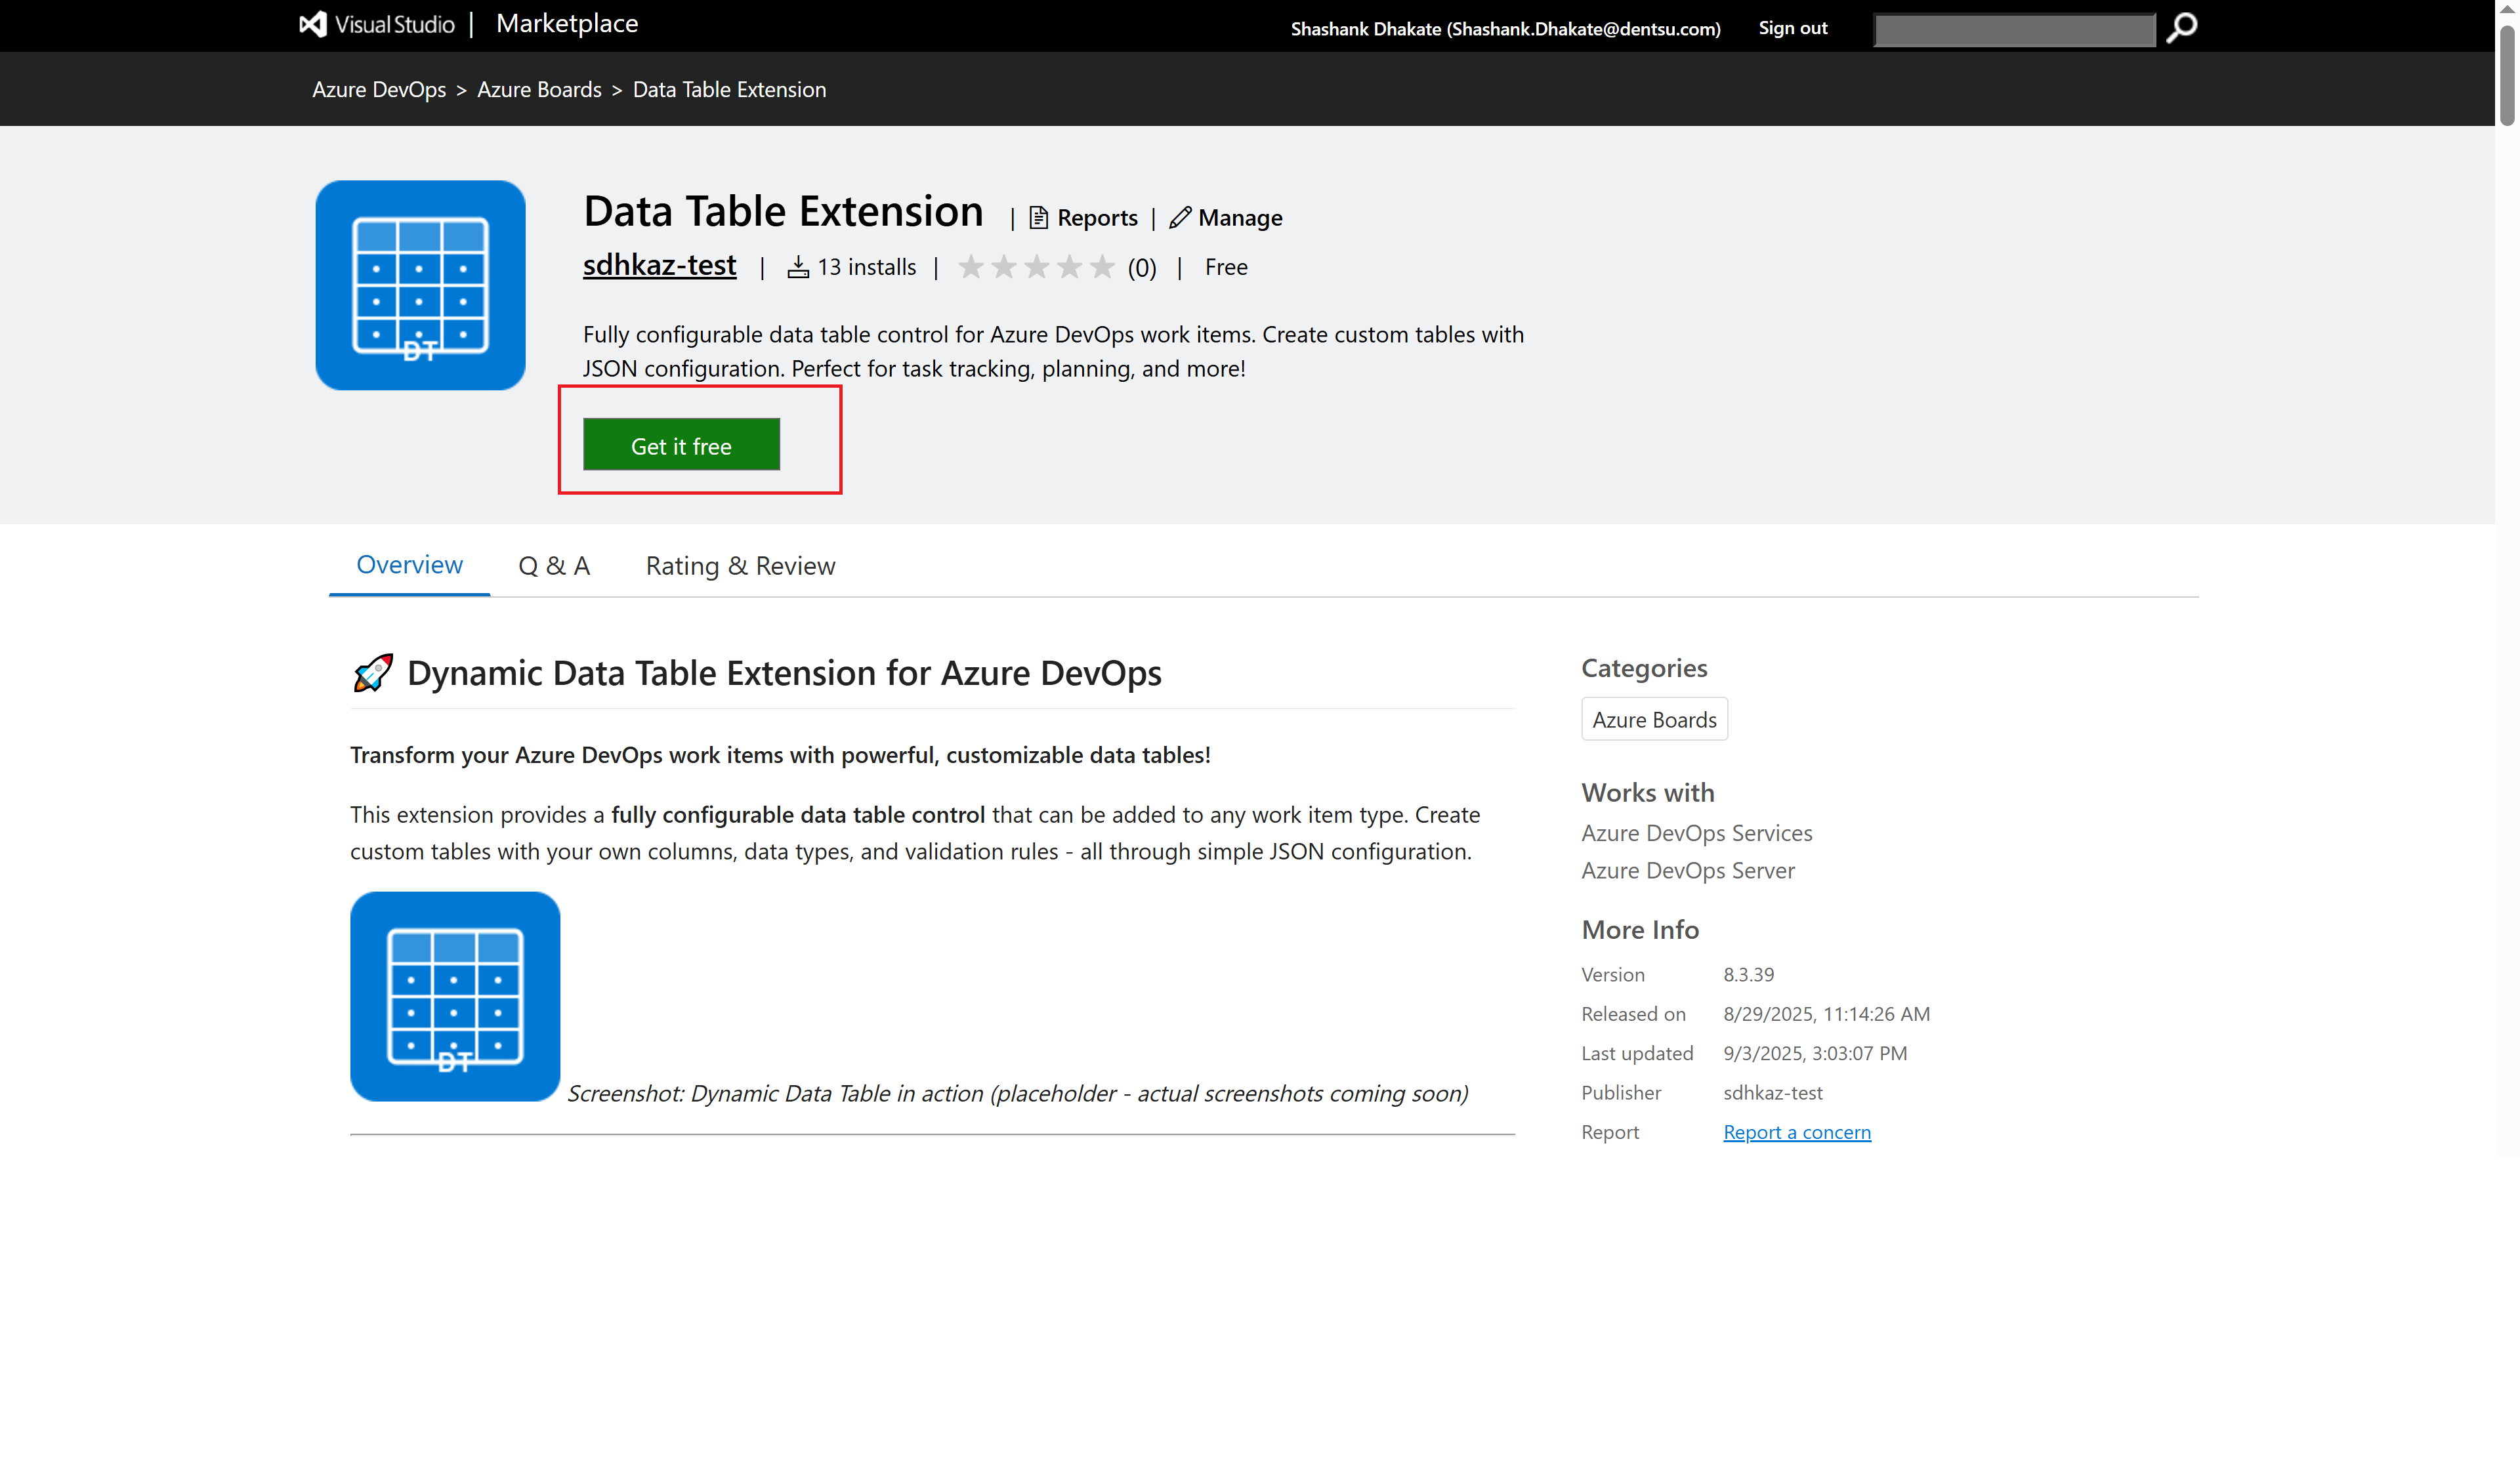 Extension details page with "Get it free" button
Step 3: Select Organization
- Choose the organization where you want to install the extension
- Click "Install" to proceed
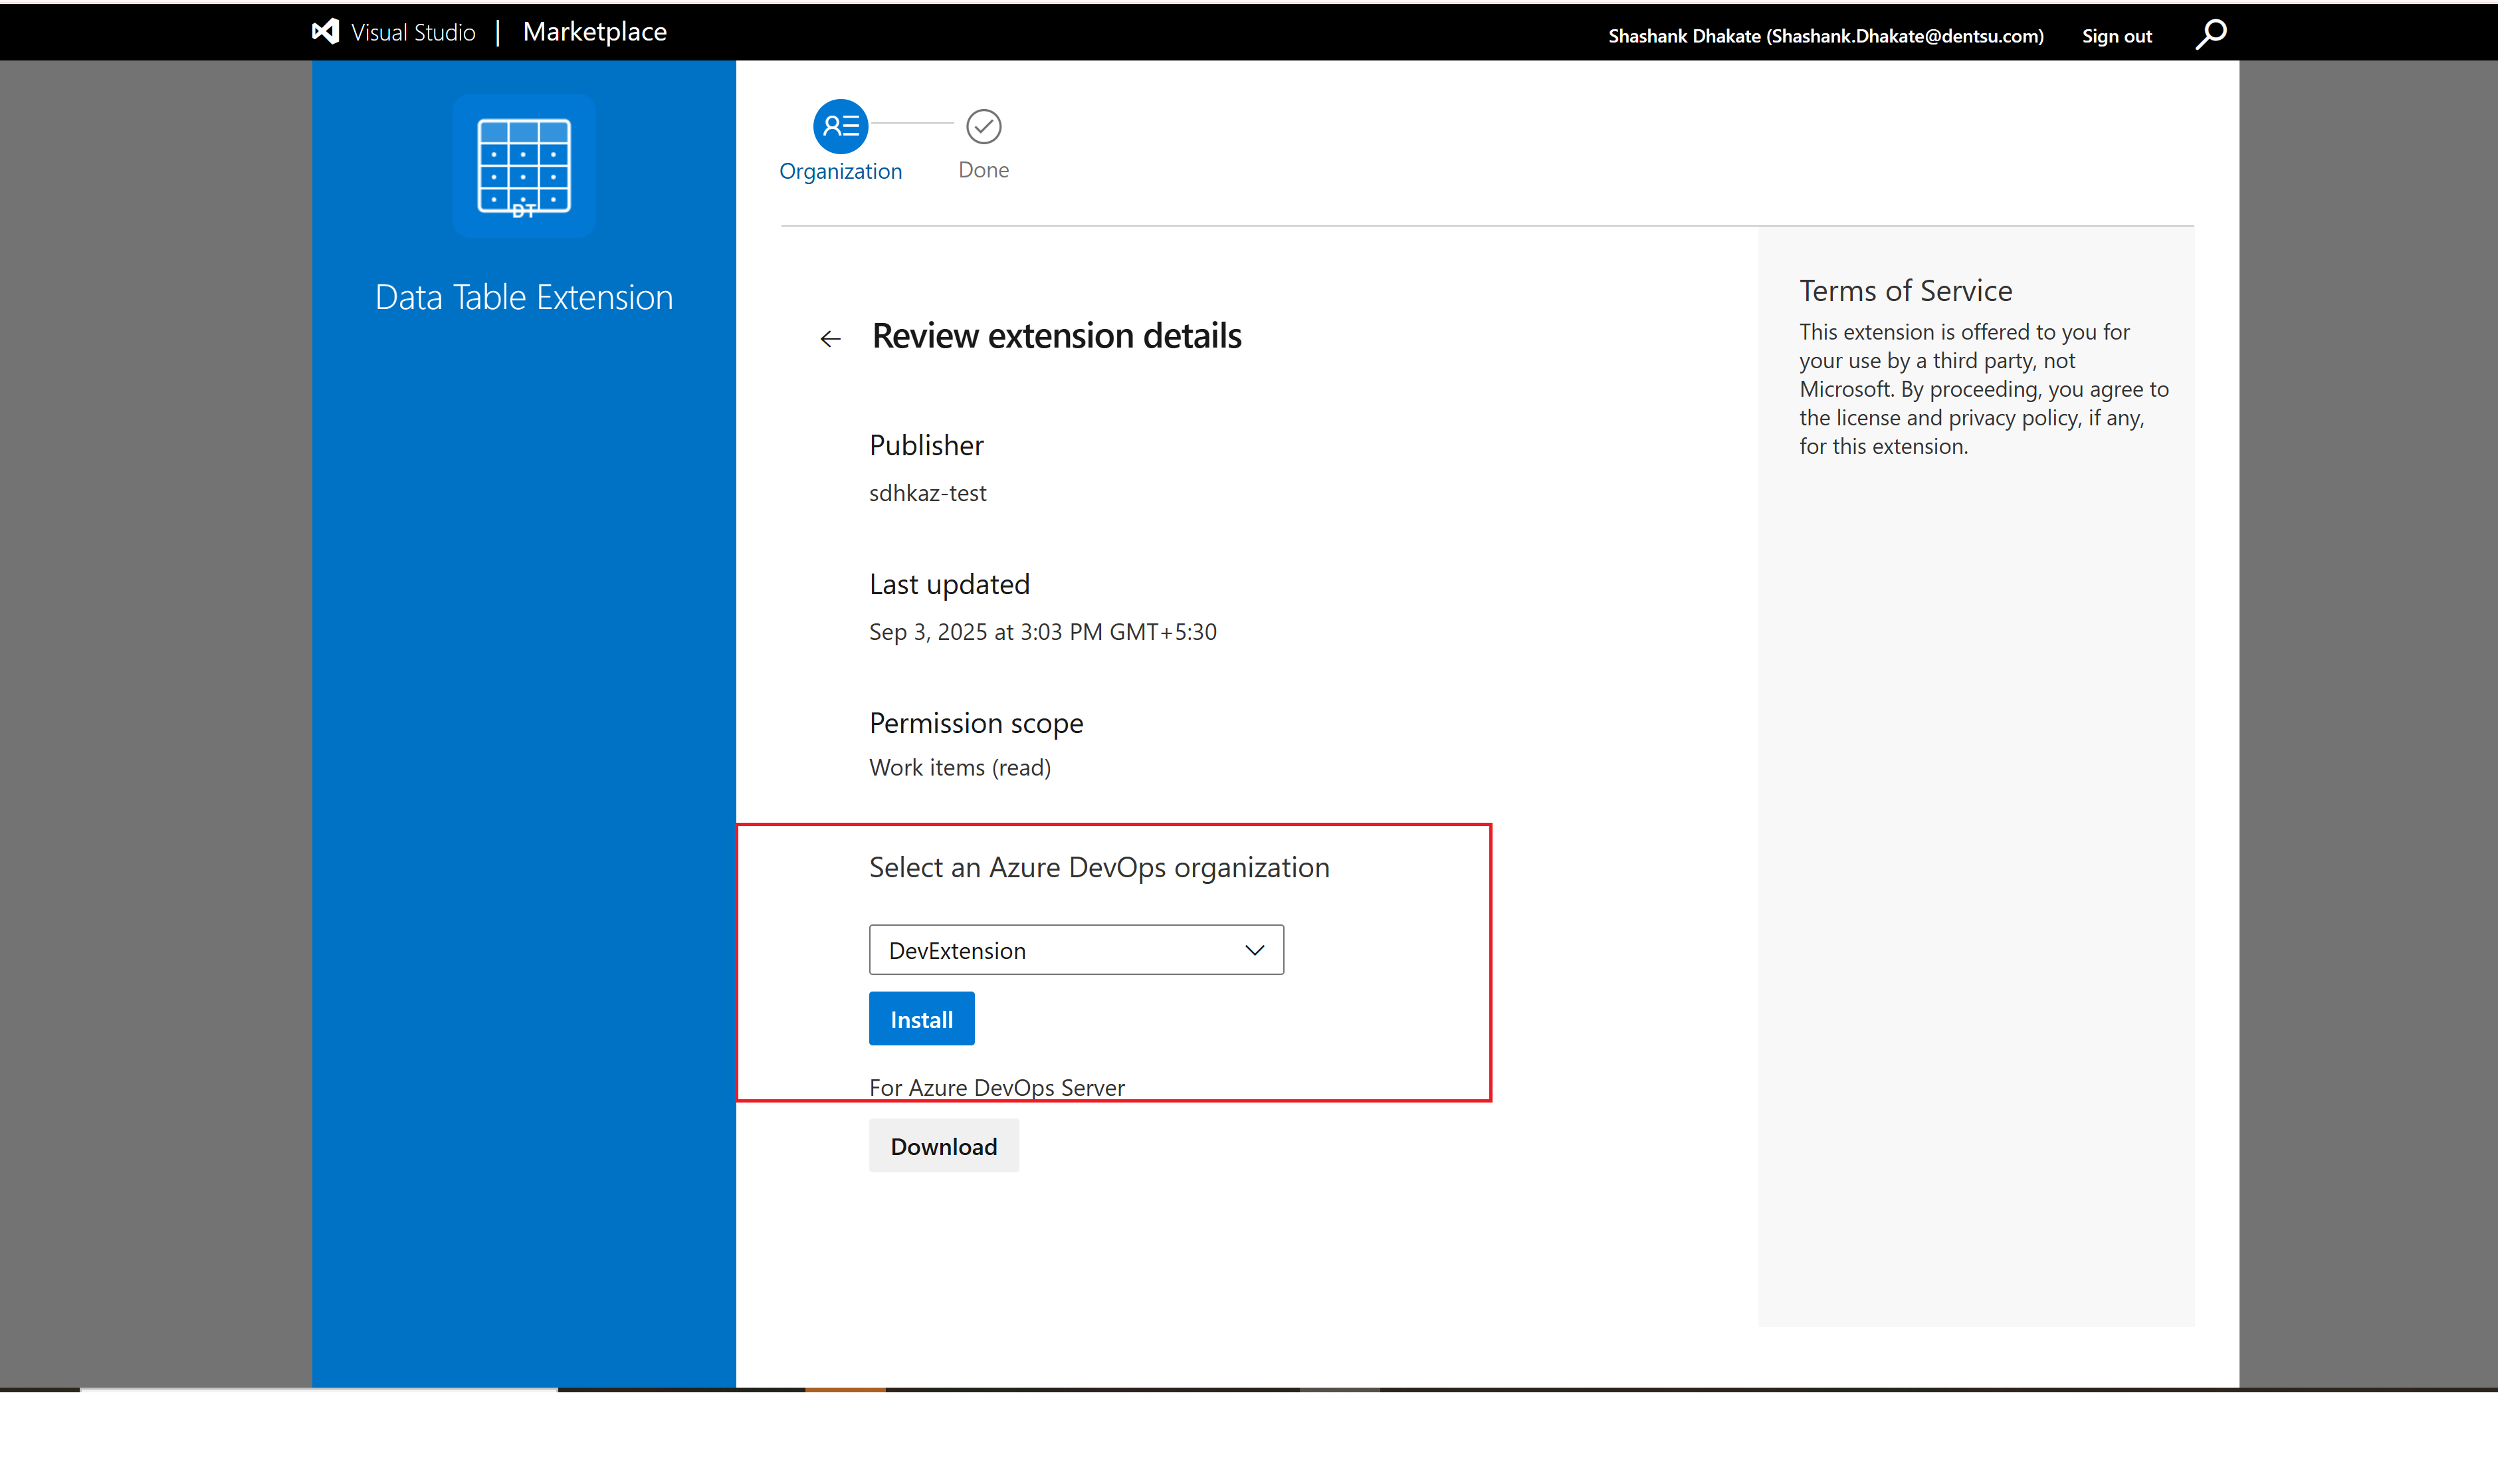 Selecting target organization for installation
Step 4: Confirm Installation
- Review the extension permissions and details
- Click "Proceed to organization" to complete installation
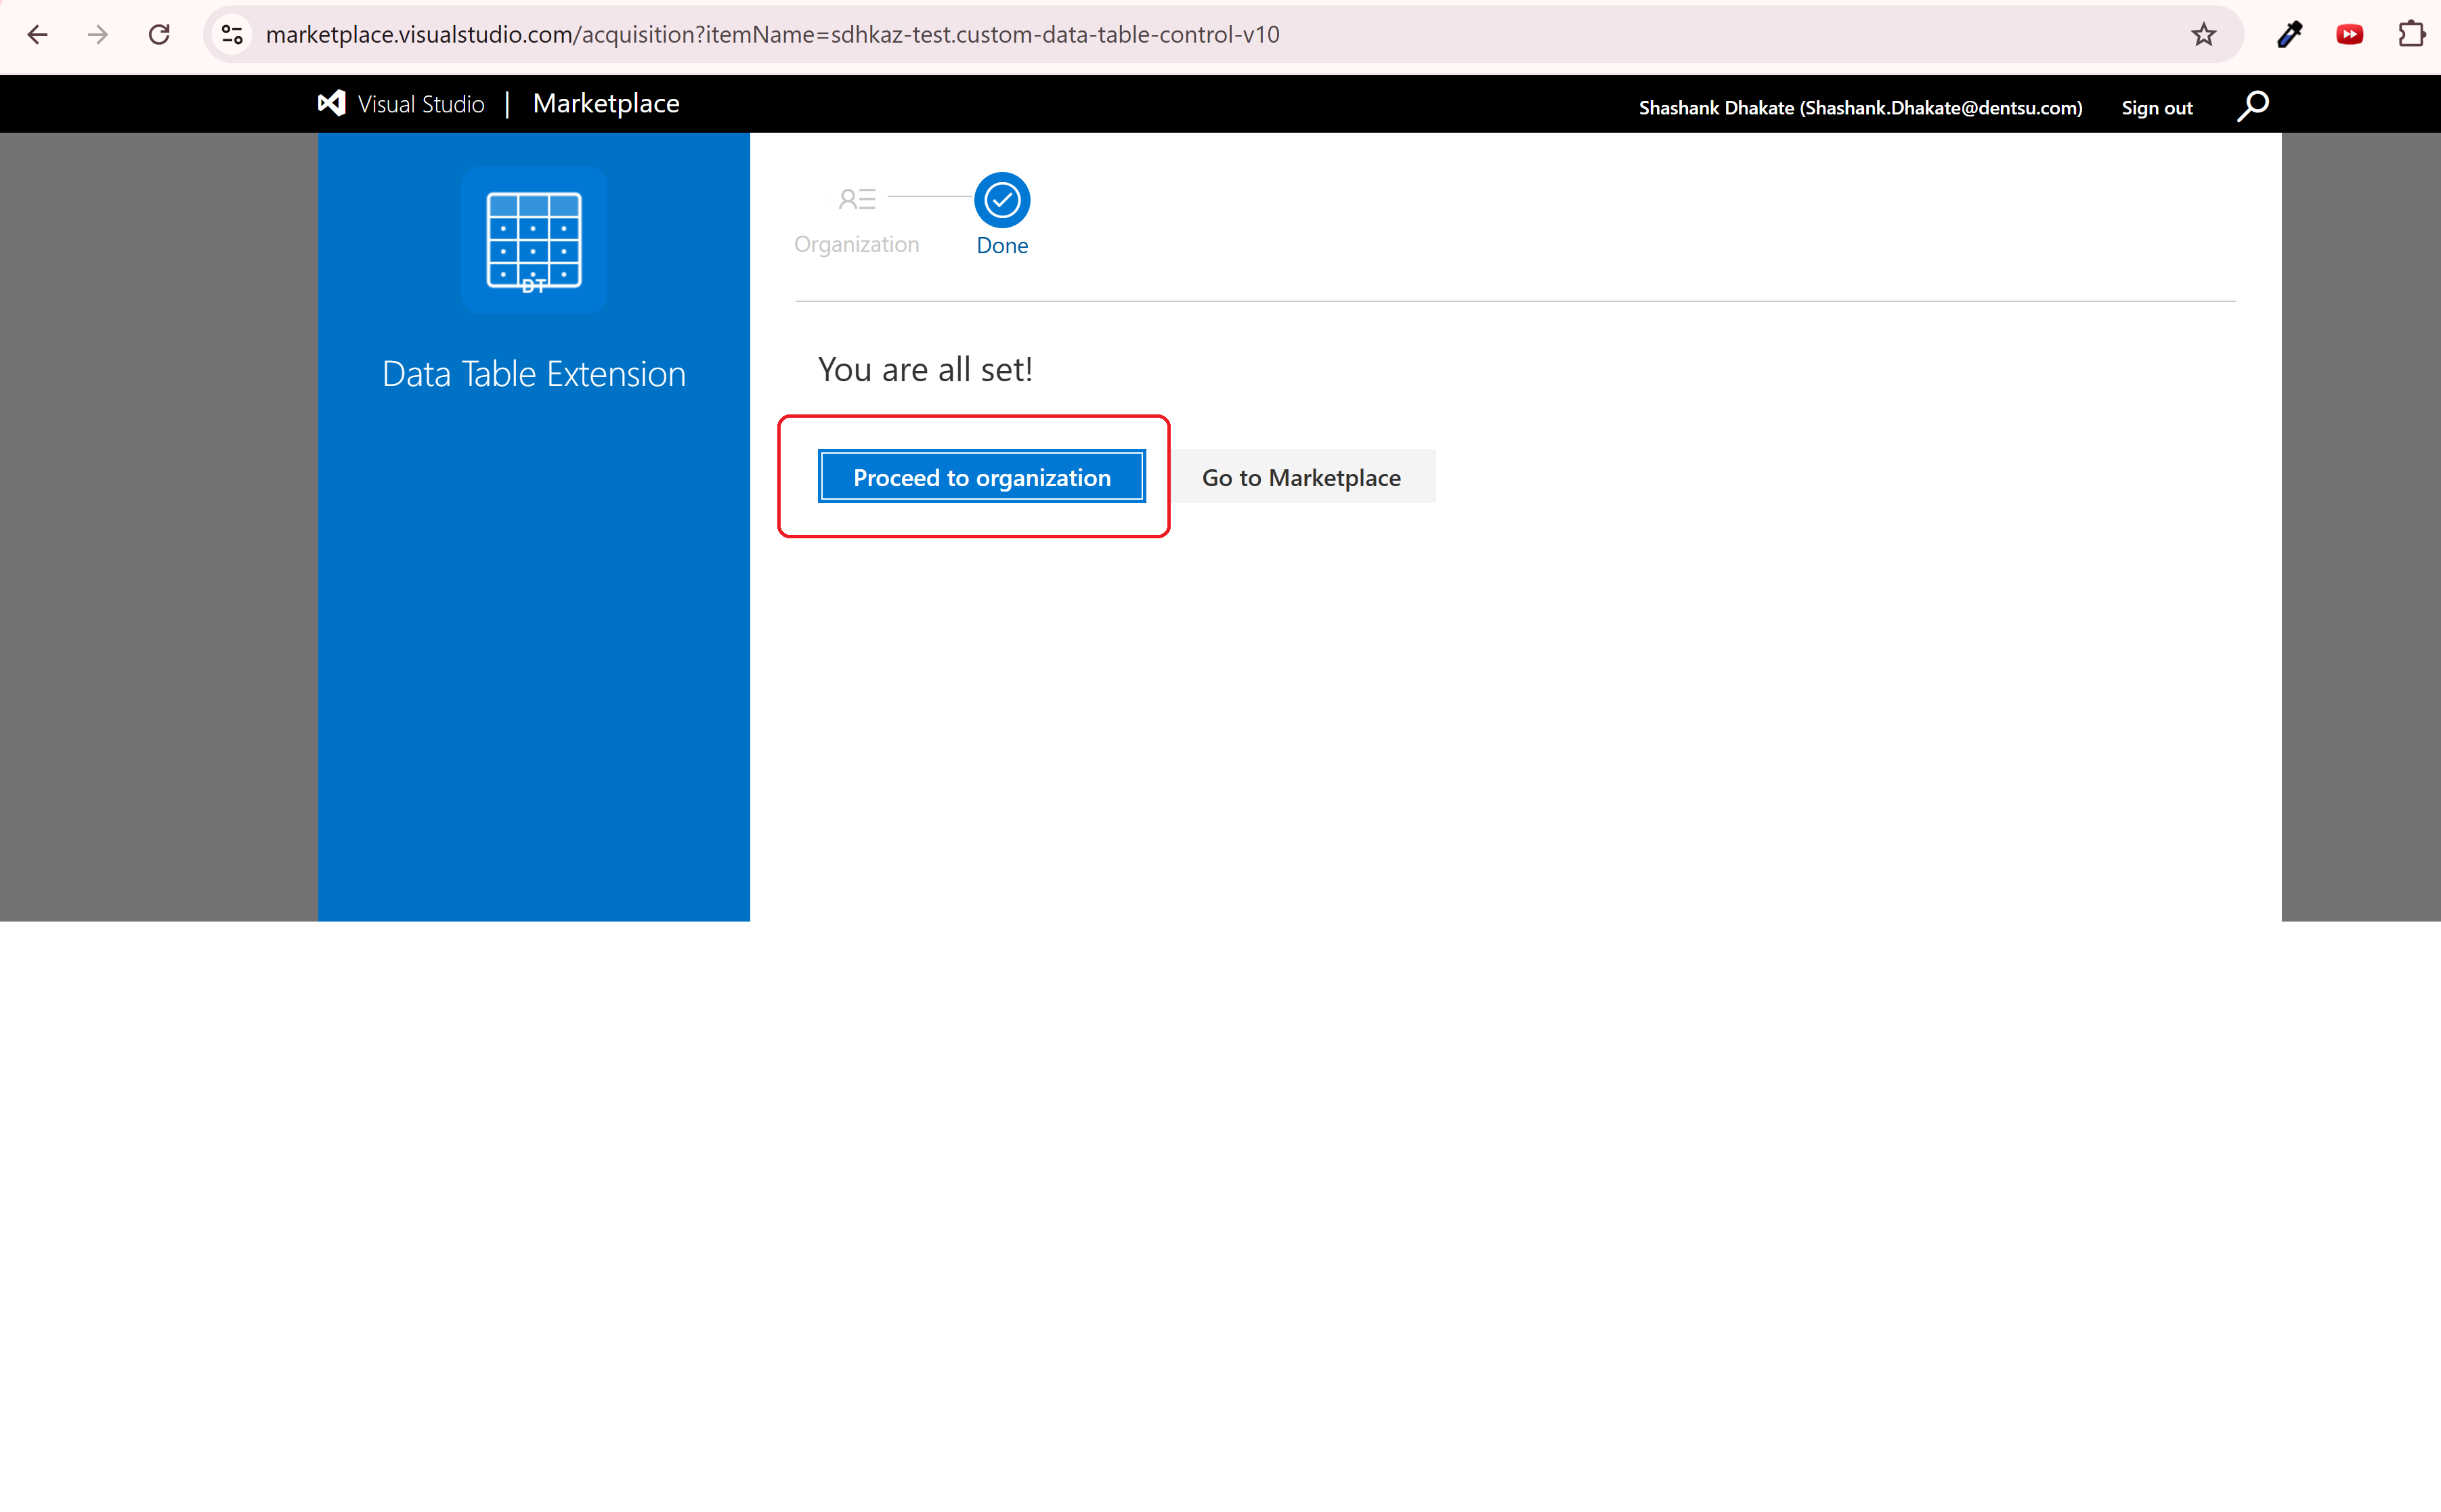 Final confirmation before installation
🔧 Phase 2: Create Inherited Process
Step 5: Access Organization Settings
- Go to your Azure DevOps organization
- Click on "Organization Settings" (bottom left)
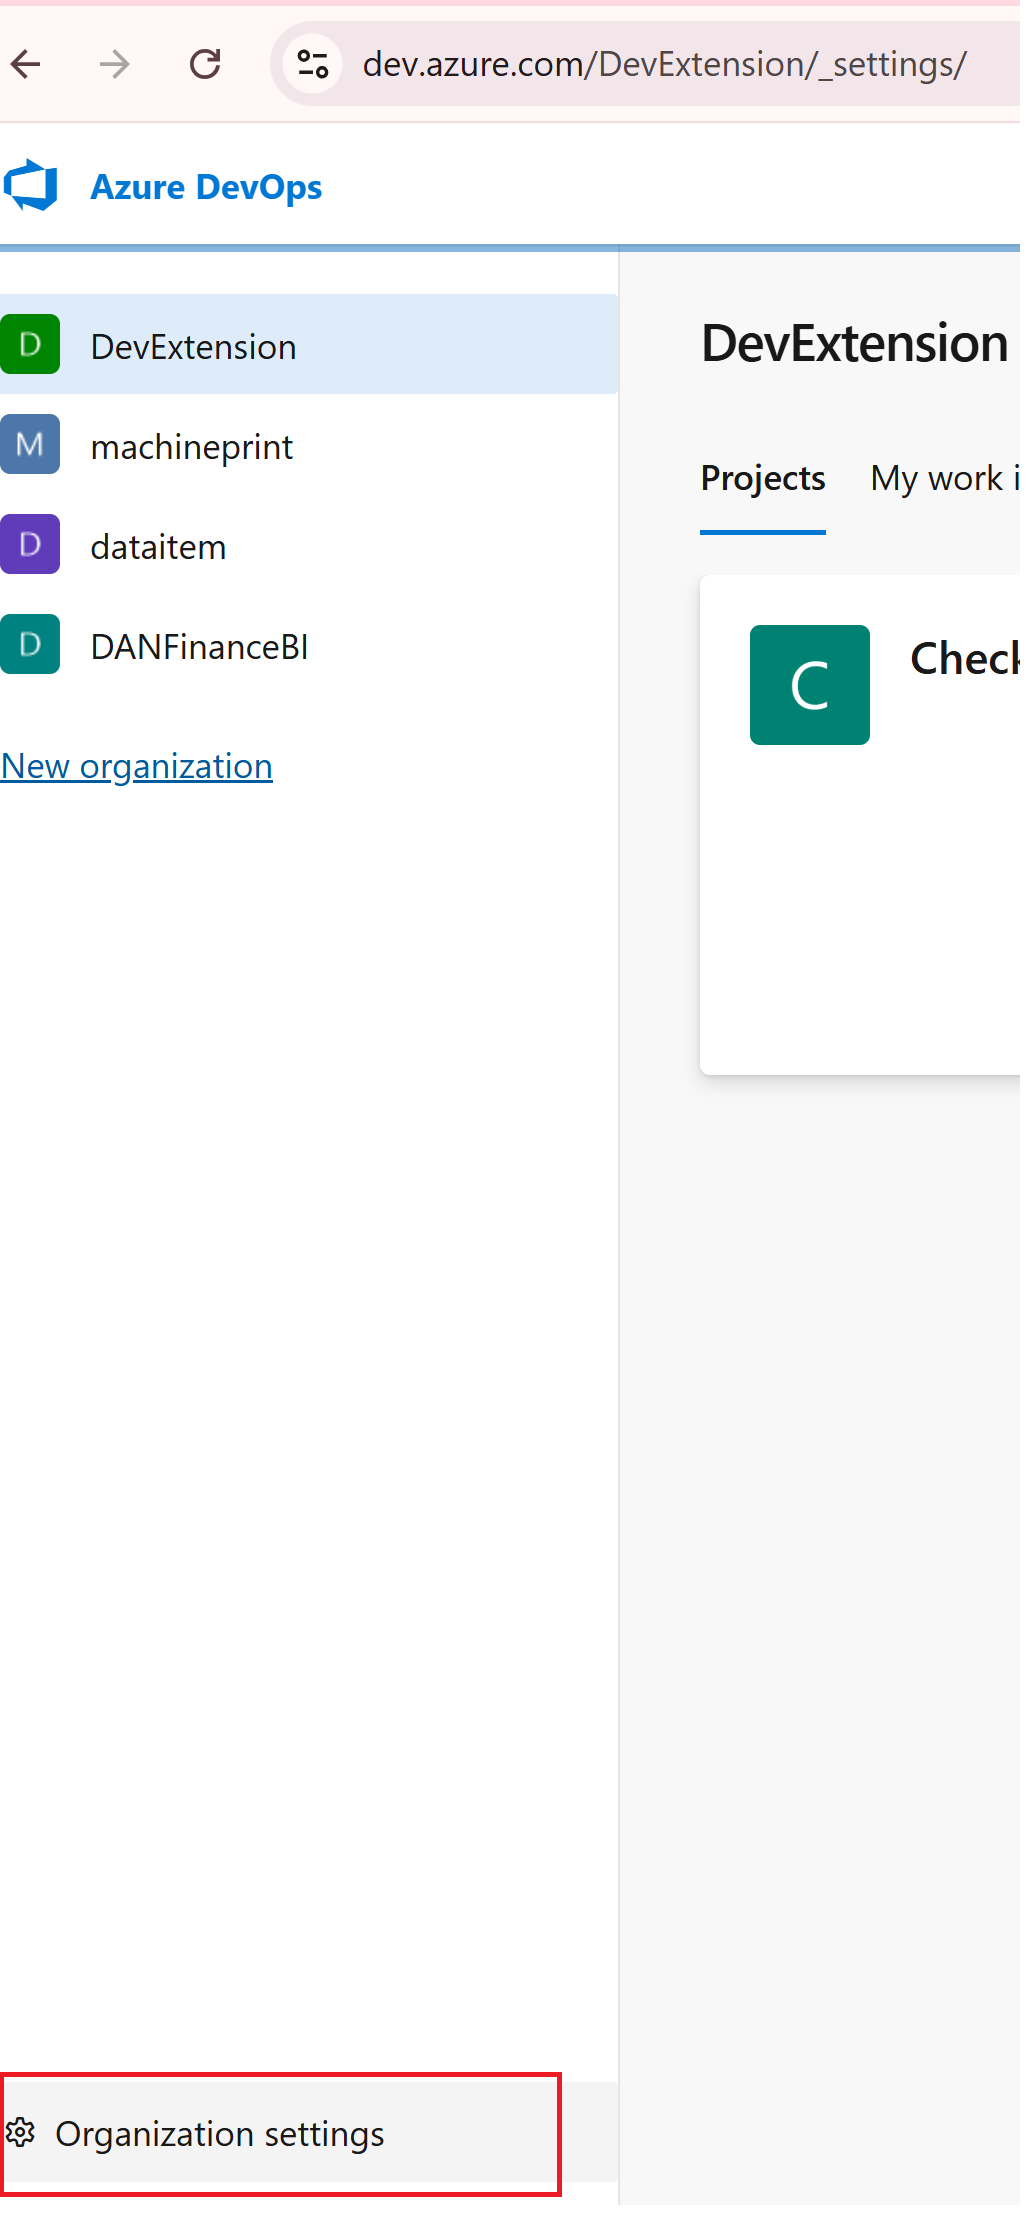 Accessing organization settings
Step 6: Navigate to Process Configuration
- In Organization Settings, click on "Process"
- View all available processes
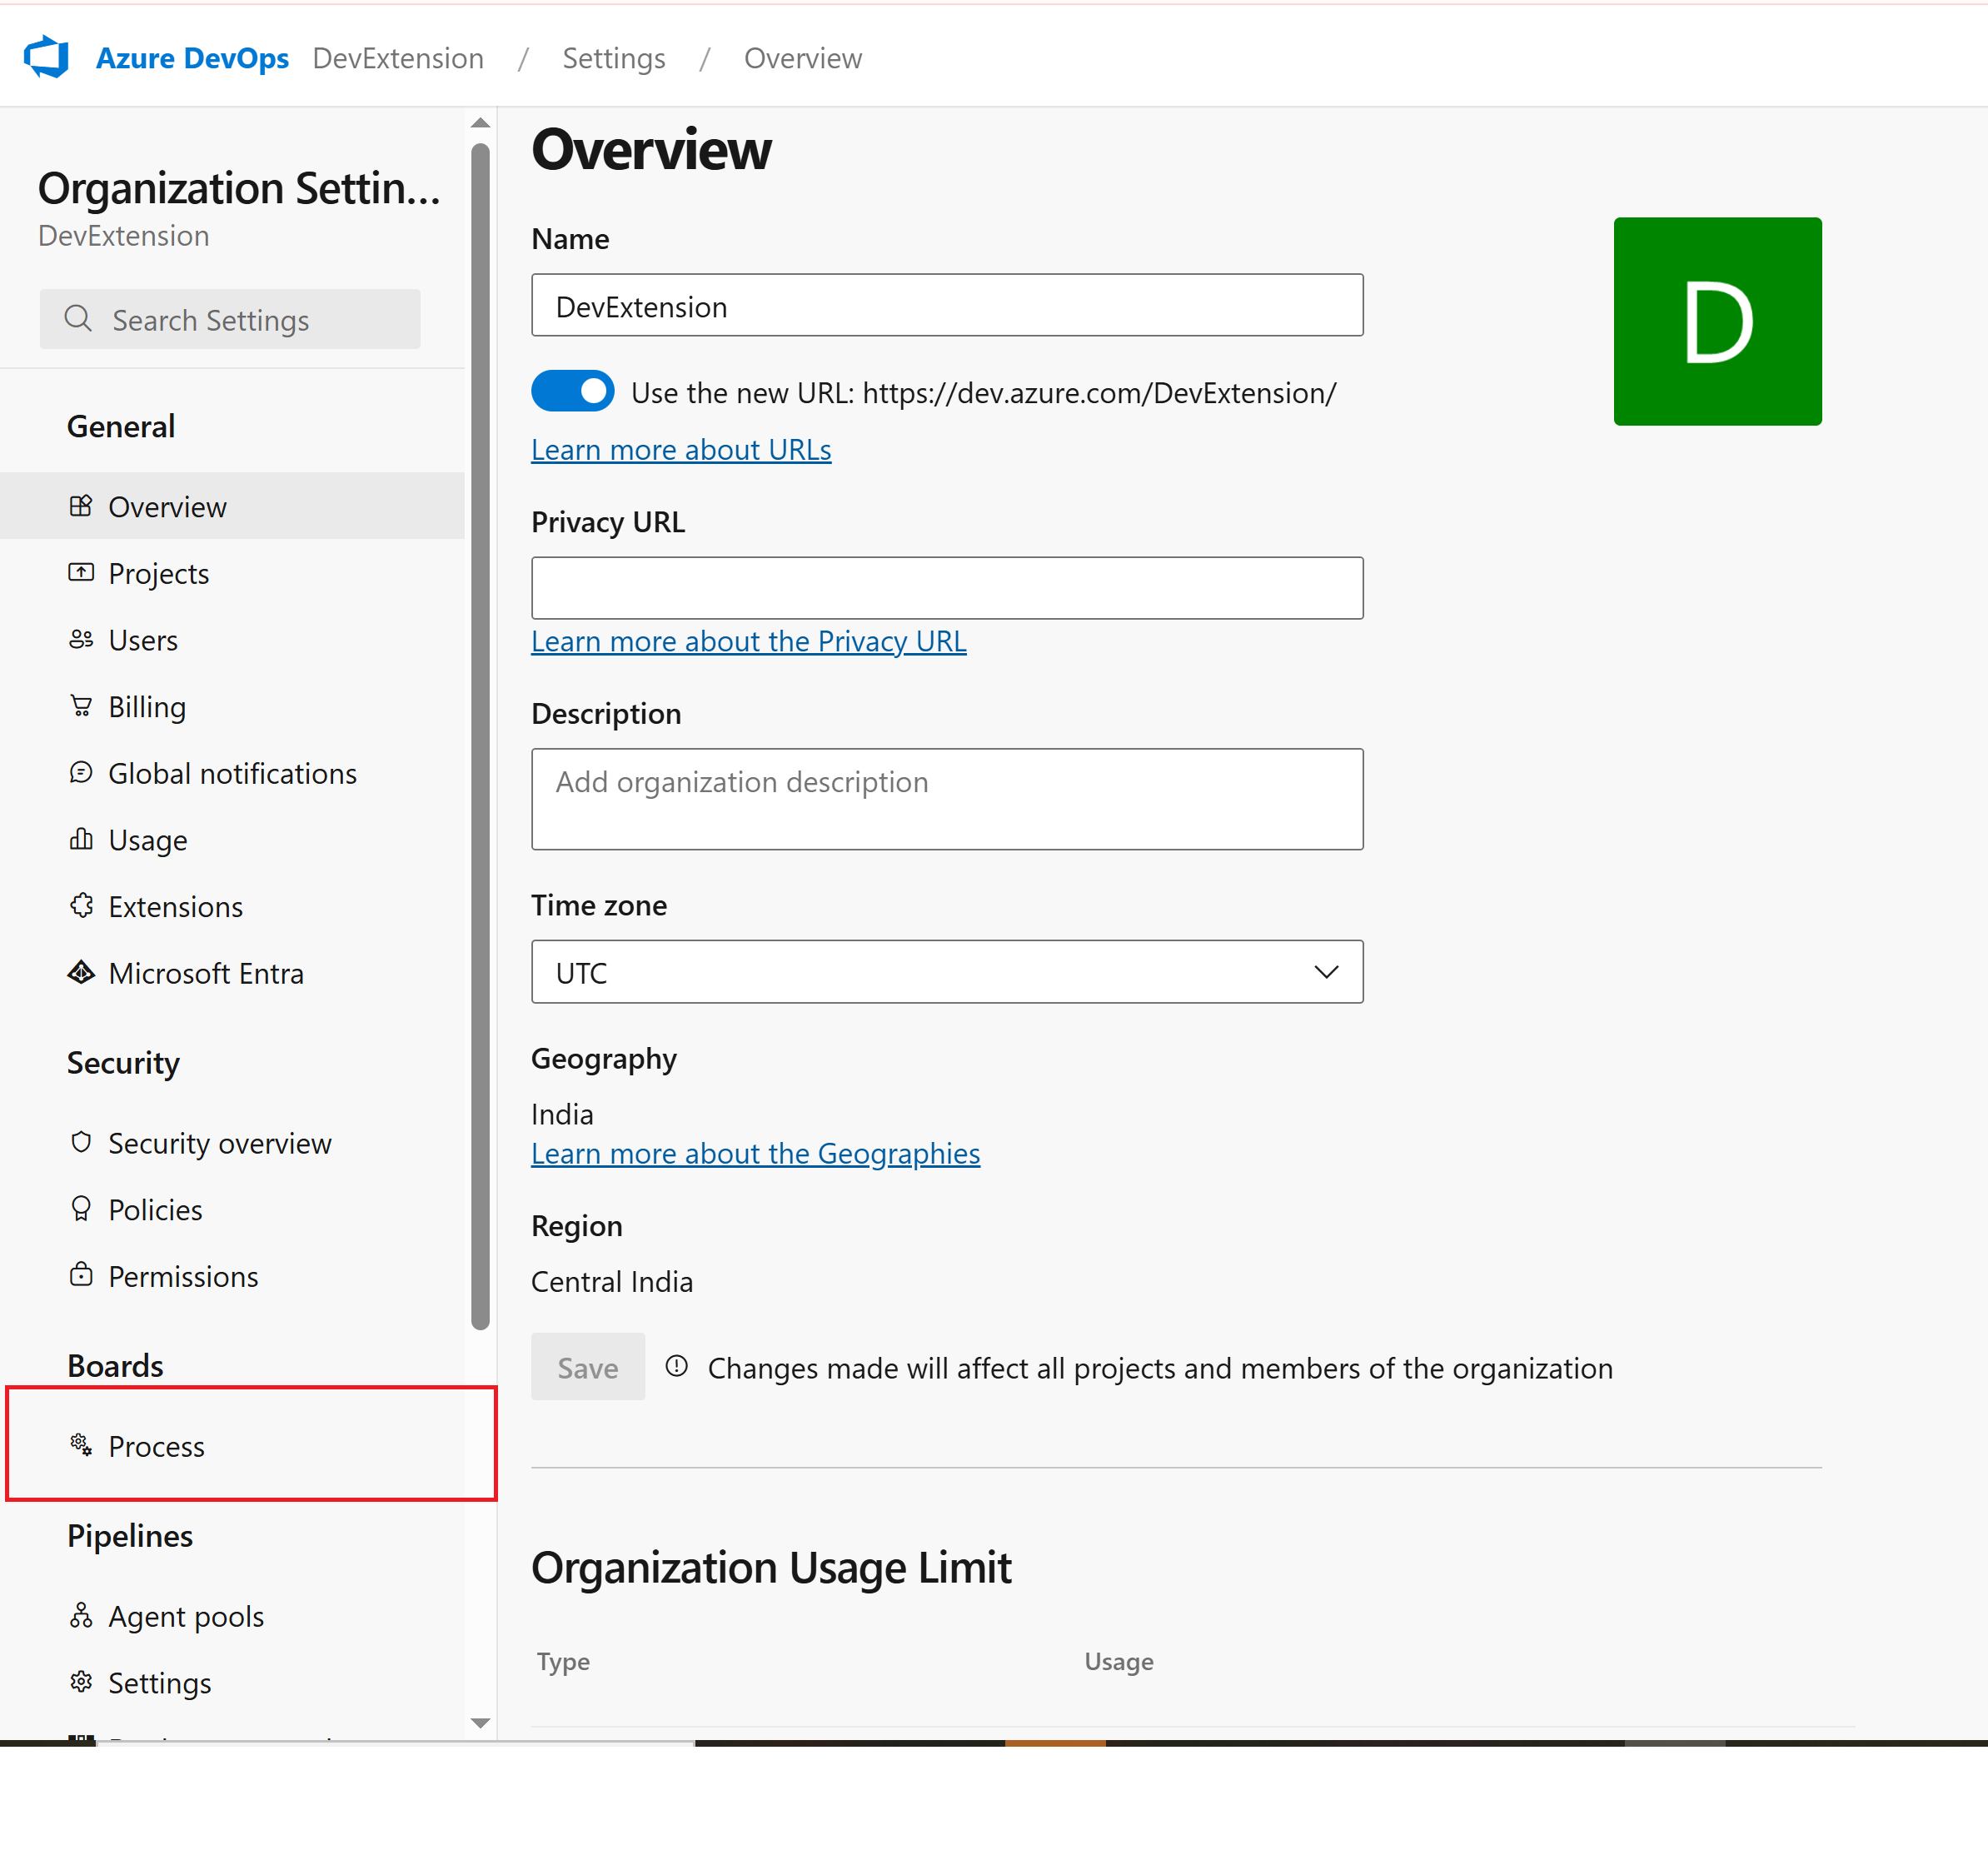 Process configuration in organization settings
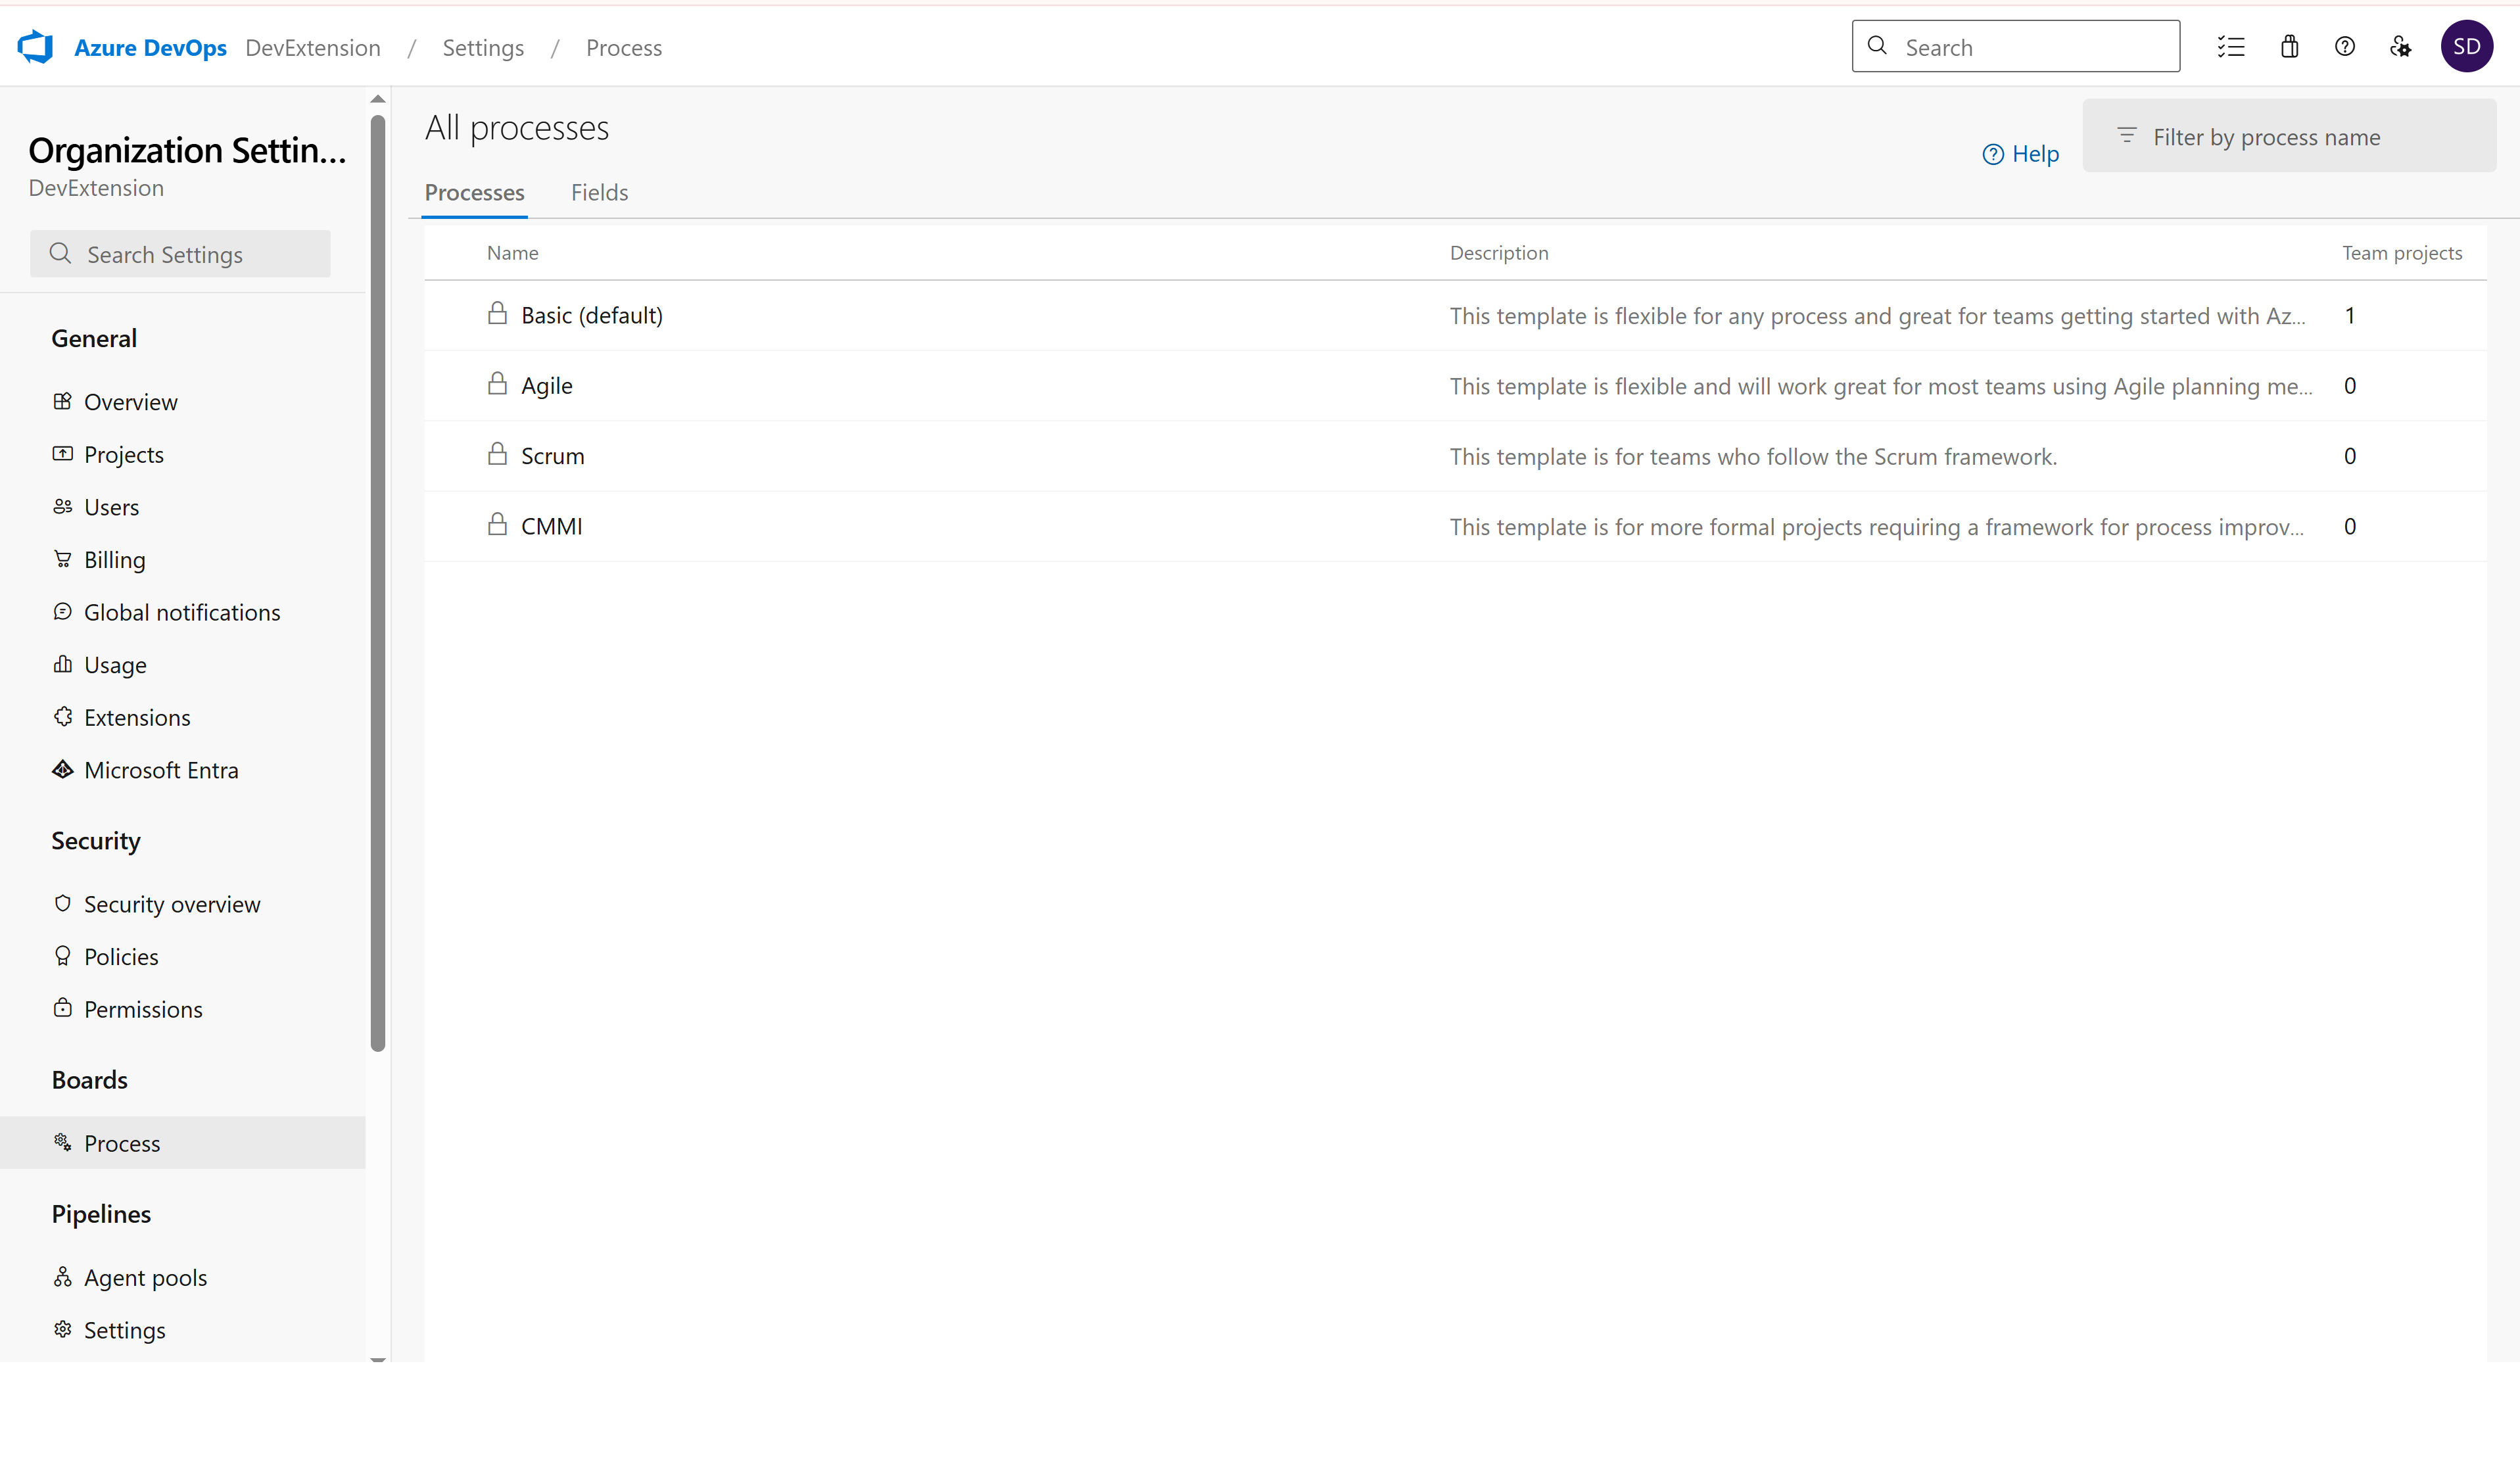 List of all available processes
Step 7: Create Inherited Process
- Find your base process (e.g., "Agile")
- Click the "..." menu next to it
- Select "Create inherited process"
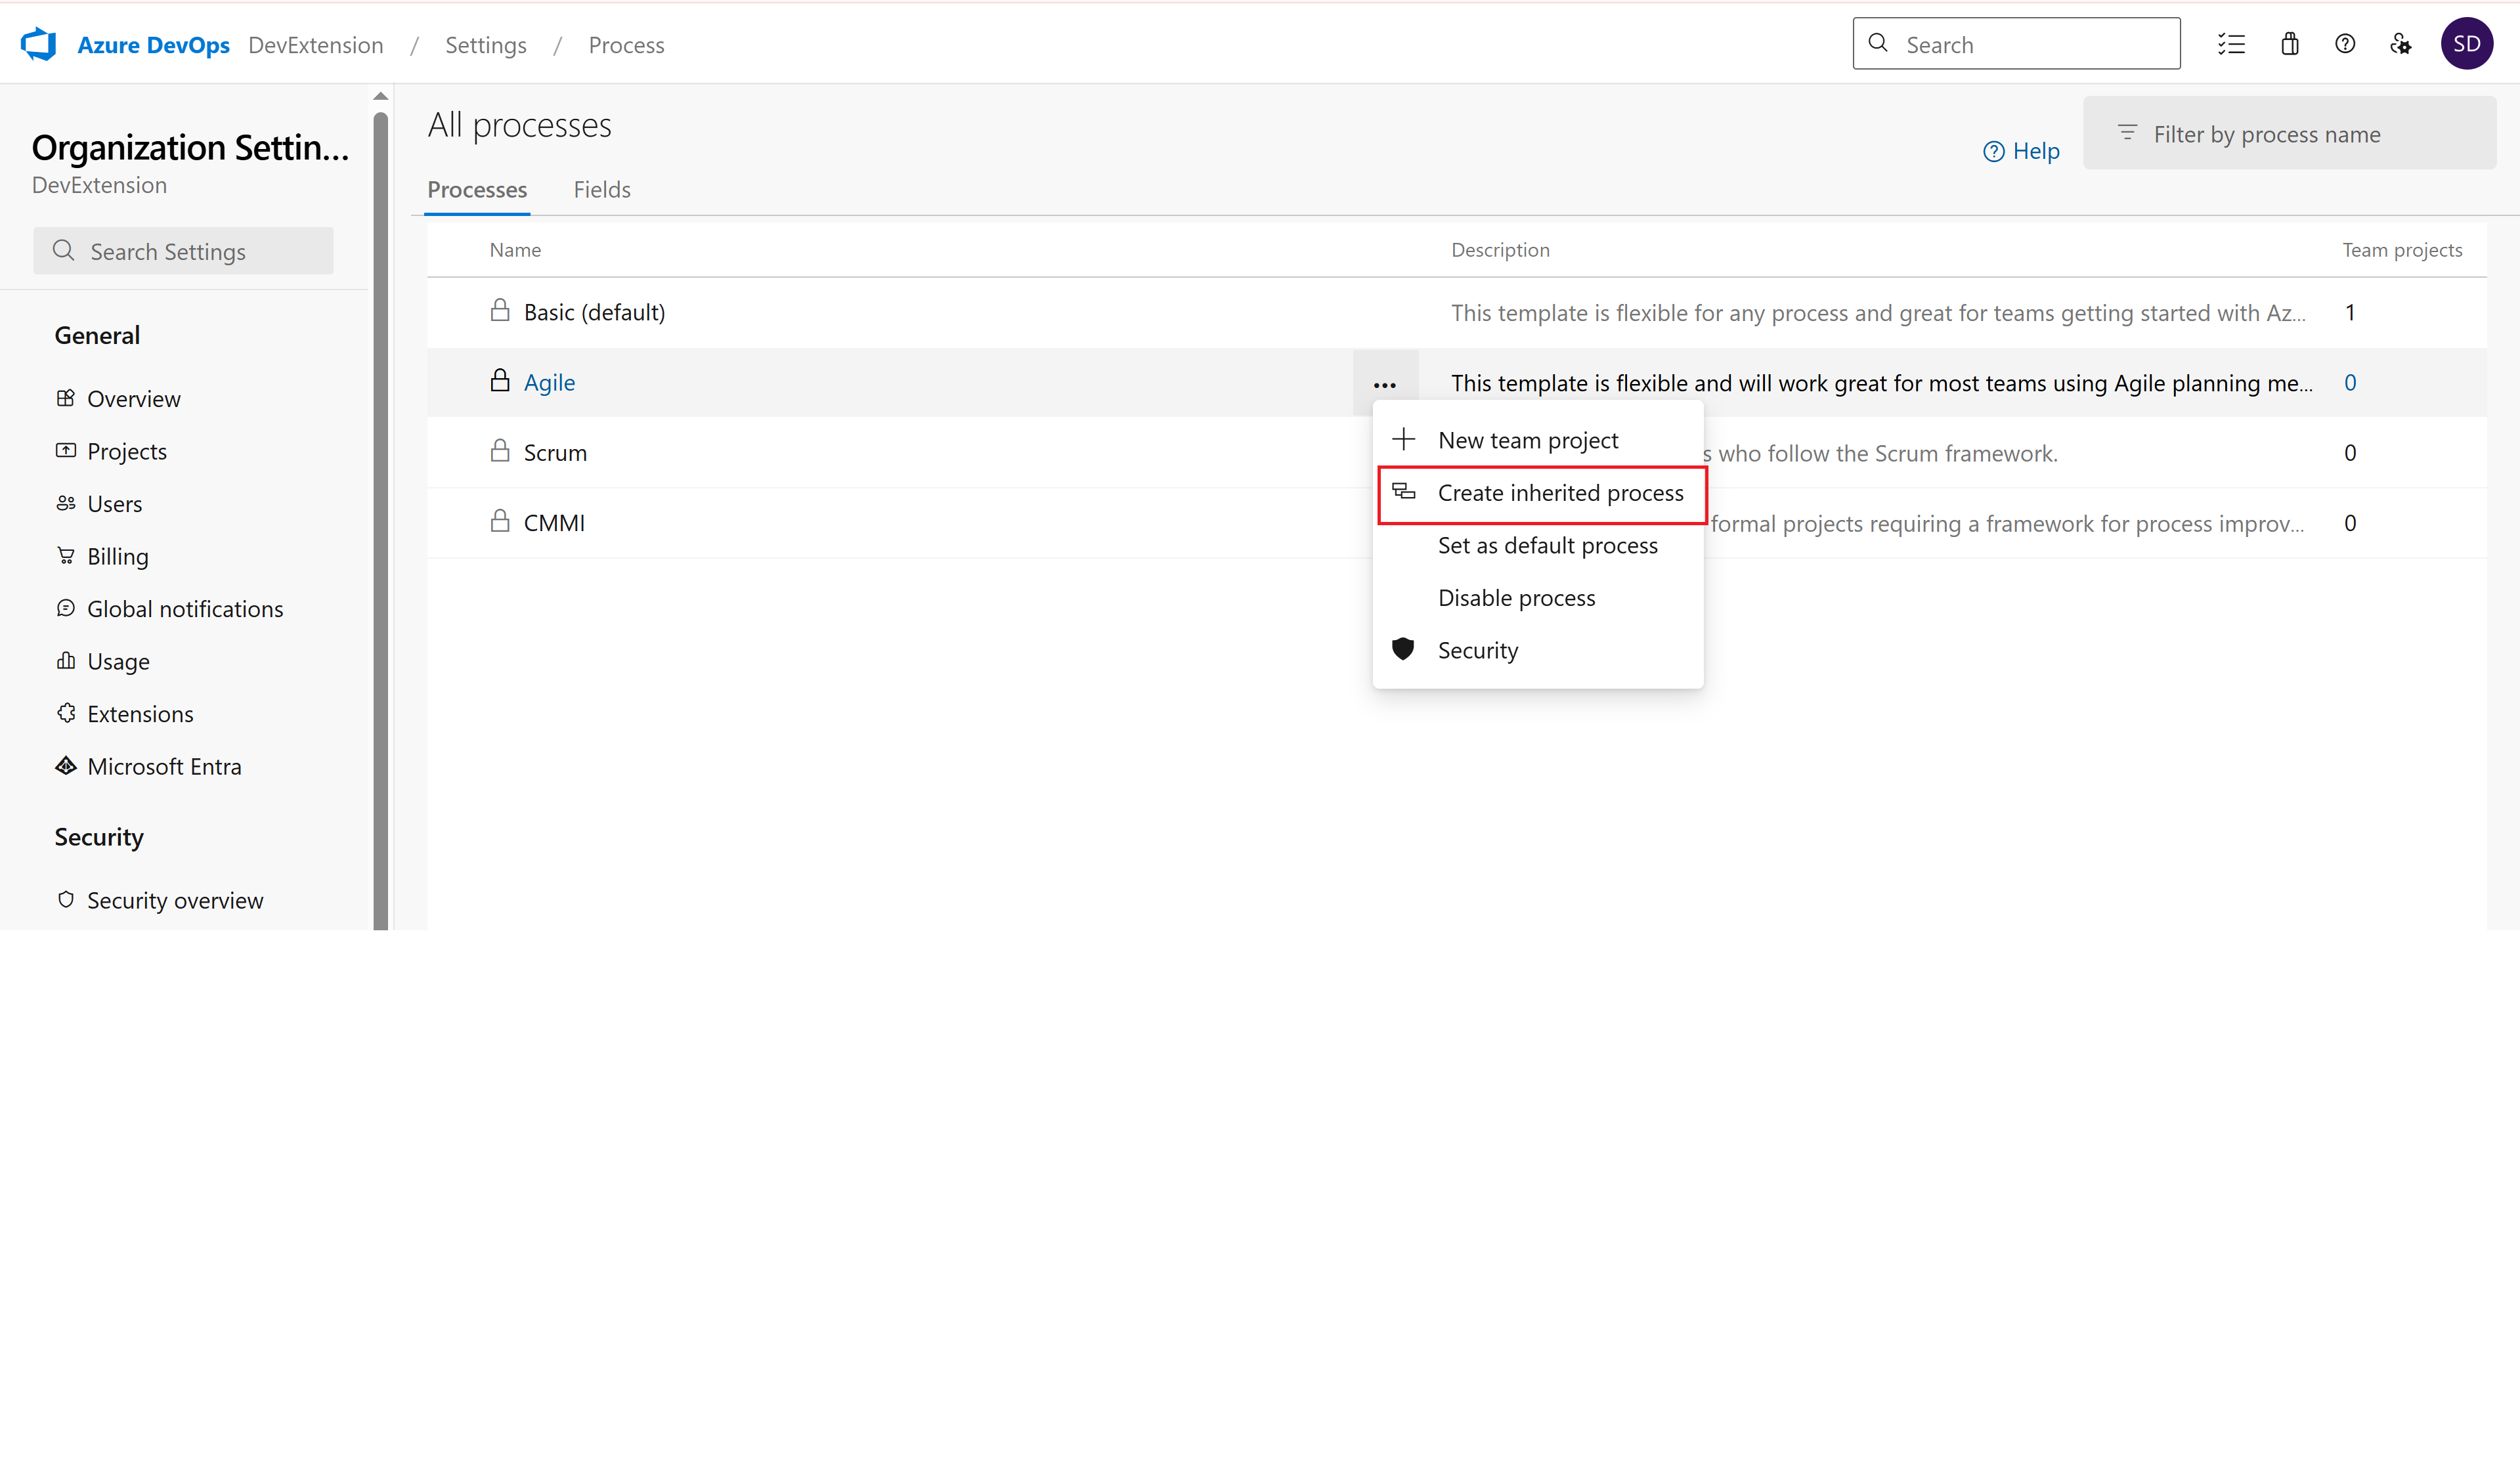 Creating a new inherited process
- Give your inherited process a name (e.g., "Agile with Data Tables")
- Add description if needed
- Click "Create process"
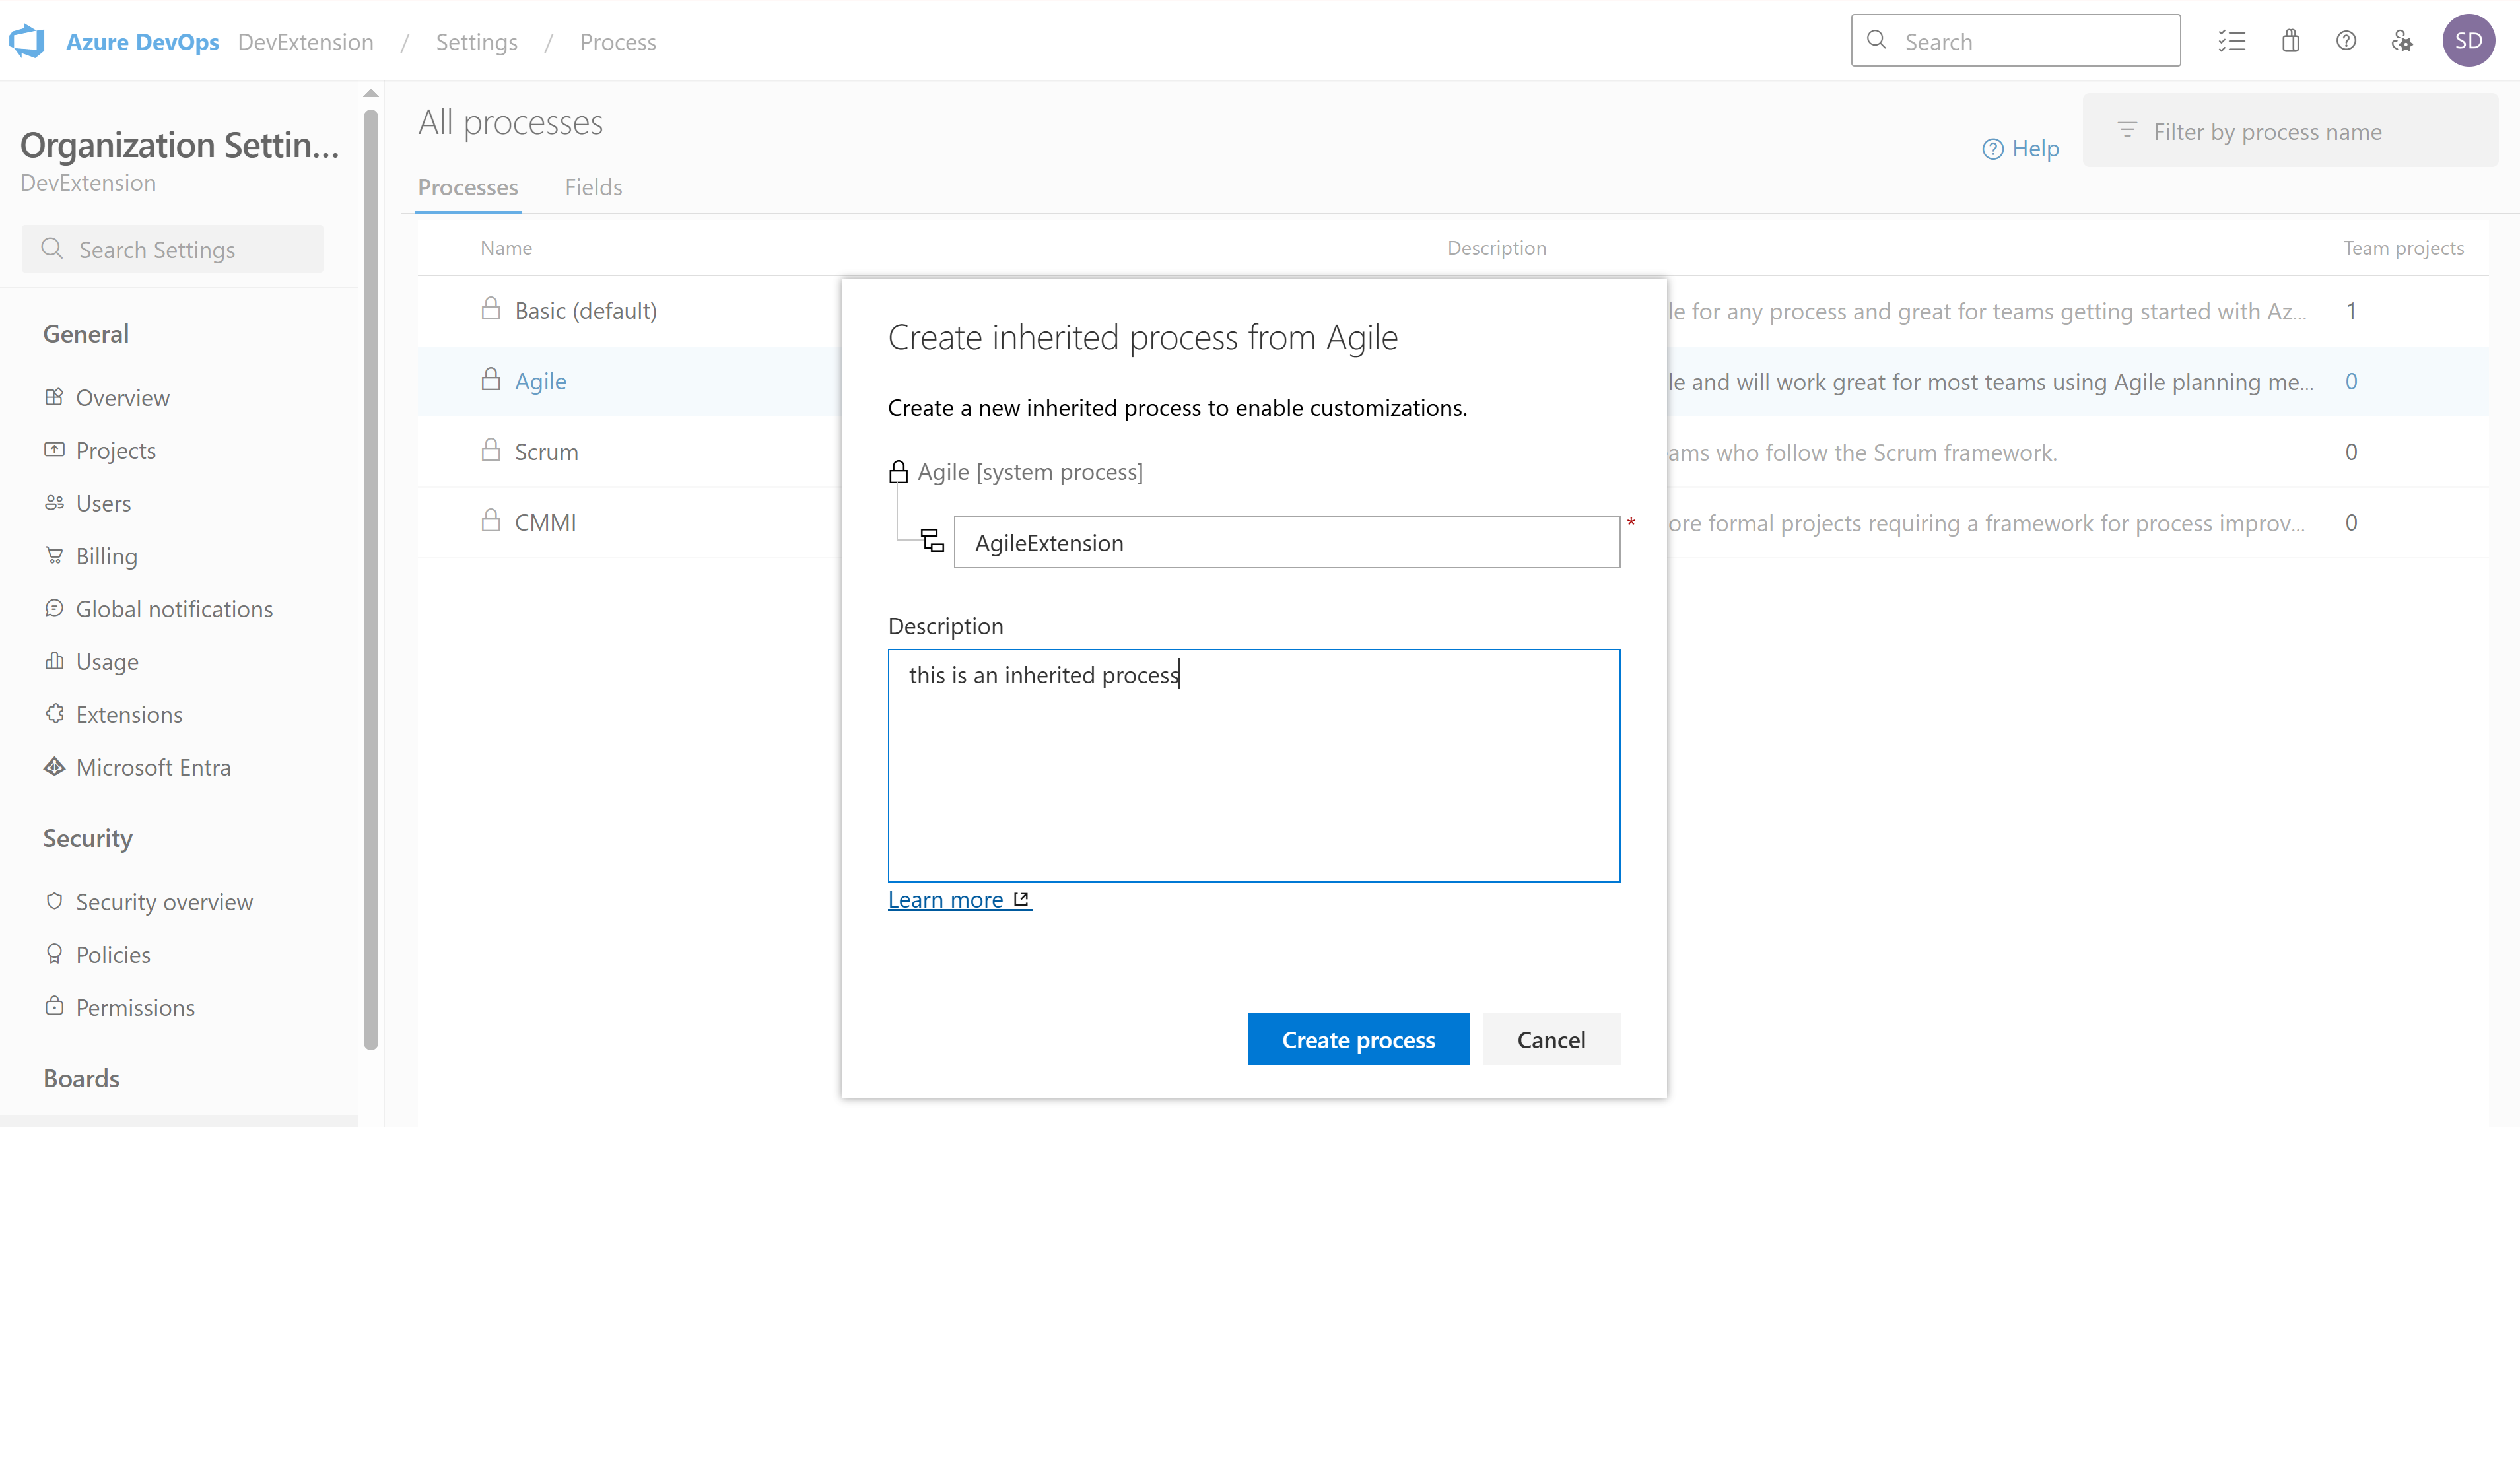 Configuring the new inherited process
📝 Phase 3: Add Custom Field
Step 9: Open Process Configuration
- Click on your newly created inherited process
- This opens the process customization interface
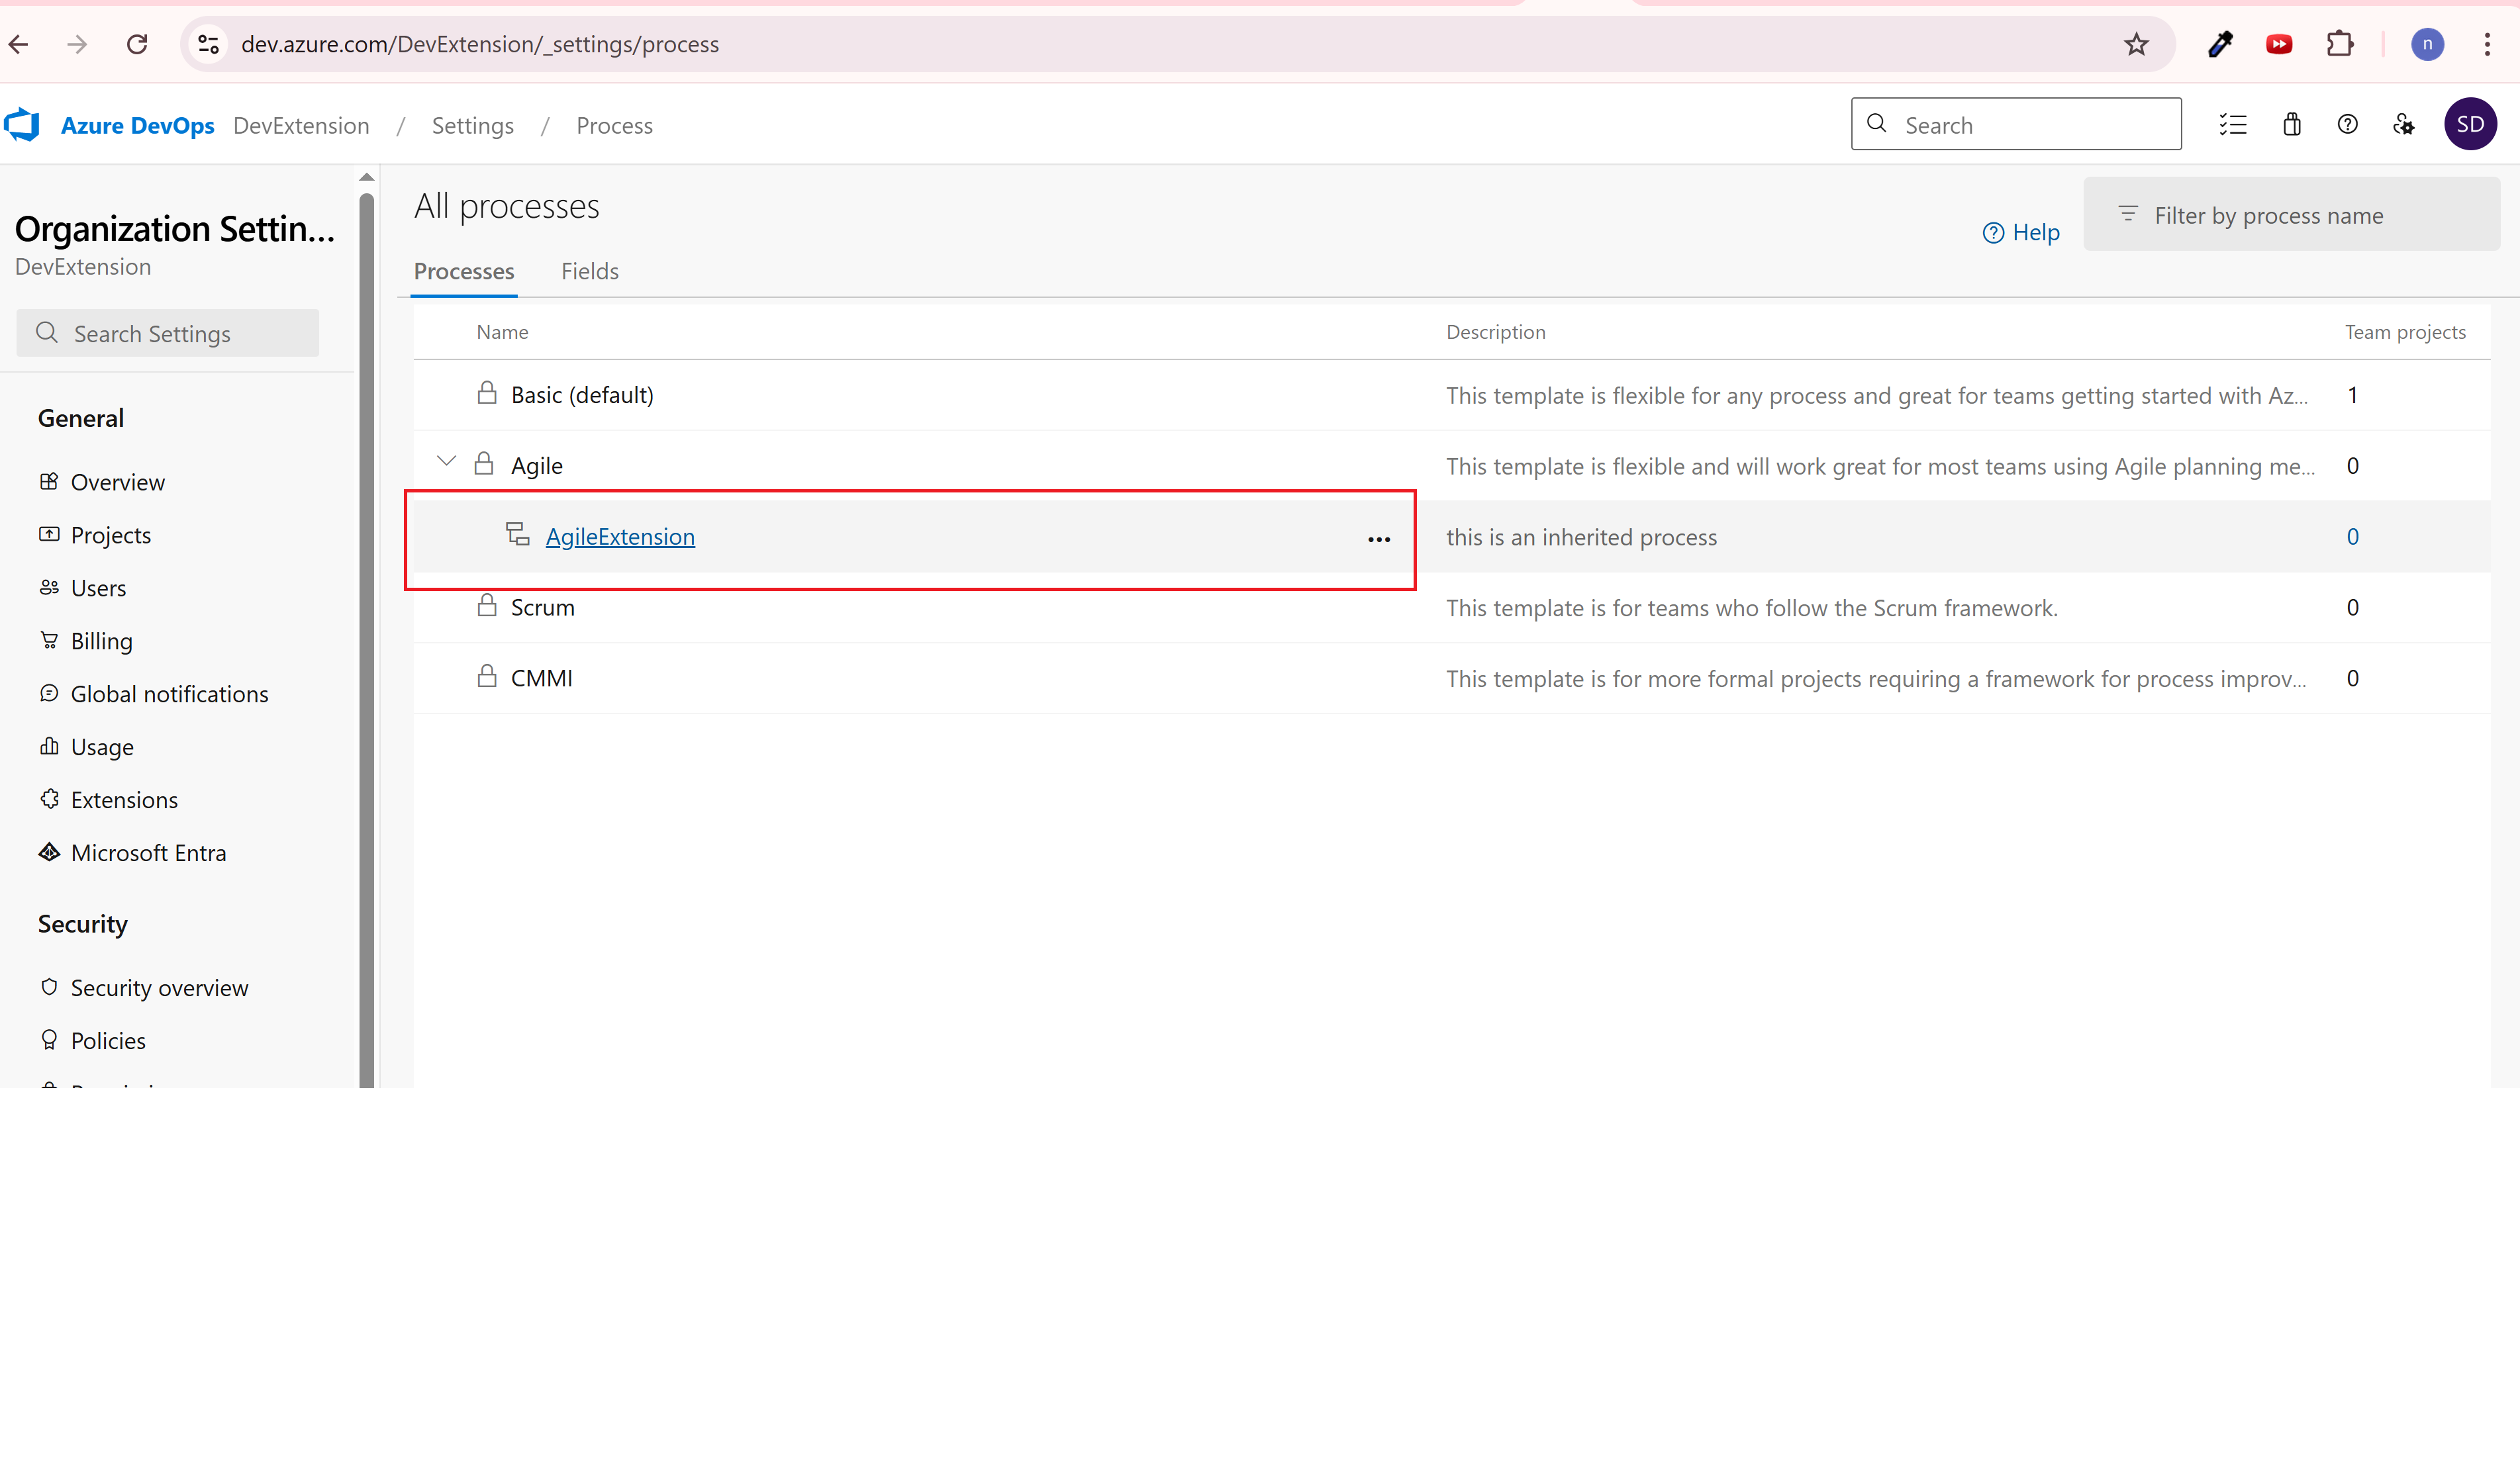 Opening the inherited process for customization
Step 10: Select Work Item Type
- Choose the work item type you want to enhance (e.g., "User Story")
- Click on it to open customization options
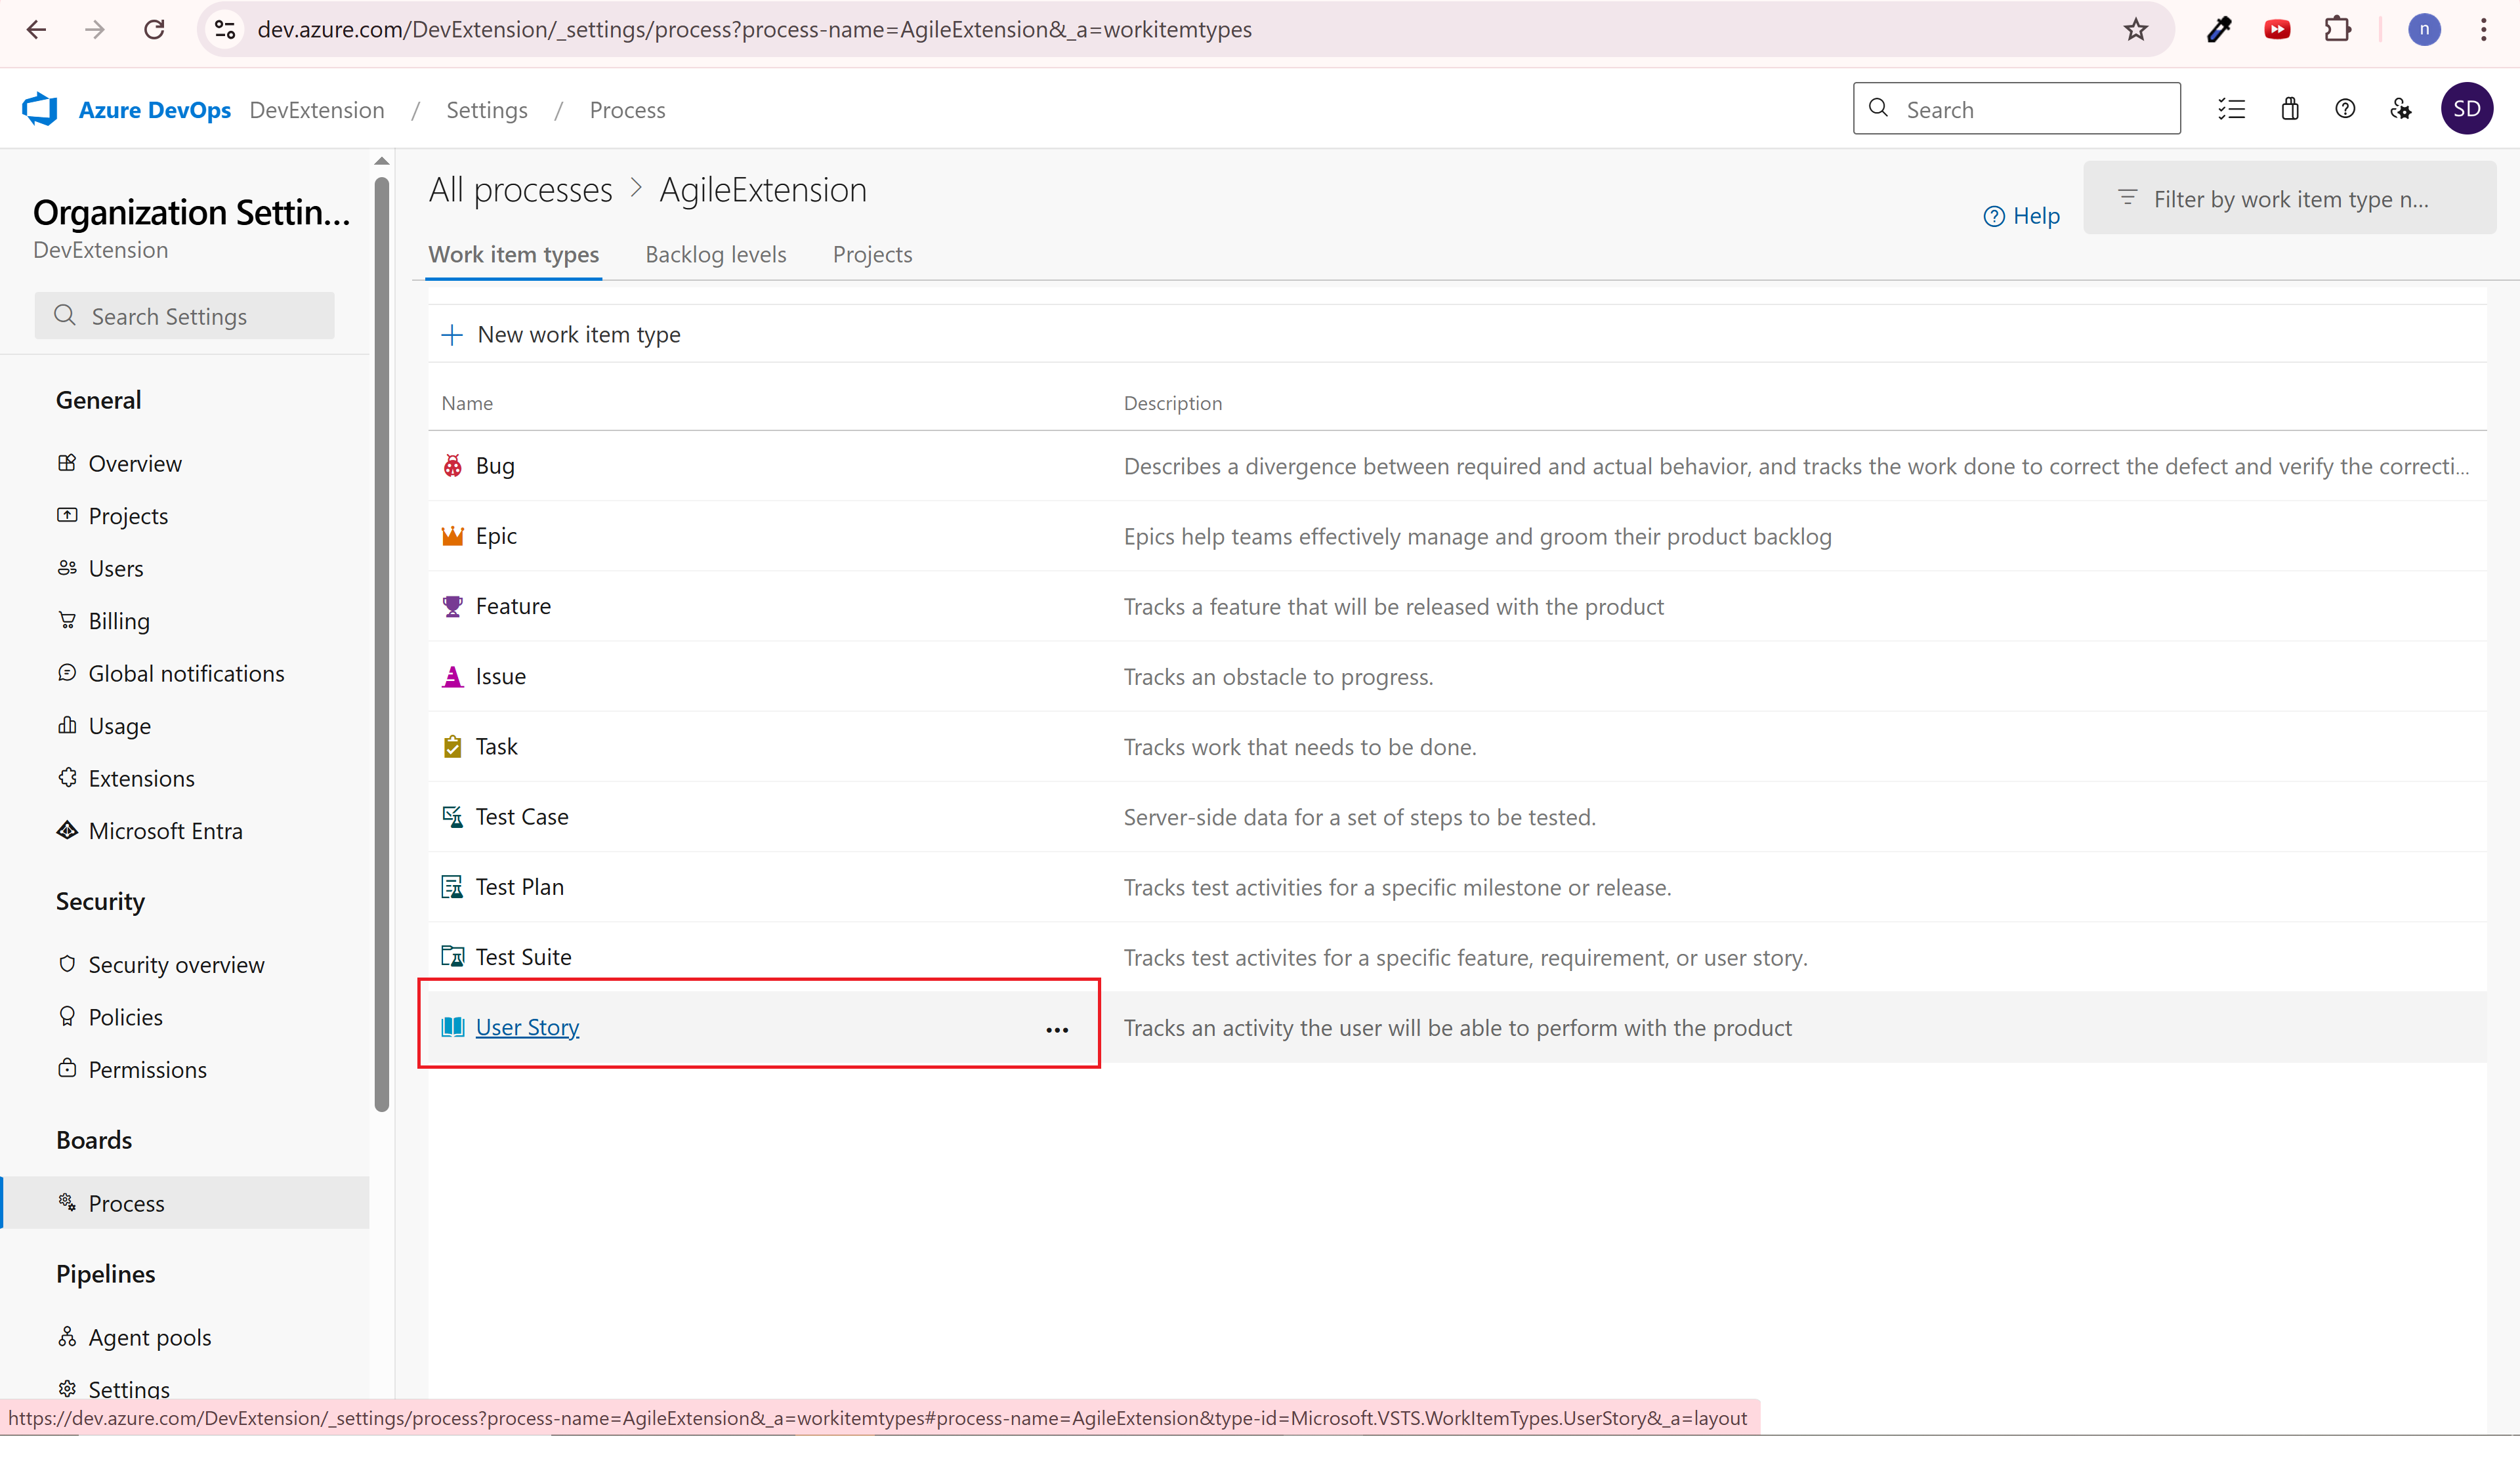 Selecting User Story work item type
Step 11: Add New Field
- Click "New field" to create a custom field for storing table data
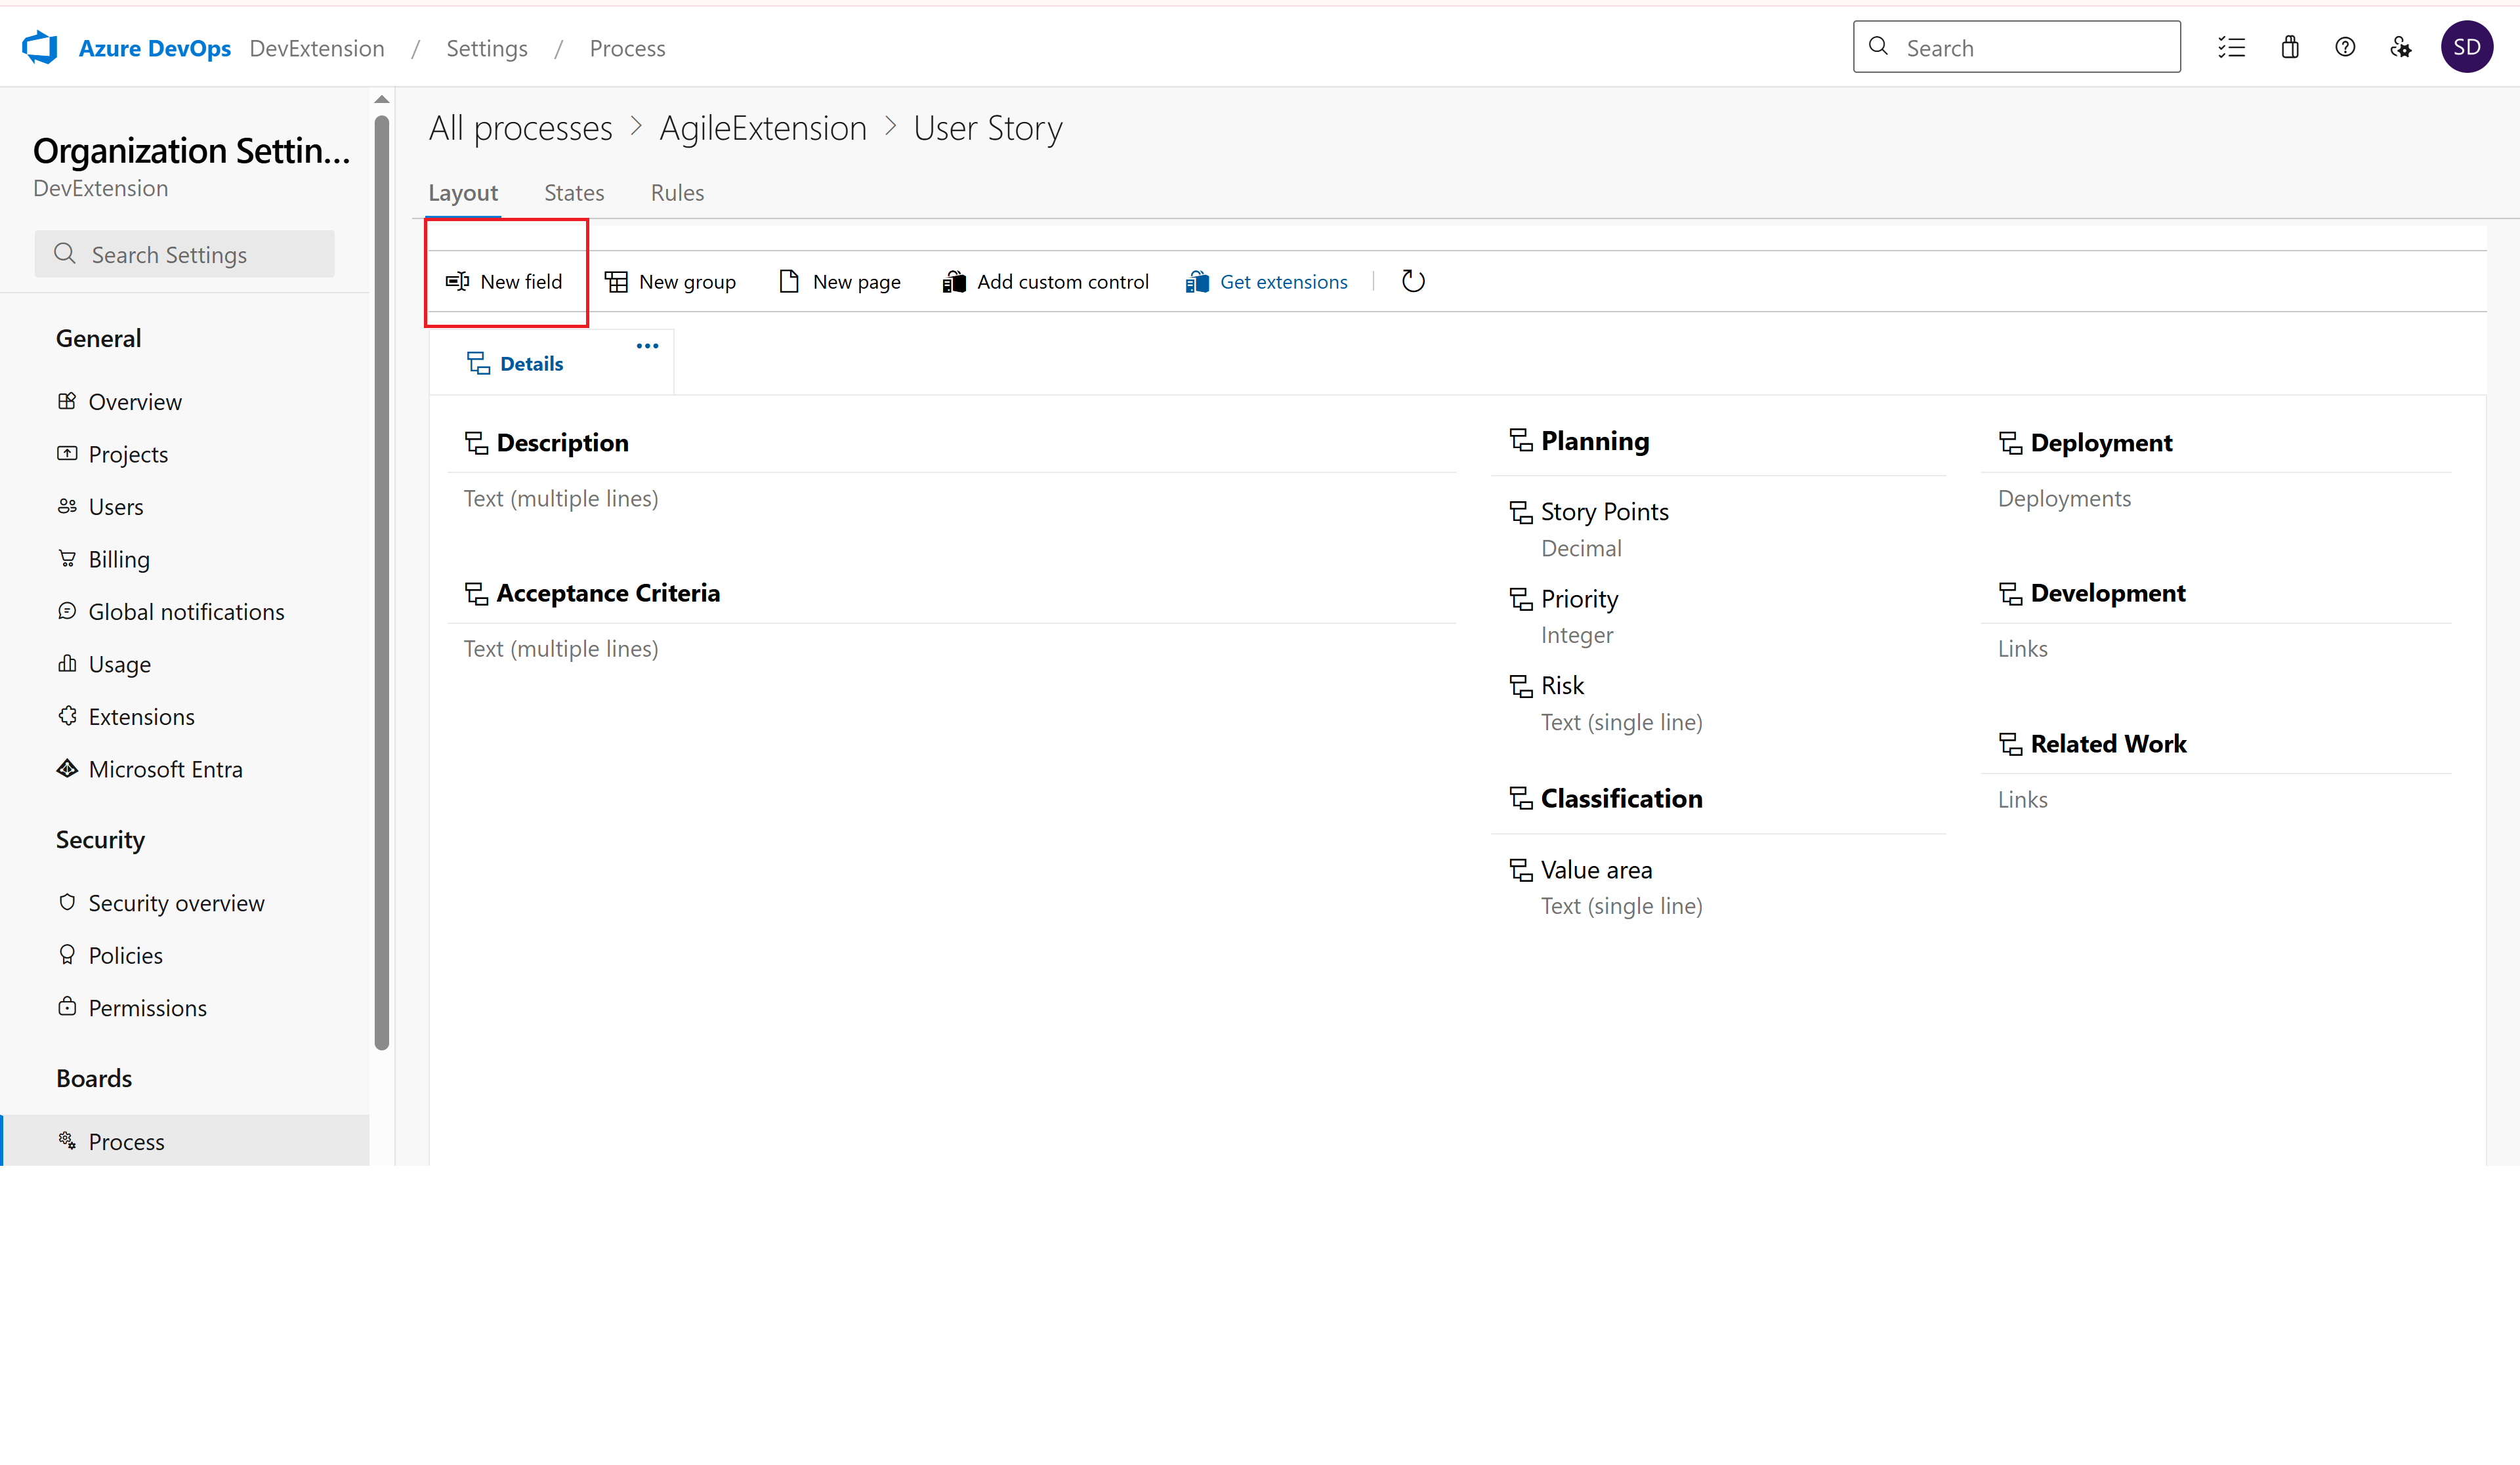 Adding a new custom field
- Name: Enter a Data Table JSON
- Type: Select "Text (multiple lines)"
- Description: Add helpful description
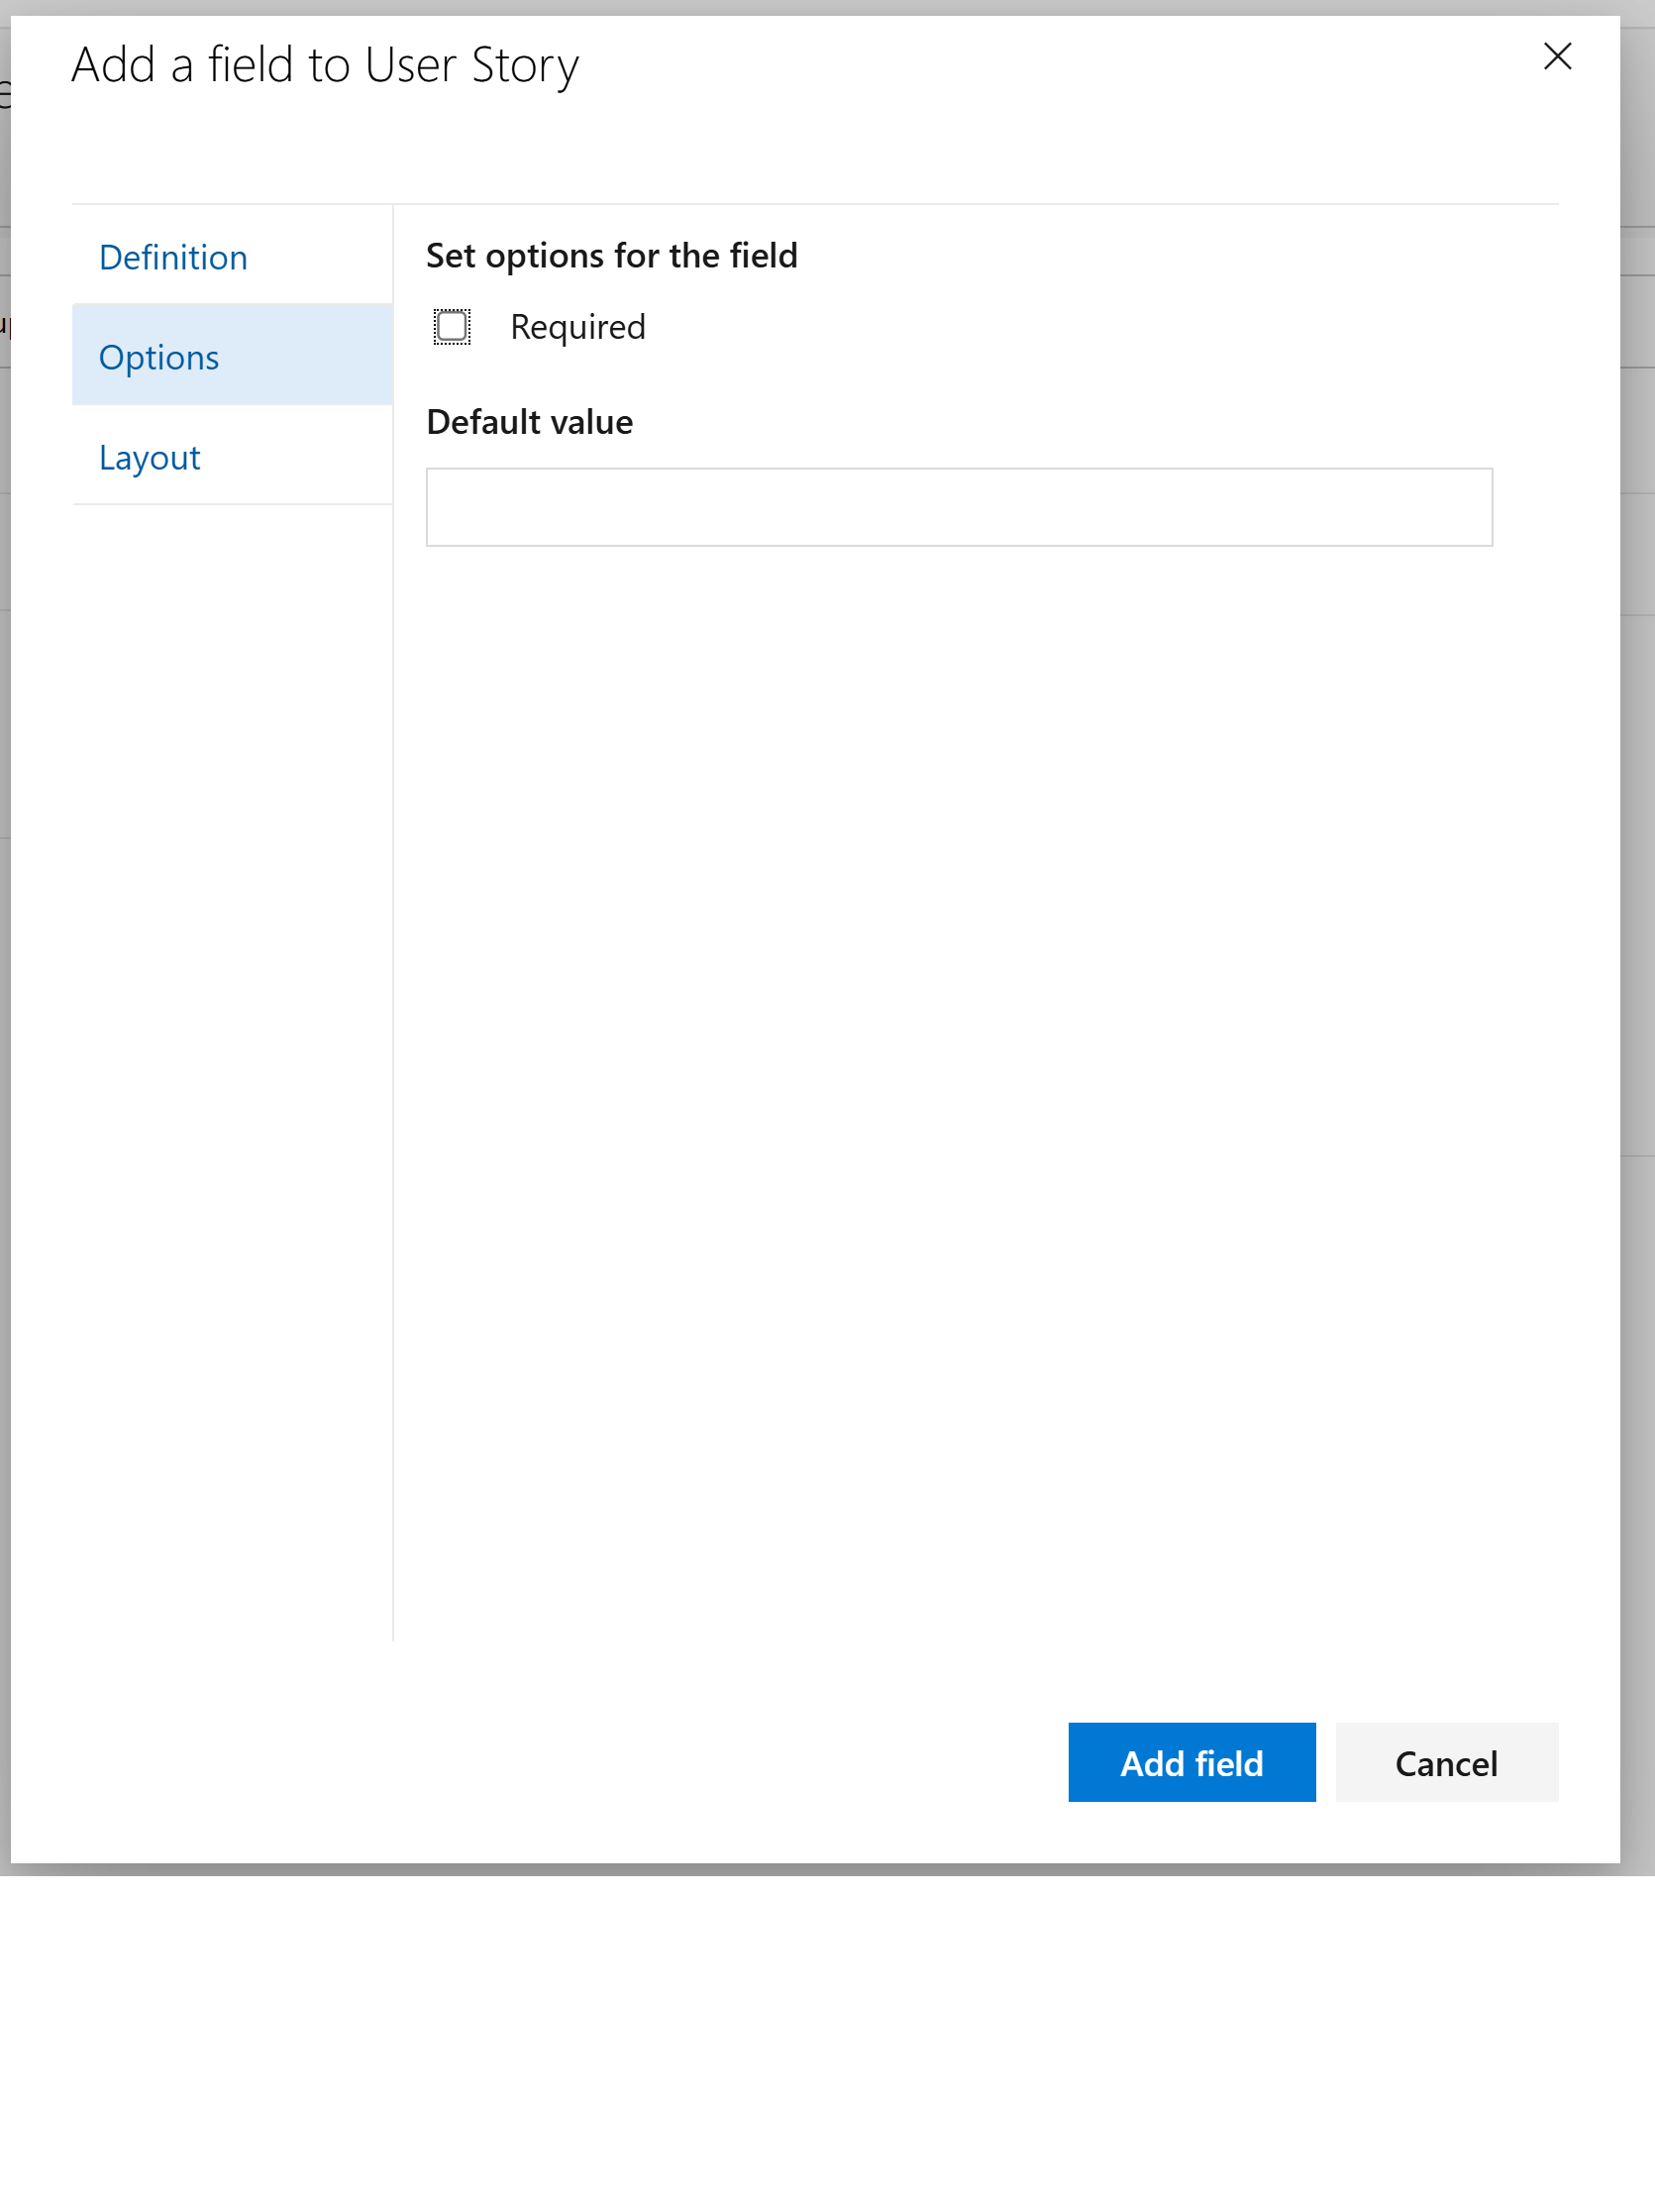
- Required: Leave unchecked (recommended)
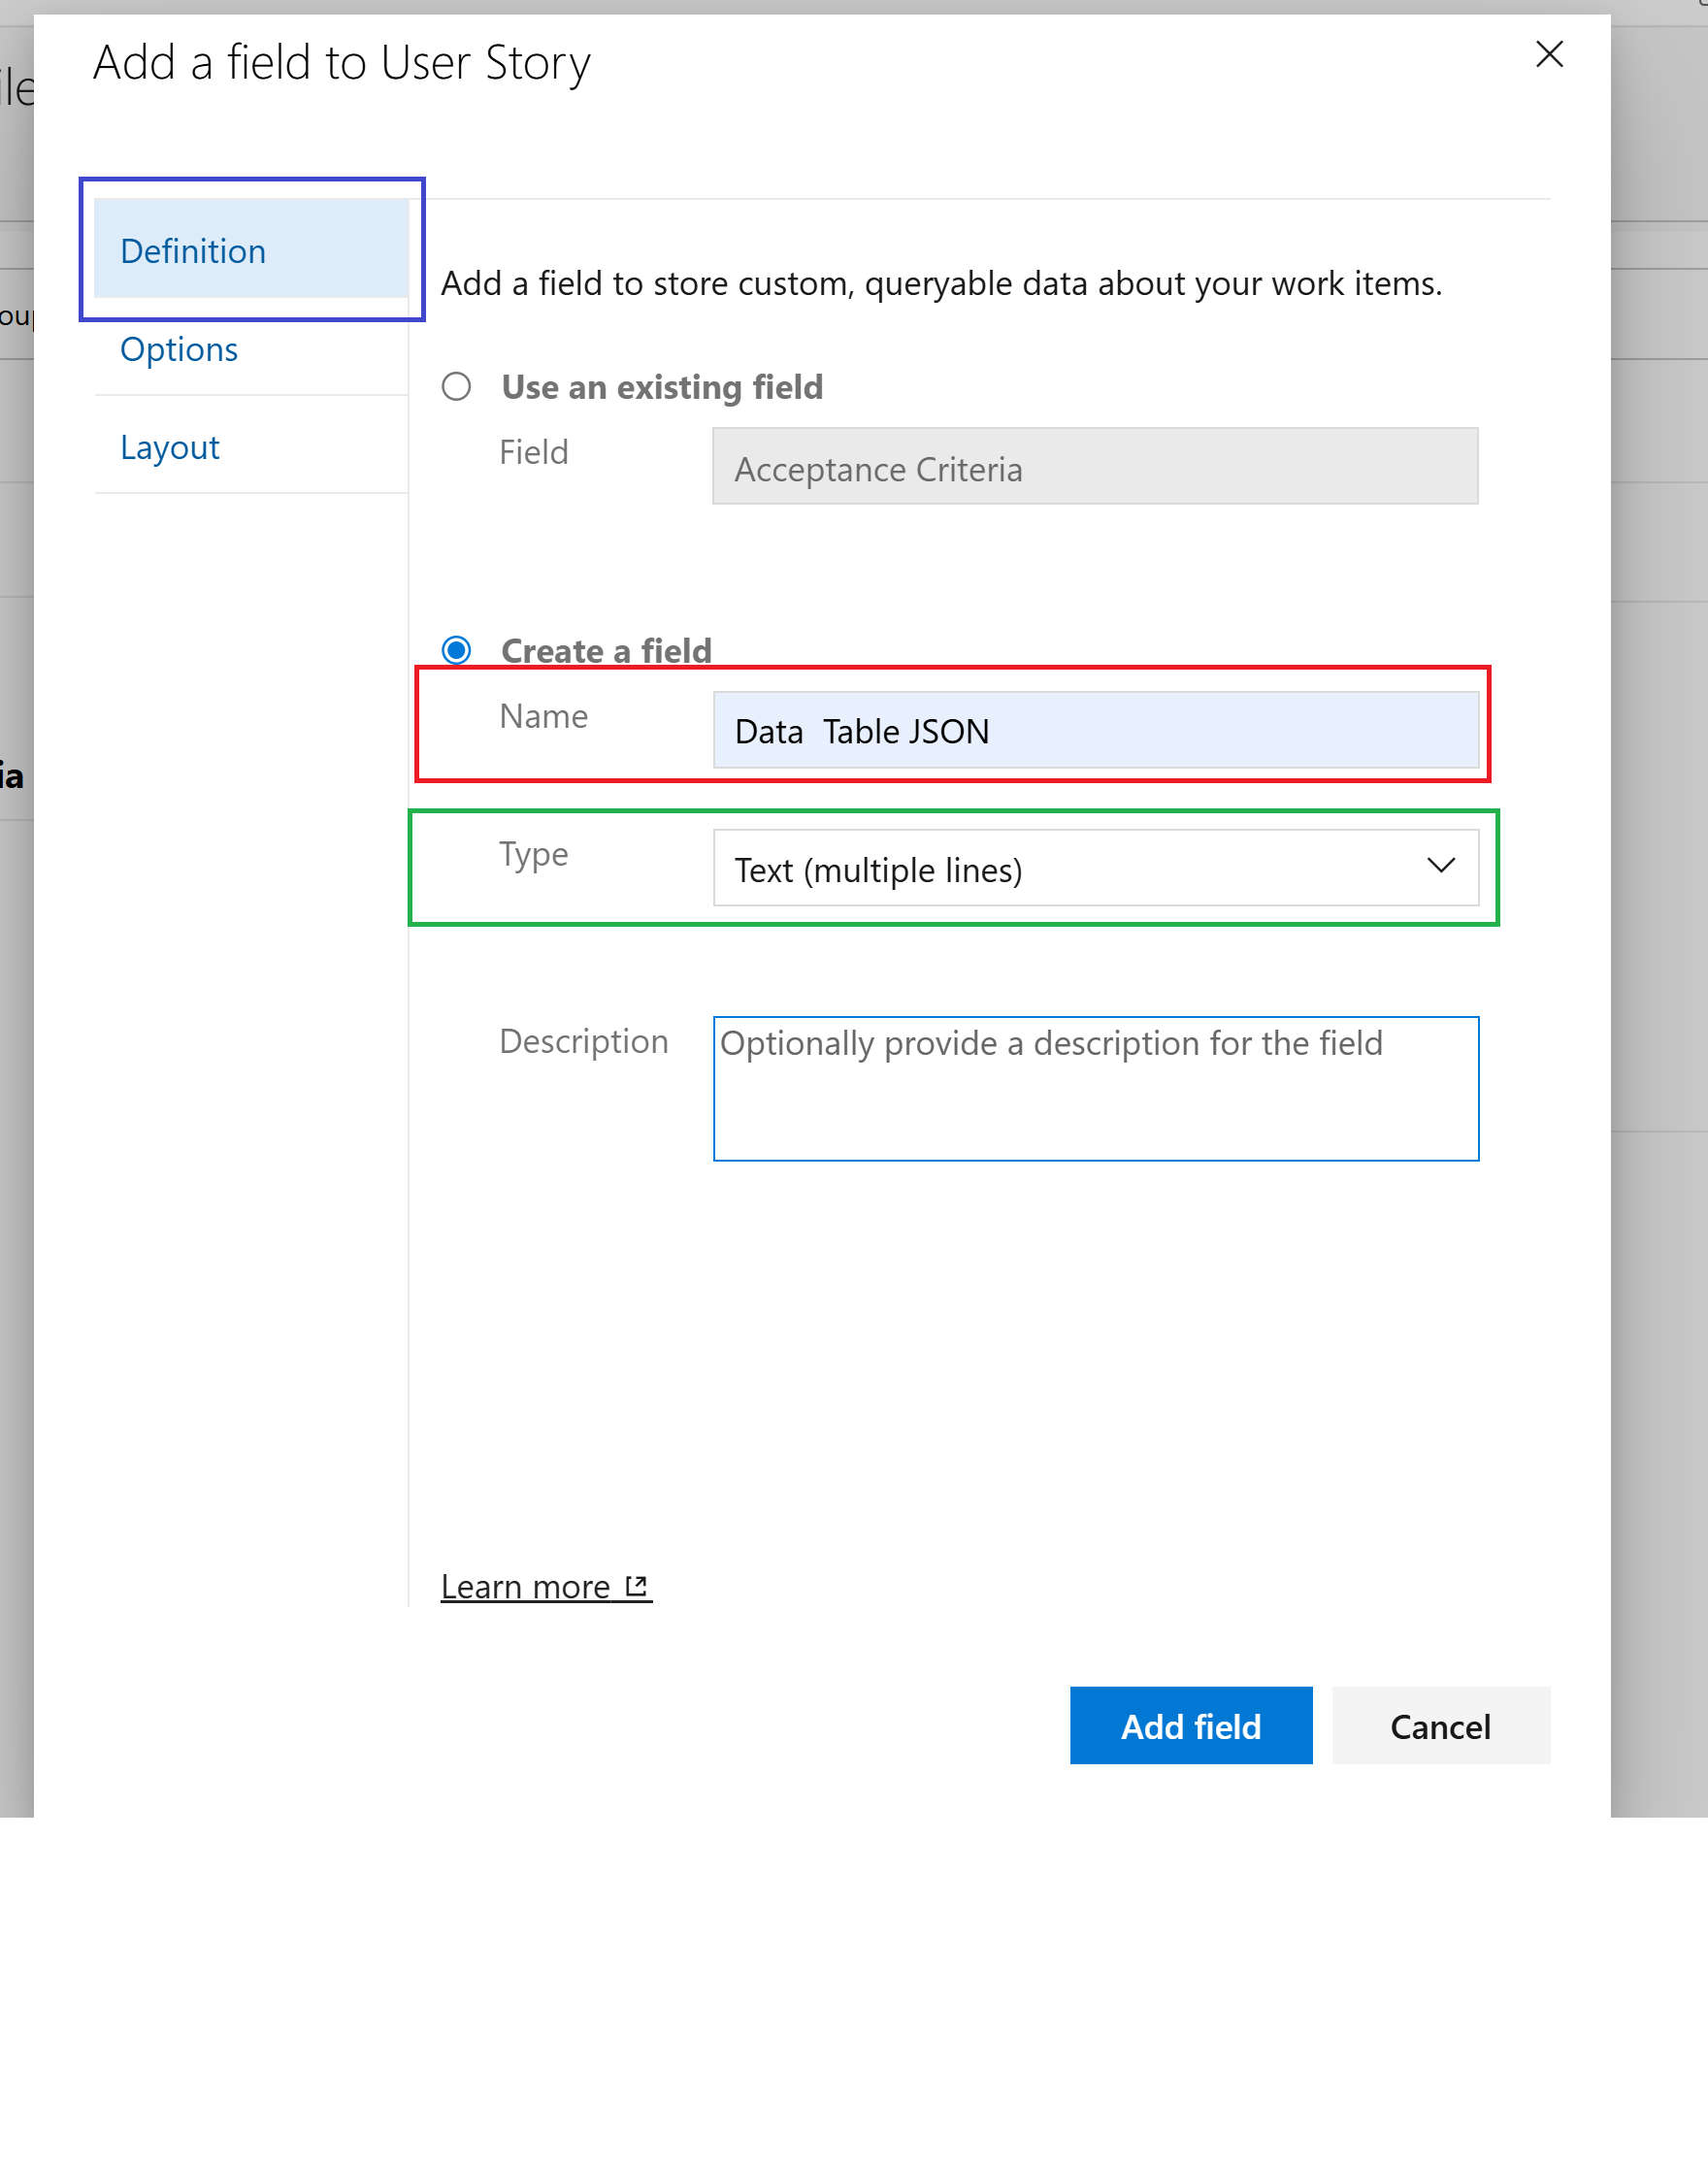 Configuring the custom field properties
 Layout and positioning options
Step 13: Access Layout Configuration
- Go to the "Layout" tab in your process configuration
 Layout configuration for the work item type
2. Click "Add field"
Layout configuration for the work item type
2. Click "Add field"
Step 14: Confirm Field Added
- Verify the field appears in the field list
- Note the reference name (e.g., "Custom.DataTableJSON")
🎛️ Phase 4: Add Data Table Control
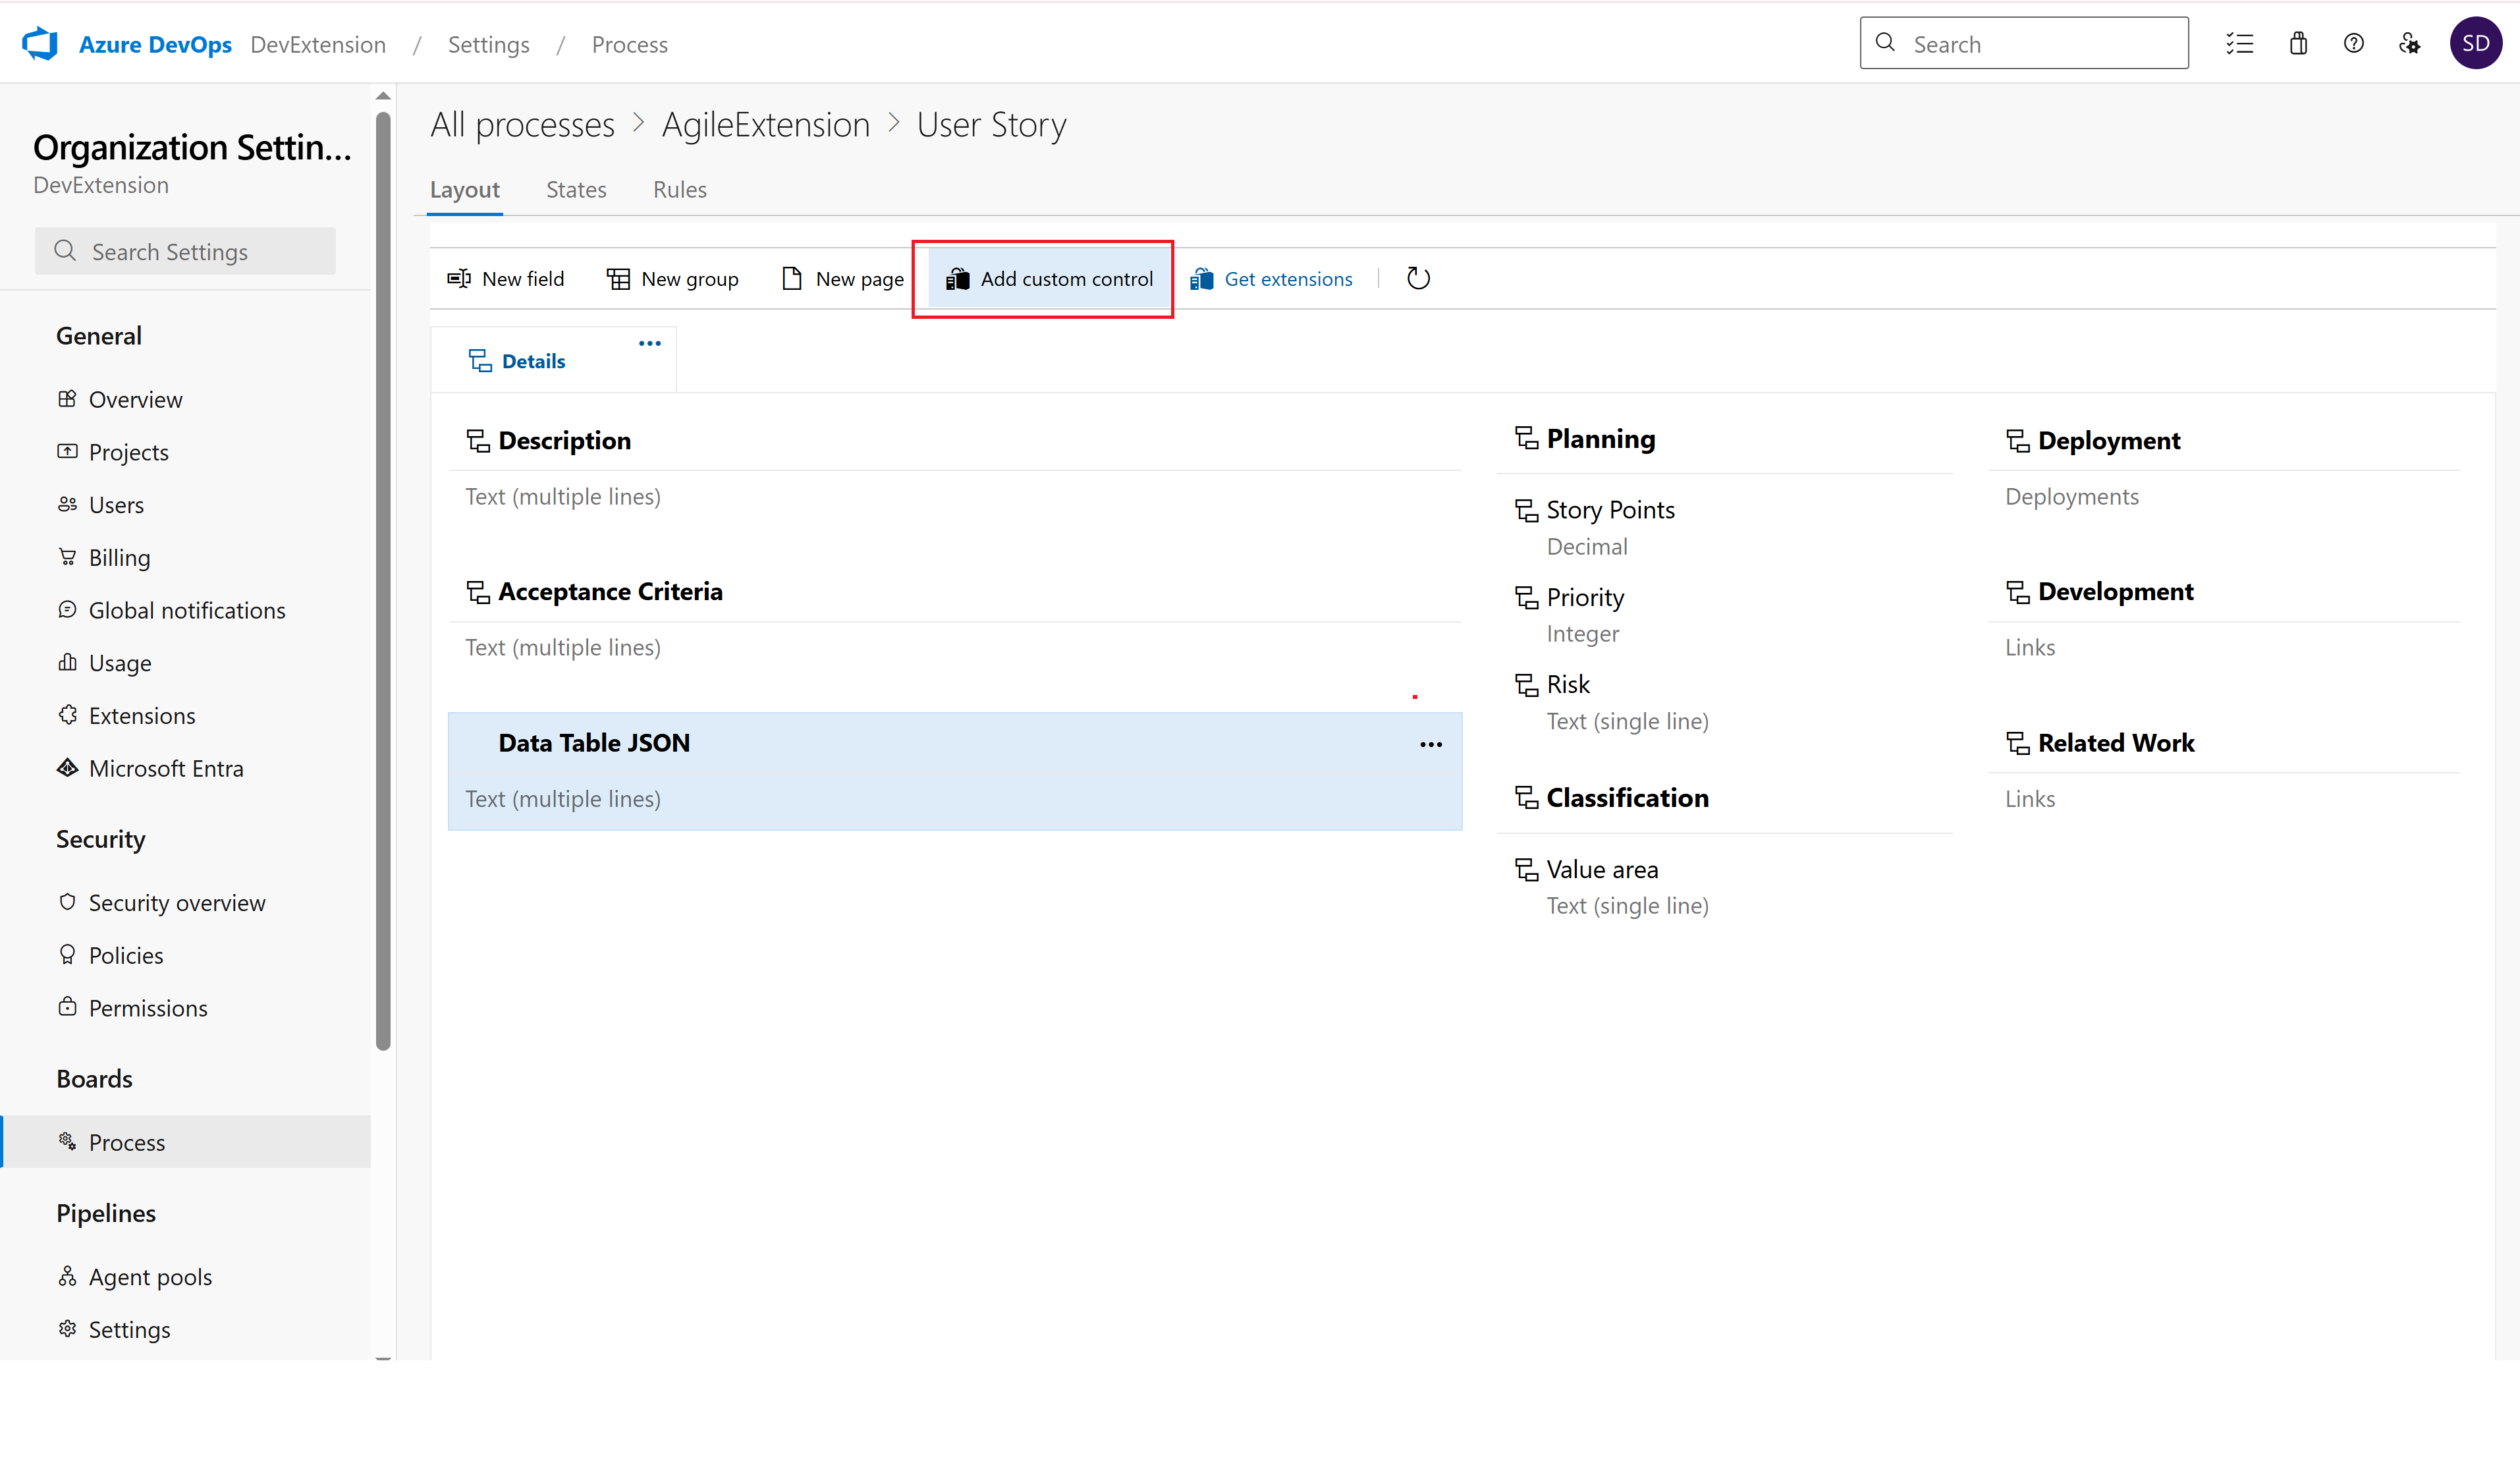
Step 15: Add Custom Control
- Click "Add a custom control"
- This opens the control selection dialog
This is the most important step! Configure the extension in the Options tab:
3. Find and select "Custom Data Table (DataTables) v3"
4. Click to select it
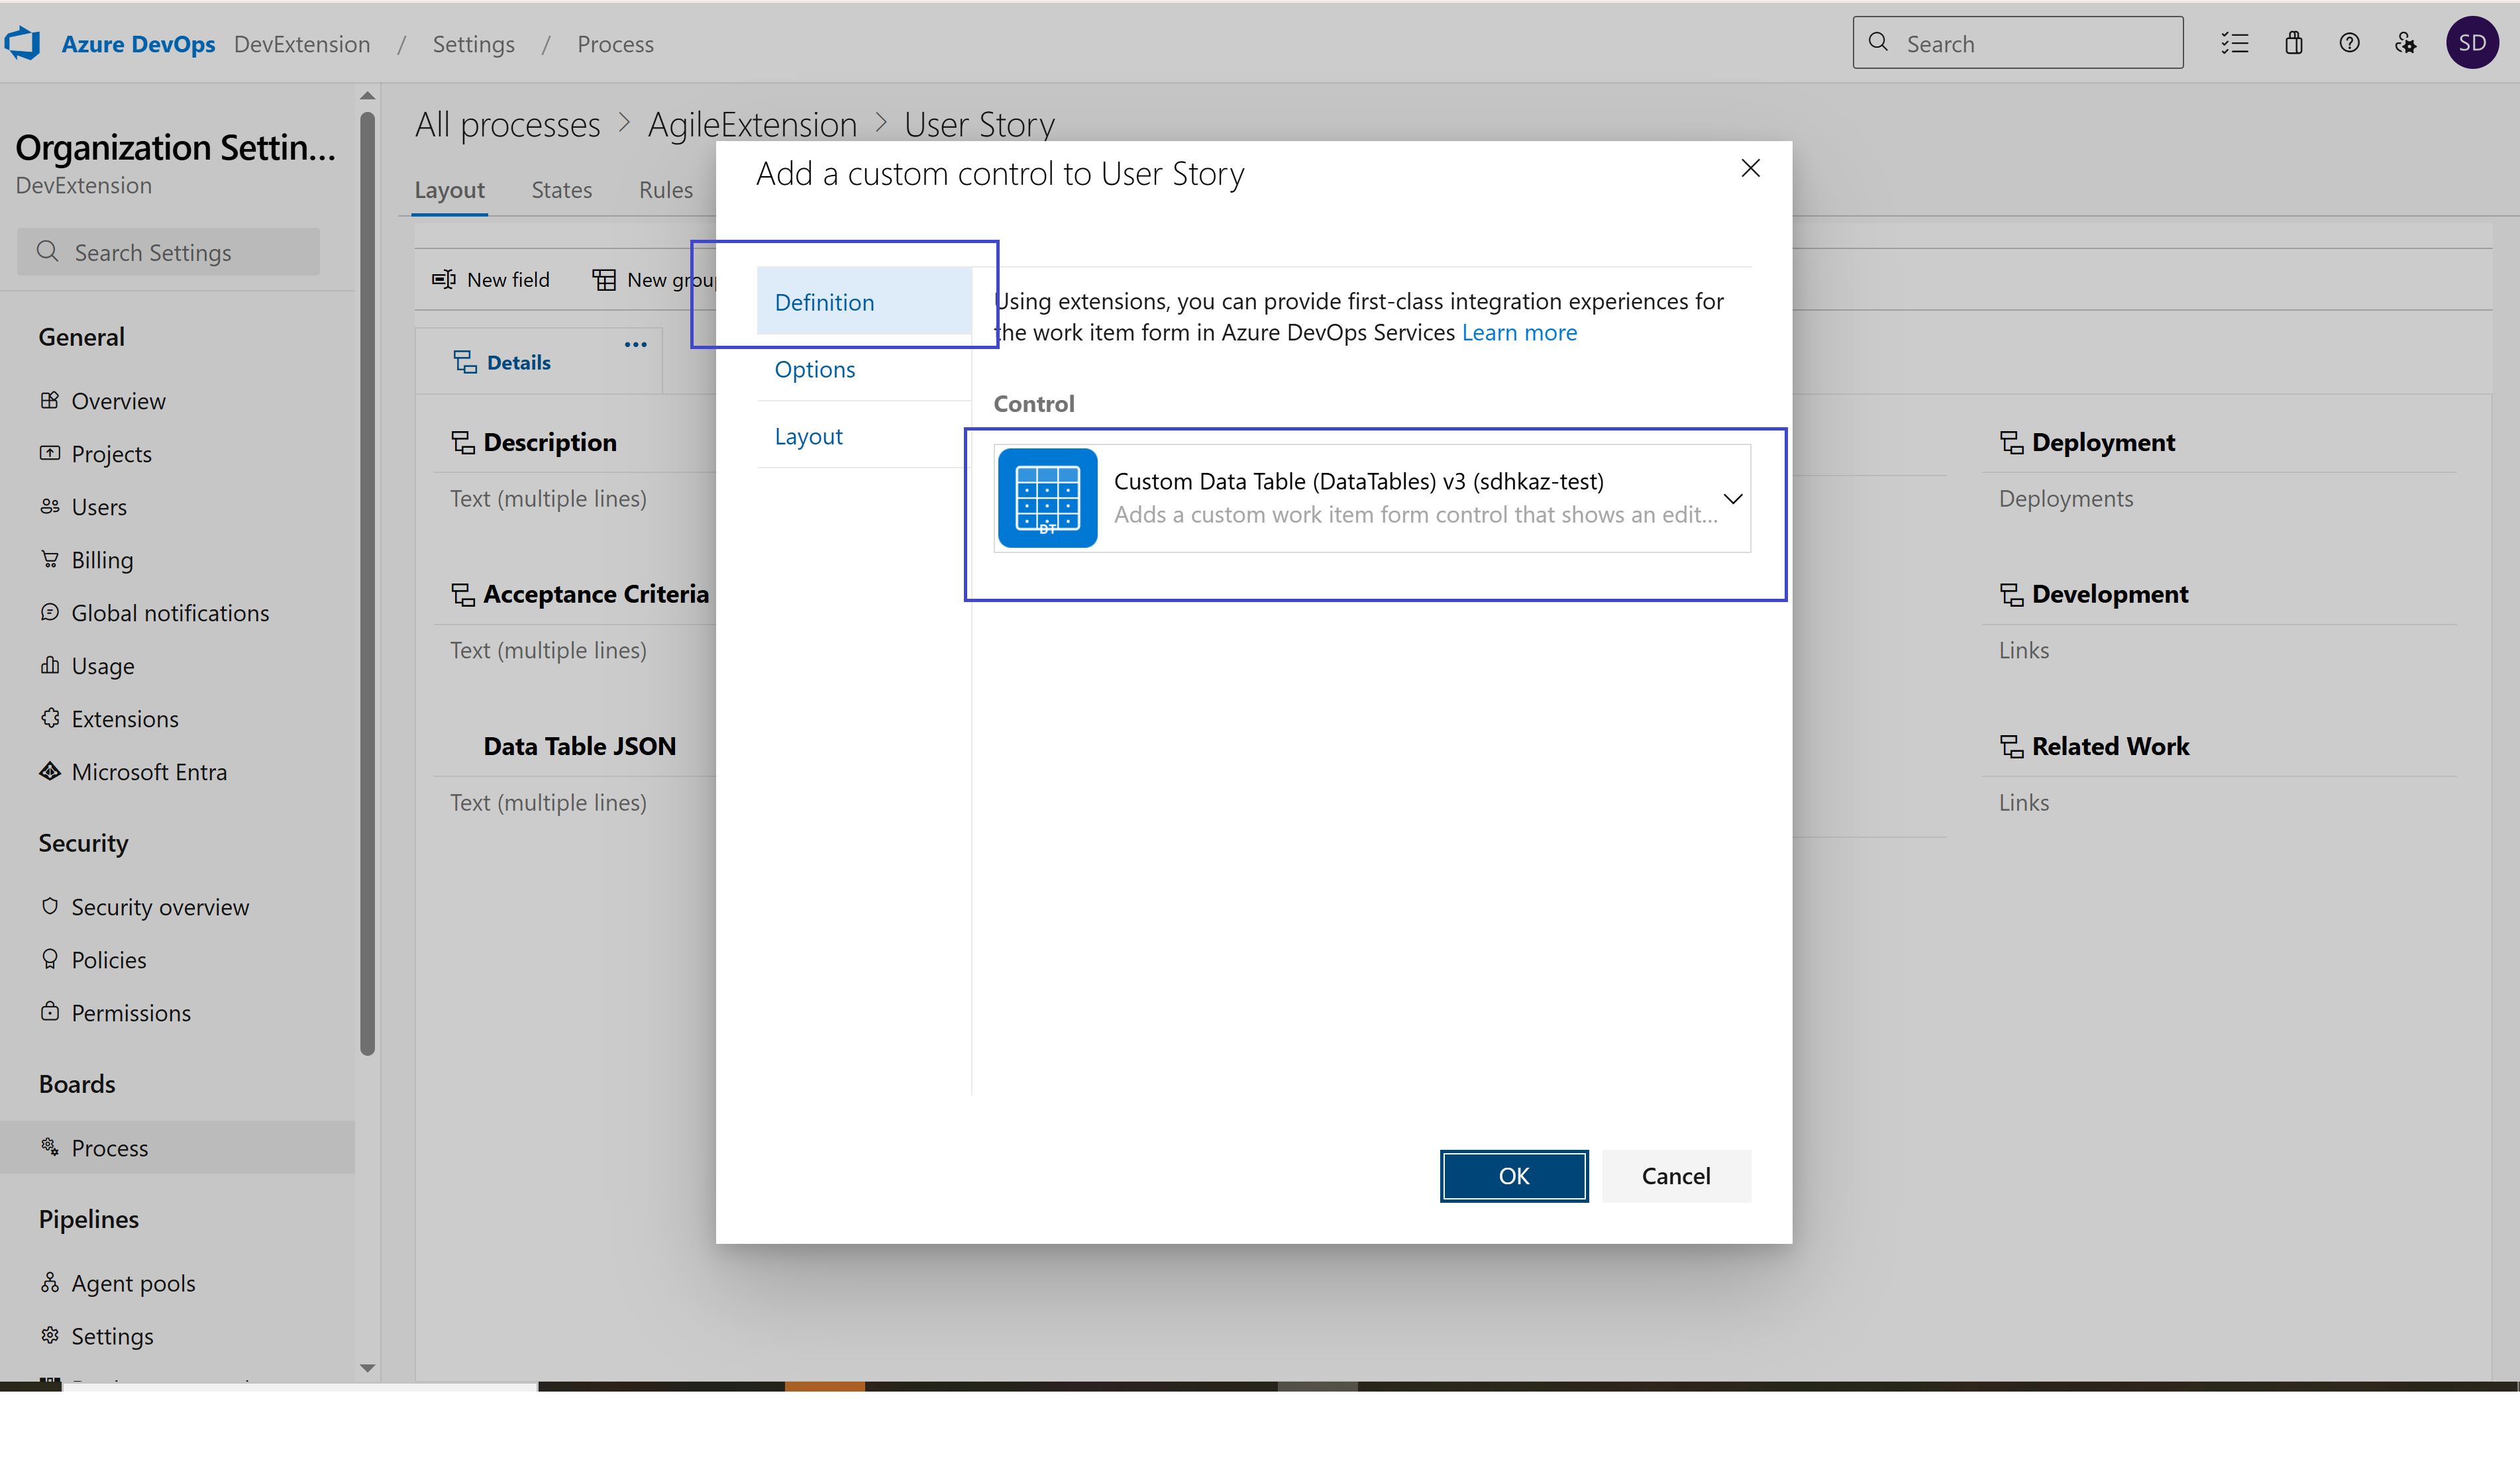 Extension definition and basic settings
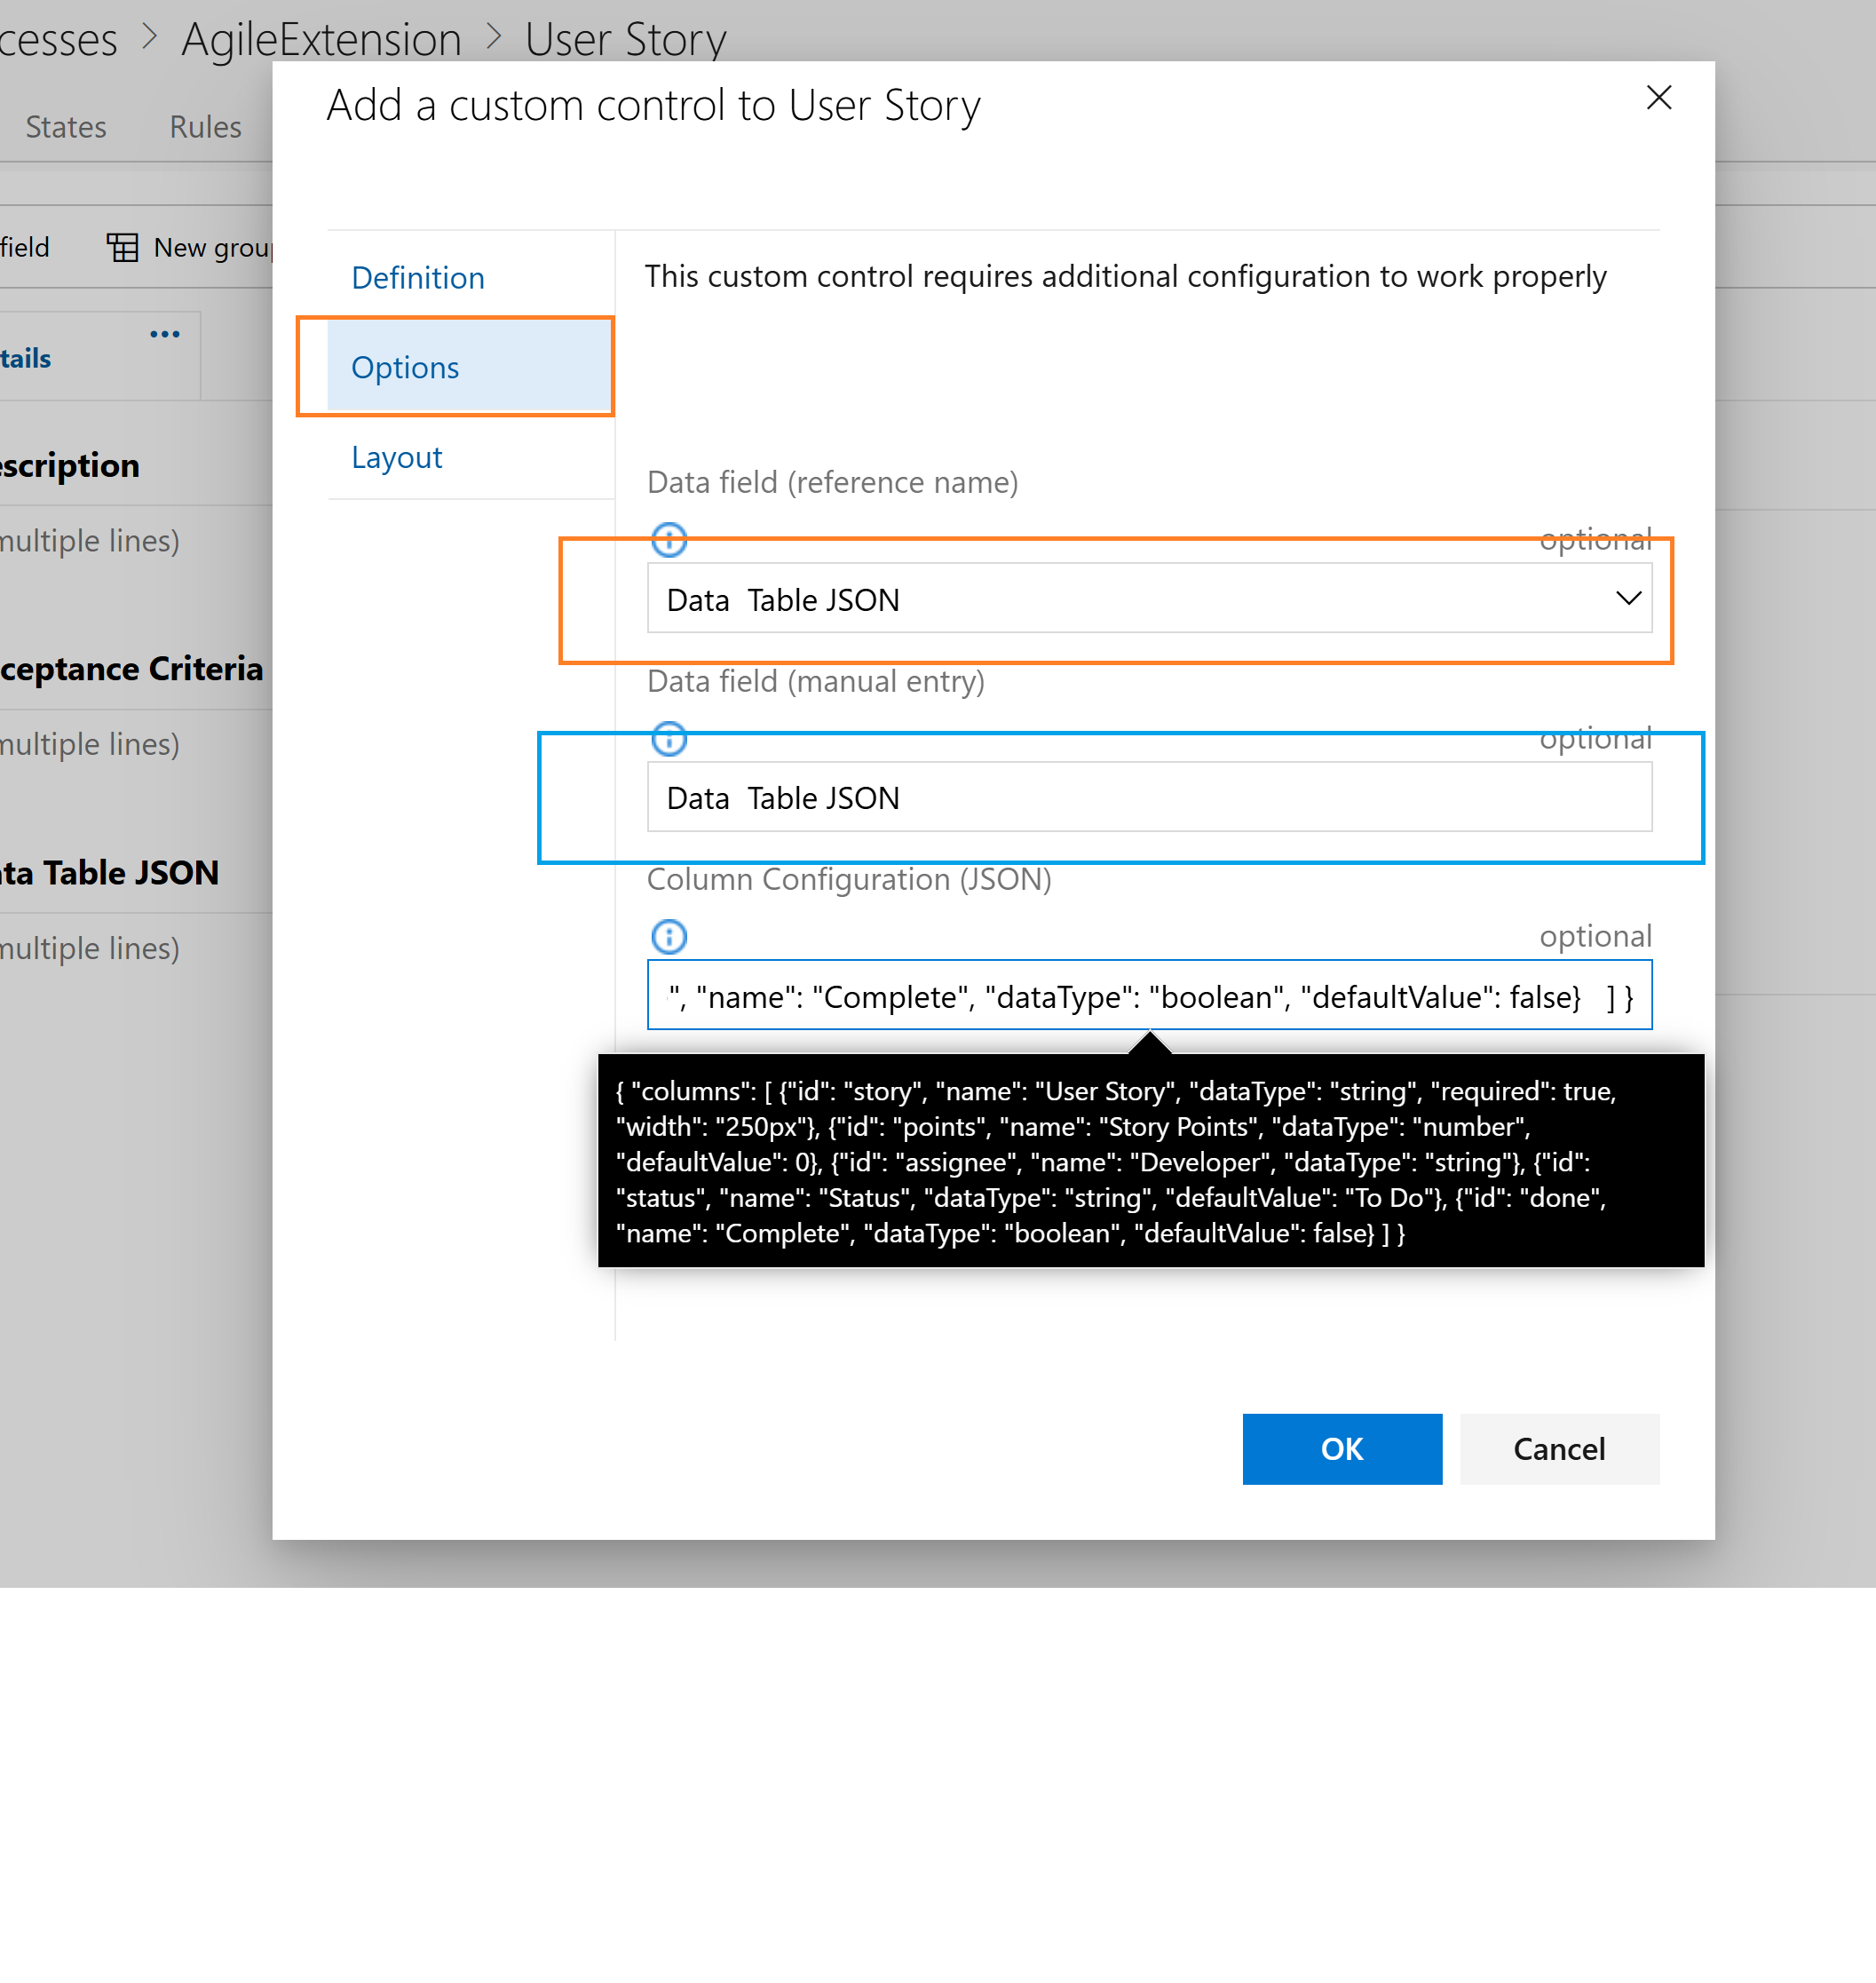 Options tab configuration - this is where the magic happens!
Configure these three options:
- Data field (reference name): Select your custom field from dropdown
- Data field (manual entry): Backup field name entry
- Column Configuration (JSON): Your custom table structure
**Test Case Management Template (Eg) **
{
  "columns": [
    {
      "id": "testCase",
      "name": "Test Case",
      "dataType": "string",
      "required": true,
      "width": "300px"
    },
    {
      "id": "priority",
      "name": "Priority",
      "dataType": "dropdown",
      "defaultValue": "Medium",
      "options": ["Critical", "High", "Medium", "Low"]
    },
    {
      "id": "result",
      "name": "Test Result",
      "dataType": "dropdown",
      "defaultValue": "Not Run",
      "options": ["Not Run", "Passed", "Failed", "Blocked", "Skipped"]
    },
    {
      "id": "testType",
      "name": "Test Type",
      "dataType": "dropdown",
      "defaultValue": "Functional",
      "options": ["Functional", "Integration", "Unit", "Performance", "Security", "UI/UX"]
    },
    {
      "id": "tester",
      "name": "Tester",
      "dataType": "string"
    },
    {
      "id": "executionDate",
      "name": "Execution Date",
      "dataType": "date"
    },
    {
      "id": "passed",
      "name": "Passed",
      "dataType": "boolean",
      "defaultValue": false
    }
  ]
}
- Label: Give your control a display name (e.g., "Task Breakdown")
- Page: Choose which page to display on (usually "Details")
- Group: Select or create a group for organization
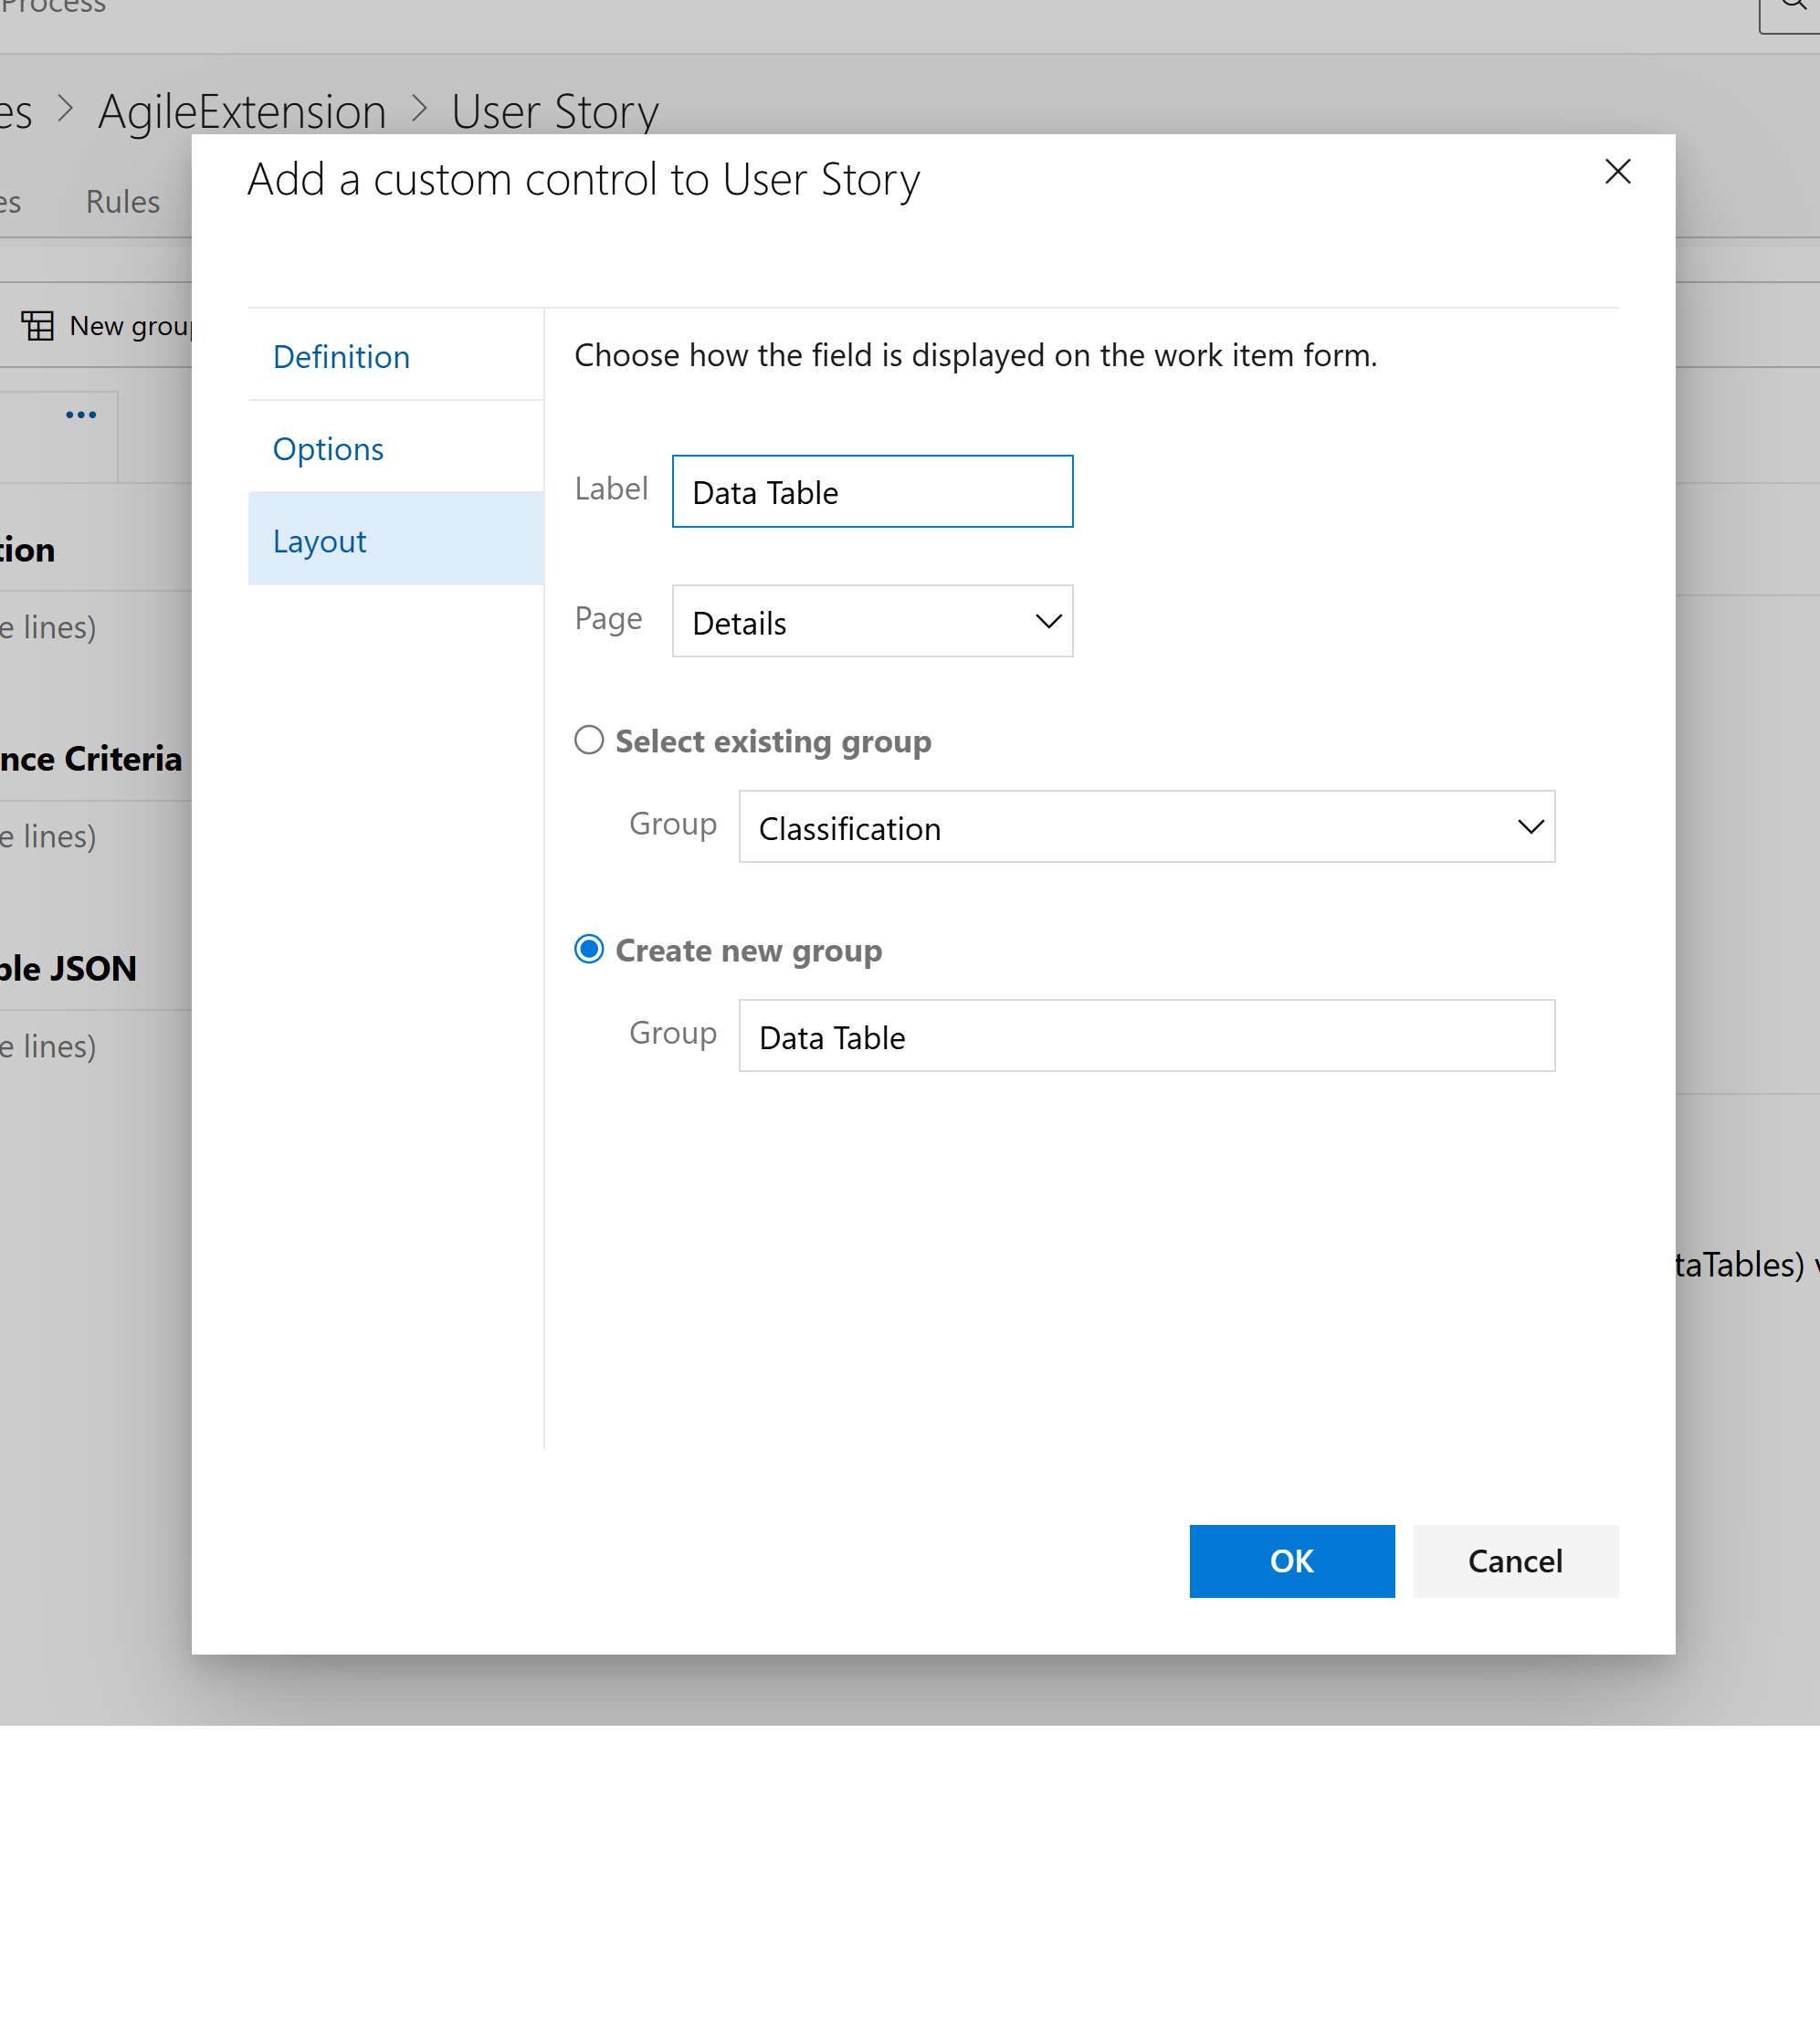 Adding a custom control to the layout
Step 19: Hide Field from Layout (Optional)
If you don't want the raw field to show separately:
- Find your custom field in the layout
- Click "Hide from layout" or hide it
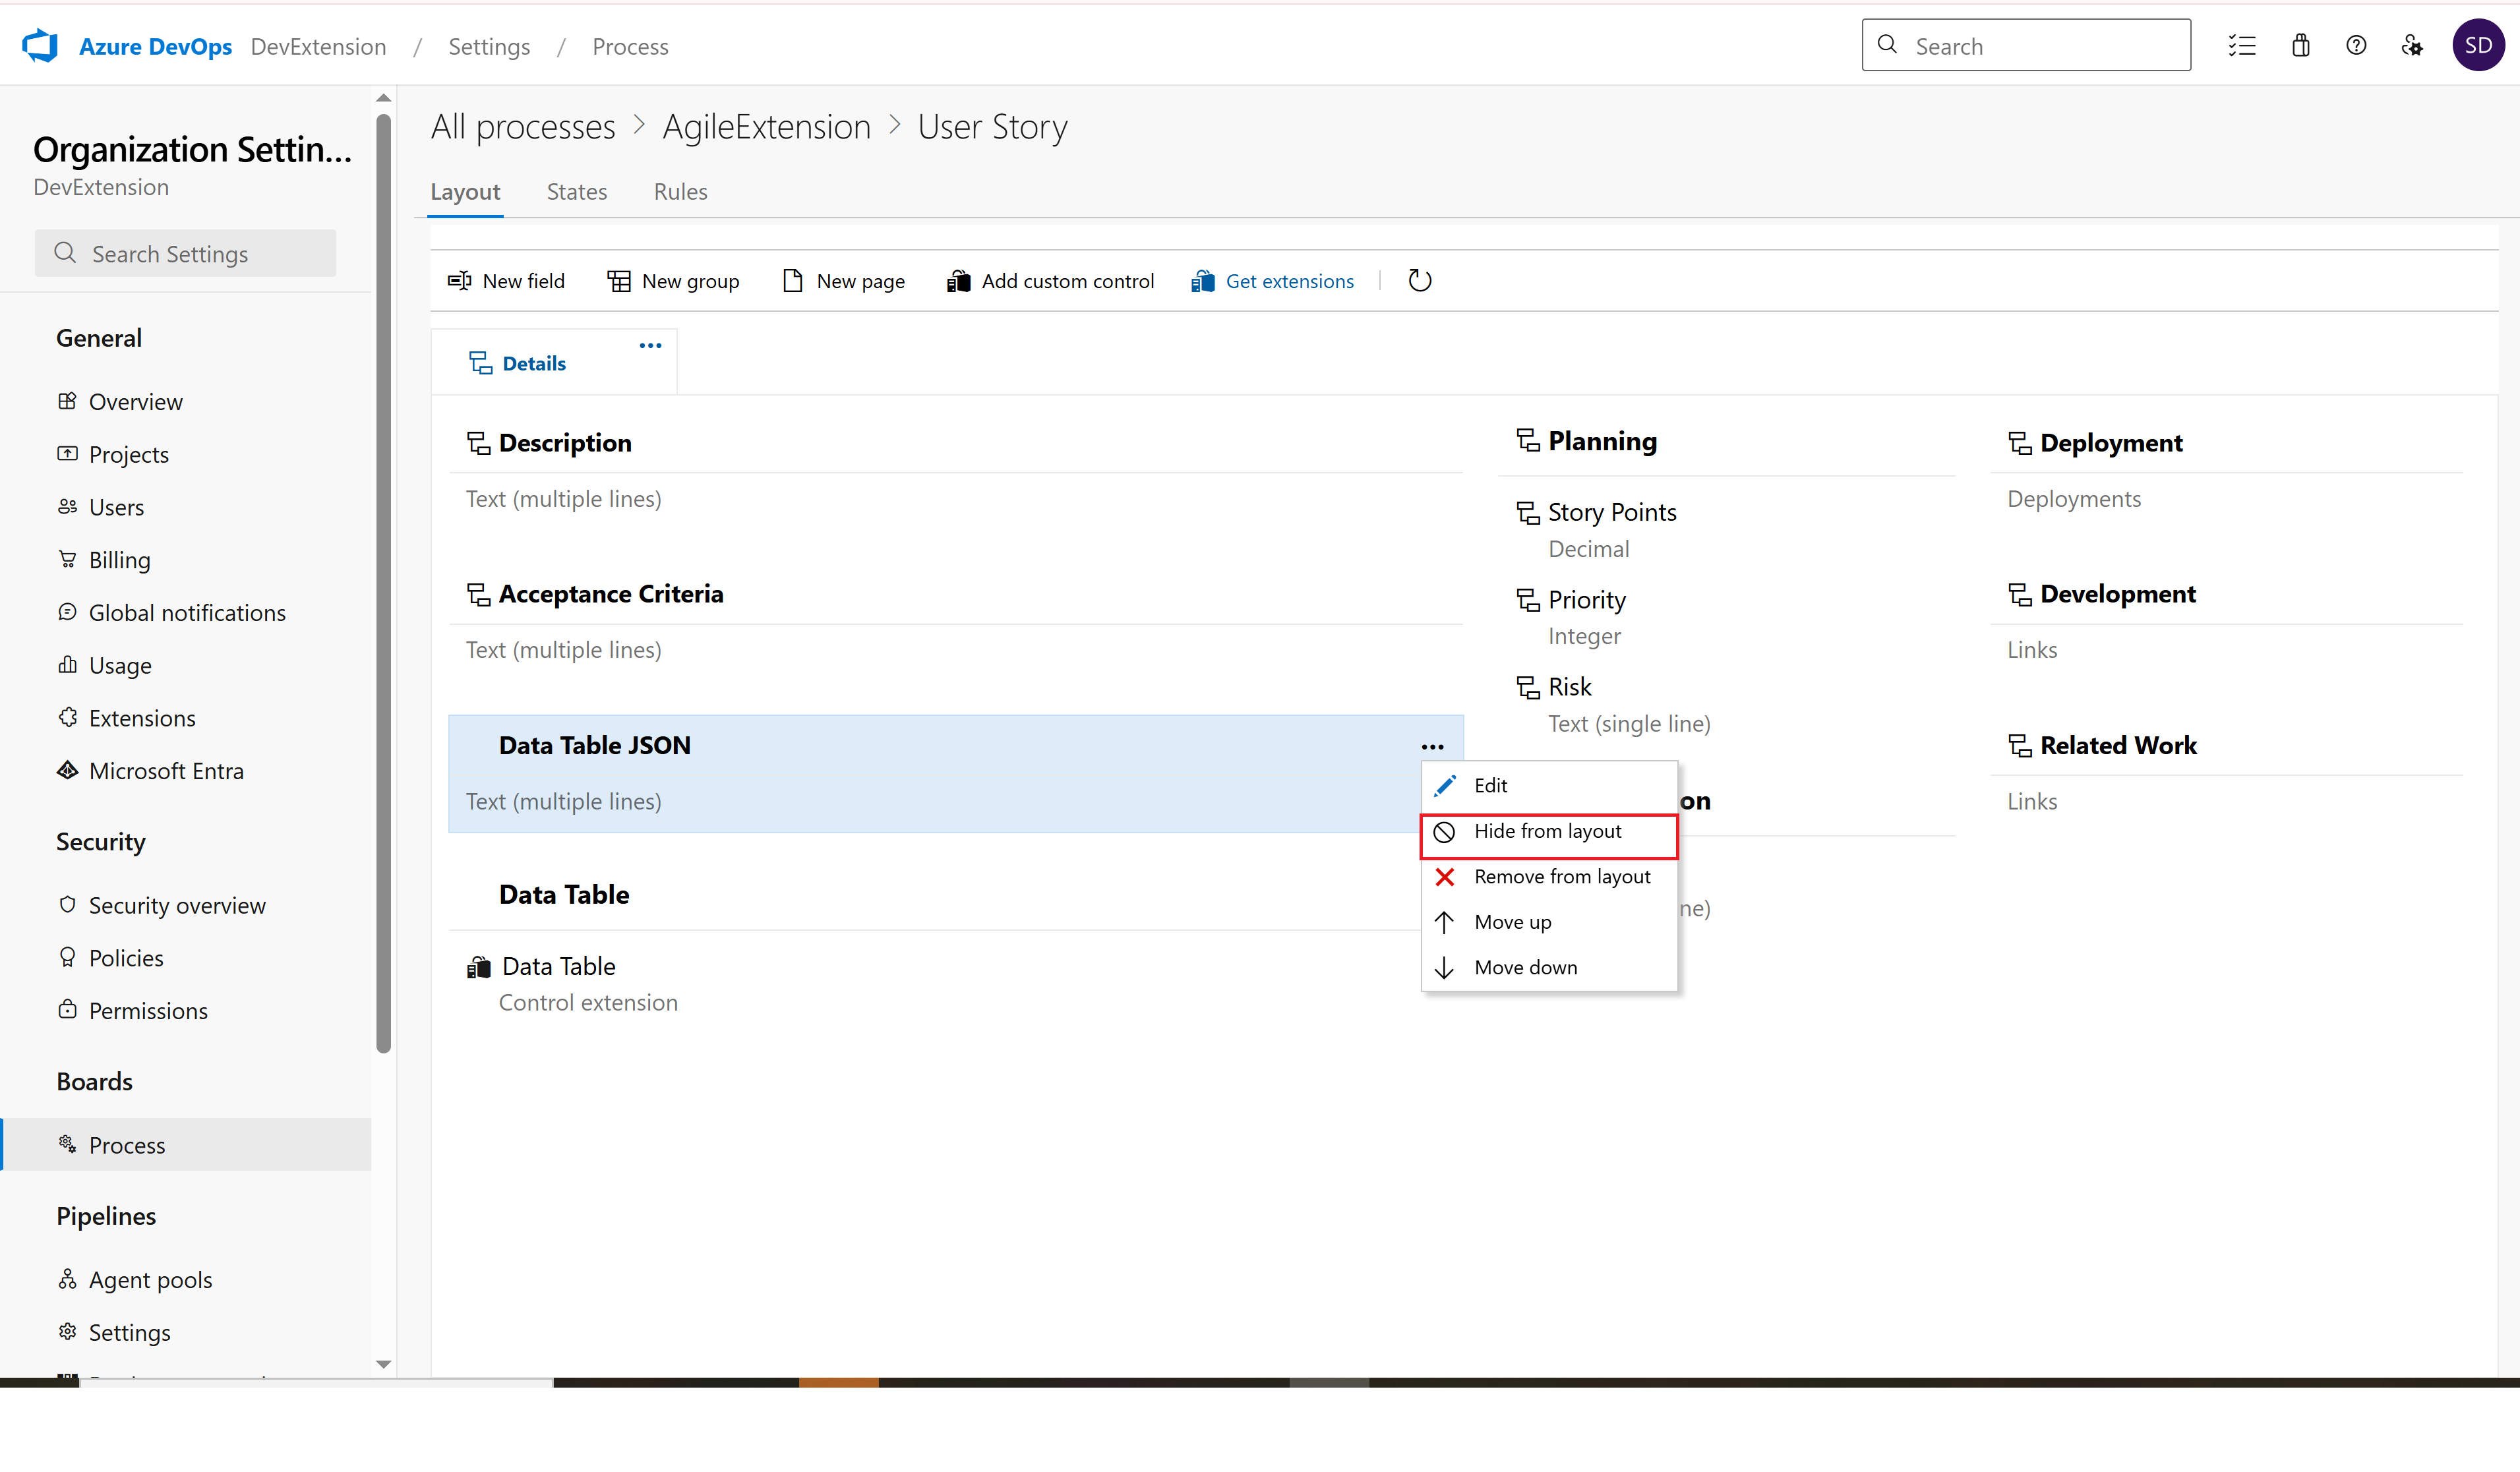 Hiding the raw field from layout since we're using the custom control
🏗️ Phase 5: Create Project with New Process
Step 20: Create New Project
- Go back to your organization main page
- Click "New project"
 Creating a new project
- Project name: Enter your project name
- Process: Select your inherited process (e.g., "Agile with Data Tables")
- Configure other settings as needed
- Click "Create"
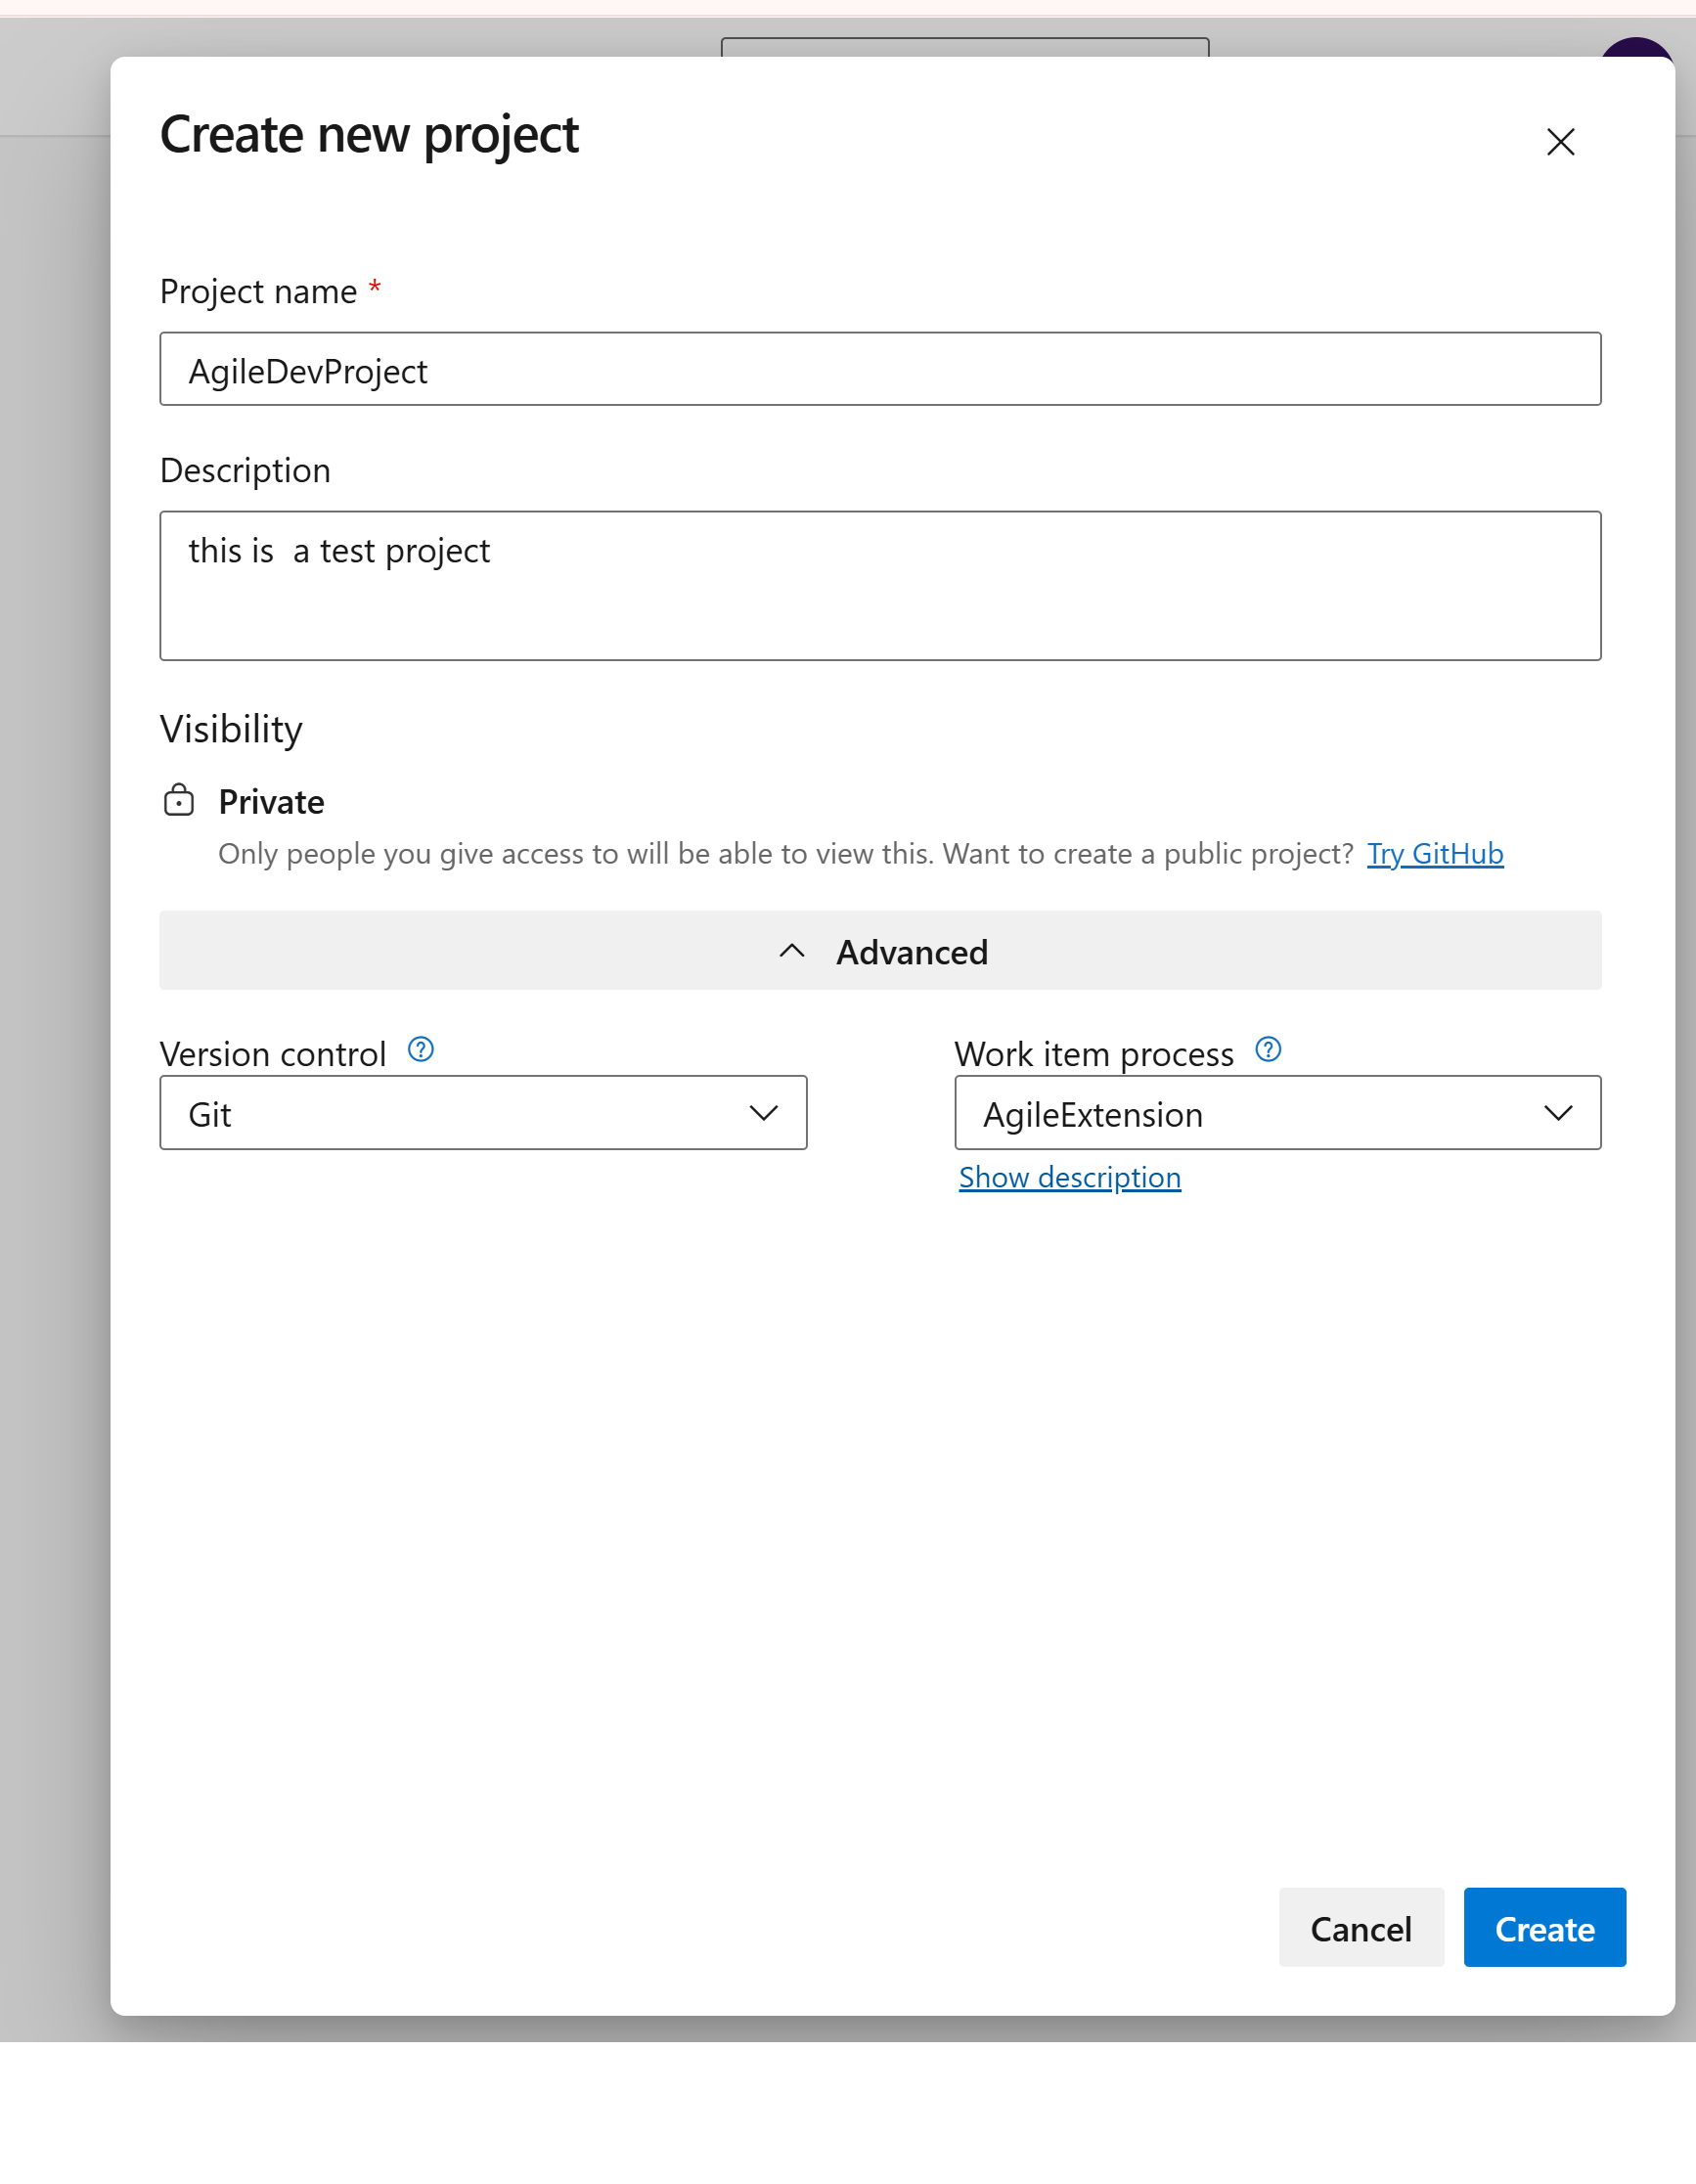 Configuring new project with inherited process
🎉 Phase 6: Use the Extension
Step 22: Create Work Item
- In your new project, create a new work item
- Choose the type you configured (e.g., "User Story")
 Creating a new User Story with the custom control
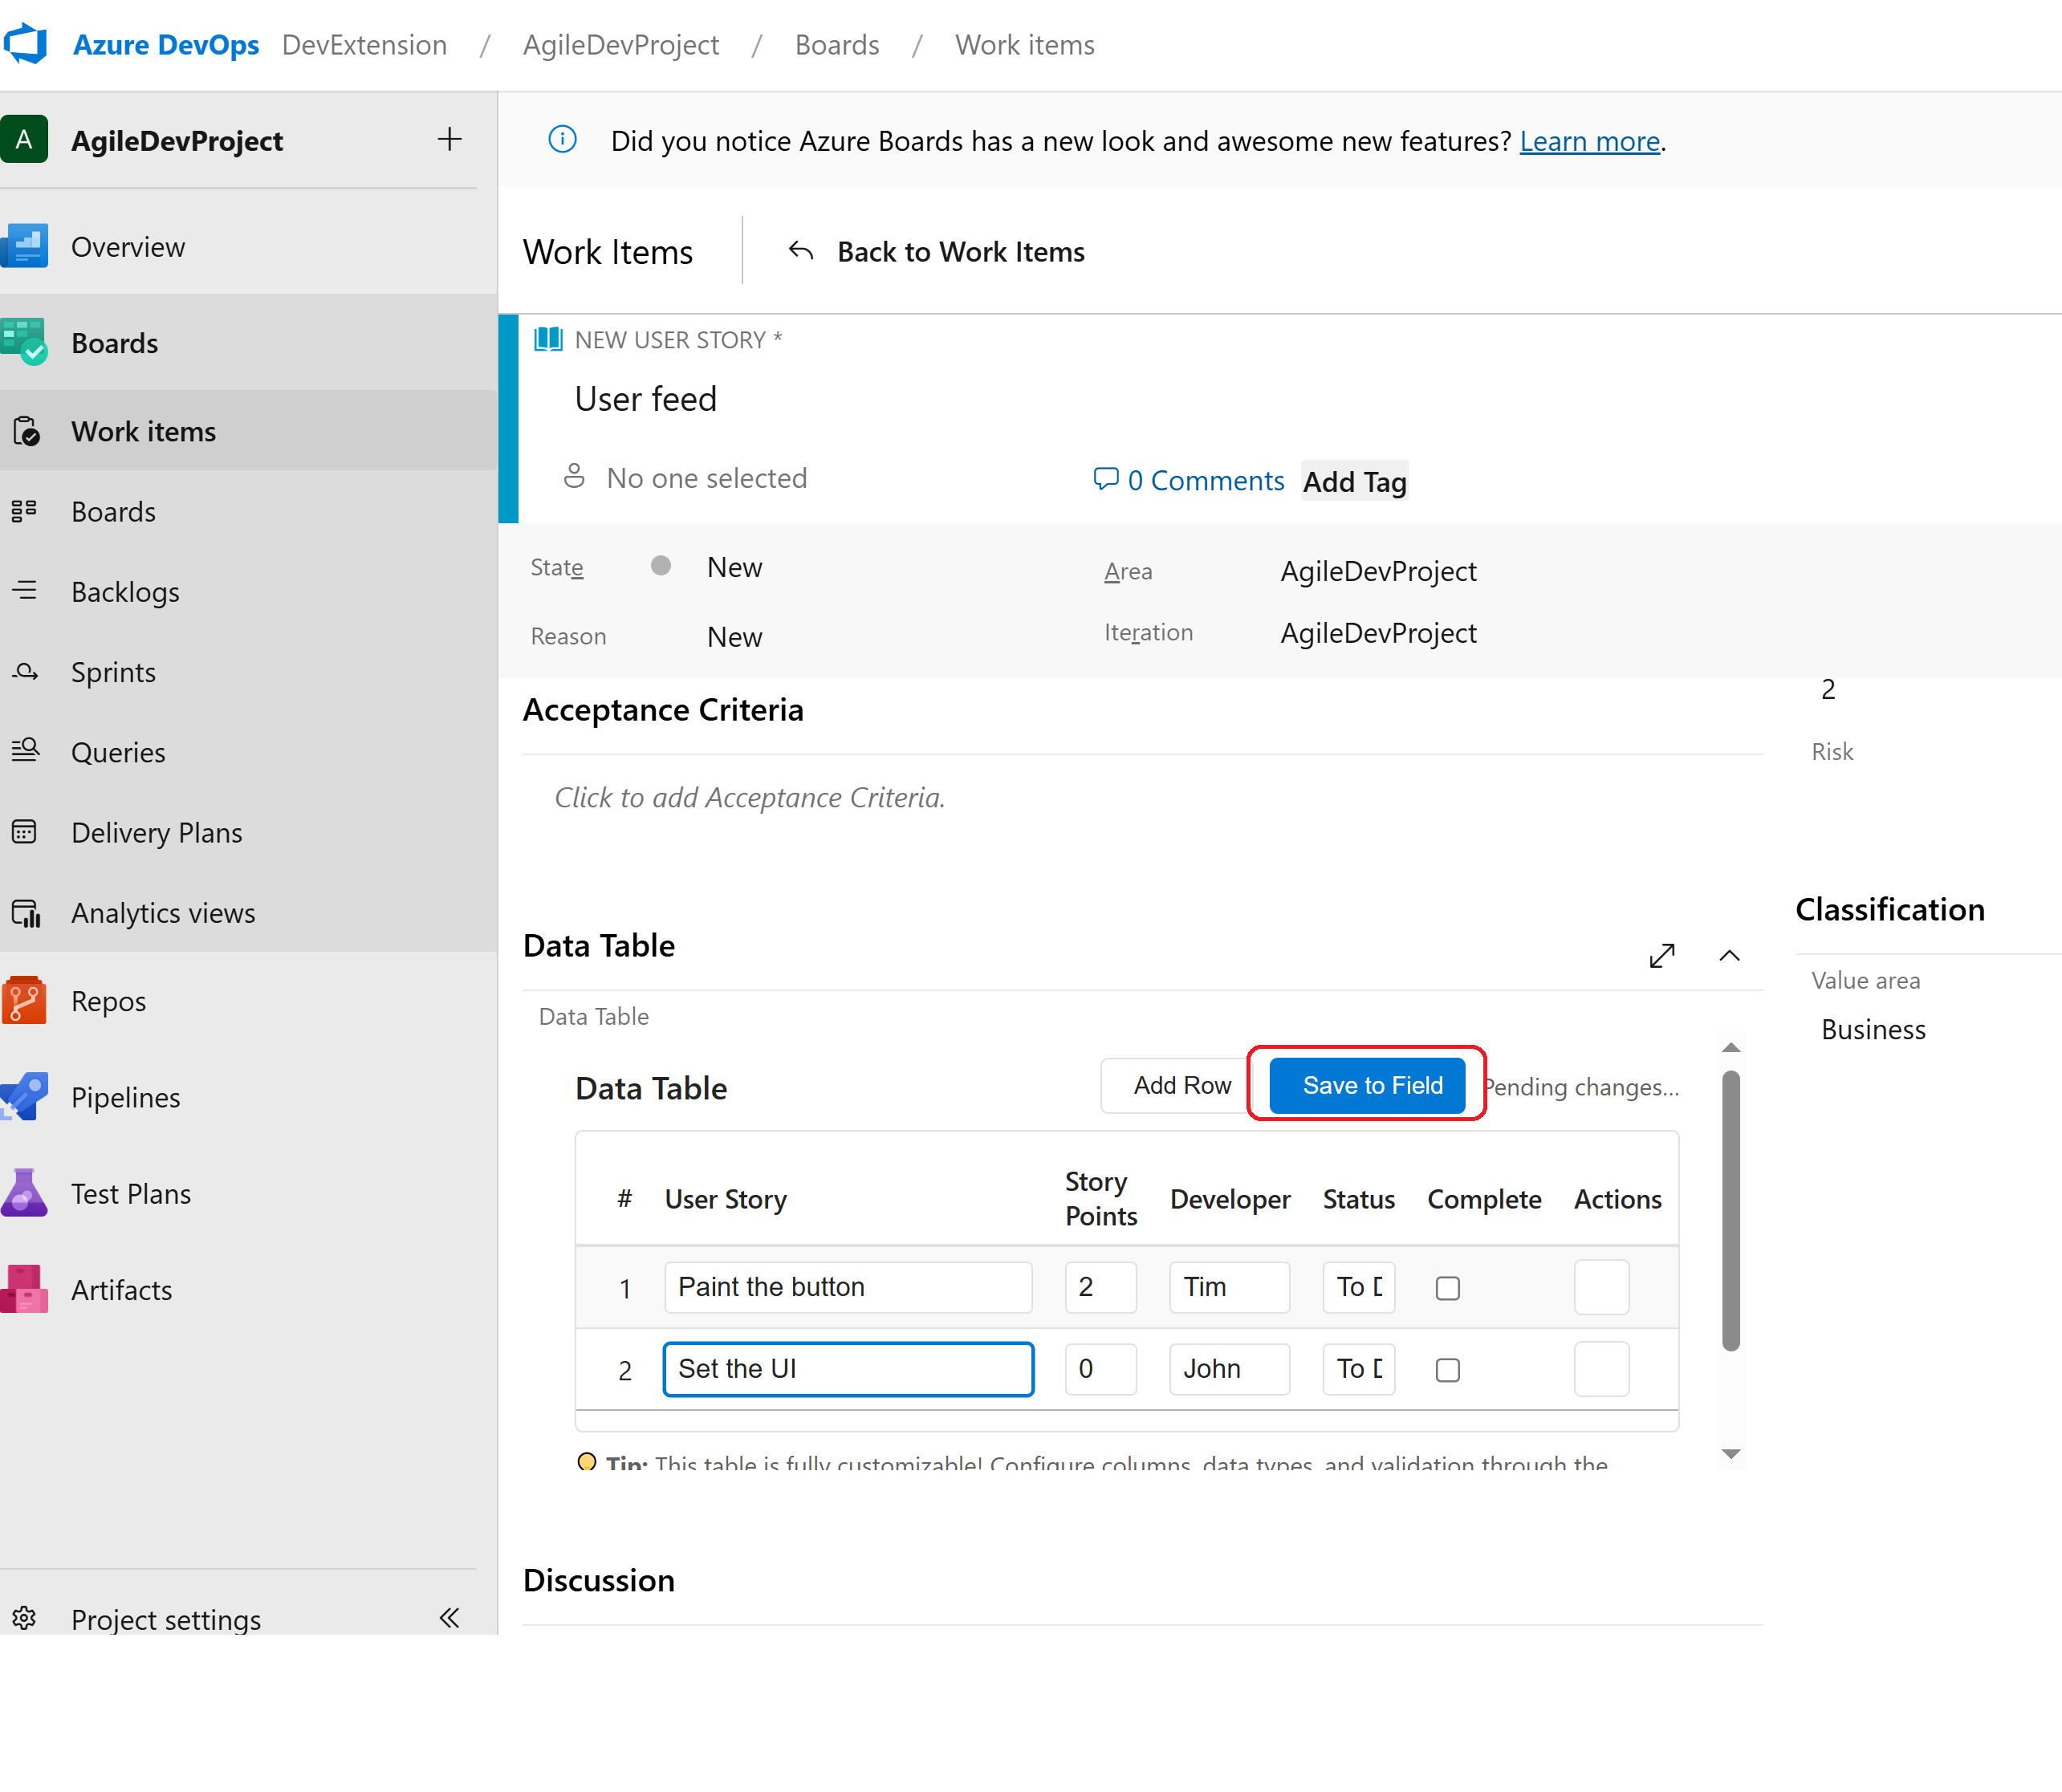
Step 23: See Extension in Action
Your custom data table control is now available! You can:
- Add rows with the "Add Row" button
- Edit data directly in the table cells
- Delete rows with the trash icon
- Auto-save - changes save automatically
- Manual save with the "Save to Field" button
The extension in full size showing all functionality
🎨 Column Configuration Examples
Default Configuration (Basic Task Tracking)
{
  "columns": [
    {
      "id": "name",
      "name": "Item Name",
      "dataType": "string",
      "required": true
    },
    {
      "id": "estimate",
      "name": "Estimate (hrs)",
      "dataType": "number",
      "defaultValue": 0
    },
    {
      "id": "done",
      "name": "Done?",
      "dataType": "boolean",
      "defaultValue": false
    }
  ]
}
Simple Dropdown Example
{
  "columns": [
    {
      "id": "task",
      "name": "Task Name",
      "dataType": "string",
      "required": true
    },
    {
      "id": "priority",
      "name": "Priority",
      "dataType": "dropdown",
      "defaultValue": "Medium",
      "options": ["High", "Medium", "Low"]
    },
    {
      "id": "status",
      "name": "Status",
      "dataType": "dropdown",
      "defaultValue": "To Do",
      "options": ["To Do", "In Progress", "Done"]
    }
  ]
}
Project Planning Table
{
  "columns": [
    {
      "id": "feature",
      "name": "Feature Name",
      "dataType": "string",
      "required": true,
      "width": "200px"
    },
    {
      "id": "priority",
      "name": "Priority",
      "dataType": "string",
      "defaultValue": "Medium"
    },
    {
      "id": "storyPoints",
      "name": "Story Points",
      "dataType": "number",
      "defaultValue": 0
    },
    {
      "id": "assignee",
      "name": "Assigned To",
      "dataType": "string"
    },
    {
      "id": "dueDate",
      "name": "Due Date",
      "dataType": "date"
    },
    {
      "id": "completed",
      "name": "Completed",
      "dataType": "boolean",
      "defaultValue": false
    }
  ]
}
Sprint Planning Template
{
  "columns": [
    {
      "id": "story",
      "name": "User Story",
      "dataType": "string",
      "required": true,
      "width": "250px"
    },
    {
      "id": "points",
      "name": "Story Points",
      "dataType": "number",
      "defaultValue": 0
    },
    {
      "id": "assignee",
      "name": "Developer",
      "dataType": "string"
    },
    {
      "id": "status",
      "name": "Status",
      "dataType": "string",
      "defaultValue": "To Do"
    },
    {
      "id": "done",
      "name": "Complete",
      "dataType": "boolean",
      "defaultValue": false
    }
  ]
}
Test Case Management Template
{
  "columns": [
    {
      "id": "testCase",
      "name": "Test Case",
      "dataType": "string",
      "required": true,
      "width": "300px"
    },
    {
      "id": "priority",
      "name": "Priority",
      "dataType": "dropdown",
      "defaultValue": "Medium",
      "options": ["Critical", "High", "Medium", "Low"]
    },
    {
      "id": "result",
      "name": "Test Result",
      "dataType": "dropdown",
      "defaultValue": "Not Run",
      "options": ["Not Run", "Passed", "Failed", "Blocked", "Skipped"]
    },
    {
      "id": "testType",
      "name": "Test Type",
      "dataType": "dropdown",
      "defaultValue": "Functional",
      "options": ["Functional", "Integration", "Unit", "Performance", "Security", "UI/UX"]
    },
    {
      "id": "tester",
      "name": "Tester",
      "dataType": "string"
    },
    {
      "id": "executionDate",
      "name": "Execution Date",
      "dataType": "date"
    },
    {
      "id": "passed",
      "name": "Passed",
      "dataType": "boolean",
      "defaultValue": false
    }
  ]
}
Bug Tracking Template with Dropdowns
{
  "columns": [
    {
      "id": "bugTitle",
      "name": "Bug Description",
      "dataType": "string",
      "required": true,
      "width": "250px"
    },
    {
      "id": "severity",
      "name": "Severity",
      "dataType": "dropdown",
      "defaultValue": "Medium",
      "options": ["Critical", "High", "Medium", "Low"]
    },
    {
      "id": "priority",
      "name": "Priority",
      "dataType": "dropdown",
      "defaultValue": "P2",
      "options": ["P0", "P1", "P2", "P3", "P4"]
    },
    {
      "id": "status",
      "name": "Status",
      "dataType": "dropdown",
      "defaultValue": "New",
      "options": ["New", "Active", "Resolved", "Closed", "Rejected"]
    },
    {
      "id": "assignee",
      "name": "Assigned To",
      "dataType": "string"
    },
    {
      "id": "environment",
      "name": "Environment",
      "dataType": "dropdown",
      "defaultValue": "Development",
      "options": ["Development", "Testing", "Staging", "Production"]
    },
    {
      "id": "foundDate",
      "name": "Date Found",
      "dataType": "date"
    },
    {
      "id": "fixed",
      "name": "Fixed",
      "dataType": "boolean",
      "defaultValue": false
    }
  ]
}
Risk Management Template
{
  "columns": [
    {
      "id": "riskDescription",
      "name": "Risk Description",
      "dataType": "string",
      "required": true,
      "width": "250px"
    },
    {
      "id": "category",
      "name": "Category",
      "dataType": "dropdown",
      "defaultValue": "Technical",
      "options": ["Technical", "Business", "Resource", "Schedule", "Quality", "External"]
    },
    {
      "id": "probability",
      "name": "Probability",
      "dataType": "dropdown",
      "defaultValue": "Medium",
      "options": ["Very Low", "Low", "Medium", "High", "Very High"]
    },
    {
      "id": "impact",
      "name": "Impact",
      "dataType": "dropdown",
      "defaultValue": "Medium",
      "options": ["Very Low", "Low", "Medium", "High", "Very High"]
    },
    {
      "id": "riskLevel",
      "name": "Risk Level",
      "dataType": "dropdown",
      "defaultValue": "Medium",
      "options": ["Low", "Medium", "High", "Critical"]
    },
    {
      "id": "owner",
      "name": "Risk Owner",
      "dataType": "string",
      "required": true
    },
    {
      "id": "mitigation",
      "name": "Mitigation Plan",
      "dataType": "string"
    },
    {
      "id": "status",
      "name": "Status",
      "dataType": "dropdown",
      "defaultValue": "Open",
      "options": ["Open", "Mitigated", "Accepted", "Closed"]
    },
    {
      "id": "reviewDate",
      "name": "Review Date",
      "dataType": "date"
    }
  ]
}
Meeting Action Items Template
{
  "columns": [
    {
      "id": "action",
      "name": "Action Item",
      "dataType": "string",
      "required": true,
      "width": "250px"
    },
    {
      "id": "owner",
      "name": "Owner",
      "dataType": "string",
      "required": true
    },
    {
      "id": "priority",
      "name": "Priority",
      "dataType": "dropdown",
      "defaultValue": "Medium",
      "options": ["High", "Medium", "Low"]
    },
    {
      "id": "status",
      "name": "Status",
      "dataType": "dropdown",
      "defaultValue": "Not Started",
      "options": ["Not Started", "In Progress", "Blocked", "Completed", "Cancelled"]
    },
    {
      "id": "dueDate",
      "name": "Due Date",
      "dataType": "date"
    },
    {
      "id": "category",
      "name": "Category",
      "dataType": "dropdown",
      "defaultValue": "General",
      "options": ["General", "Technical", "Process", "Documentation", "Communication"]
    },
    {
      "id": "notes",
      "name": "Notes",
      "dataType": "string"
    },
    {
      "id": "completed",
      "name": "Done",
      "dataType": "boolean",
      "defaultValue": false
    }
  ]
}
Resource Planning Template
{
  "columns": [
    {
      "id": "resource",
      "name": "Resource Name",
      "dataType": "string",
      "required": true,
      "width": "200px"
    },
    {
      "id": "role",
      "name": "Role",
      "dataType": "dropdown",
      "defaultValue": "Developer",
      "options": ["Developer", "Tester", "Designer", "Analyst", "Manager", "Architect"]
    },
    {
      "id": "skillLevel",
      "name": "Skill Level",
      "dataType": "dropdown",
      "defaultValue": "Intermediate",
      "options": ["Junior", "Intermediate", "Senior", "Expert"]
    },
    {
      "id": "availability",
      "name": "Availability %",
      "dataType": "number",
      "defaultValue": 100
    },
    {
      "id": "startDate",
      "name": "Start Date",
      "dataType": "date"
    },
    {
      "id": "endDate",
      "name": "End Date",
      "dataType": "date"
    },
    {
      "id": "location",
      "name": "Location",
      "dataType": "dropdown",
      "defaultValue": "Office",
      "options": ["Office", "Remote", "Hybrid", "Client Site"]
    },
    {
      "id": "allocated",
      "name": "Allocated",
      "dataType": "boolean",
      "defaultValue": false
    }
  ]
}
Feature Requirements Template
{
  "columns": [
    {
      "id": "requirement",
      "name": "Requirement",
      "dataType": "string",
      "required": true,
      "width": "300px"
    },
    {
      "id": "type",
      "name": "Type",
      "dataType": "dropdown",
      "defaultValue": "Functional",
      "options": ["Functional", "Non-Functional", "Business", "Technical", "Compliance"]
    },
    {
      "id": "priority",
      "name": "Priority",
      "dataType": "dropdown",
      "defaultValue": "Medium",
      "options": ["Must Have", "Should Have", "Could Have", "Won't Have"]
    },
    {
      "id": "complexity",
      "name": "Complexity",
      "dataType": "dropdown",
      "defaultValue": "Medium",
      "options": ["Simple", "Medium", "Complex", "Very Complex"]
    },
    {
      "id": "status",
      "name": "Status",
      "dataType": "dropdown",
      "defaultValue": "Draft",
      "options": ["Draft", "Review", "Approved", "In Development", "Testing", "Done"]
    },
    {
      "id": "owner",
      "name": "Owner",
      "dataType": "string"
    },
    {
      "id": "estimatedEffort",
      "name": "Estimated Effort (hrs)",
      "dataType": "number",
      "defaultValue": 0
    },
    {
      "id": "targetDate",
      "name": "Target Date",
      "dataType": "date"
    }
  ]
}
📖 Column Configuration Reference
Required Properties
| Property |
Type |
Description |
Example |
id |
string |
Unique identifier for the column |
"taskName" |
name |
string |
Display name shown in table header |
"Task Name" |
dataType |
string |
Data type (see supported types below) |
"string" |
Optional Properties
| Property |
Type |
Description |
Default |
Example |
required |
boolean |
Whether field is required |
false |
true |
defaultValue |
any |
Default value for new rows |
"" or 0 |
"New Task" |
width |
string |
Column width (CSS format) |
Auto |
"150px" |
Supported Data Types
| Data Type |
Input Control |
Description |
Example Values |
string |
Text input |
Single or multi-line text |
"Task description" |
number |
Number input |
Integers or decimals |
42, 3.14 |
boolean |
Checkbox |
True/false values |
true, false |
date |
Date picker |
Date selection |
"2024-12-25" |
dropdown |
Select dropdown |
Predefined list of options |
"High", "Medium", "Low" |
Dropdown Configuration
For dropdown columns, you must include an options array:
{
  "id": "priority",
  "name": "Priority",
  "dataType": "dropdown",
  "defaultValue": "Medium",
  "options": ["High", "Medium", "Low"]
}
Important Notes:
options array is required for dropdown columnsdefaultValue should be one of the options in the array- Options are displayed in the order specified in the array
- Users can only select from the predefined options
🐛 Troubleshooting
Understanding Status Messages
The extension shows helpful status messages in the top-right corner:
| Status |
Meaning |
Action Needed |
"Ready" |
✅ Working correctly |
None |
"Pending changes…" |
🔄 Auto-saving in progress |
Wait for save |
"Saved" |
✅ Manual save completed |
None |
"⚠️ Field not found/writable" |
❌ Configuration issue |
Check field setup |
"Error while updating field" |
❌ Save failed |
Check debug panel |
Common Issues & Solutions
"No configuration is needed for this control extension"
- Cause: Extension manifest issue or caching
- Solution: Clear browser cache, refresh page, or contact admin
"Field not found/writable"
- Cause: Custom field doesn't exist or has wrong permissions
- Solution:
- Verify custom field exists in process configuration
- Check field type is String, PlainText, or HTML
- Ensure field is added to the work item type
"Invalid column configuration JSON"
- Cause: Malformed JSON in configuration
- Solution:
- Validate JSON syntax using online JSON validator
- Check all required properties are present
- Use provided examples as templates
Data not saving
- Cause: Field permissions or validation issues
- Solution:
- Check debug panel for error messages
- Verify field is not read-only
- Ensure user has edit permissions on work item
Quick Diagnostic Checklist
When something isn't working:
- ✅ Check Field Configuration: Ensure custom field exists and is accessible
- ✅ Validate JSON: Use online JSON validator to check configuration syntax
- ✅ Check Permissions: Ensure user can edit the work item and field
- ✅ Browser Console: Check for JavaScript errors in developer tools
- ✅ Clear Cache: Try incognito/private browsing mode
- ✅ Process Assignment: Verify project is using the correct inherited process
🎯 Best Practices
Column Design Guidelines
- Keep IDs Simple: Use camelCase, no spaces (
taskName not Task Name)
- Meaningful Names: Use clear, descriptive column names users will understand
- Appropriate Types: Choose the right data type for each column
- Required Fields: Mark essential columns as required, but don't overdo it
- Default Values: Provide sensible defaults to speed up data entry
- Column Width: Set widths for important columns to ensure good layout
- Column Count: Keep under 10 columns for optimal performance
- Data Volume: Tested with 100+ rows, works well for typical use cases
- Field Type: Use
Text (multiple lines) rather than HTML when possible
User Experience Tips
- Logical Order: Arrange columns in the order users will fill them
- Consistent Naming: Use consistent terminology across your organization
- Help Documentation: Document your configurations for team members
- Training: Provide brief training on how to use the tables effectively
🆘 Support & Resources
What's New in v8.3.39
- ✨ Dynamic Column Configuration: Fully customizable table columns
- 🐛 Fixed Options Panel: Configuration now shows correctly
- 🔧 Clean User Interface: Debug information hidden by default
- 🛡️ Improved Data Migration: Seamless upgrade from previous versions
- 📱 Better Mobile Support: Responsive design improvements
Getting Help
- Status Messages: Read status messages for quick diagnostics
- Browser Console: Check browser developer tools for errors
- Documentation: Refer to this guide and examples
- JSON Validation: Use online JSON validators for configuration
🎉 Congratulations! You now have a fully functional Dynamic Data Table Extension in your Azure DevOps organization!
Your teams can now create powerful, customized data tables for any work item type, making project management, sprint planning, and task tracking more efficient and organized.
Your Dynamic Data Table Extension is ready to transform your Azure DevOps experience!
