Pulumi Azure task extension for Azure Pipelines
This extension allows you to run your Pulumi apps in Azure Pipeline as a build and release task.
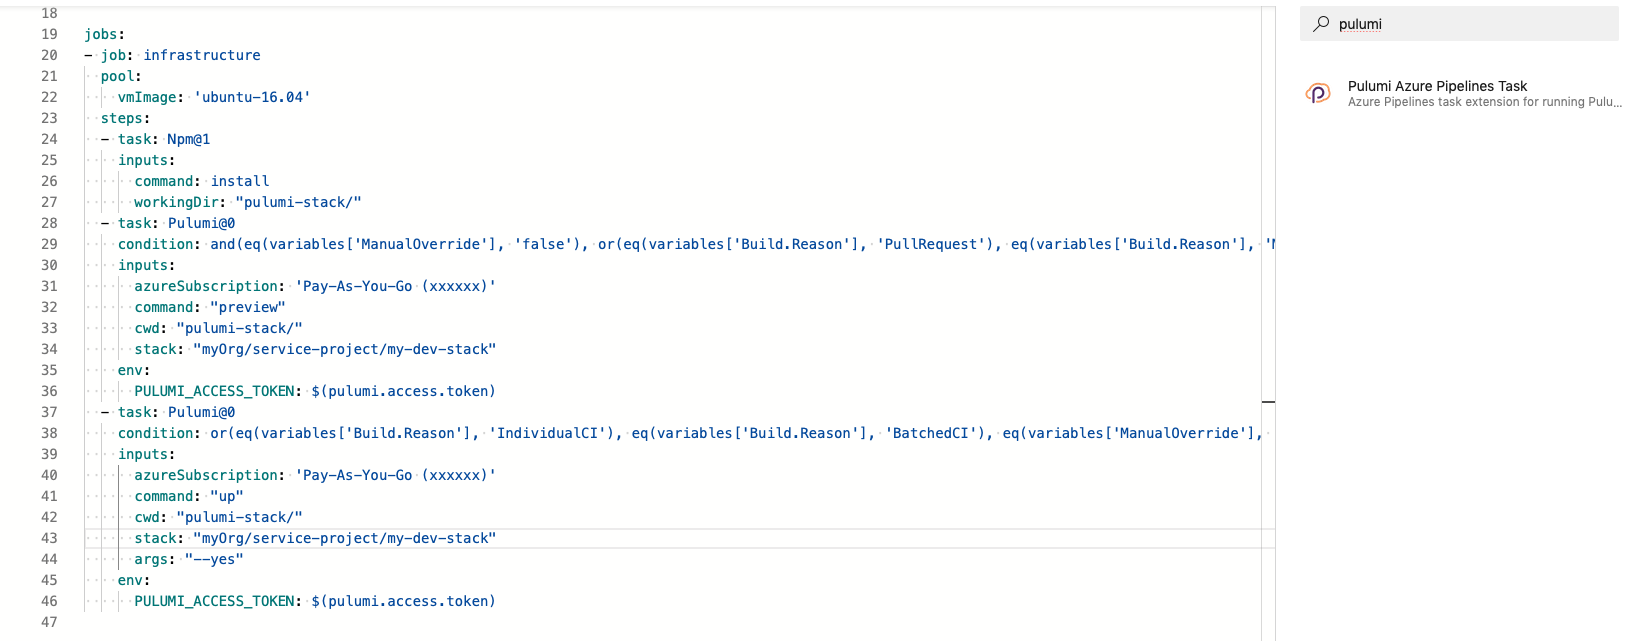
Here's how a typical Azure Pipelines build configuration file in YAML looks like using the Pulumi task.

Alternatively, you can also use the classic wizard UI to setup a new Azure Pipeline build for your Azure DevOps project. Simply search for the Pulumi task by typing "pulumi" in the list of tasks.
Don't know how to get started? We got you covered with an extensive library of easy examples to get you started within minutes.
Read on to learn how you can get started quickly.
Prerequisites
- You must have an active Azure DevOps account and an organization. Create a new account at https://dev.azure.com.
- Install this extension to your organization. To do this, you must be an admin of the organization.
- Once installed, you may have to have your admin make the extension available to you or your project.
- You'll need an Azure subscription if you plan on creating resources in Azure. Create a service connection for the Azure Subscription in your DevOps project.
- Note: At this time, only a
Service Principal Authentication based service connection can be used with this extension.
- The name of this service connection is what you will use in the Pulumi task for the input
azureSubscription if you are using the YAML configuration.
Quickstart
The goal of the quickstart is to help you setup a "stack" on app.pulumi.com for your account. You can then setup CI in your Azure Pipelines to deploy infrastructure to it.
- If you haven't already signed-up, you may signup for an account at https://app.pulumi.com/signup using your preferred identity. We support GitHub, GitLab, Atlassian, and just email/password.
- Once you are logged-in, click on the New Project button as shown in the screenshot below, and follow the on-screen instructions to complete setting up a new project.

- Alternatively, you can pick an example from our examples repo at https://github.com/pulumi/examples. Simply click on the Deploy with Pulumi button (shown below) to get started.

- Having created the project, you can now use this task extension in your pipeline build to run it in your CI/CD setup. Search for "Pulumi" from the list of built-in tasks when authoring your pipeline build YAML or from the wizard UI.
- If you cannot find the Pulumi task, contact your organization's administrator to install this extension by clicking the above Get it free button.
Pulumi Access Token
A Pulumi access token is required so that the Pulumi task can log you into your account on https://app.pulumi.com. Since the task runs in a CI environment, you can specify the access token using a build variable PULUMI_ACCESS_TOKEN for logging into your account non-interactively.
The Pulumi Access Token is a sensitive value. Click on the padlock icon to mark it as a secret when you save it in your Pipeline variables or variable group.
The Pulumi task supports adding PR comments containing the log output from the Pulumi command that was executed in your build pipeline.
Your project's build service user will need additional permissions to perform that action. Follow these steps to grant the build service user the Contribute to pull requests permission:
- Navigate to the Project Settings page and click on Repositories under the Repos heading.
- Select the repository where you will be using this feature and then click on the Security tab.
- Now under the Users section find the build service user. If you are using the default build service user,
the naming convention is
<Project name> Build Service where <Project name> is your project's name.
- Change the value of
Contribute to pull requests to Allow.
Note: This feature is only supported for builds triggered by pull requests created in git repositories hosted by Azure DevOps.
Repositories hosted by external VCS such as Bitbucket, GitHub, GitLab are not supported at this time.
Example Pulumi app
Here's an example app that creates an App Service with a SQL DB and Application Insights. You can download this example from https://github.com/pulumi/examples/tree/master/azure-ts-appservice.
import * as pulumi from "@pulumi/pulumi";
import * as azure from "@pulumi/azure";
import { signedBlobReadUrl } from "./sas";

// use first 10 characters of the stackname as prefix for resource names
const prefix = pulumi.getStack().substring(0, 9);

const resourceGroup = new azure.core.ResourceGroup(`${prefix}-rg`, {
        location: "West US 2",
    });

const resourceGroupArgs = {
    resourceGroupName: resourceGroup.name,
    location: resourceGroup.location,
};

// Storage Account name must be lowercase and cannot have any dash characters
const storageAccountName = `${prefix.toLowerCase().replace(/-/g, "")}sa`;
const storageAccount = new azure.storage.Account(storageAccountName, {
    ...resourceGroupArgs,

    accountKind: "StorageV2",
    accountTier: "Standard",
    accountReplicationType: "LRS",
});


const appServicePlan = new azure.appservice.Plan(`${prefix}-asp`, {
    ...resourceGroupArgs,

    kind: "App",

    sku: {
        tier: "Basic",
        size: "B1",
    },
});

const storageContainer = new azure.storage.Container(`${prefix}-c`, {
    resourceGroupName: resourceGroup.name,
    storageAccountName: storageAccount.name,
    containerAccessType: "private",
});

const blob = new azure.storage.ZipBlob(`${prefix}-b`, {
    resourceGroupName: resourceGroup.name,
    storageAccountName: storageAccount.name,
    storageContainerName: storageContainer.name,
    type: "block",

    content: new pulumi.asset.FileArchive("wwwroot")
});

const codeBlobUrl = signedBlobReadUrl(blob, storageAccount, storageContainer);

const appInsights = new azure.appinsights.Insights(`${prefix}-ai`, {
    ...resourceGroupArgs,

    applicationType: "Web"
});

const username = "pulumi";

// Get the password to use for SQL from config.
const config = new pulumi.Config();
const pwd = config.require("sqlPassword");

const sqlServer = new azure.sql.SqlServer(`${prefix}-sql`, {
    ...resourceGroupArgs,

    administratorLogin: username,
    administratorLoginPassword: pwd,
    version: "12.0",
});

const database = new azure.sql.Database(`${prefix}-db`, {
    ...resourceGroupArgs,
    serverName: sqlServer.name,
    requestedServiceObjectiveName: "S0"
});

const app = new azure.appservice.AppService(`${prefix}-as`, {
    ...resourceGroupArgs,

    appServicePlanId: appServicePlan.id,


    appSettings: {
        "WEBSITE_RUN_FROM_ZIP": codeBlobUrl,
        "ApplicationInsights:InstrumentationKey": appInsights.instrumentationKey,
        "APPINSIGHTS_INSTRUMENTATIONKEY": appInsights.instrumentationKey
    },

    connectionStrings: [{
        name: "db",
        value:
            pulumi.all([sqlServer.name, database.name]).apply(([server, db]) =>
                `Server=tcp:${server}.database.windows.net;initial catalog=${db};user ID=${username};password=${pwd};Min Pool Size=0;Max Pool Size=30;Persist Security Info=true;`),
        type: "SQLAzure"
    }]
});

exports.endpoint = pulumi.interpolate `https://${app.defaultSiteHostname}`;
FAQs
What is Pulumi?
Pulumi enables developers to write code in their favorite language (e.g., JavaScript, Python, Go), deploying cloud apps and infrastructure easily, without the need to learn specialized DSLs or YAML templating solutions.
The use of first class languages enables abstractions and reuse, in addition to software engineering practices like great IDEs, refactoring, and testing. Pulumi provides high-level cloud packages in addition to low-level resource definitions across all the major clouds -- AWS, Azure, GCP, and Kubernetes -- so that you can master one system to deliver to them all.
I have an app that I need to deploy to Azure, and GCP. Can I still use Pulumi?
Yes! Pulumi enables you to achieve continuous delivery of cloud apps and infrastructure to any cloud environment -- AWS, Azure, GCP, Kubernetes, and even hybrid and on-premises envioronments.
Is this extension open-source?
Yes. The source code for this extension is at https://github.com/pulumi/pulumi-az-pipelines-task.
The Pulumi platform is open-source as well. Visit our GitHub repo at https://github.com/pulumi/pulumi.
I installed the Pulumi task extension to my organization, but I still cannot find it.
Try to uninstall the extension, and then re-install it. Most of the times this resolves the issue with discovery. If you are still experiencing issues, please open an issue here.
How do I deploy to AWS, GCP and other cloud providers using Pulumi and this task extension?
Pulumi supports several cloud providers, including Kubernetes. You can deploy to any cloud provider that Pulumi supports using this task extension, by simply setting the required environment variables as part of each cloud provider's setup, as your Pipeline's build variable.
For example, in order to deploy to AWS, simply set the AWS_ACCESS_KEY_ID, AWS_SECRET_ACCESS_KEY env vars either as pipeline variables or in a variable group that is linked to your pipeline.
Troubleshooting
User's Home directory could not be determined
If the Azure Pipelines Agent does not have access to the service accounts home directory, Pulumi projects using the dotnet runtime may be faced with the below error message when executing Pulumi commands:
error: The user's home directory could not be determined. Set the 'DOTNET_CLI_HOME' environment variable to specify the directory to use.
To remediate this either allow the agent access to the home directory, or set the DOTNET_CLI_HOME variable. This can be done either as a pipeline variable or directly in the task using the env parameter. An example of setting this can be found below:
# Setting the variable for use in the job/stage
variables:
- name: DOTNET_CLI_HOME
  value: $(Agent.TempDirectory)

# Or Setting the variable to the agents temporary directory for this task only
- task: Pulumi@1
  env:
    DOTNET_CLI_HOME: $(Agent.TempDirectory)
  inputs:
    command: preview
    stack: $(StackName)
This error indicates that the service account used by build pipelines in your DevOps project do not have the Contribute Pull Request permission.
Follow the steps outlined in the Quickstart section above.


