Octopus Deploy IntegrationBuild and Release tasks and other features for integrating with Octopus Deploy. Octopus is great for deploying ASP.NET or Core apps to on IIS or Azure, SQL databases, Windows services and much more. |


This extension provides Build and Release tasks to integrate with Octopus Deploy, as well as a dashboard widget to show the status of a deployment in Octopus. Octopus Deploy is great for deploying ASP.NET or .NET Core applications running on IIS or Azure, Windows services, SQL databases, and much, much more. The Azure Devops guides provide step by step instructions for deploying applications to Octopus from Azure Devops. Note: This extension is only compatible with Azure DevOps, Team Foundation Server (TFS) 2017 Update 2 and above, and Visual Studio Team Services (VSTS).
There is an alternative extension compatible with TFS 2015 Update 2 and above. See the Octopus Documentation for extension compatibility details and a download link. RequirementsStep versions >=6.0.0The v6+ steps use a native TypeScript client and depend on APIs introduced in Octopus Server A benefit of the native client is that it means the steps no longer depend on the Octopus CLI, so neither it nor the .NET Core SDK are a hard requirement for these versions. Octopus CLI installerAs noted above the CLI is no longer are hard dependency for our out-of-the-box steps, but the installer step is still available should you wish to use the CLI in your own script steps. Note: The Octopus CLI installer step is still available, however v6 introduces a breaking change. v6 of the step will install the Go CLI, not the C# CLI.
Step versions <6.0.0You will need a minimum build agent version of Add Octopus CLI toolThe Octopus tasks prior to v6 require the Octopus CLI tool, which can be supplied any of the following ways:
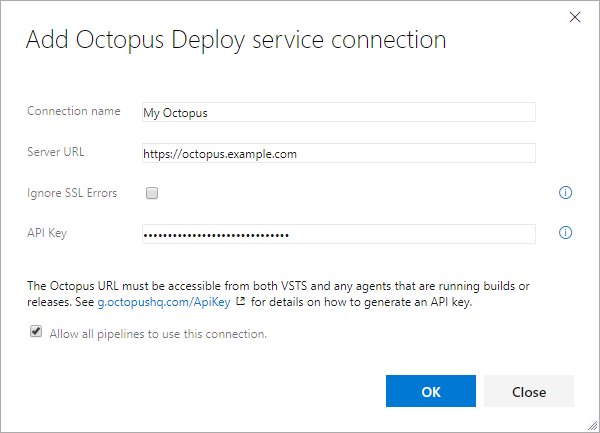
Add a service connection to Octopus DeployBefore adding any Build or Release tasks to your process, configure an "Octopus Deploy" service connection in the Project Settings under Service connections. You'll need an API Key for a user that has sufficient permissions for the tasks you want to perform in your build and release process. For example, if your build needs to create a Release for Project A, the user who owns that API key will need ReleaseCreate role either unscoped or scoped to Project A.
Tasks and WidgetsThis extension adds the following tasks:
And the following widget:
Note: In the remaining sections of this documentation, the `inputs` shown represent the valid YAML configuration values. The names used match the underlying names used to store the data, many of which have existed since this plugin was originally created. The names do not necessarily always exactly match the labels you will see on the fields if you're using the older UI interface for the steps.
|
 Octopus CLI Installer
| Name | Description |
|---|---|
PackageId |
Required. Package id. |
PackageVersion |
Required. Package version. |
OutputPath |
The folder to put the resulting package in, relative to the current working directory, not the base_path. Defaults to the working directory. |
SourcePath |
The base path for the input files. Defaults to the working directory. |
Include |
Multi-line list of files to include in the package, relative to the base path. Supports globbing. Defaults to ** |
Overwrite |
Allow an existing package of the same ID and version to be overwritten. |
📤 Outputs
| Name | Description |
|---|---|
package_file_path |
The full path to the package file that was created. |
package_filename |
The filename, without the path, of the file that was created. |
 Package Application - NuGet
Use this task to package your built application into a NuGet package that is compatible with Octopus Deploy.
📥 Inputs
| Name | Description |
|---|---|
PackageId |
Required. Package id. |
PackageVersion |
Required. Package version. |
OutputPath |
The folder to put the resulting package in, relative to the current working directory, not the base_path. Defaults to the working directory. |
SourcePath |
The base path for the input files. Defaults to the working directory. |
Include |
Multi-line list of files to include in the package, relative to the base path. Supports globbing. Defaults to ** |
NuGetDescription |
Required. A description to add to the NuGet package metadata. |
NuGetAuthors |
Required. Authors to add to the NuGet package metadata. |
NuGetTitle |
A title to add to the NuGet package metadata. |
NuGetReleaseNotes |
Release notes to add to the NuGet package metadata. |
NuGetReleaseNotesFile |
A file containing release notes to add to the NuGet package metadata. Overrides NuGetReleaseNotes. |
Overwrite |
Allow an existing package of the same ID and version to be overwritten. |
📤 Outputs
| Name | Description |
|---|---|
package_file_path |
The full path to the package file that was created. |
package_filename |
The filename, without the path, of the file that was created. |
 Push Packages to Octopus
Use this task to push your NuGet or Zip package to your Octopus Deploy Server. v6 of this step requires Octopus 2022.3+
📥 Inputs
| Name | Description |
|---|---|
OctoConnectedServiceName |
Required. The name of the Octopus Deploy service connection |
Space |
Required. The space name within Octopus. |
Packages |
Required. Multi-line list of packages to push to Octopus |
Replace |
Whether to replace the existing package(s). Valid options are true, false (default), IgnoreIfExists. If false is set the upload will fail if the package already exists. |
📤 Outputs
None.
Push Package Build Information to Octopus
Options include:
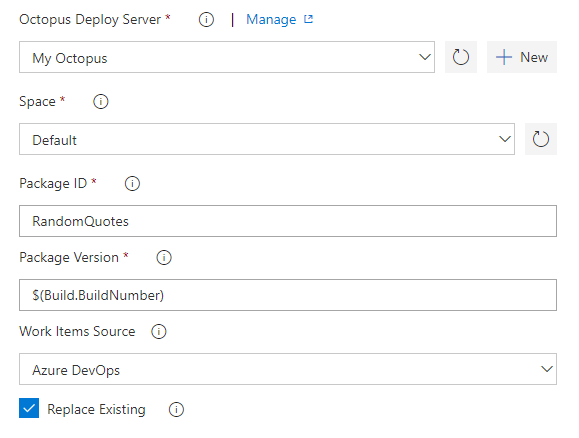
- Octopus Deploy Server: The Octopus Server (click New to add a service connection).
- Space: The Octopus space to push package build information to.
- Package ID: The ID of the package, pushed separately, to push build information onto. e.g. MyCompany.App
- Package Version: The version of the package, pushed separately, to push build information onto.
- Work Items Source: The service hosting any work items or issues associated with each version of the package. Octopus will add information about the work items or issues to the package build information, which can be used in release notes. For more information see the Issue Trackers documentation.
- Replace Existing: If the package build information already exists in the repository, the default behavior is to reject the new build information being pushed. Set this flag to 'True' to overwrite the existing package build information.
- Additional Arguments: Any additional Octopus CLI arguments to include.
Push Package Build Information to Octopus (v6 or later)
📥 Inputs
| Name | Description |
|---|---|
OctoConnectedServiceName |
Required. The name of the Octopus Deploy service connection |
Space |
Required. The space name within Octopus. |
PackageIds |
Required. Multi-line list of package Ids to push to Octopus. |
PackageVersion |
Required. The version of the package; must be a valid SemVer version. |
Replace |
Determines the action to perform with build information if it already exists in the repository. Valid input values are FailIfExists (default), OverwriteExisting, and IgnoreIfExists. |
📤 Outputs
None.
 Create Octopus Release
📥 Inputs
| |
| Name | Description |
|---|---|
OctoConnectedServiceName |
Required. Name of the Octopus Server connection. |
Space |
Required. The Octopus space the release is in. This must be the name of the space, not the id. |
Project |
Required. The Octopus project to deploy. This must be the name of the project, not the id. |
ReleaseNumber |
The number to use for this release. You can leave this blank if the release number is calculated by Octopus. |
Channel |
The channel to use for the release. This must be the name of the channel, not the id. |
DefaultPackageVersion |
Set this to provide a default package version to use for all packages on all steps. Can be used in conjunction with the Packages field, which can be used to override versions for specific packages. |
Packages |
A multi-line list of version numbers to use for a package in the release. Format: StepName:Version or PackageID:Version or StepName:PackageName:Version. StepName, PackageID, and PackageName can be replaced with an asterisk ('*'). An asterisk will be assumed for StepName, PackageID, or PackageName if they are omitted. |
ReleaseNotes |
Octopus Release notes. This field supports markdown. To include newlines, you can use HTML linebreaks. Can only specify this if 'ReleaseNotesFile' is not supplied. |
ReleaseNotesFile |
Octopus Release notes file. Path to a file that contains the release notes. Supports markdown. Can only specify this if 'ReleaseNotes' is not supplied. |
GitRef |
Git branch reference to use when creating the release for version controlled Projects. |
GitCommit |
Git commit to use when creating the release for version controlled Projects. Use in conjunction with the gitRef parameter to select any previous commit. |
📤 Outputs
| Name | Description |
|---|---|
release_number |
The Octopus Deploy release number assigned to the Release. |
 Deploy Octopus Release
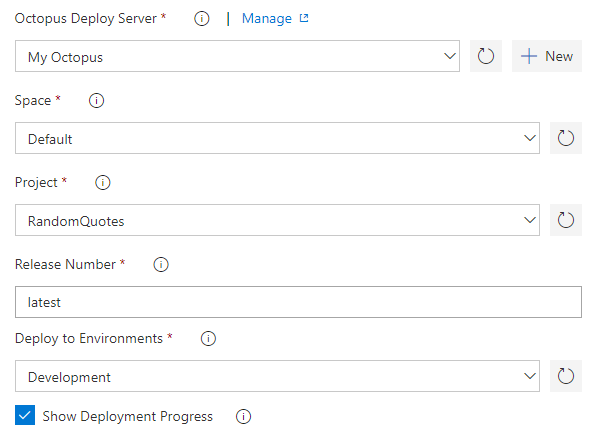
Options include:
- Octopus Deploy Server: The Octopus Server (click New to add a service connection).
- Space: The Octopus space the release is in.
- Project: The Octopus project to deploy.
- Release Number: Release number for the new release (defaults to
latest). - Deploy to Environments: Comma-separated list of environments to deploy to.
- Show Deployment Progress: Whether to wait for the operation to finish, recording output in the log. When enabled, the task only succeeds if the operation finished successfully.
- Tenants section:
- Tenant(s): Comma-separated list of tenants to deploy to. Note that if completed, this will be treated as a Tenanted Deployment by Octopus.
- Tenant tag(s): Comma-separated list of tenant tags matching tenants to deploy to. Note that if completed, this will be treated as a Tenanted Deployment by Octopus.
- Additional Arguments: Any additional Octopus CLI arguments to include.
Version 6 of Deploy Release step
From version 6, the deploy release step is split into two seperate functions for normal deployments and tenanted deployments
Deploy Octopus Release (v6 or later)
📥 Inputs
| Name | Description |
|---|---|
OctoConnectedServiceName |
Required. Name of the Octopus Server connection. |
Space |
Required. The Octopus space the release is in. |
Project |
Required. The Octopus project to deploy. |
ReleaseNumber |
Required. Release number for the new release. |
Environments |
Required. List of environments to deploy to, one environment per line. A comma-separated list of environments is also supported to ease migration from earlier versions for the step. |
Variables |
List of prompted variable values, one variable-value pair per line. Each variable should be in format variable name: value |
UseGuidedFailure |
Whether to use guided failure mode if errors occur during the deployment. |
AdditionalArguments |
Additional arguments are no longer supported. This field has been retained to ease migration from earlier versions of the step but values should be moved to the appropriate fields. |
📤 Outputs
| Name | Description |
|---|---|
server_tasks |
A list of server task Ids and Environment names for each deployment triggered. |
Deploy Octopus Release for Tenants(v6 or later)
📥 Inputs
| Name | Description |
|---|---|
OctoConnectedServiceName |
Required. Name of the Octopus Server connection. |
Space |
Required. The Octopus space the release is in. |
Project |
Required. The Octopus project to deploy. |
ReleaseNumber |
Required. Release number for the new release. |
Environment |
Required. Environment to deploy to. For a tenanted deployment only one environment is supported. |
DeployForTenants |
List of tenant names to deploy for. One tenant name per line. |
DeployForTenantTags |
List of tenant tag names to deploy for. One tenant tag per line in the format tag set name/tag name. |
Variables |
List of prompted variable values, one variable-value pair per line. Each variable should be in format variable name: value |
UseGuidedFailure |
Whether to use guided failure mode if errors occur during the deployment. |
AdditionalArguments |
Additional arguments are no longer supported. This field has been retained to ease migration from earlier versions of the step but values should be moved to the appropriate fields. |
📤 Outputs
| Name | Description |
|---|---|
server_tasks |
A list of server task Ids and Tenant names for each deployment triggered. |
Run an Octopus Runbook
📥 Inputs
| Name | Description |
|---|---|
OctoConnectedServiceName |
Required. Name of the Octopus Server connection. |
Space |
Required. The Octopus space name the release is in. |
Project |
Required. The Octopus project name to deploy. |
Runbook |
Required. Runbook name to run. |
Environments |
Required. The environment names to run the runbook for. One environment name per line. |
GitRef |
The Git reference to run the runbook for e.g. main. Only applies when runbooks are stored in a Git repository for config-as-code enabled projects. |
Tenants |
The tenant names to run the runbook for. One tenant name per line. |
TenantTags |
Run for all tenants with the given tag(s). One tenant tag per line in the format tag set name/tag name. |
Variables |
List of prompted variable values, one variable-value pair per line. Each variable should be in format variable name: value |
UseGuidedFailure |
Whether to use guided failure mode if errors occur during the run. |
📤 Outputs
| Name | Description |
|---|---|
server_tasks |
A list of objects, containing ServerTaskId, EnvironmentName and TenantName, for each queued run. |
Await Task
📥 Inputs
| Name | Description |
|---|---|
OctoConnectedServiceName |
Required. Name of the Octopus Server connection. |
Space |
Required. The Octopus space the release is in. |
Step |
Required The name of the step that queued the deployment/runbook run. |
PollingInterval |
How frequently, in seconds, to check the status. (Default: 10s) |
TimeoutAfter |
Duration, in seconds, to allow for completion before timing out. (Default: 600s) |
ShowProgress |
Log Octopus task outputs to Azure DevOps output. (Default: false) |
CancelOnTimeout |
Cancel the Octopus task and mark this task as failed if the timeout is reached. (Default: false) |
The Step input parameter needs to be set to the name of the deployment step that generated the server tasks to be waited. In the classic-pipeline mode, you need to set the reference name on the server_tasks output variable and use that value for Step.
📤 Outputs
| Name | Description |
|---|---|
completed_successfully |
True if all execution tasks completed succcessfully, false if any execution tasks failed. |
server_task_results |
JSON representation of the tasks and their success. Schema: { "serverTaskId": , "tenantName": , "environmentName": , "successful": <true/false> } |
<context>.completed_successfully |
Contextual success flag for each task using the name of the environment or tenant, e.g production.completed_successfully or uat_tenant.completed_successfully. Spaces in names are replaced with underscores |
 Promote Octopus Release
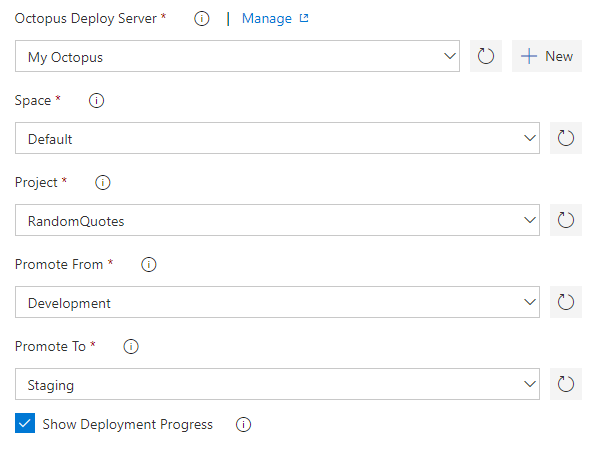
Options include:
- Octopus Deploy Server: The Octopus Server (click New to add a service connection).
- Space: The Octopus space the release is in.
- Project: The Octopus project to deploy.
- Promote From: The environment to promote a deployment from.
- Promote To: The environment to promote a deployment to.
- Show Deployment Progress: Whether to wait for the operation to finish, recording output in the log. When enabled, the task only succeeds if the operation finished successfully.
- Tenants section:
- Tenant(s): Comma-separated list of tenants to deploy to. Note that if completed, this will be treated as a Tenanted Deployment by Octopus.
- Tenant tag(s): Comma-separated list of tenant tags matching tenants to deploy to. Note that if completed, this will be treated as a Tenanted Deployment by Octopus.
- Additional Arguments: Any additional Octopus CLI arguments to include.
 Octopus Deploy Status Widget
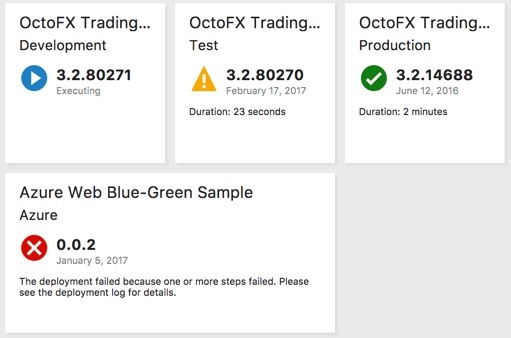
Each instance of this widget displays the status of an Octopus project in one environment.
Configuration settings:
- Size: Either a 1x1 or a 2x1 widget size.
- Octopus Connection: The Octopus Server (available once you add a service connection).
- Space: The Octopus space the project is in.
- Octopus Project: The Octopus project to display.
- Environment: The Octopus environment to display status in.
Clicking on the widget will open the deployment log for the displayed task in Octopus.
Note: The widget will only be populated when a deployment of the specified project to the specified environment has occurred.