Terraform is an open-source tool created by HashiCorp (an IBM Company) for developing, changing and versioning infrastructure safely and efficiently. It provides a service known as "Infrastructure as Code" which enables users to define and provision infrastructure using a high-level configuration language.
This extension provides the following components:
- A task for installing a specific version of Terraform, if not already installed, on the agent
- A task for executing the core Terraform commands
- A service connection for connecting to an Amazon Web Services(AWS) account
- A service connection for connecting to a Google Cloud Platform(GCP) account
- A service connection for connecting to a Oracle Cloud Infrastructure(OCI) account
The Terraform tool installer task acquires a specified version of Terraform from the Internet or the tools cache and prepends it to the PATH of the Azure Pipelines Agent (hosted or private). This task can be used to change the version of Terraform used in subsequent tasks. Adding this task before the Terraform task in a build definition ensures you are using that task with the right Terraform version.
The Terraform task enables running Terraform commands as part of Azure Build and Release Pipelines providing support for the following Terraform commands
- init
- validate
- show
- plan
- apply
- output
- custom (any command terraform CLI supports natively)
- destroy
This extension is intended to run on Windows, Linux and MacOS agents.
The TerraformInstaller task installs a specific version of Terraform on the agent. The task can be used to install a specific version of Terraform or the latest version.
- task: TerraformInstaller@1
  displayName: 'Install Terraform'
  inputs:
    terraformVersion: 'latest'
- task: TerraformInstaller@1
  displayName: 'Install Terraform'
  inputs:
    terraformVersion: '1.11.3'
The Terraform task abstracts running Terraform commands as part of an Azure DevOps Pipeline.
- Install this task from the Marketplace.
- Create a service connetion if you don't already have one. See the Creating a new service connection section below for more details.
- Create or open a YAML pipeline.
- Add the Terraform task to your pipeline YAML file.
Example: Using default settings with the same service connection for all tasks.
- task: TerraformTask@5
  displayName: Run Terraform Init
  inputs:
    provider: 'azurerm'
    command: 'init'
    backendServiceArm: 'your-service-connection'
    backendAzureRmStorageAccountName: 'your-stg-name'
    backendAzureRmContainerName: 'your-container-name'
    backendAzureRmKey: 'state.tfstate'

- task: TerraformTask@5
  name: terraformPlan
  displayName: Run Terraform Plan
  inputs:
    provider: 'azurerm'
    command: 'plan'
    commandOptions: '-out tfplan'
    environmentServiceNameAzureRM: 'your-service-connection'

# Only runs if the 'terraformPlan' task has detected changes the in state.
- task: TerraformTask@5
  displayName: Run Terraform Apply
  condition: and(succeeded(), eq(variables['terraformPlan.changesPresent'], 'true'))
  inputs:
    provider: 'azurerm'
    command: 'apply'
    commandOptions: 'tfplan'
    environmentServiceNameAzureRM: 'your-service-connection'
Terraform on Azure currently only supports different identities / service connections for the backend state and providers for Workload identity federation when using ID Token Refresh. If you are not using ID Token refresh (the default) and have explicitly set the backendAzureRmUseIdTokenGeneration and / or environmentAzureRmUseIdTokenGeneration inputs to false, then you cannot use different service connections for the backend state and providers as it will result in an ID Token timeout.
In order to use different service connections for the backend state and providers, you need to set backendAzureRmUseCliFlagsForAuthentication to true in the Terraform task. This will set the backend configuration as CLI flags for the client_id, ado_pipeline_service_connection_id and use_oidc settings. This means that they will not read the environment variables set for the provider. You must take caustion when doing this, as it will cache these settings in the plan file and can have unexpected results depending on your combination of service connections.
The following example shows an example of using a 3 service connection setup with the Terraform task:
trigger:
- main

stages:
# In Stage 1, run Terraform init and plan
# `your-backend-service-connection` identity only has Storage Blob Data Contributor permissions to the Storage Account Container
# `your-plan-service-connection` identity has Reader permissions to the Azure subscription
- stage: plan
  displayName: 'Terraform Plan'
  jobs:
  - job: plan
    displayName: 'Terraform Init and Plan'
    pool:
      vmImage: 'ubuntu-latest'
    steps:
    - task: TerraformInstaller@1
      displayName: 'Install Terraform'
      inputs:
        terraformVersion: 'latest'

    - task: TerraformTask@5
      displayName: Run Terraform Init
      inputs:
        provider: 'azurerm'
        command: 'init'
        backendServiceArm: 'your-backend-service-connection'
        backendAzureRmStorageAccountName: 'your-storage-account-name'
        backendAzureRmContainerName: 'your-container-name'
        backendAzureRmKey: 'state.tfstate'
        backendAzureRmUseCliFlagsForAuthentication: true

    - task: TerraformTask@5
      name: terraformPlan
      displayName: Run Terraform Plan
      inputs:
        provider: 'azurerm'
        command: 'plan'
        commandOptions: '-out tfplan'
        environmentServiceNameAzureRM: 'your-plan-service-connection'

    - task: CopyFiles@2
      displayName: Create Module Artifact
      inputs:
        SourceFolder: '$(Build.SourcesDirectory)'
        Contents: |
          **/*
          !.terraform/**/*
          !.git/**/*
          !**/.terraform/**/*
          !**/.git/**/*
        TargetFolder: '$(Build.ArtifactsStagingDirectory)'
        CleanTargetFolder: true
        OverWrite: true

    - task: PublishPipelineArtifact@1
      displayName: Publish Module Artifact
      inputs:
        targetPath: '$(Build.ArtifactsStagingDirectory)'
        artifact: 'terraformModule'
        publishLocation: 'pipeline'

# In Stage 2, run Terraform init and apply
# `your-backend-service-connection` identity only has Storage Blob Data Contributor permissions to the Storage Account Container
# `your-apply-service-connection` identity has Owner / Contributor permissions to the Azure subscription
- stage: apply
  displayName: 'Terraform Apply'
  jobs:
  - job: apply
    displayName: 'Terraform Init and Apply'
    pool:
      vmImage: 'ubuntu-latest'
    steps:
    - task: DownloadPipelineArtifact@2
      displayName: Download Module Artifact
      inputs:
        source: 'current'
        artifactName: 'terraformModule'
        targetPath: '$(Build.SourcesDirectory)'

    - task: TerraformInstaller@1
      displayName: 'Install Terraform'
      inputs:
        terraformVersion: 'latest'

    - task: TerraformTask@5
      displayName: Run Terraform Init
      inputs:
        provider: 'azurerm'
        command: 'init'
        backendServiceArm: 'your-backend-service-connection'
        backendAzureRmStorageAccountName: 'your-storage-account-name'
        backendAzureRmContainerName: 'your-container-name'
        backendAzureRmKey: 'state.tfstate'
        backendAzureRmUseCliFlagsForAuthentication: true

    - task: TerraformTask@5
      displayName: Run Terraform Apply
      inputs:
        provider: 'azurerm'
        command: 'apply'
        commandOptions: 'tfplan'
        environmentServiceNameAzureRM: 'your-apply-service-connection'
NOTE: This example is not comprehensive, you need to consider using environments, concurrency control, deployment jobs, approvals on the service connection, private networking, and other best practices based your specific use case. This example is only designed to show the fundamentals of how to use the Terraform task with different service connections for the backend state and providers.
- task: TerraformTask@5
  displayName: Run Terraform Init
  inputs:
    provider: 'aws'
    command: 'init'
    backendServiceAWS: 'your-service-connection'
    backendAWSBucketName: 'your-bucket-name'
    backendAWSKey: 'state.tfstate'

- task: TerraformTask@5
  name: terraformPlan
  displayName: Run Terraform Plan
  inputs:
    provider: 'aws'
    command: 'plan'
    commandOptions: '-out tfplan'
    environmentServiceNameAWS: 'your-service-connection'

# Only runs if the 'terraformPlan' task has detected changes the in state.
- task: TerraformTask@5
  displayName: Run Terraform Apply
  condition: and(succeeded(), eq(variables['terraformPlan.changesPresent'], 'true'))
  inputs:
    provider: 'aws'
    command: 'apply'
    commandOptions: 'tfplan'
    environmentServiceNameAWS: 'your-service-connection'
- task: TerraformTask@5
  displayName: Run Terraform Init
  inputs:
    provider: 'gcp'
    command: 'init'
    backendServiceGCP: 'your-service-connection'
    backendGCPBucketName: 'your-bucket-name'
    backendGCPPrefix: 'state.tfstate'

- task: TerraformTask@5
  name: terraformPlan
  displayName: Run Terraform Plan
  inputs:
    provider: 'gcp'
    command: 'plan'
    commandOptions: '-out tfplan'
    environmentServiceNameGCP: 'your-service-connection'

# Only runs if the 'terraformPlan' task has detected changes the in state.
- task: TerraformTask@5
  displayName: Run Terraform Apply
  condition: and(succeeded(), eq(variables['terraformPlan.changesPresent'], 'true'))
  inputs:
    provider: 'gcp'
    command: 'apply'
    commandOptions: 'tfplan'
    environmentServiceNameGCP: 'your-service-connection'
- task: TerraformTask@5
  displayName: Run Terraform Init
  inputs:
    provider: 'oci'
    command: 'init'
    backendServiceOCI: 'your-service-connection'
    backendOCIPar: 'state.tfstate'

- task: TerraformTask@5
  name: terraformPlan
  displayName: Run Terraform Plan
  inputs:
    provider: 'oci'
    command: 'plan'
    commandOptions: '-out tfplan'
    environmentServiceNameOCI: 'your-service-connection'

# Only runs if the 'terraformPlan' task has detected changes the in state.
- task: TerraformTask@5
  displayName: Run Terraform Apply
  condition: and(succeeded(), eq(variables['terraformPlan.changesPresent'], 'true'))
  inputs:
    provider: 'oci'
    command: 'apply'
    commandOptions: 'tfplan'
    environmentServiceNameOCI: 'your-service-connection'
The Terraform task has the following input parameters:
provider: The cloud provider to use. The options are azurerm, aws, gcp, and oci. The default value is azurerm.command: The Terraform command to run. The options are init, validate, show, plan, apply, output, destroy, and custom. The default value is init.workingDirectory: The working directory to run the command in. The default value is $(System.DefaultWorkingDirectory).
backendServiceArm: The name of the Azure service connection to use for the azurerm backend. The default value is ''.backendAzureRmUseEntraIdForAuthentication: Use Azure Entra ID for authentication for the storage account. The default value is true.backendAzureRmStorageAccountName: The name of the Azure storage account to use for the azurerm backend. The default value is ''.backendAzureRmContainerName: The name of the Azure storage container to use for the azurerm backend. The default value is ''.backendAzureRmKey: The name of the Azure storage blob to use for the azurerm backend. The default value is ''.backendAzureRmOverrideSubscriptionID: The override subscription ID to use for the azurerm backend. This is only required if using URI lookup and if you don't want to use the service connection subscription ID. The default value is ''.backendAzureRmResourceGroupName: The name of the Azure resource group the Storage Account sits in to use for the azurerm backend. This is only required if using URI lookup. The default value is ''.backendAzureRmUseIdTokenGeneration: Whether to use ID token generation for the azurerm backend Workload identity federation. This is a fallback setting for older backend versions and can result in unexpected timeout issues. The default value is false.backendAzureRmUseCliFlagsForAuthentication: Whether to use CLI flags for authentication for the azurerm backend. This is required if you want to use different service connections for the backend state and providers. It will set client_id, ado_pipeline_service_connection_id and use_oidc as CLI flags, so they are persisted in the plan file. The default value is false.
backendServiceAWS: The name of the AWS service connection to use for the aws backend. The default value is ''.backendAWSBucketName: The name of the AWS S3 bucket to use for the aws backend. The default value is ''.backendAWSBucketKey: The name of the AWS S3 object to use for the aws backend. The default value is ''.
backendServiceGCP: The name of the GCP service connection to use for the gcp backend. The default value is ''.backendGCPBucketName: The name of the GCP bucket to use for the gcp backend. The default value is ''.backendGCPPrefix: The name of the GCP object to use for the gcp backend. The default value is ''.
backendServiceOCI: The name of the OCI service connection to use for the oci backend. The default value is ''.backendOCIPar: The OCI object storage PAR configuration for the Terraform remote state file to use for the oci backend. The default value is ''.backendOCIConfigGenerate: Whether to generate the Terraform remote state file config (Use Yes when not included in TF files) for the oci backend. The default value is yes.
commandOptions: The addtiional command arguments to pass to the command. The default value is ''.customCommand: The custom command to run if command is set to custom. The default value is ''.outputTo: Choose whether to output to the console or a file for the show and output Terraform commands. The options are console, and file. The default value is console.fileName: The name of the file to output to for the show and output commands if outputTo is set to file. The default value is ''.outputFormat: The output format to use for the show command. The options are json, and default. The default value is default.
environmentServiceNameAzureRM: The name of the Azure service connection to use for the Azure providers. The default value is ''.environmentAzureRmOverrideSubscriptionID: The override subscription ID to use for the Azure providers. This is only required if you don't want to use the service connection subscription ID. The default value is ''.environmentAzureRmUseIdTokenGeneration: Whether to use ID token generation for the Azure providers with Workload identity federation. This is a fallback setting for older provider versions and can result in unexpected timeout issues. The default value is false.
environmentServiceNameAWS: The name of the AWS service connection to use for the aws provider. The default value is ''.
environmentServiceNameGCP: The name of the GCP service connection to use for the gcp provider. The default value is ''.
environmentServiceNameOCI: The name of the OCI service connection to use for the oci provider. The default value is ''.
Creating a new service connection
The Terraform task requires a service connection for setting up the credentials to connect to the provider account. For setting up a new service connection:
Create a new service connection for connecting to an Azure account
Follow the instructions in the Azure DevOps documentation to create a new service connection for connecting to an Azure account using Workload identity federation.
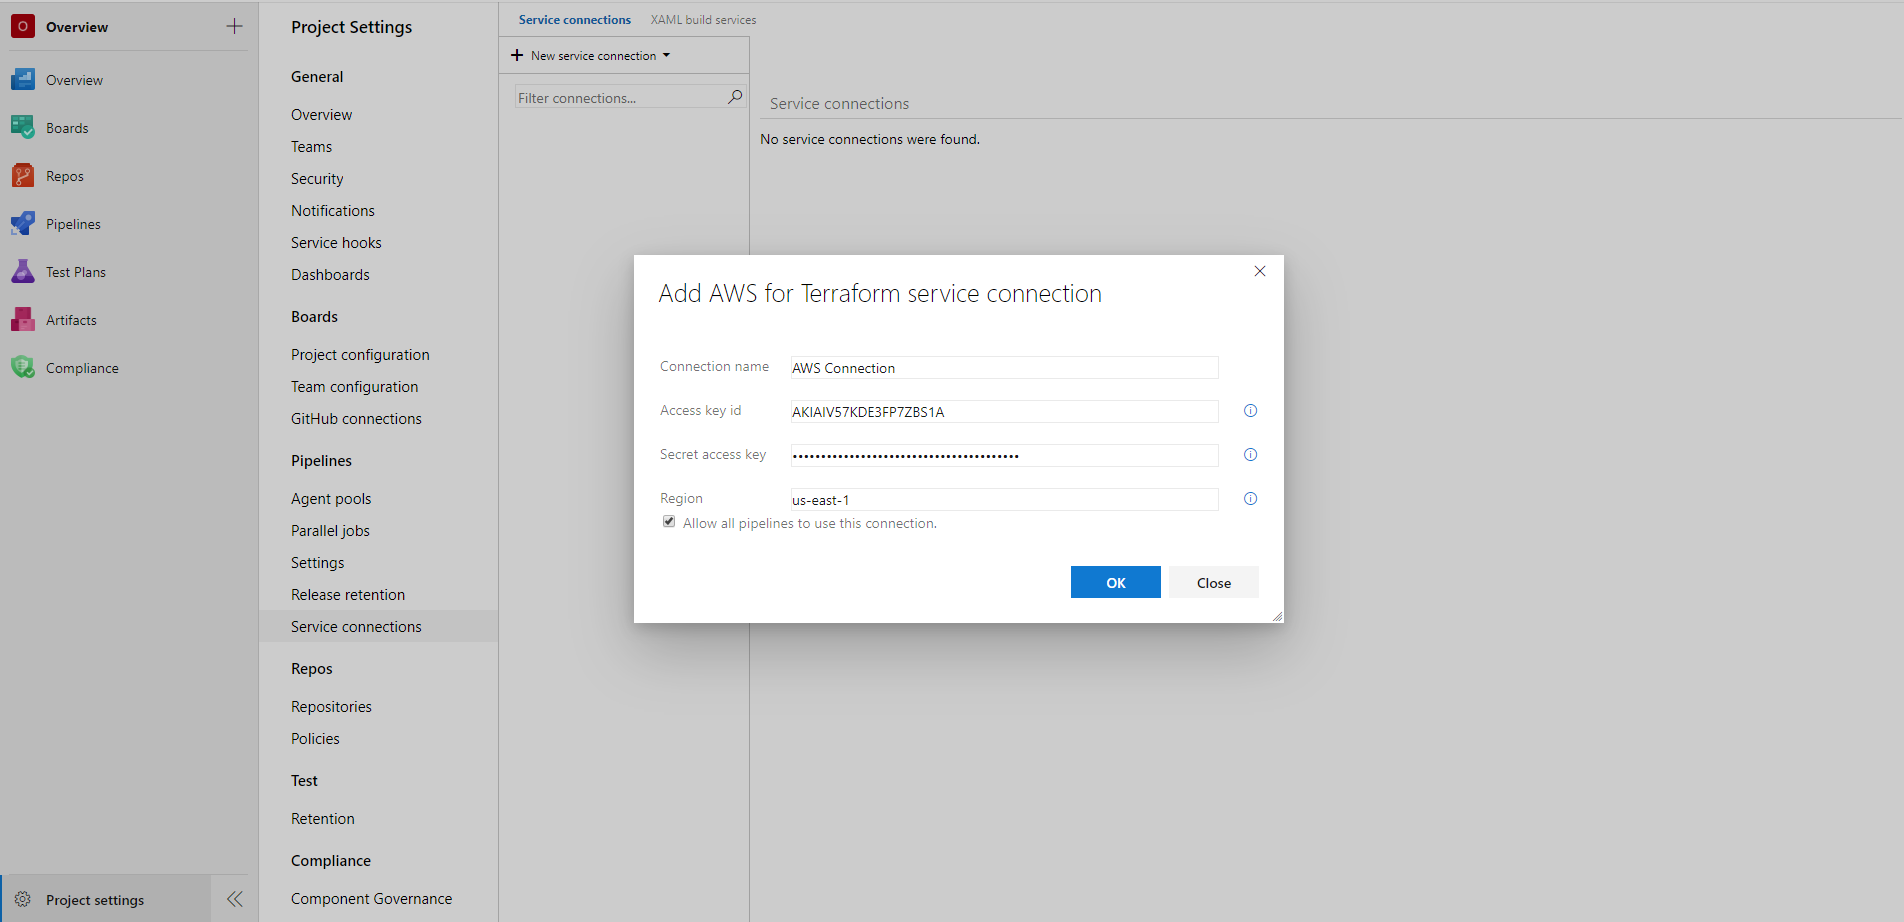
Create a new service connection for connecting to an AWS account
The Terraform task requires a AWS service connection for setting up the credentials to connect to an AWS account. For setting up a new AWS service connection:
- On the project page, go to Project settings and choose Service connections.
- In the New service connection list, choose AWS for Terraform.
- Enter the following details to set up the service connection:
- Connection name*: Enter a unique name of the service connection to identify it within the project
- Access key id*: Enter the access key id for your AWS account
- Secret access key*: Enter the secret access key associated with the access key id
- Region*: Enter the region of the Amazon Simple Storage Service(S3) bucket in which you want to store the Terraform remote state file e.g. 'us-east-1'

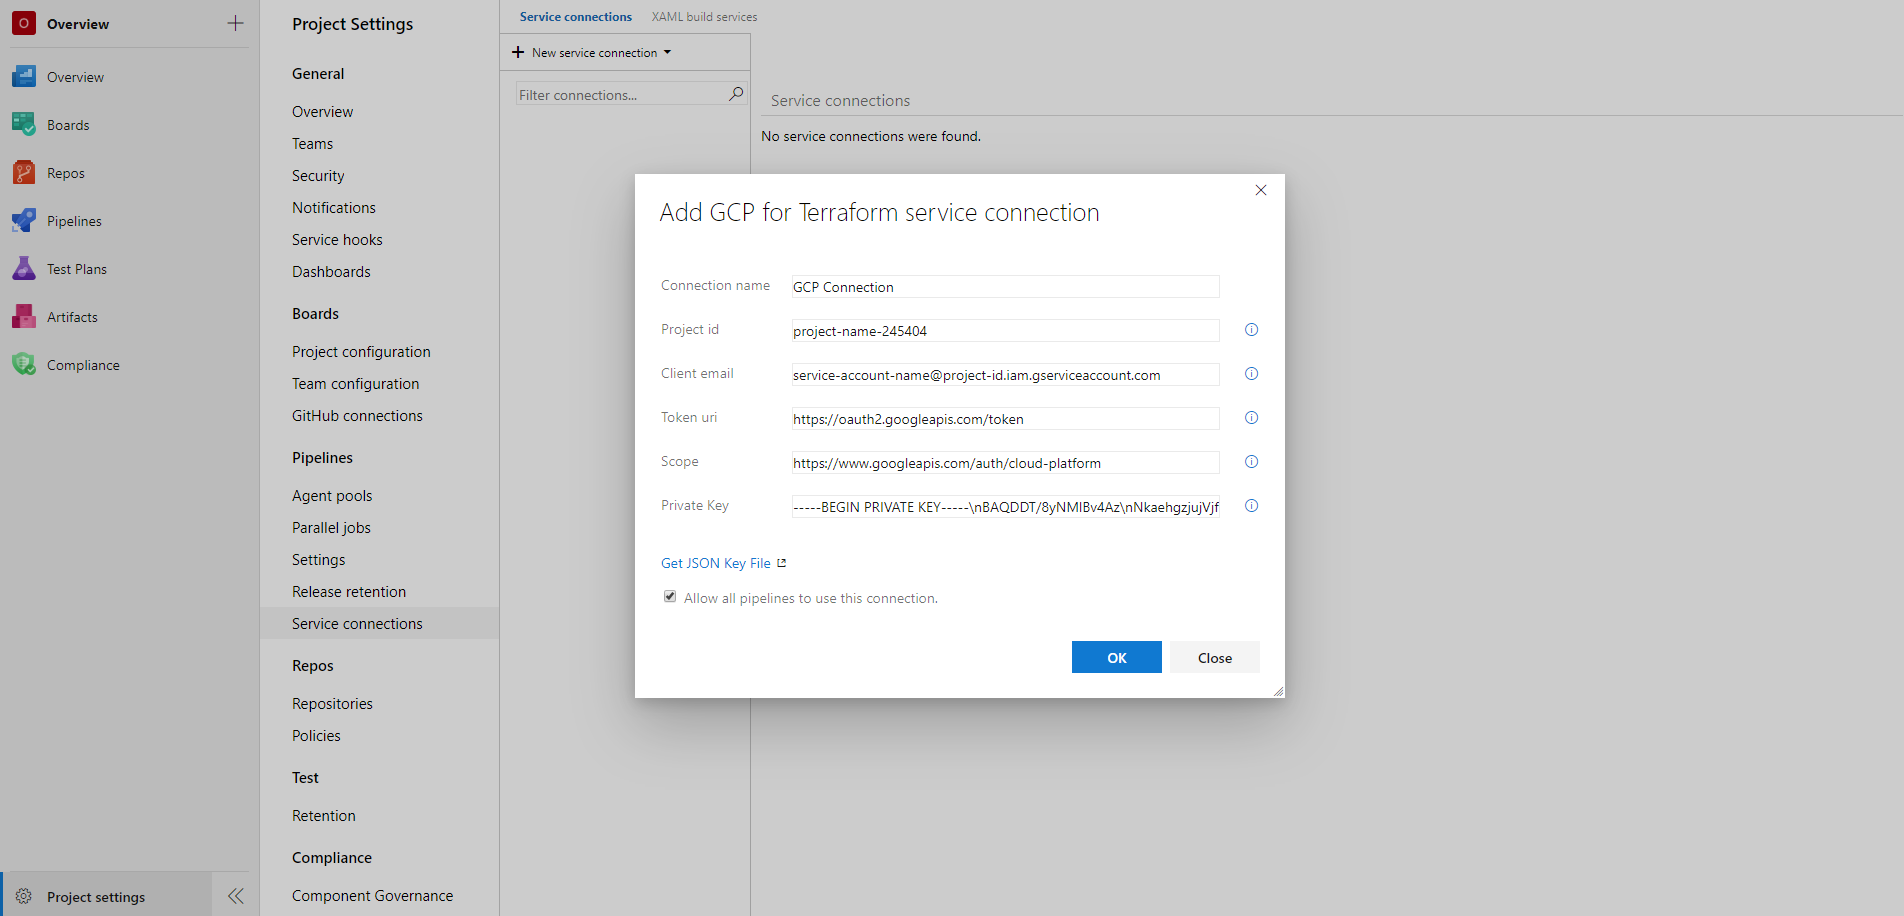
Create a new service connection for connecting to a GCP account
The Terraform task requires a GCP service connection for setting up the credentials to connect to a GCP service account. For setting up a new GCP service connection:
- Download the JSON key file containing the required credentials
- In the GCP Console, go to the Create service account key page.
- From the Service account list, select the existing service account or New service account to create a new one.
- If New service account was selected in the previous step, in the Service account name field, enter a name.
- From the Role list, select Project > Owner.
- Click Create. A JSON file that contains your key downloads to your computer.
- On the project page, go to Project settings and choose Service connections.
- In the New service connection list, choose GCP for Terraform.
- Enter the following details to set up the service connection:
- Connection name*: Enter a unique name of the service connection to identify it within the project
- Project id*: Enter the project id of the GCP project in which the resources will be managed
- Client email*: Enter the value of the client_email field in the JSON key file
- Token uri*: Enter the value of the token_uri field in the JSON key file
- Scope*: Enter the scope of access to GCP resources e.g. https://www.googleapis.com/auth/cloud-platform. For more information, see granting roles to service accounts
- Private key*: Enter the value of the private_key field in the JSON key file

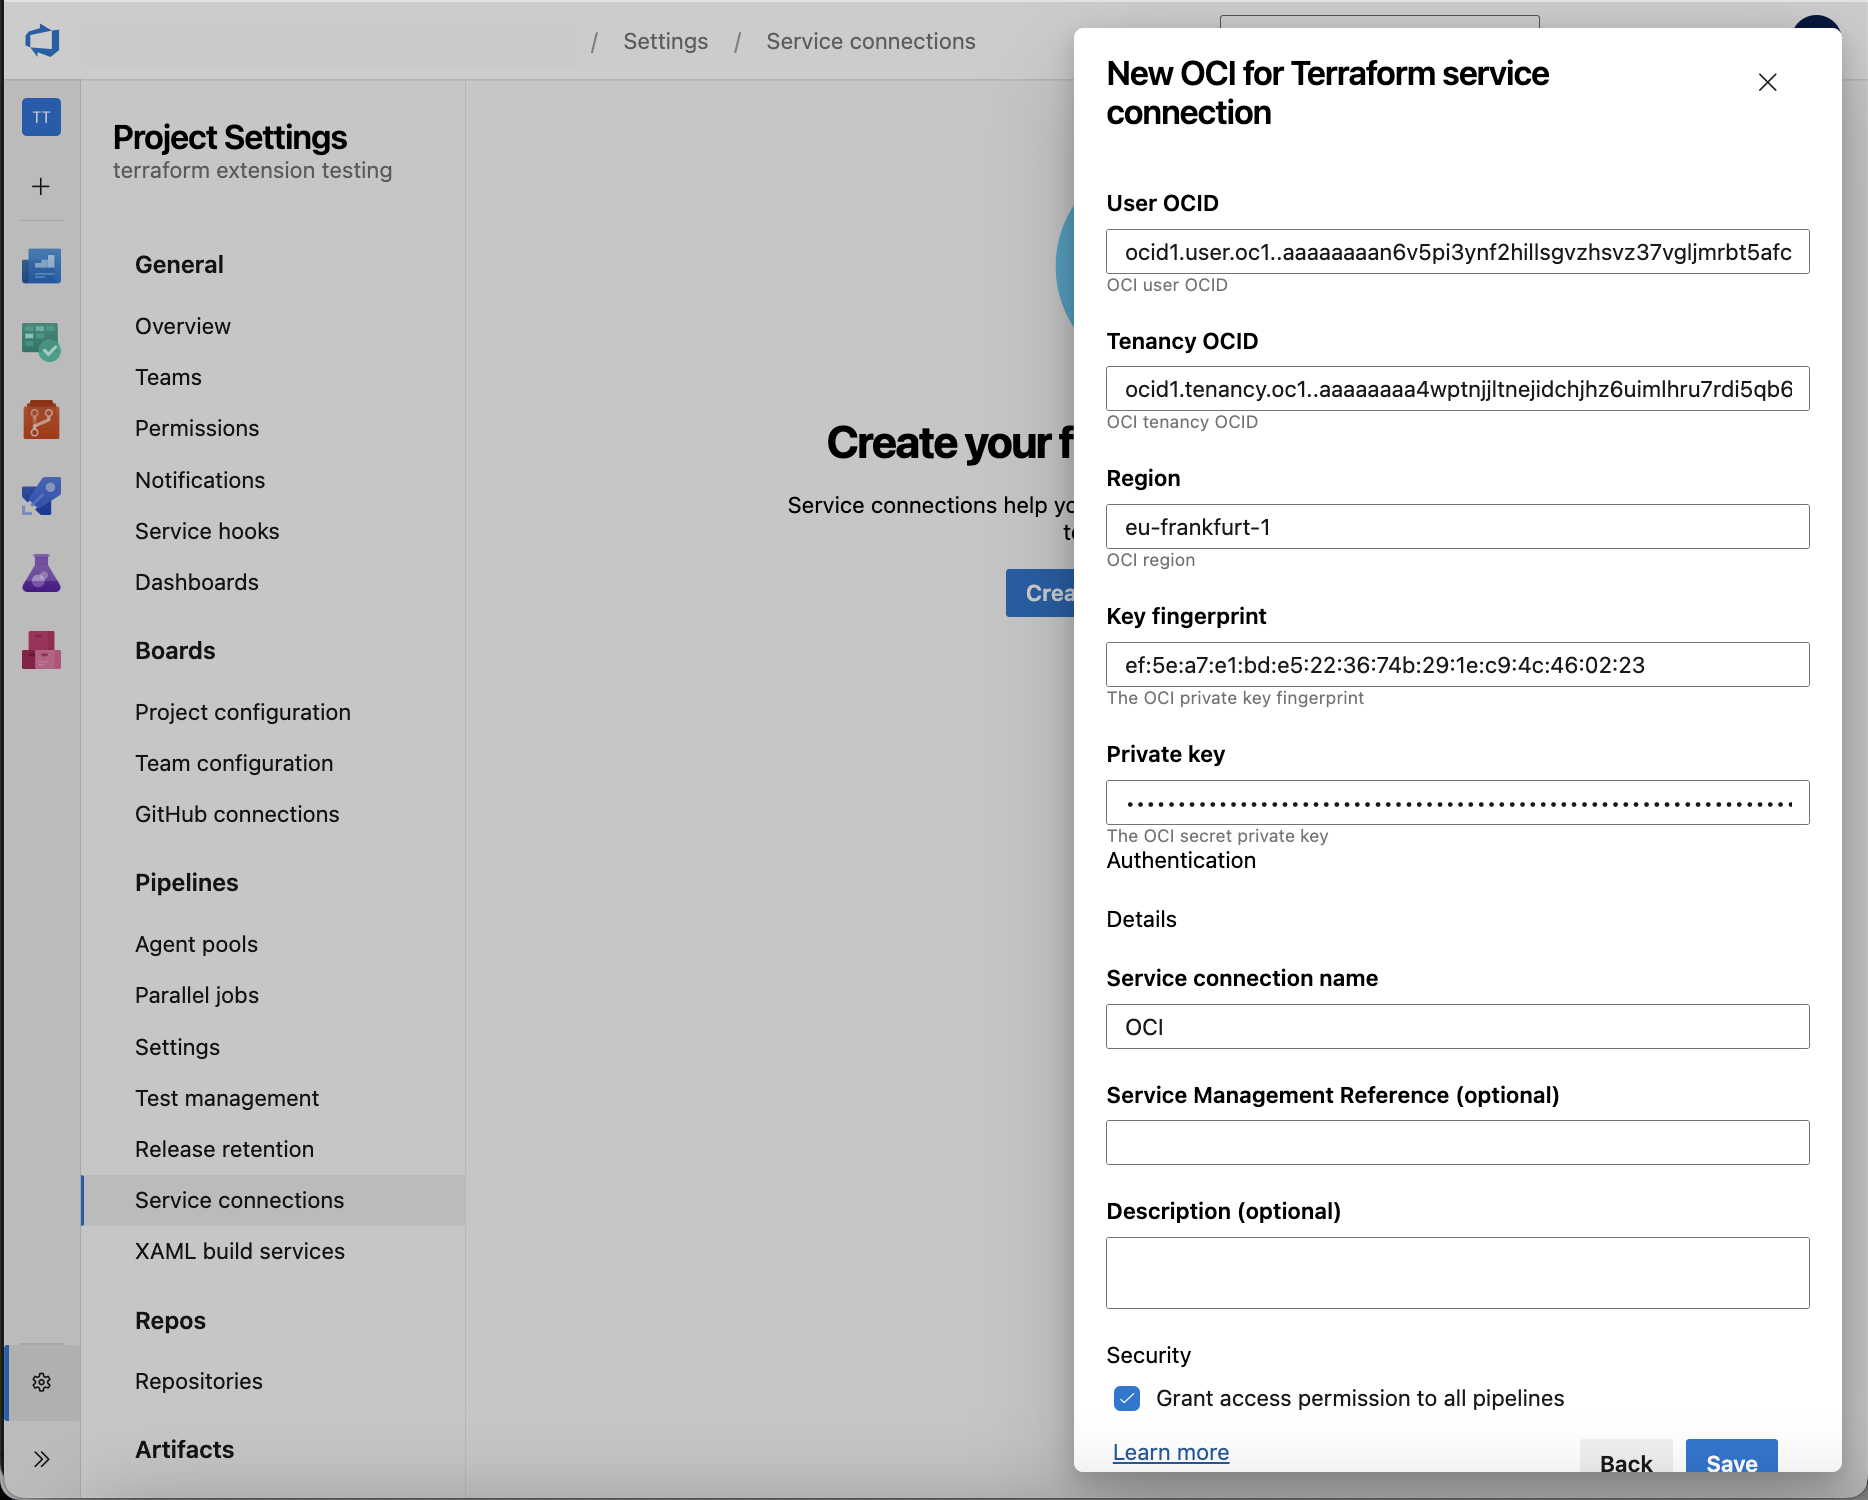
Create a new service connection for connecting to a OCI account
The Terraform task requires a OCI service connection for setting up the credentials to connect to an OCI account. For setting up a new OCI service connection:
- Using OCI Console add an API Key by generating it (https://docs.oracle.com/en-us/iaas/Content/API/Concepts/apisigningkey.htm#two) and download it
- On the project page, go to Project settings and choose Service connections.
- In the New service connection list, choose OCI for Terraform.
- Enter the following details to set up the service connection:
- Connection name*: Enter a unique name of the service connection to identify it within the project
- User OCID*: Enter the OCI account user OCID copying it from your OCI Console User Profile information
- Tenancy OCID*: Enter the OCI tenancy OCID copying it from your OCI Console Tenancy information
- Region*: Enter the value of the region you want to manage with Terraform e.g. eu-frankfurt-1
- Key fingerprint*: Enter the value of the API Key fingerprint copying it from OCI Console generated in the first step
- Private key*: Enter the value of the contents of the private_key file generated and downloaded in the first step

Troubleshooting
How to resolve an error about AzureCLI Authorizer
In you are using older Azure provider or backend versions, you may encounter the following or similar error when running the Terraform task:
Error: unable to build authorizer for Resource Manager API: could not configure AzureCli Authorizer: obtaining subscription ID: obtaining account details: running Azure CLI: exit status 1: ERROR: Please run 'az login' to setup account.
If you see an error like this, then it means you are using a provider or backend version that does not support Workload identity federation ID Token Refresh. To resolve this, you can either:
- Update your Terraform CLI and / or Azure proividers to the latest version (recommended)
- Fallback to ID token generation by setting the
backendAzureRmUseIdTokenGeneration and / or environmentAzureRmUseIdTokenGeneration inputs to true in the Terraform task. This is a fallback setting for older provider versions and can result in unexpected timeout issues, so please consider using current versions of the Terraform CLI and Azure providers before resorting to this option.
Support for ID Token Refresh was introduced in:
- Terraform CLI 1.11.1
- AzureRM Provider 4.18.0
- AzureAD Provider 3.2.0
- AzAPI Provider 2.0.1


