Backlog chatGPT Assistant 
Description 💬
Backlog chatGPT Assistant is a Visual Studio extension designed to streamline the process of creating backlog items in Azure DevOps using AI. This tool enables users to generate new work items based on pre-selected items, user instructions, or content from text files (like DOCX and PDF) directly within Visual Studio.
Main Features 🌟
- Azure DevOps Integration: Easily choose where to create new backlog items in Azure DevOps.
- AI-Powered Generation: Utilize AI to generate backlog items based on user instructions or existing documents.
- Preview and Edit: Review and refine generated backlog items before saving them to Azure DevOps.
- AI-Enhanced Improvements: Leverage AI suggestions to enhance backlog items or create child items.
User Interface 🖥
Configuration View
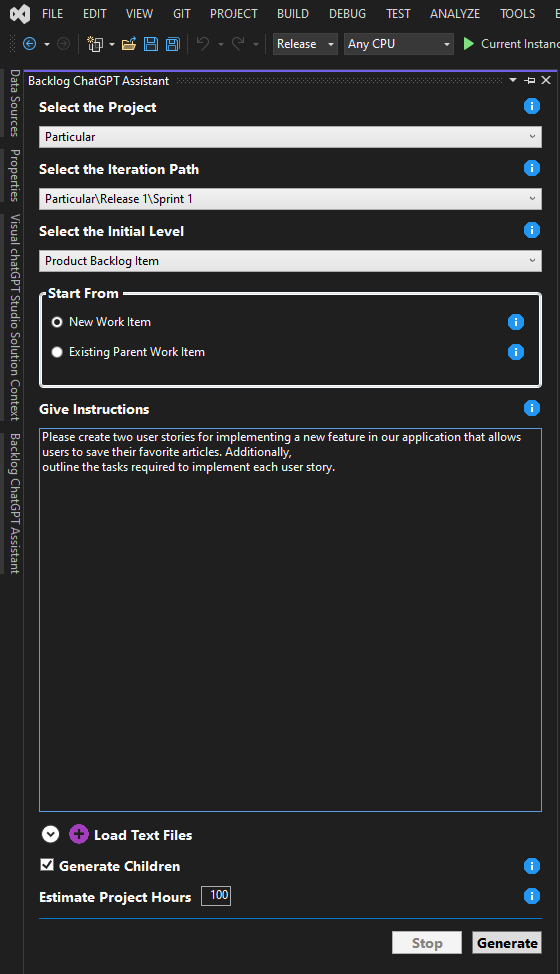
In this view, users can select the target Azure DevOps project and provide instructions for generating backlog items:
Review and Edit View
This view displays the AI-generated backlog items, allowing users to review, edit, or use AI to further enhance these items or create child tasks:
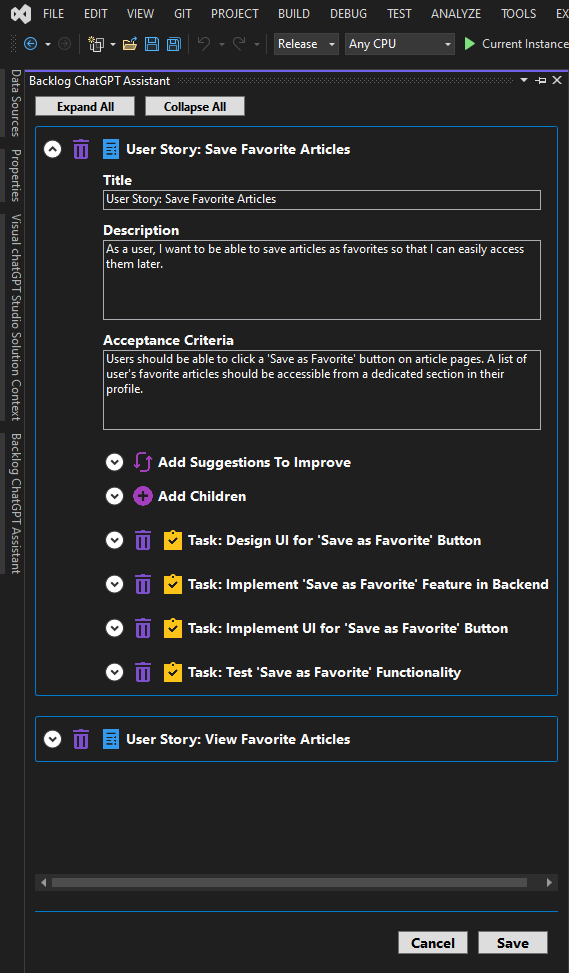
You will find this window in menu View -> Other Windows -> Backlog chatGPT Assistant.
Seamless Workflow ⚙
- Select the Source: Choose an existing work item or upload a document.
- Generate Backlog Items: Use AI to generate detailed backlog items.
- Review and Modify: Edit the AI-generated items as needed.
- Persist to Azure DevOps: Save the final backlog items directly to your Azure DevOps project.
How It Works 🛠
- User Instructions or Documents: Provide instructions or upload a document containing the information.
- AI Processing: The AI analyzes the content and generates a list of backlog items.
- Review and Edit: You can review, edit, and request further AI-generated suggestions.
- Save to Azure DevOps: Once satisfied, save the items to your selected Azure DevOps project.
Also Check Out 🔗
Visual chatGPT Studio 
If you find Backlog chatGPT Assistant helpful, you might also be interested in my other extension, Visual chatGPT Studio, which integrates chatGPT directly within Visual Studio to enhance your coding experience with features like intelligent code suggestions, automated code reviews, and more. Ideal for developers who want to boost their productivity and code quality!
Azure DevOps Authentication and Configuration 🔐
To use the Backlog chatGPT Assistant with Azure DevOps, you need to authenticate and configure your connection. You have two options to set up your credentials:
1. Set your PAT (Personal Access Token) in Settings (Optional)
A Personal Access Token (PAT) in Azure DevOps is a security token that allows you to authenticate and access Azure DevOps services. If you prefer, you can configure your PAT directly in the extension's settings:
- Navigate to the extension settings within Visual Studio.
- Locate the PAT configuration option and input your Personal Access Token.
- Save the settings.
2. Login Prompt
If you choose not to provide a PAT, you will be prompted to log in with your Azure DevOps credentials when you open the extension. Simply enter your Azure DevOps credentials when prompted.
Configuring the Azure DevOps URL
In addition to authentication, you'll need to specify the Azure DevOps URL where your work items will be created. This can be done by:
- Opening the extension settings within Visual Studio.
- Entering the Azure DevOps URL in the designated field.
- Saving your configuration.
This URL is essential for establishing the connection between the extension and your Azure DevOps organization or project.
OpenAI Authentication 🔑
To use this tool it is necessary to connect through the OpenAI API, Azure OpenAI, or any other API that is OpenAI API compatible.
By OpenAI
1 - Create an account on OpenAI: https://platform.openai.com
2 - Generate a new key: https://platform.openai.com/api-keys
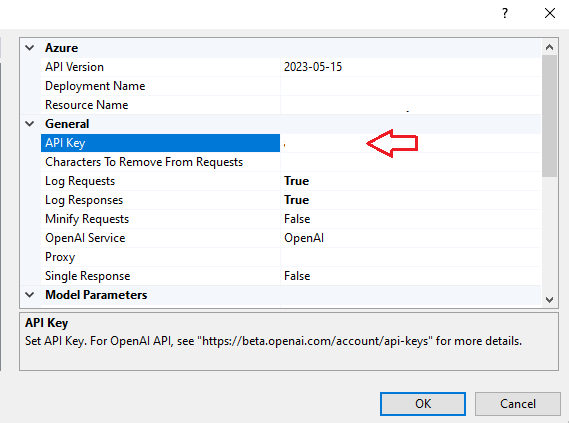
3 - Copy and past the key on options and set the OpenAI Service parameter as OpenAI:
By Azure (API Key Authentication)
1 - First, you need have access to Azure OpenAI Service. You can see more details here.
2 - Create an Azure OpenAI resource, and set the resource name on options. Example:

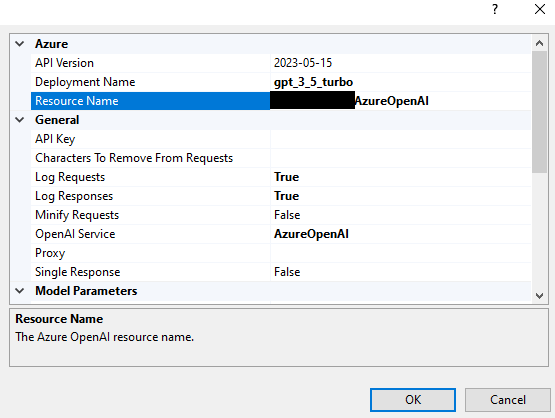
3 - Copy and past the key on options and set the OpenAI Service parameter as AzureOpenAI:


4 - Create a new deployment through Azure OpenAI Studio, and set the name:


5 - Set the Azure OpenAI API version. You can check the available versions here.
By Azure (Entra ID Authentication)
In addition to API Key authentication, you can now authenticate to Azure OpenAI using Microsoft Entra ID. To enable this option:
1 - Ensure your Azure OpenAI deployment is registered in Entra ID, and the user has access permissions.
2 - In the extension settings, set the parameter Entra ID Authentication to true.
3 - Define the Application Id and Tenant Id for your application in the settings.
4 - The first time you run any command, you will be prompted to log in using your Microsoft account.
5 - For more details on setting up Entra ID authentication, refer to the documentation here.
By Others Customs LLM
Is possible to use a service that is not the OpenAI or Azure API, as long as this service is OpenAI API compatible.
This way, you can use APIs that run locally, such as Meta's llama, or any other private deployment (locally or not).
To do this, simply insert the address of these deployments in the Base API URL parameter of the extension.
It's worth mentioning that I haven't tested this possibility for myself, so it's a matter of trial and error, but I've already received feedback from people who have successfully doing this.
Known Issues 🐛
Issue 1: Occasional delays in AI response times.
Issue 2: AI can hallucinate in its responses, generating invalid content.
Issue 3: If the request sent is too long and/or the generated response is too long, the API may cut the response or even not respond at all.
Workaround: Retry generating the backlog items changing the model parameters and/or the instructions.
Issue 4: This extension uses the newly created "Structured Outputs" functionality by the OpenAI (you can see more here). This feature is not available in all language models or deployments.
Workaround: Make sure you are using a model and a deployment compatible with "Structured Outputs".
Disclaimer ⚠
As this extension depends on the API provided by OpenAI or Azure, there may be some change by them that affects the operation of this extension without prior notice.
As this extension depends on the API provided by OpenAI or Azure, there may be generated responses that not be what the expected.
The speed and availability of responses directly depend on the API.
If you are using OpenAI service instead Azure and receive a message like 429 - You exceeded your current quota, please check your plan and billing details., check OpenAI Usage page and see if you still have quota, example:

You can check your quota here: https://platform.openai.com/account/usage
- If you find any bugs or unexpected behavior, please leave a comment so I can provide a fix.
Donations 🙏
☕️ If you find this extension useful and want to support its development, consider buying me a coffee. Your support is greatly appreciated!

Dependencies ⚙
Release Notes 📜
1.3.0
- Due to the fact that OpenAI is always updating the list of models, and also because other LLMs may have their own models, I am setting the "Model" parameter in the extension options as an open field for editing. And because of that, the parameter "Model Language Override" is not more necessary. See the available models here.
1.2.1
- Fixed the issue preventing the extension from loading correctly starting from version 17.12.0 of Visual Studio 2022.
1.2.0
- Added support for projects that use User Story instead of Product Backlog Item.
1.1.0
- Added the possibility to use your Microsoft Account to authenticate to the Azure Open AI Service through Entra ID.
- Fixed connection with Azure OpenAI.
- Changed the default Azure OpenAI API version to 2024-08-01-preview due compatibility.
1.0.0
- Initial release with full support for Azure DevOps integration and AI-generated backlog item creation.


