Contrast Integration
Azure Pipeline Plugin integrates the threshold calculation of vulnerabilities associated with Projects and Applications. This feature will enable the user to perform the build/release pipeline execution.
Features
- Assess
- Assess-Library
- Both
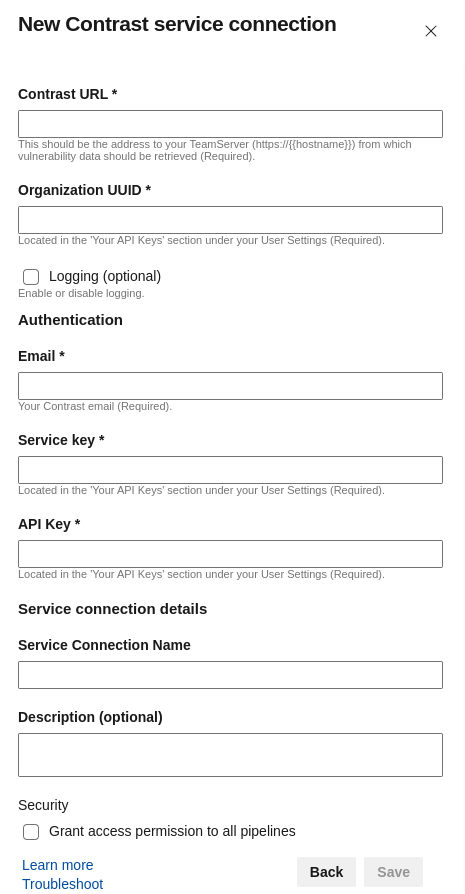
Create a new service connection to connect to Contrast
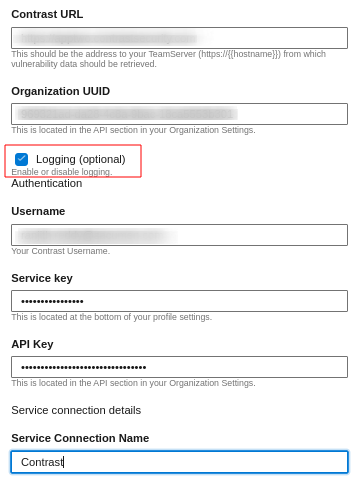
The Contrast Server Connection service connection allows Azure DevOps to integrate with Contrast Security’s TeamServer. Here, you can specify your Contrast URL and credentials so that our tasks can retrieve security insights and vulnerability data from Contrast.
These credentials (Organization UUID, Service Key, API Key, and Username) are available in the Contrast Security website under User Settings.
Additionally, there is an optional Logging toggle. If enabled, logs will be stored in the pipeline artifact, providing visibility into the task execution and Contrast API interactions.
Pipeline Task
Step one - Enter Edit mode
The task can be used in a Build or Release pipeline
Release Pipeline
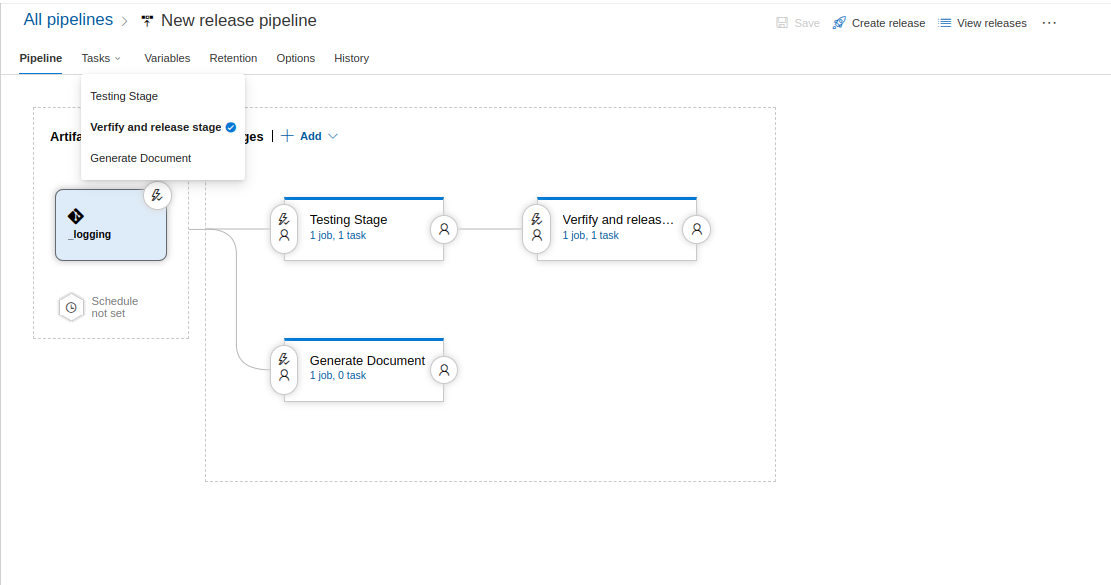
- Enter Edit mode for the release pipeline you wish to add the task.
- Select a stage for which you wish to add the task
Build Pipeline
- Enter Edit mode for the build pipeline you wish to add the task.
Step two - add the task
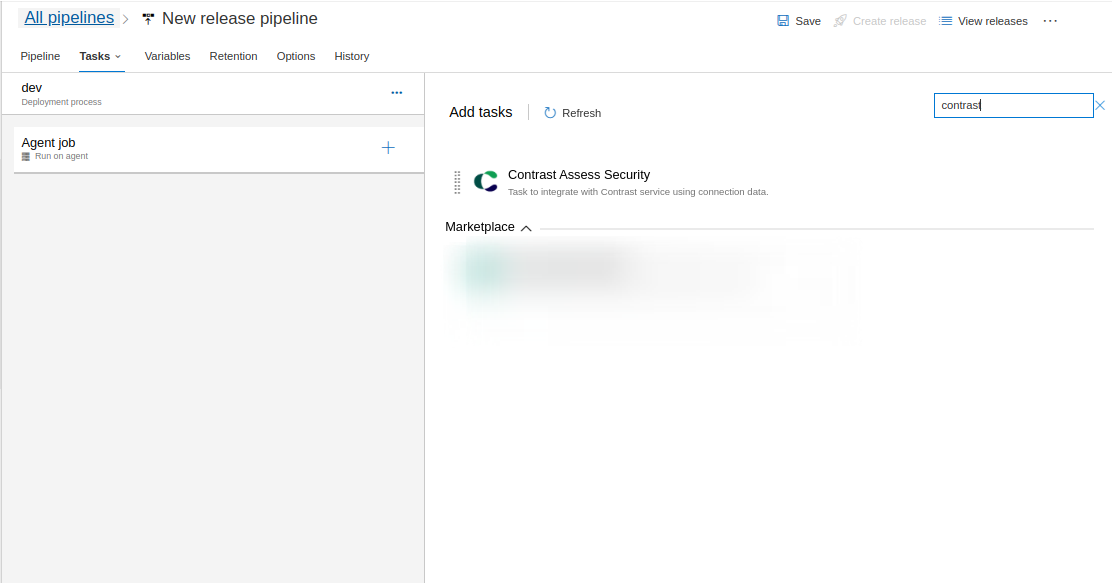
- Now that you are in edit mode for a Release Pipeline or Build Pipeline, click on the ellipsis (...) menu and add an agent job.
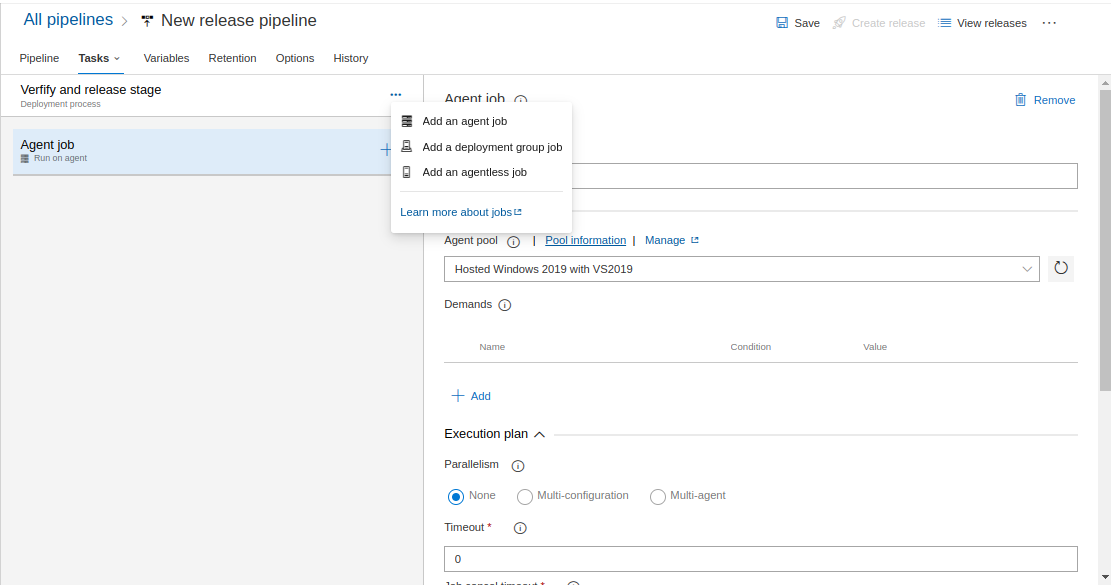
- Click on the + button next to you agentless job and add the Contrast Assess Security task.
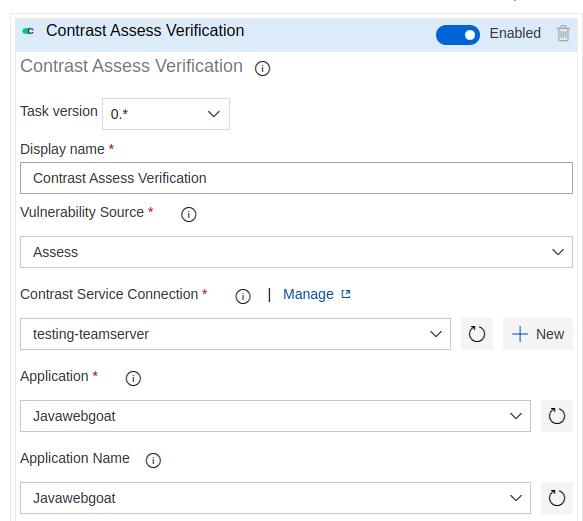
Step three - choose connection and application
- Select a Service Connection from the Contrast Service Connection field. You can also click on the Manage option to go to the Service connections settings in your Project Settings.
- Select one of your applications from the Application dropdown. This enables more fields for configuring the task.
- (Optional) Select an Application Name from the Application Name. If left empty, the task will automatically resolve the name using the Application ID.

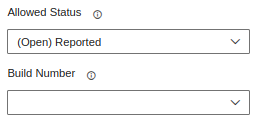
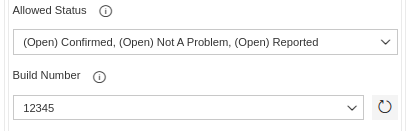
- You can use the Allowed Status and Build Number fields to filter your results from Contrast, leave them blank if you don't want to filter. The values set in these fields will be validated against the conditions you configure in the following fields.
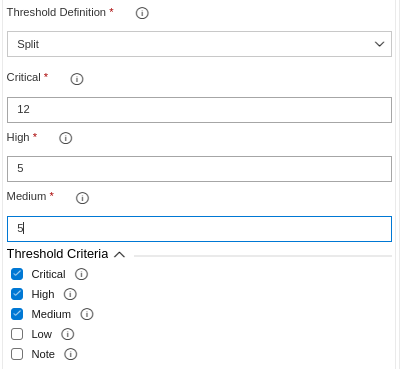
- If the threshold definition is set to split, you must specify the maximum allowed vulnerabilities for each severity level. The evaluation will be conducted by independently comparing each severity value against its defined threshold. (OR)
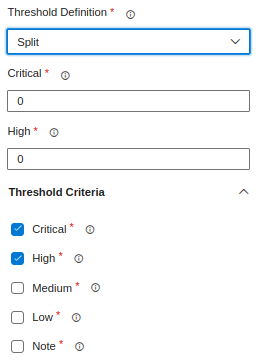
- If the threshold definition is set to combined, you must specify the total allowed threshold for the sum of all severity levels. The evaluation will be performed by comparing the combined severity count against the defined total threshold.

- The Threshold Criteria allows you to select or deselect severity levels to include or exclude from the evaluation.
Release Gate
Adding a new gate
Enter Edit mode for the release pipeline you wish to add the gate to.
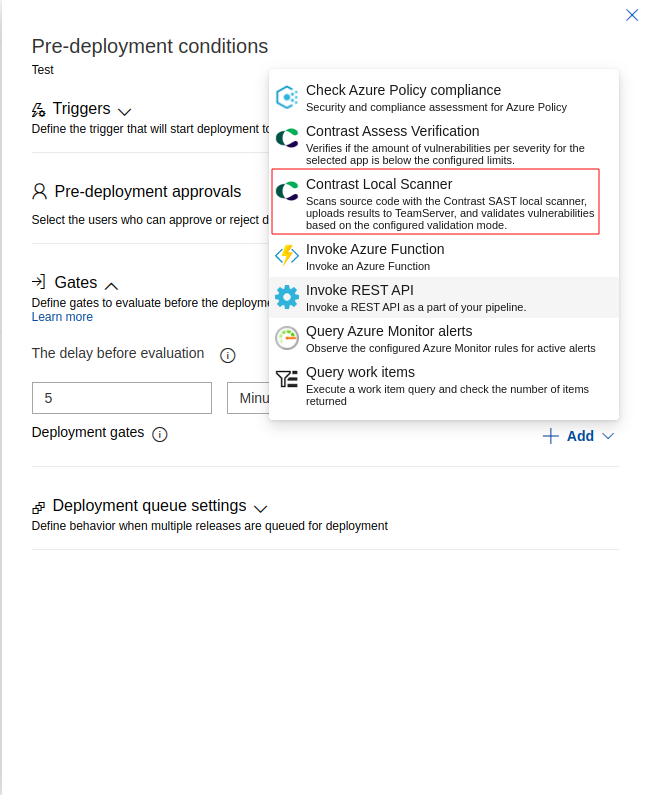
Choose the stage and deployment conditions to which you'll be adding the gate, either pre or post conditions. You may later add more gates of the same type to the same stage or deployment conditions.
- Go to the Gates section and enable them if you haven't already.
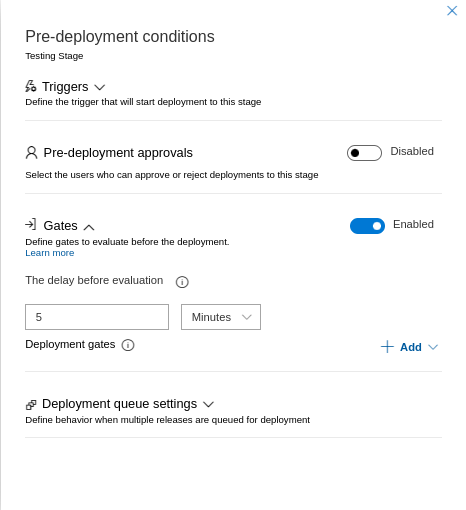
- Click on + Add text and select Verify application vulnerabilities. Now you are ready to configure the gate.

Gate Configuration
- You should have created a Contrast service connection first, if you don't have yet you can click on the New button next to the Service Connection
dropdown. Fill all the fields with the correct data and click on Ok. Click on the refresh list next to the dropdown button and select your newly created
connection.
Proceed to load the applications list either by clicking over the field or the refresh button next to it and select the application to which this artifact belongs.
(Optional) Load and select an Application Name from the Application Name dropdown. If left empty, the task will automatically resolve the name using the selected Application.
You may choose to be more specific with the severity counters by selecting which vulnerability status
or build numbers will be used for filtering when retrieving the data for the gate evaluation.
- Now set the maximum amount of vulnerabilities per severity or total threshold based on the threshold definition split or combined. Do mind that whenever your pipeline reaches this gate if one or all the validations fail your pipeline
will keep requesting for samples until it is valid or the evaluation timeout is reached.
Logging
- To enable logging of pipeline task details in the pipeline artifact, navigate to the service connection and select the logging checkbox.
Once the pipeline is executed the task result will be captured and stored in a log file, the log file will be stored as a pipeline artifact.
These artifacts are stored separately from the console logs.
Location in Azure DevOps (Build Pipeline):
Go to Azure DevOps → Pipelines → Runs.
Click on a pipeline run.
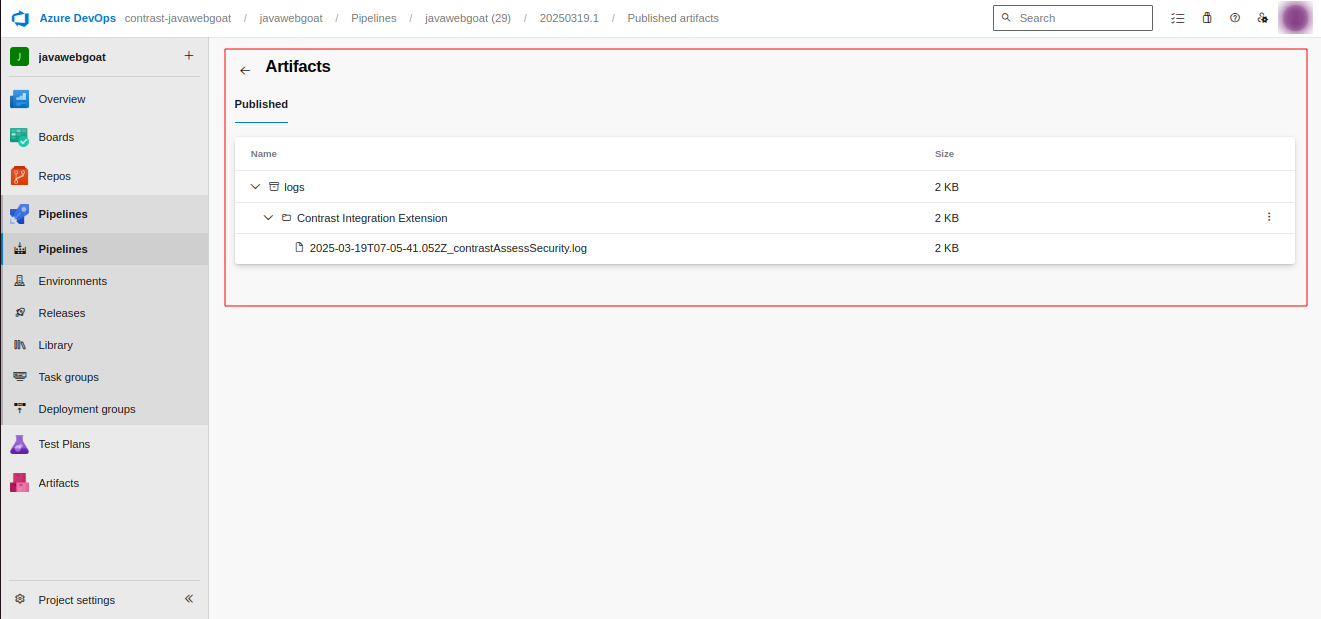
Go to the "Artifacts" section (top-right).
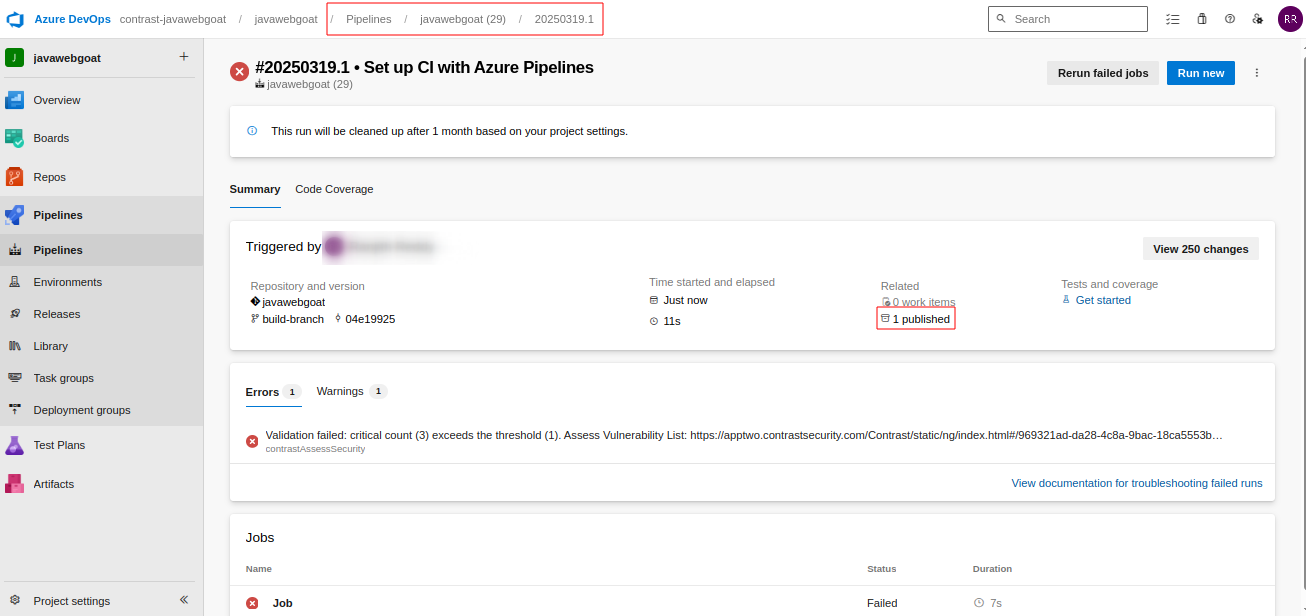
Click on the "Logs" artifact
Download the log file (e.g.,..log).
Location in Azure DevOps (Release Pipeline):
Go to Azure DevOps Portal.
Navigate to your project.
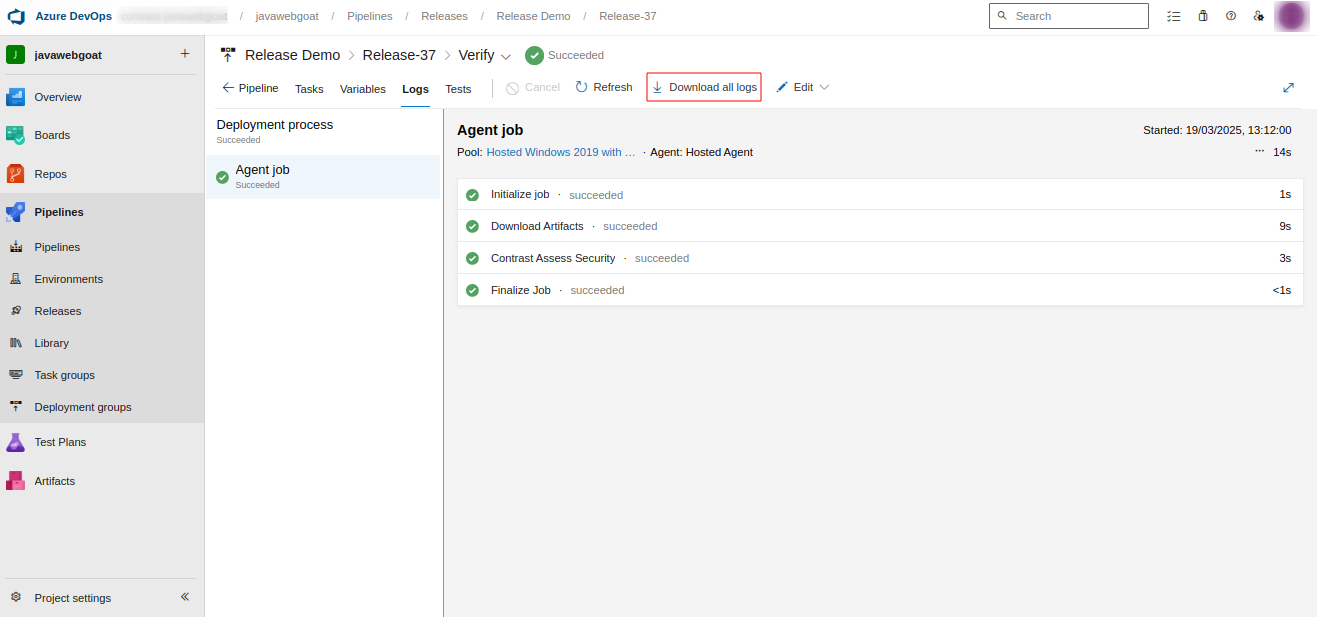
Click on Pipelines > Releases.
Open the specific release for which you need the logs.
Hover on the stage, select Logs.
Click on the Download all logs button.
You may look for more info on Microsoft Docs Site on articles related to gates like Define a gate for a stage or Configure a gate.
Contrast Local Scanner Integration
The plugin enables secure, offline static application security testing (SAST) directly within Azure DevOps pipelines. It allows teams to run scans locally without sending source code outside the build environment.
Features
Enables early detection of security issues by running static scans during the development pipeline.
Seamless integration with existing Azure DevOps projects and repositories—add the task to both build and release pipelines.
Locally executed SAST scans on source code from the default branch, ensuring source code stays within the build environment.
Automatic scanner download from Contrast TeamServer during pipeline execution.
Scan results uploaded to Contrast TeamServer, allowing centralized visibility and remediation tracking.
Customizable Vulnerability Validation:
Enforces configurable validation logic with pipeline pass/fail gating based on scan results.
Supports Net New Validation and Severity Validation modes:
Net New Validation: Validates only newly introduced vulnerabilities by comparing the current scan against the baseline scan. The pipeline fails if any new issues are detected, regardless of their severity level. This method requires a previous scan to be available for comparison.
Severity Validation: Allows users to define a severity threshold (e.g., Medium). The scan checks for all vulnerabilities that match or exceed the selected level—i.e., Medium includes Medium, High, and Critical. If any vulnerabilities at or above the chosen level are found, the pipeline will fail accordingly.
Generates SARIF output and automatically uploads it as a pipeline artifact in build pipeline
Provides immediate visibility into detected vulnerabilities, with detailed insights available in the Contrast UI for remediation.
Create a new service connection to connect to Contrast
The Contrast Server Connection service connection allows Azure DevOps to integrate with Contrast Security’s TeamServer. Here, you can specify your Contrast URL and credentials so that our tasks can retrieve security insights and vulnerability data from Contrast.
These credentials (Organization UUID, Service Key, API Key, and Username) are available in the Contrast Security website under User Settings.
Additionally, there is an optional Logging toggle. If enabled, logs will be stored in the pipeline artifact, providing visibility into the task execution and Contrast API interactions.
Important Considerations and Best Practices
Net New Validation Warning
Net New Validation will fail the pipeline if any new vulnerabilities are found — regardless of severity (including Low or Note).
This can cause builds to fail unexpectedly, especially in early or first-time scans.
Best Practices
Use Net New Validation only when all known vulnerabilities are already resolved.
Add this step only in the release stage, to gate production deployment.
For first-time scans or non-release stages, consider using Severity Validation instead.
Java 21 Requirement
This extension uses a scan engine (v2.0.0) that requires Java 21 to run.
On Microsoft-hosted agents, Java 21 is already pre-installed, and the extension automatically sets the correct path internally — no action needed.
On self-hosted agents, you must ensure that Java 21 is installed and the environment variable JAVA_HOME_21_X64 is set correctly.
If Java 21 is missing or misconfigured, the scan step will fail with a descriptive error.
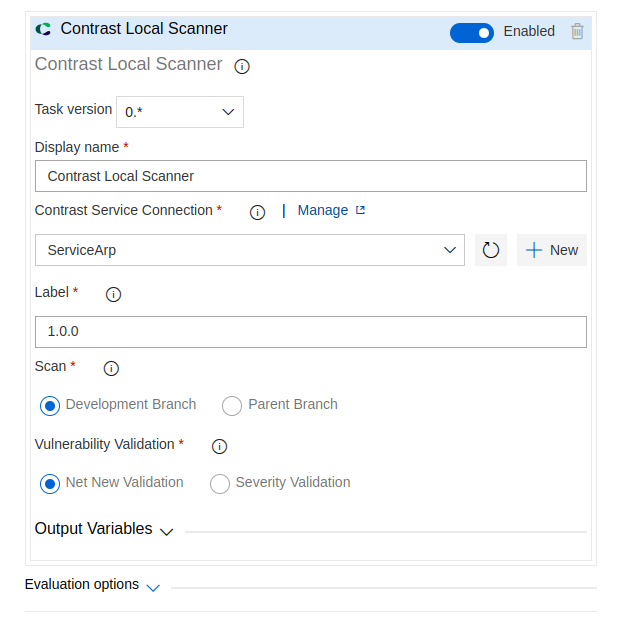
Pipeline Task
Step one - Enter Edit mode
The task can be used in a Build or Release pipeline
Release Pipeline
- Enter Edit mode for the release pipeline you wish to add the task.
- Select a stage for which you wish to add the task
Build Pipeline
- Enter Edit mode for the build pipeline you wish to add the task.
Step two - add the task
- Now that you are in edit mode for a Release Pipeline or Build Pipeline, click on the ellipsis (...) menu and add an agent job.
- Click on the + button next to you agentless job and add the Contrast Local Scanner task.
Local Scanner UI
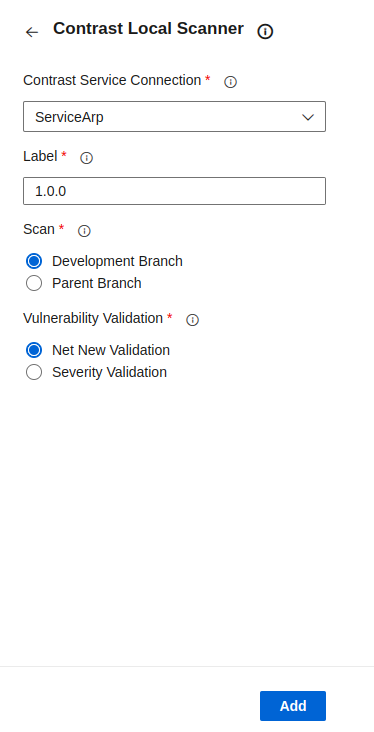
Step three - choose connection and add label
- Select a Service Connection from the Contrast Service Connection field. You can also click on the Manage option to go to the Service connections settings in your Project Settings.
- Add unique label to identify the build/release
Step four - select scan type
- If the user selects the Development branch, the vulnerabilities will be updated in the Branches tab of the application after the scan in Contrast console.
- If the user selects the Parent branch, the vulnerabilities will be updated in the Vulnerabilities tab of the application after the scan in Contrast console.
Step four - select validation method
- Net New Validation: Validates only newly introduced vulnerabilities by comparing the current scan against the baseline scan. The pipeline fails if any new issues are detected, regardless of their severity level. This method requires a previous scan to be available for comparison.
- Severity Validation: Allows users to define a severity threshold (e.g., Medium). The scan checks for all vulnerabilities that match or exceed the selected level—i.e., Medium includes Medium, High, and Critical. If any vulnerabilities at or above the chosen level are found, the pipeline will fail accordingly.
Release Gate
Adding a new gate
Enter Edit mode for the release pipeline you wish to add the gate to.
Choose the stage and deployment conditions to which you'll be adding the gate, either pre or post conditions. You may later add more gates of the same type to the same stage or deployment conditions.
- Go to the Gates section and enable them if you haven't already.
- Click on + Add text and select Verify application vulnerabilities. Now you are ready to configure the gate.

Gate Configuration
- You should have created a Contrast service connection first, if you don't have yet you can click on the New button next to the Service Connection
dropdown. Fill all the fields with the correct data and click on Ok. Click on the refresh list next to the dropdown button and select your newly created
connection.
- Add the label, select scan type and validation method
Logging
- To enable logging of pipeline task details in the pipeline artifact, navigate to the service connection and select the logging checkbox.
Once the pipeline is executed the task result will be captured and stored in a log file, the log file will be stored as a pipeline artifact.
These artifacts are stored separately from the console logs.
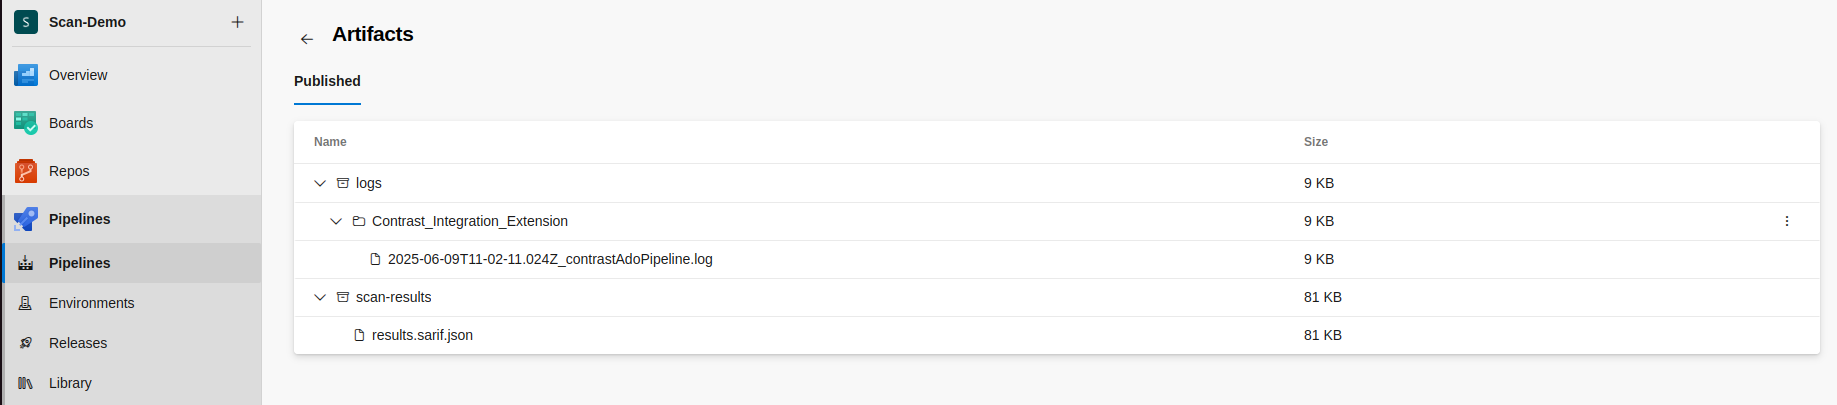
Location in Azure DevOps (Build Pipeline):
Go to Azure DevOps → Pipelines → Runs.
Click on a pipeline run.
Go to the "Artifacts" section (top-right).
Click on the "Logs" artifact
Download the log file (e.g.,..log).
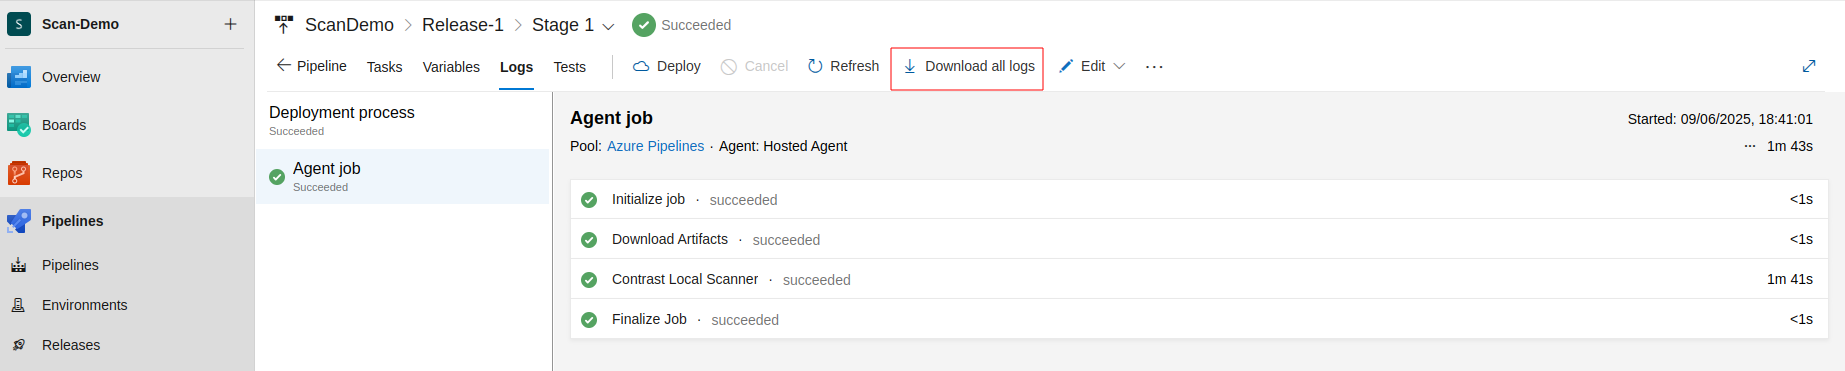
Location in Azure DevOps (Release Pipeline):
Go to Azure DevOps Portal.
Navigate to your project.
Click on Pipelines > Releases.
Open the specific release for which you need the logs.
Hover on the stage, select Logs.
Click on the Download all logs button.
You may look for more info on Microsoft Docs Site on articles related to gates like Define a gate for a stage or Configure a gate.
| |