Time Tracker for Azure DevOps
Keep projects on track with clear, reliable time visibility—right where your teams work.
Watch it in action
Click to watch a quick demo of Time Tracker in action.
Why teams choose Time Tracker
- Frictionless logging: Team members add hours directly on Work Items in seconds.
- Instant visibility: See daily activity and trends on a clean calendar view.
- Accountability made easy: Time Logs show who logged what, when, and on which task.
- Plan with confidence: Track remaining capacity by project and avoid over‑allocations.
- Works with your process: Respect your existing states/flows; optionally block logging on closed items.
What you get today
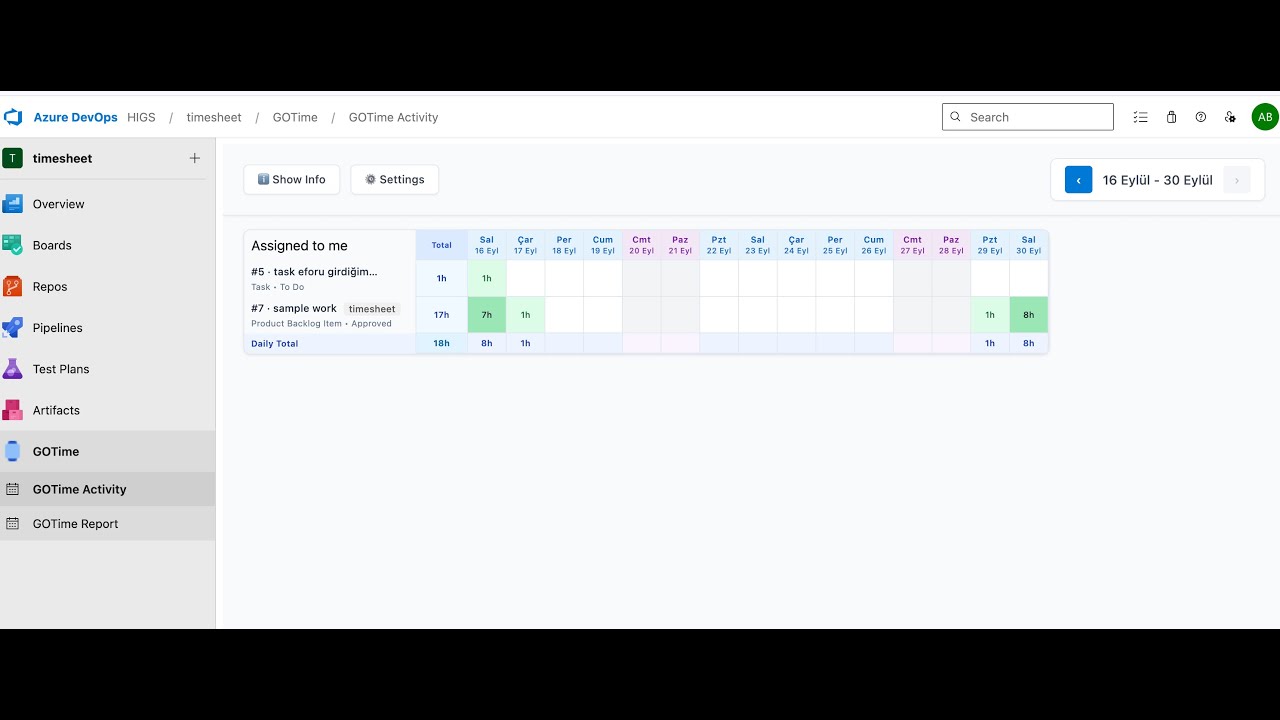
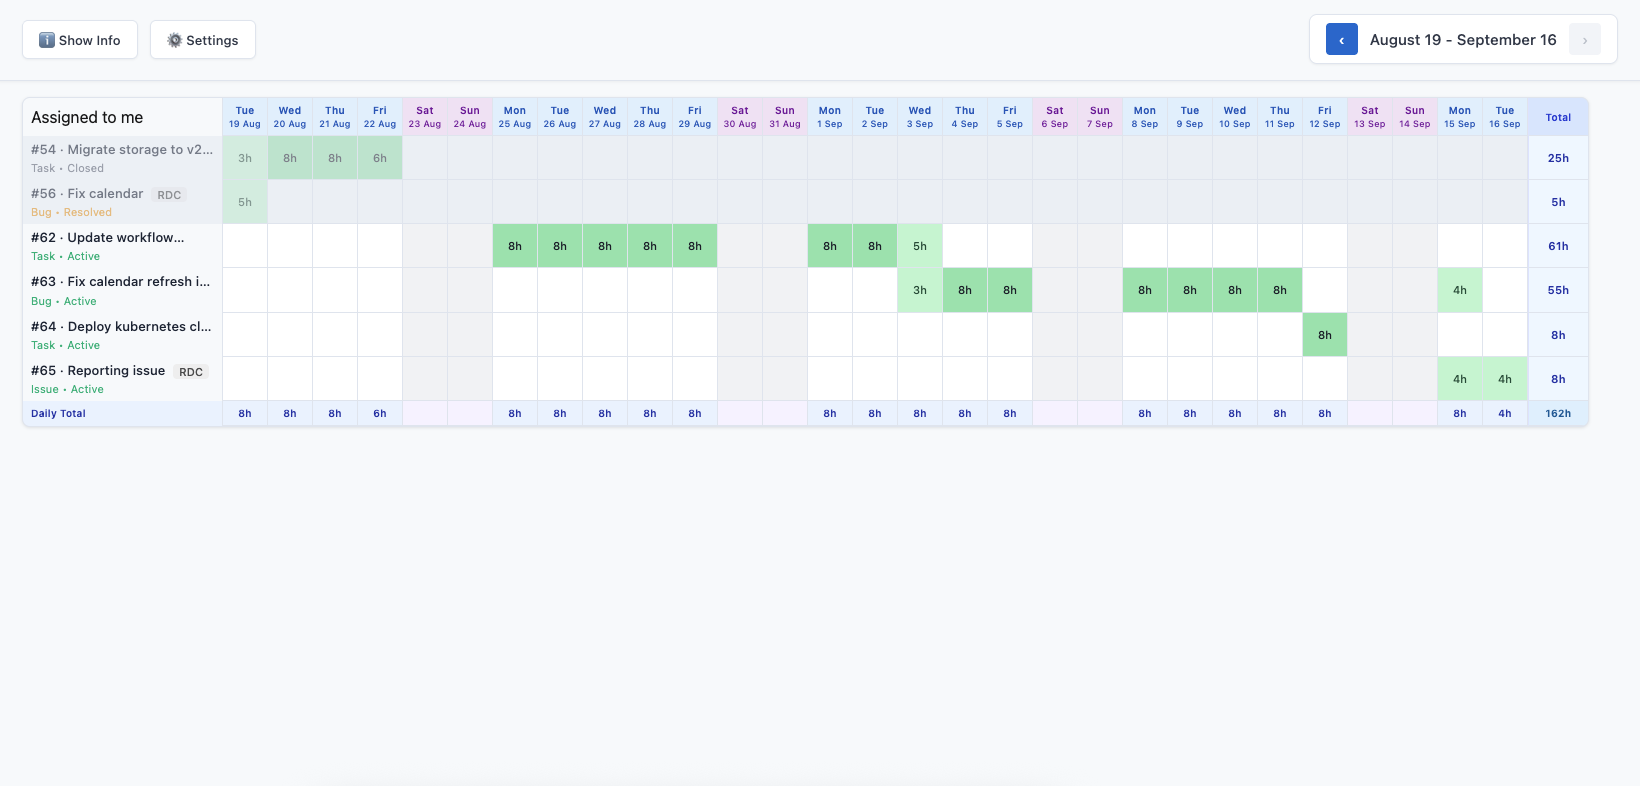
- Calendar (Manager view): A simple, at‑a‑glance heat map that highlights focus areas and gaps.
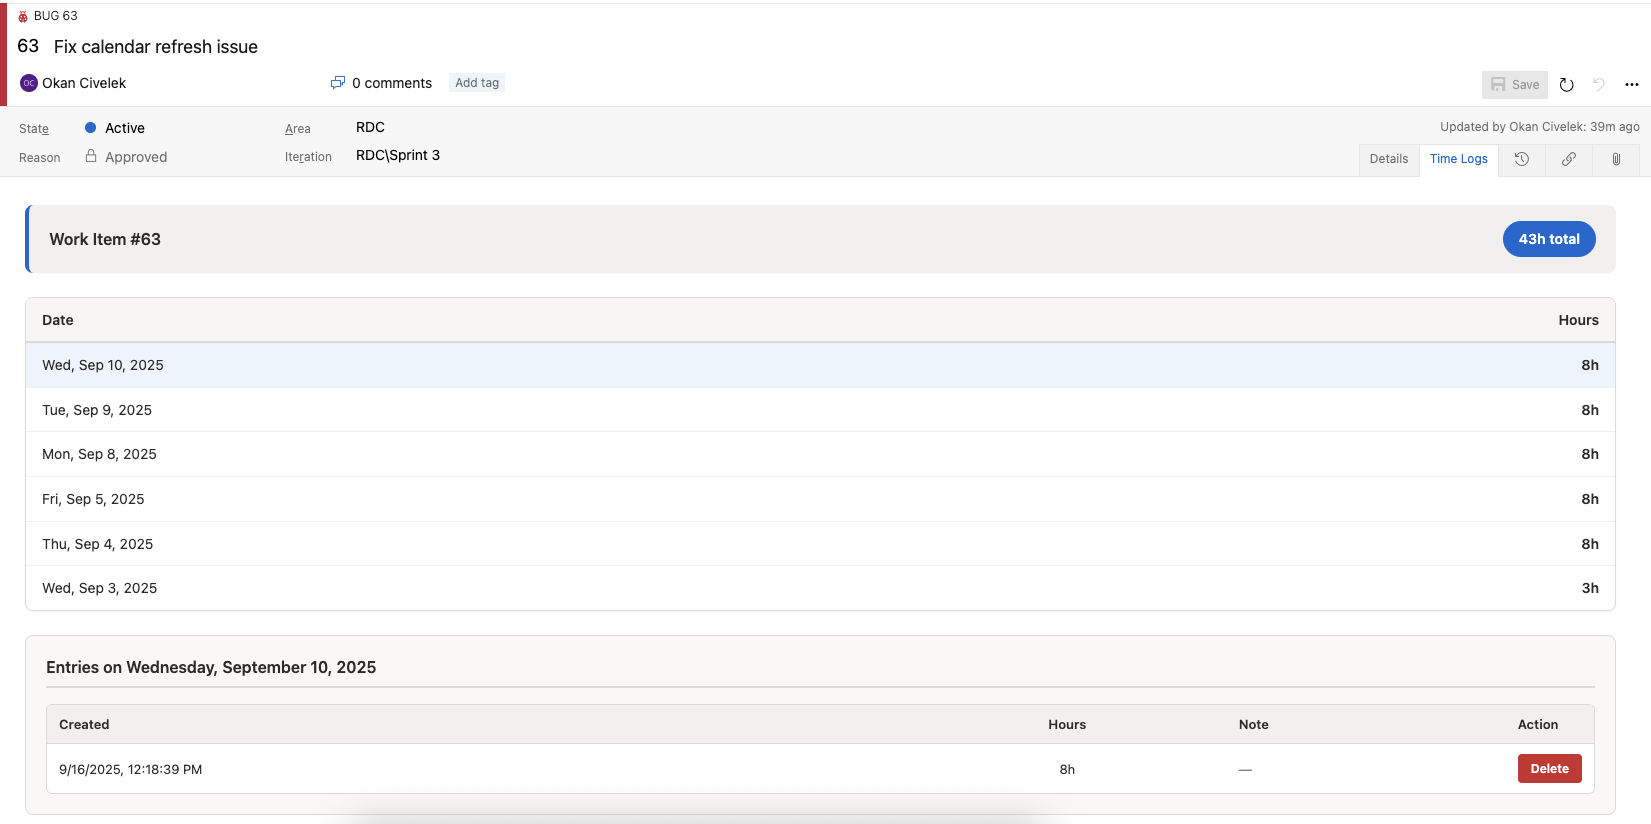
- Time Logs (Work Item view): A clear list of entries with notes and totals across any date range.
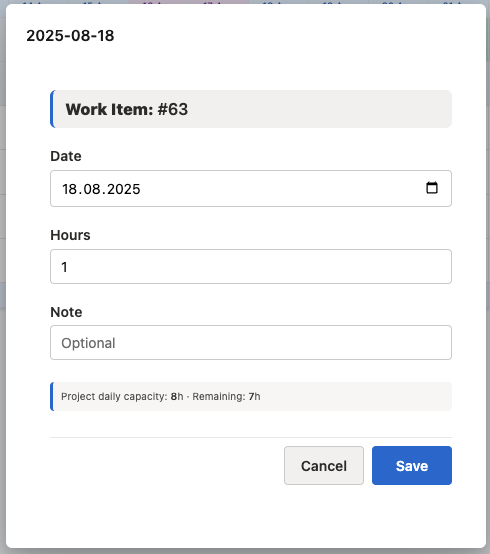
- Effort dialog (Contributor view): Fast entry with hours and an optional note—no spreadsheets, no switching tools.
- Reports (Overview): Summaries that help you steer work and spot trends quickly.
Built for project managers
- Clarity: Understand progress without chasing updates.
- Predictability: Spot risks early with visible workload and trends.
- Simplicity: No extra systems to maintain; lives inside Azure DevOps.
- Adoption: Minimal change for teams—designed to be used every day.
Seamless in Azure DevOps
- Lives inside Work Items and team hubs—no context switching.
- Respects your permissions and organization policies.
- No external systems required.
Getting Started - Complete User Guide
Step 1: Install the Extension
- Open your Azure DevOps organization
- Go to Organization settings → Extensions
- Find GOTime and install it to your organization
- The extension will be available immediately after installation
Step 2: Activate Your License
After installation, you need to activate a license to use the extension:
Navigate to Extension Settings:
- Go to your Azure DevOps organization settings
- Navigate to Extensions > GOTime
- Or access directly via: Organization Settings > General > Extensions > GOTime Settings
Get Your Free Trial License (First Year Free):
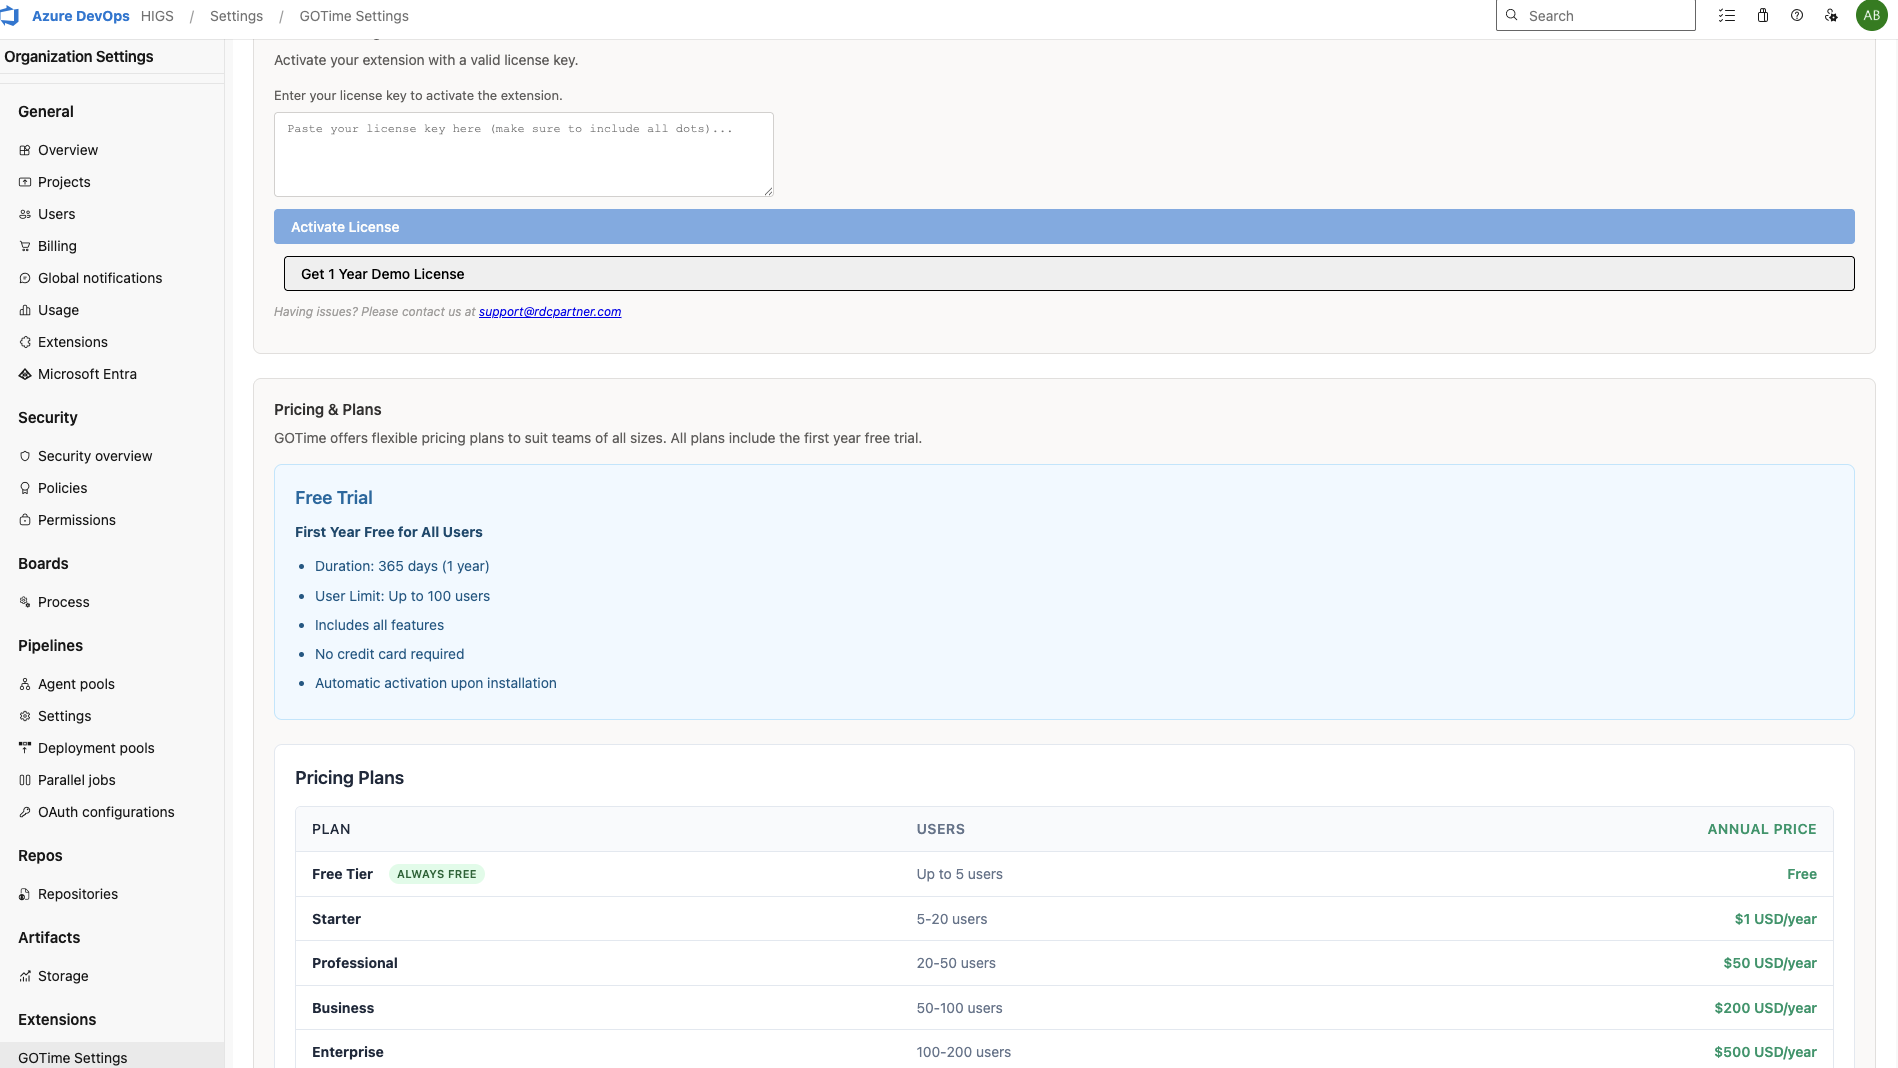
- Verify License Status:
- Check the license status indicator (should show "License Active")
- Review license details including expiration date and user count
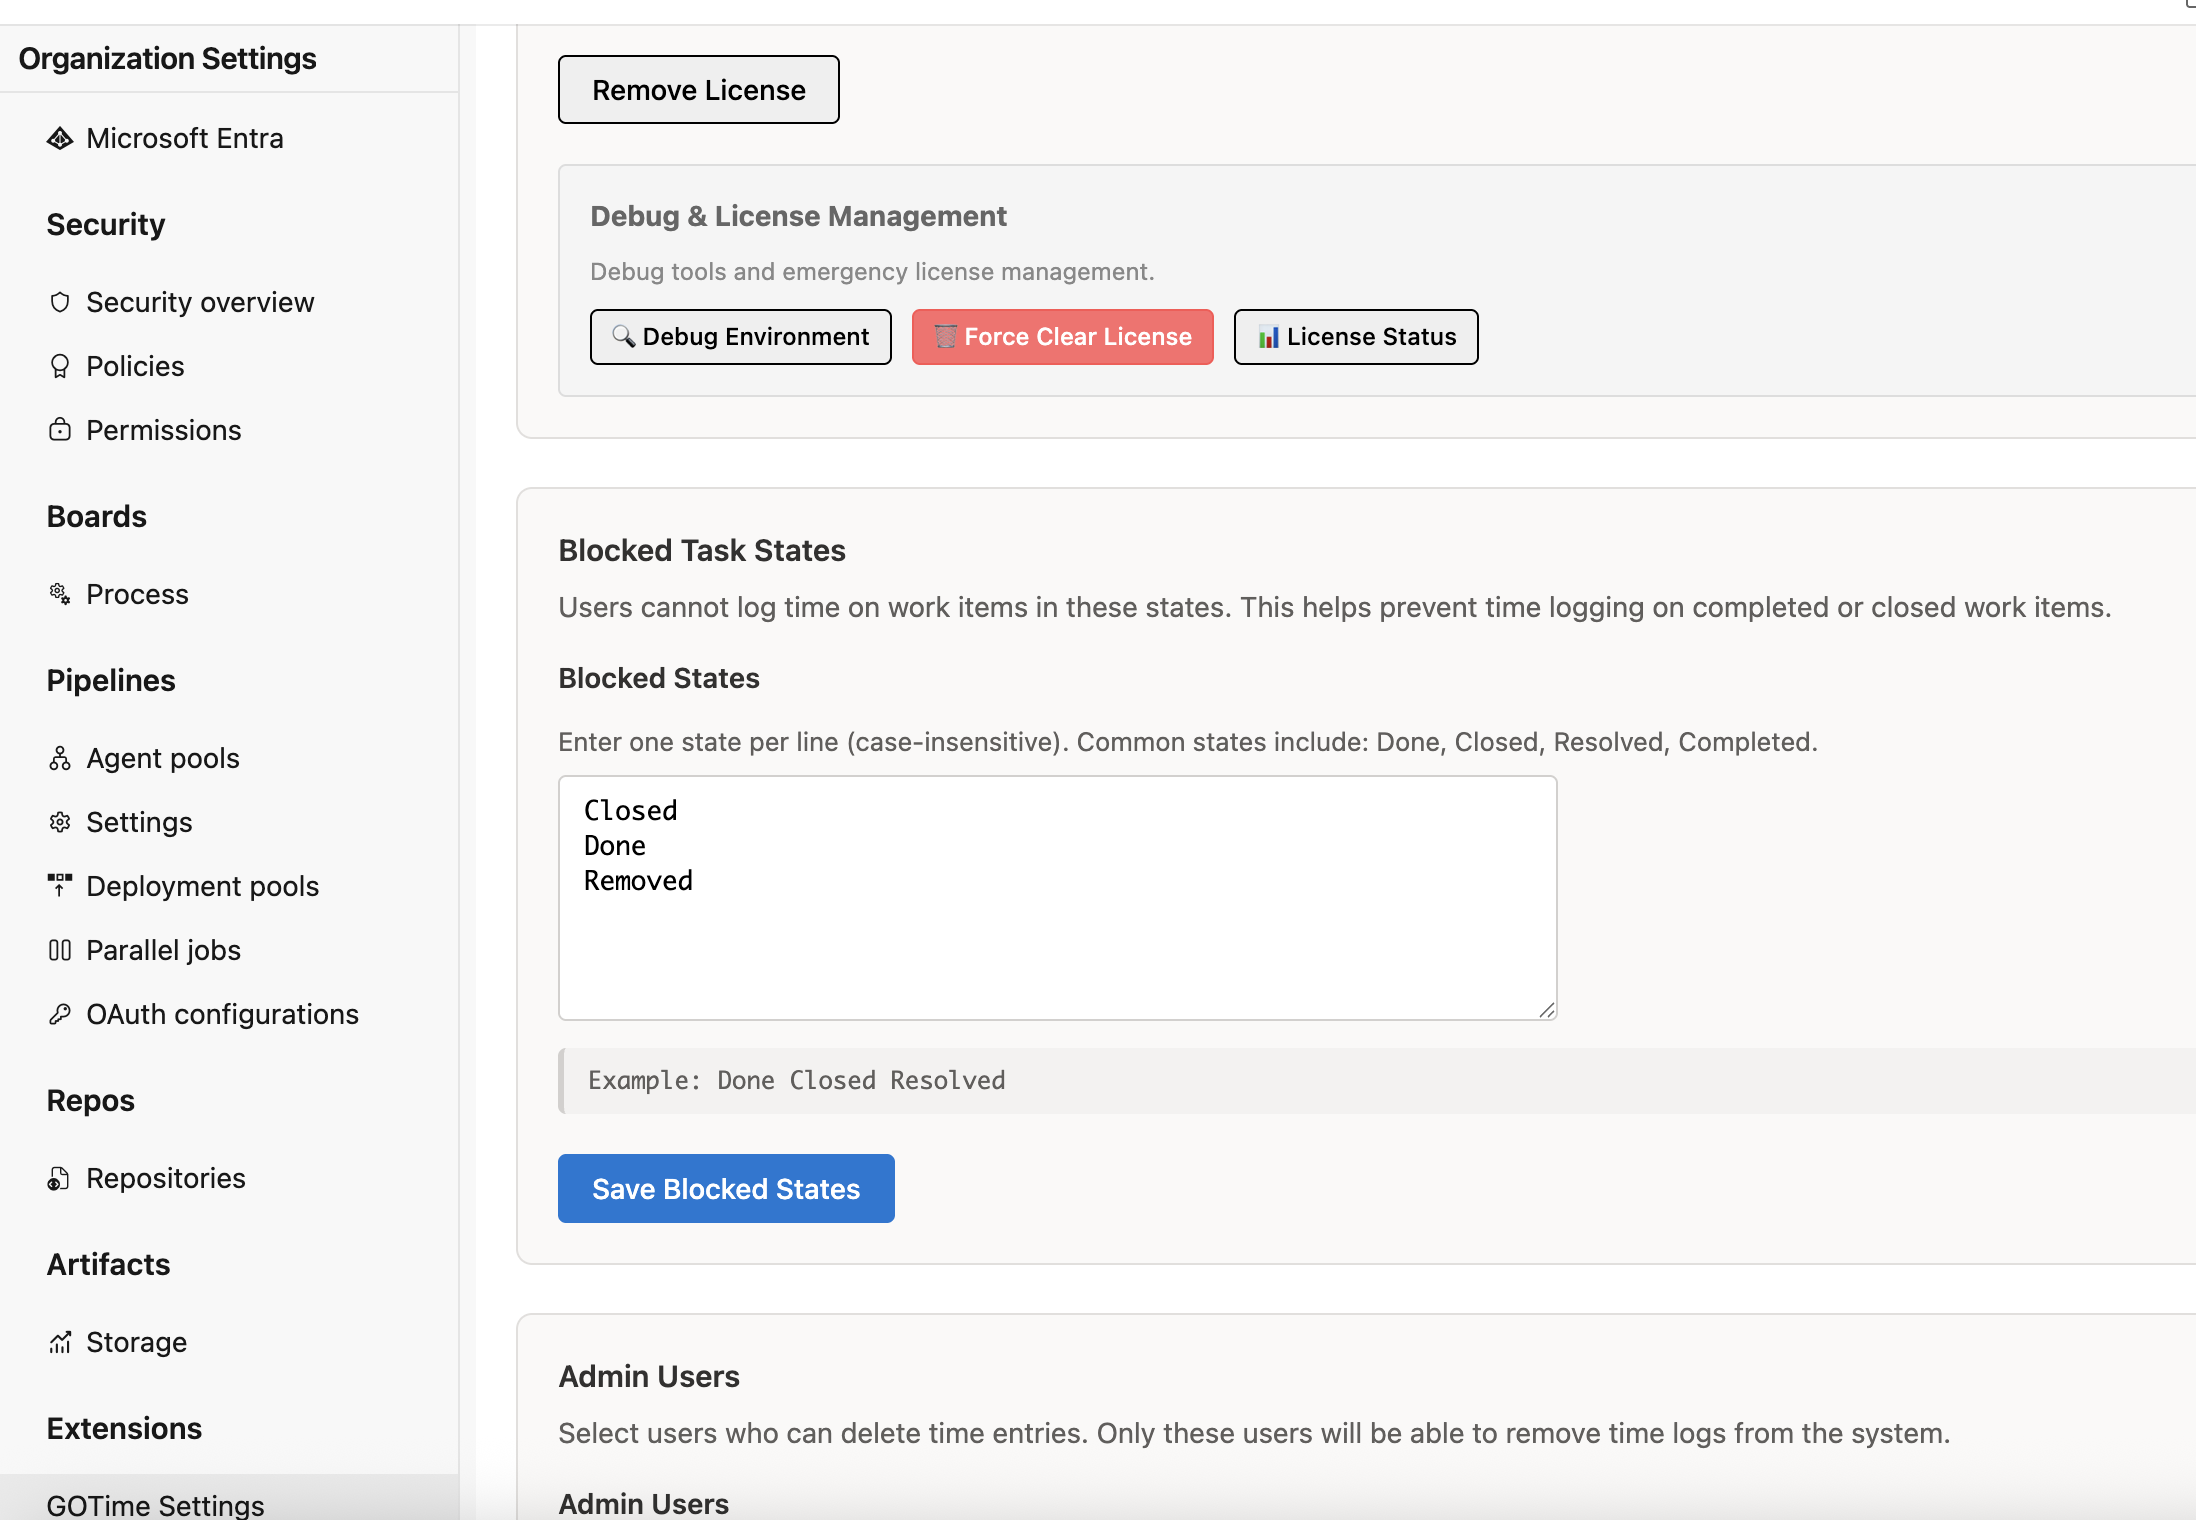
As an administrator, you can configure extension settings:
Blocked Task States:
- Define work item states where time logging is blocked
- Common states: "Done", "Closed", "Resolved", "Completed"
- Enter one state per line (case-insensitive)
- Click "Save Blocked States" to apply
- This prevents users from logging time to closed or completed work items
Effort Logging Settings:
- Allow effort logging without capacity/activity: Enable this to allow users to log effort even if they don't have capacity or activity configured in the active sprint
- When enabled: Users can log effort without capacity configuration, but still cannot log to past dates or closed/completed work items
- When disabled: Users must have capacity/activity configured in the active sprint to log effort
Project-Specific Settings:
- Select a project from the dropdown
- Configure project-specific effort logging settings
- Project settings override global settings for the selected project
Admin Users:
- Add users who can delete time entries
- Only these users will be able to remove time logs from the system
- Search and add users by typing their name
Step 4: Log Time on Work Items
Once the license is activated, team members can start logging time:
- Open a Work Item (Bug, Task, User Story, etc.)
- Navigate to the "Time Logs" tab (added by the extension)
- Click "Log Time" button or use the quick action
- Fill in the Effort Dialog:
- Date: Select the date for the time entry (defaults to today)
- Hours: Enter the number of hours worked (supports decimals like 1.5, 2.25)
- Note: Optional note field (max 50 characters)
- Click "Save" to record the time entry
- The time entry will appear in the Time Logs tab immediately
Important Notes:
- You can only log time to work items assigned to you (unless no assignee is set)
- Time logging to blocked states (Done, Closed, etc.) is not allowed
- Past dates cannot be logged (depending on settings)
- Capacity/activity configuration may be required (depending on settings)
Step 5: View Calendar (Manager View)
The Calendar view provides a visual overview of team activity:
Navigate to the Calendar:
- Go to Boards > GOTime (in the left navigation)
- Or access from the hub menu
Calendar Features:
- Heat Map: Visual representation of time logged per day
- Date Range: Adjust the period using the period settings (default: last 14 days)
- Work Items Display: See work items with time entries for each day
- Color Coding: Different colors indicate activity levels
- Filter by Project: Focus on specific projects (if multiple projects)
Using the Calendar:
- Hover over dates to see details
- Click on dates to view work items with time entries
- Use the period settings to adjust the date range
- Export data if needed
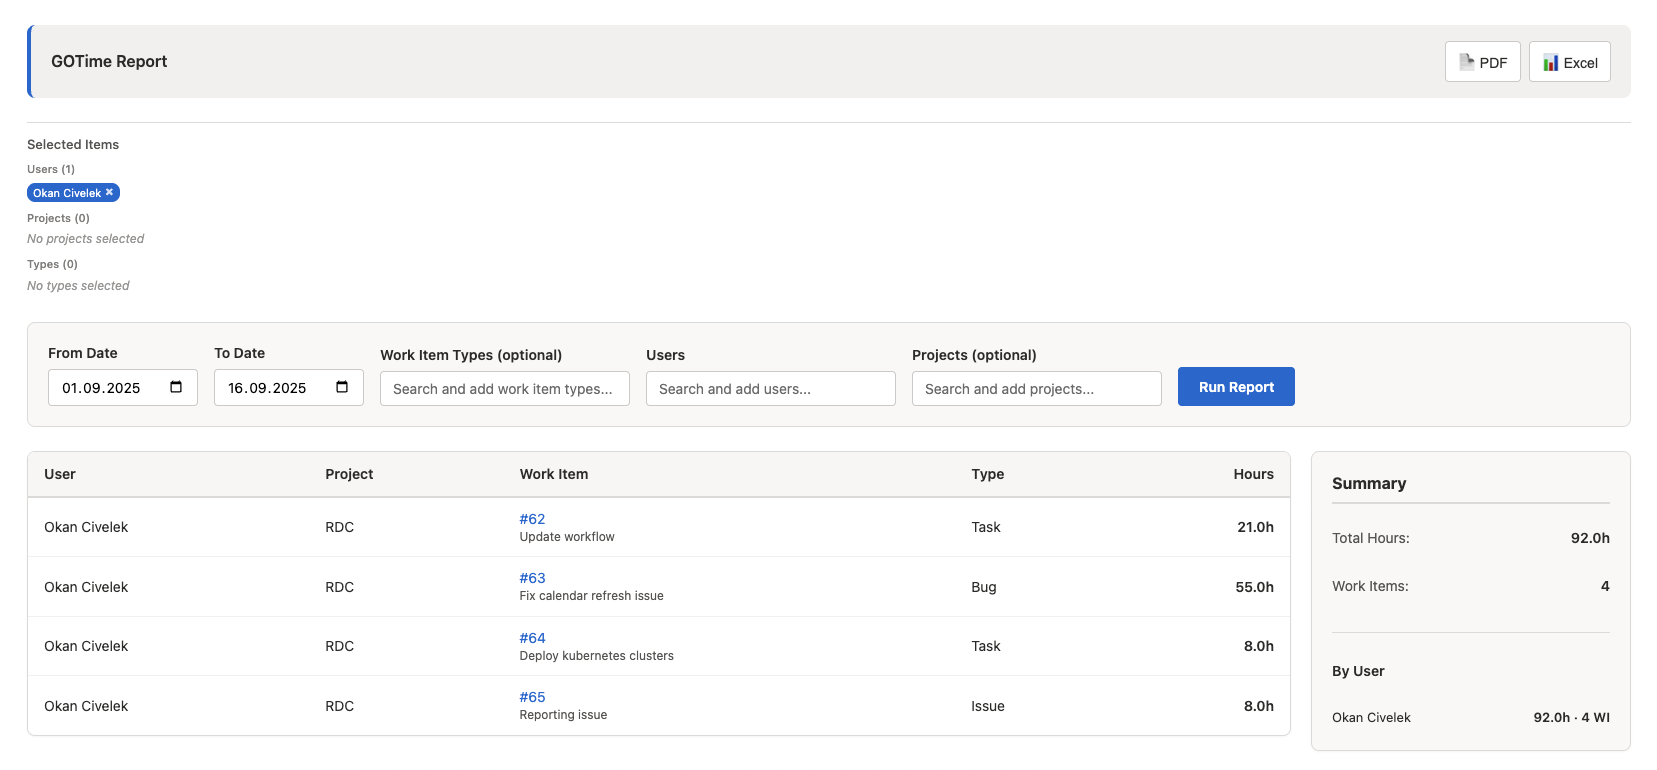
Step 6: Generate Reports
Generate comprehensive time tracking reports:
Navigate to Reports:
- Go to Boards > GOTime Report (in the left navigation)
Configure Report Parameters:
- Date Range: Select start and end dates
- Users: Select specific users or all users
- Projects: Optionally filter by specific projects
Run the Report:
- Click "Run Report" to generate the report
- View summary statistics:
- Total hours by user
- Total hours by project
- Daily breakdowns
- Work item summaries
Export Reports:
- Export to Excel or PDF format
- Share with stakeholders
- Use for billing, project tracking, or resource planning
Step 7: Manage Data (Administrators)
Administrators can manage time tracking data:
Export All Data:
- Export all time logs and settings as JSON
- Useful for backup or migration purposes
- Includes all time entries, settings, and metadata
Import Data:
- Import previously exported data
- Restore from backup
- Migrate data between organizations
Delete All Time Logs (Use with caution):
- Permanently delete all time logs and indexes
- Cannot be undone
- Requires confirmation
Capacity and Activity Management
Understanding Capacity
The extension integrates with Azure DevOps capacity planning:
- Daily Capacity: Based on your team's capacity settings in Azure DevOps
- Remaining Capacity: Shows how many hours you have left for the day
- Capacity Enforcement: Optional setting to enforce capacity limits
Effort Logging Without Capacity
You can configure the extension to allow effort logging even without capacity/activity configuration:
- Global Setting: Apply to all projects
- Project-Specific Setting: Override global setting for specific projects
- Restrictions Still Apply: Past dates and closed/completed work items are still blocked
Troubleshooting
License Issues
Problem: "License Invalid" or "License Error" message
Solutions:
- Verify your license is activated in Settings
- Check license expiration date
- Ensure you're using the correct organization/host
- Request a new demo license if expired
- Contact support@rdcpartner.com for assistance
Problem: "License already issued for these organizations/hosts"
Solutions:
- You already have an active license for this organization
- Check your license status in Settings
- If you need to regenerate, contact your administrator or support
Time Logging Issues
Problem: Cannot log time to a work item
Solutions:
- Check if the work item is assigned to you
- Verify the work item state is not blocked (Done, Closed, etc.)
- Check if you're trying to log to a past date (may be restricted)
- Verify capacity/activity settings (if enforcement is enabled)
- Check project-specific settings
Problem: "Limit exceeded" error
Solutions:
- You've reached your daily capacity limit
- Check your capacity settings in Azure DevOps
- Verify project daily capacity limits
- Consider adjusting capacity or effort logging settings
General Issues
Problem: Extension not appearing in navigation
Solutions:
- Refresh your browser
- Verify the extension is installed and enabled
- Check organization permissions
- Try logging out and back in
Problem: Data not loading
Solutions:
- Check your internet connection
- Verify license is active
- Clear browser cache
- Try a different browser
- Contact support if problem persists
Best Practices
For Administrators
- Configure Blocked States Early: Set up blocked states before team starts using the extension
- Set Capacity Settings: Configure team capacity in Azure DevOps for accurate tracking
- Review Settings Regularly: Periodically review effort logging and capacity settings
- Monitor Usage: Use reports to monitor team adoption and usage patterns
- Backup Data: Regularly export data for backup purposes
For Team Members
- Log Time Daily: Log time at the end of each day for accuracy
- Use Descriptive Notes: Add brief notes to time entries for clarity
- Check Capacity: Monitor your remaining capacity for the day
- Verify Work Item State: Ensure work items are in the correct state before logging
- Review Calendar: Regularly review the calendar view to track progress
Support and Resources
Make time tracking a habit teams actually keep—and decisions you can trust.
