HCL AppScan extension for Visual Studio 2022 and newer
Apply the power of static application security testing with HCL AppScan, as SaaS solution that identifies and helps to eliminate vulnerabilities from applications before they are deployed. HCL AppScan integrates directly into the SDLC for static and open source security testing.
HCL AppScan Visual Studio extension allows users to scan their source code early in development lifecycle using the HCL CodeSweep integration. CodeSweep scan results can be marked as noise or remediated using the quick-fix feature. A rules panel enables users to view all supported rules and either disable or enable these rules. HCL AppScan Visual Studio extension also allows users to view fix groups and scan data, and initiate security scans from HCL AppScan on Cloud and HCL AppScan 360° applications.
Not yet an HCL AppScan customer? Start a free trial.
Prerequisites
Before installing the extension, ensure the target system meets these requirements:
- Windows: AMD64
- Java Runtime (JRE) 17 or higher.
- Microsoft Visual Studio Enterprise/Community/Professional 2022 or newer
Installation
To install the HCL AppScan for Visual Studio extension:
- Click on Download button on this page.
- Alternatively, you can also download the extension from within Visual Studio IDE via Extensions->Manage Extension. Search for HCL AppScan and select Download.
- Double-click on installer.
- Restart Visual Studio to activate the extension.
- Once you install the HCL AppScan extension, HCL AppScan option is available on the View menu in Visual Studio (View->HCL AppScan).
What's new in HCL AppScan extension for Visual Studio
2.5.2 (2025-12-15)
- Support for displaying cmd+ctrl training links within How To Fix articles
- Support for Secrets scanning
- Support for Visual Studio 2026
- Bug fixes
2.5.1 (2024-12-18)
- Enhanced functionality in the My Scans tab
- Bug fixes
2.5 (2024-09-30)
- Initiate SAST and SCA scans on HCL AppScan on Cloud or SAST scans on HCL AppScan 360° from within IDE.
- View initiated scans within IDE in new "My Scans" tab.
- Bug fixes.
2.4 (2024-06-24)
- Included support for AppScan 360°.
- Provided option to update status of Fix groups & Issues from the Visual Studio directly.
- Bug fixes.
2.3 (2024-03-21)
- Migration to version 4 of ASoC REST APIs.
- Support to import SCA scans information from HCL AppScan on Cloud applications.
- Bug fixes.
2.2 (2023-12-21)
- View fix groups and scans data from HCL AppScan on Cloud applications.
2.1 (2023-09-05)
- Support for vulnerable code highlight.
2.0 (2023-07-01)
- HCL AppScan CodeSweep integration with support for scanning vulnerabilities in 35+ languages.
Extension configuration
Below settings are available for HCL AppScan Visual Studio extension under Tools->Options->HCL AppScan
AppScan on Cloud/AppScan 360° Configuration
You can connect HCL AppScan Visual Studio extension to HCL AppScan on Cloud/AppScan 360°.
To configure connection details:
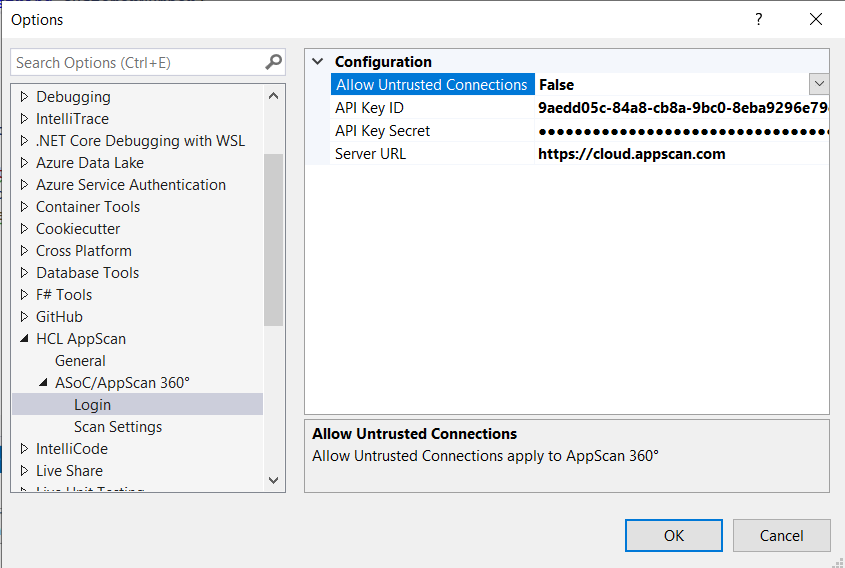
- Select Tools > Options > HCL AppScan > ASoC/AppScan 360° > Login.
- Provide the API Key ID and API Key Secret. If you don’t have
a Key ID/Secret, create one by following the steps
[here](https://help.hcl-software.com/appscan/ASoC/appseccloud_generate_api_key_cm.html).
- Verify the API Server URL.
By default the server URL is set to https://cloud.appscan.com. To connect to the ASoC EU server, set the server value to https://eu.cloud.appscan.com/.
- Check Allow Untrusted Connections to enable untrusted connection to AppScan 360° service.
- Click OK to save the credentials.
Once connected, issues that have been set to “Noise” in AppScan on Cloud/AppScan 360° are not shown in CodeSweep.
To remove the connection to AppScan on Cloud/AppScan 360°, remove the keyID and keySecret credentials and restart Visual Studio.
Manage Telemetry
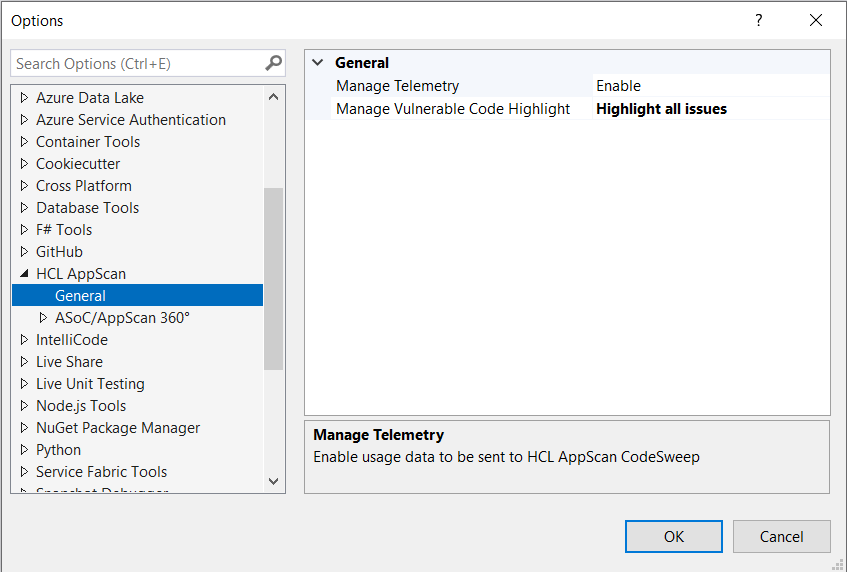
We are collecting telemetry data [rules ignored, rules info viewed, file types scanned] to give you a better user experience with our future releases. No information about specific issues is captured or stored. In case you want to opt out, please disable this option by navigating to Tools->Options->HCL AppScan->General->Manage Telemetry and choose "Disable".
Manage Vulnerable Code Highlight
This settings enables you to choose the code highlight option for issues identified in a scan.
To configure code highlight option:
- Go to Tools->Options->HCL AppScan->General->Manage Vulnerable Code Highlight.
Select the Don't highlight option if you don't want to highlight the vulnerable code in the editor on file save.
Select the Highlight all issues option if you want to highlight all the security issues in the file immediately after the file save.
Select the Highlight when selected option if you want to highlight the issue only when it is clicked in the findings table. This option is selected by default.

Scan Settings
To configure Scan Settings option:
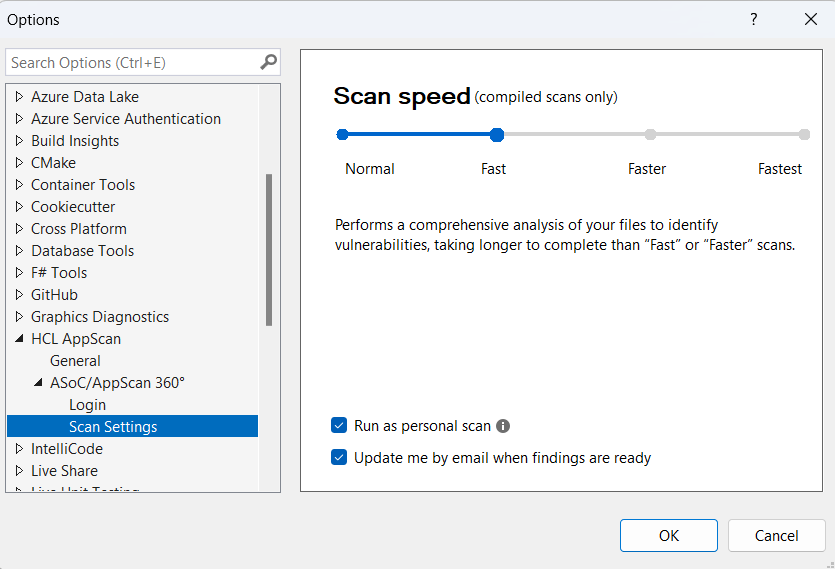
Go to Tools > Options > HCL AppScan > ASoC/AppScan 360° > Scan Settings.
Specify Scan Speed
Optimize scan speed and results according to development stage. Choose faster scans early in the development lifecycle to identify basic security issues; choose thorough scans later in the cycle to ensure complete coverage for your application.
- Normal: Performs a complete analysis of the code, identifying vulnerabilities in detail and differentiating issues that could be reported as false positives. This scan takes the longest to complete.
- Fast: Performs a comprehensive analysis of your files to identify vulnerabilities, taking longer to complete than "Faster" or "Fastest" scans.
- Faster: Provides a medium level of detail of analysis and identification of security issues. This scan takes more time to complete than the "Fastest" option.
- Fastest: Performs a surface-level analysis of your files to identify the most pressing issues for remediation, taking the least amount of time to complete.
Indicate whether to Run as a Personal Scan.
This option is selected by default and loads values from the Scan Settings.
Specify Email Notification.
You can be notified by email when the scan complete.
Getting Started
CodeSweep Users
- From the AppScan tool window, click the CodeSweep tab.
- If you are first time user, you see the CodeSweep welcome page. Save a file to display the findings table in the plugin.
- If you have already saved a file and there are findings reported by AppScan, those findings are displayed in the findings table in the plugin.
AppScan on Cloud/AppScan 360° users:
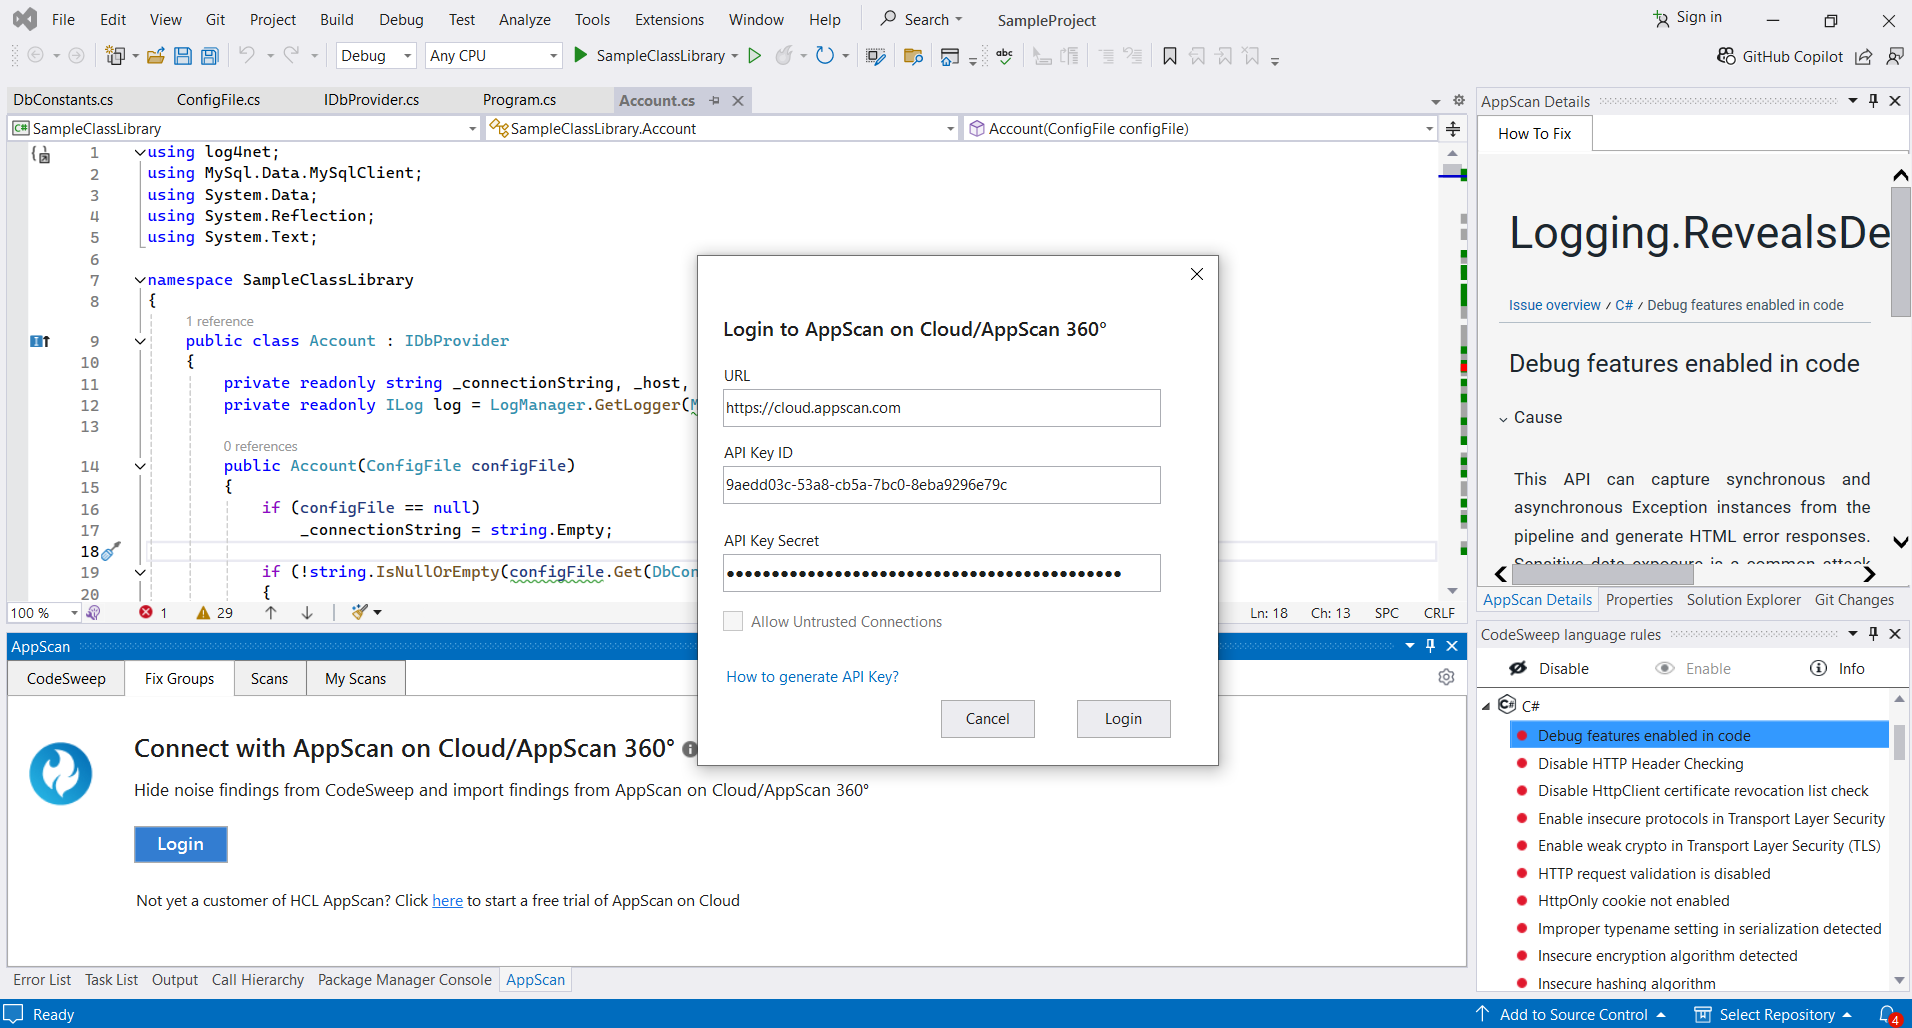
- From the AppScan tool window, click the Fix Groups or Scans tab.
- Click the Login button.
- Login to AppScan on Cloud/AppScan 360° using your key ID and secret.
- Select an application from the list presented.
Working with CodeSweep
CodeSweep Findings Table
- Severity - Issue Severity
- Issue Type - Click to open rule information in the How To Fix tab of AppScan Details tool window.
- Location - Line number where the issue is located. Click to navigate to that line location in the IDE pane.
- Auto fix - If available for the vulnerability, choose Select Auto fix from the drop-down menu.
- Mark as noise - Indicates it should be ignored. To unmark an issue as noise, click on Clear Status.
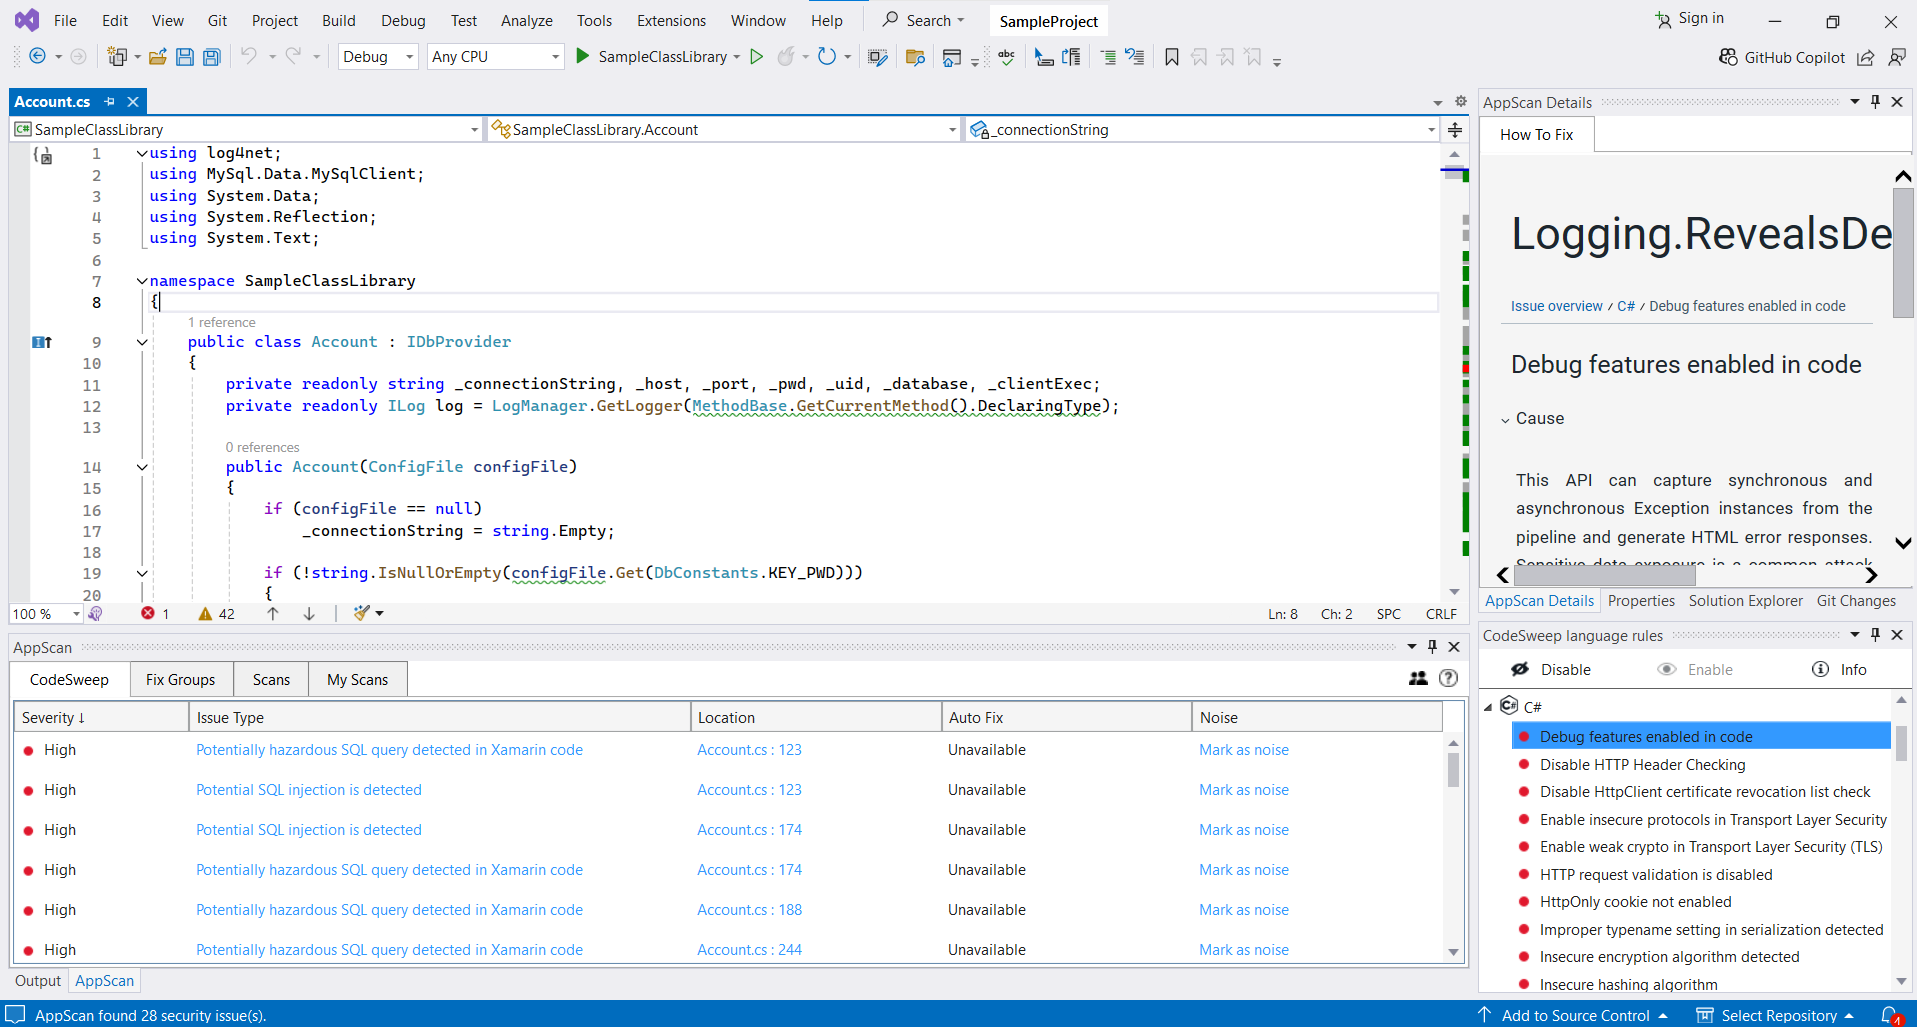
CodeSweep Findings operations
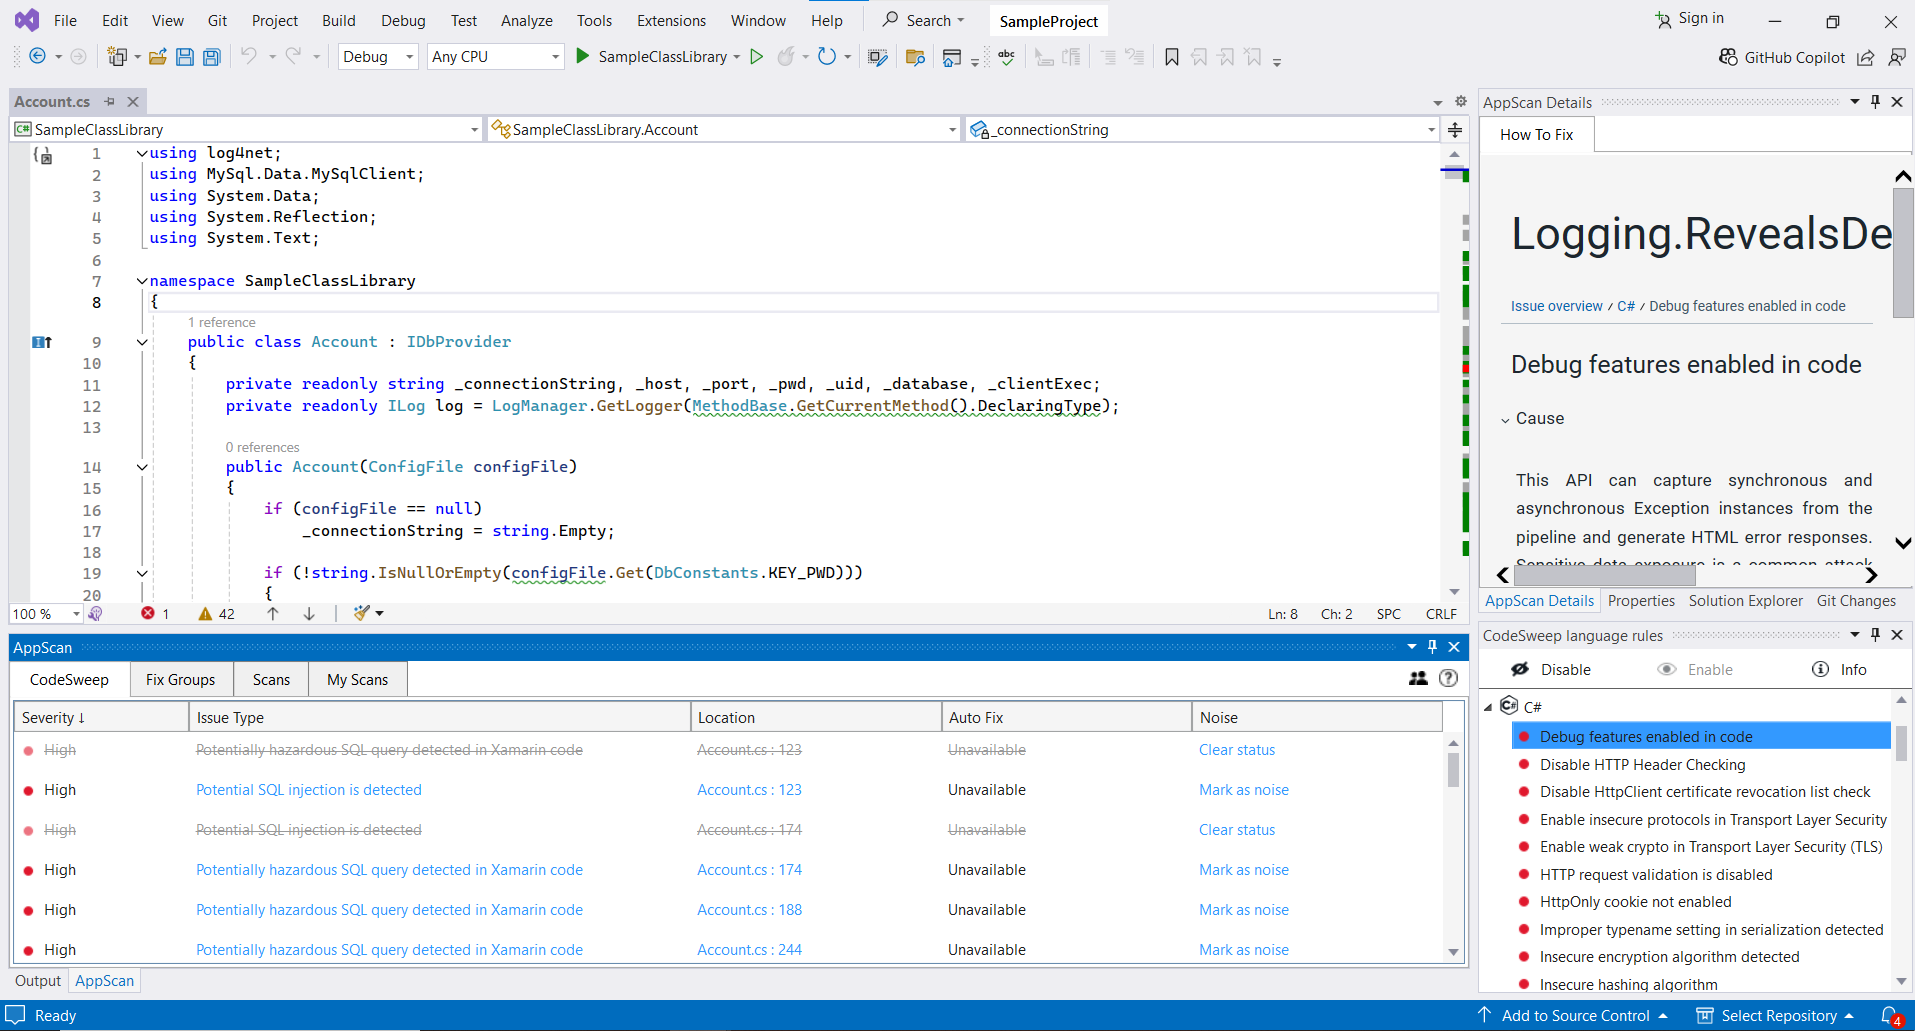
Marking an issue as “noise” indicates it should be ignored now and in the future; it will not be reported in future scans of the file. Issues marked as noise are strike through and greyed out until the next save of the corresponding file or an editor restart, whichever happens first.
To mark an issue as noise, click Mark as noise.
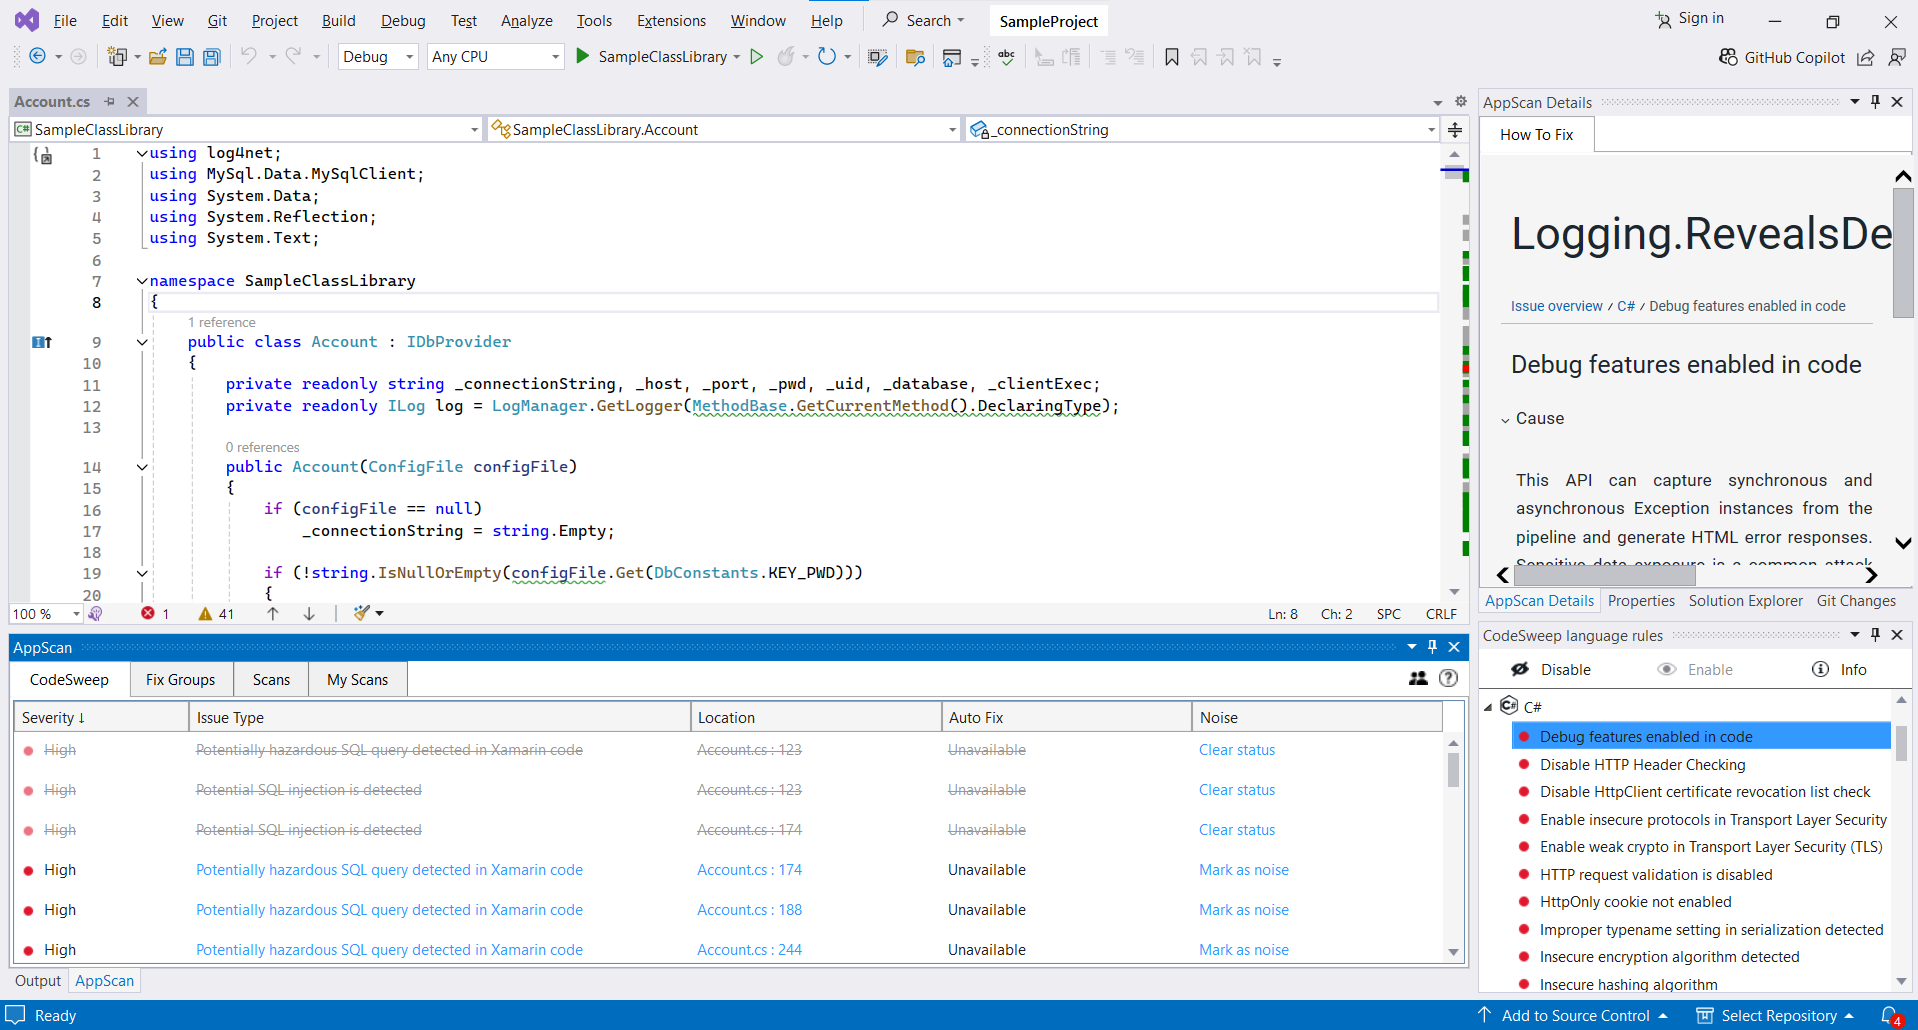
Unmarking an issue as noise ensures that the issue considered in future scans. You can clear the noise status only for issues marked as noise in the current session, provided the file has not been saved since being labelled as noise. To unmark an issue as noise, click Clear status.
CodeSweep Rules Panel
This view displays applicable rules grouped by supported programming languages. Within every group, the rules are ordered based on severity.
CodeSweep Rules operation
1. Disable Rule
Disabling a rule means it will not be considered for future scans. Once disabled, the rule name is annotated with the “Rule Disabled” label and the severity icon changes to note the disabled status. Once a rule is disabled, issues listed for a rule are no longer displayed.
To disable a rule, either:
- Select a single or multiple rules or single or multiple languages and click Disable.
- Right-click on rule and select Disable.
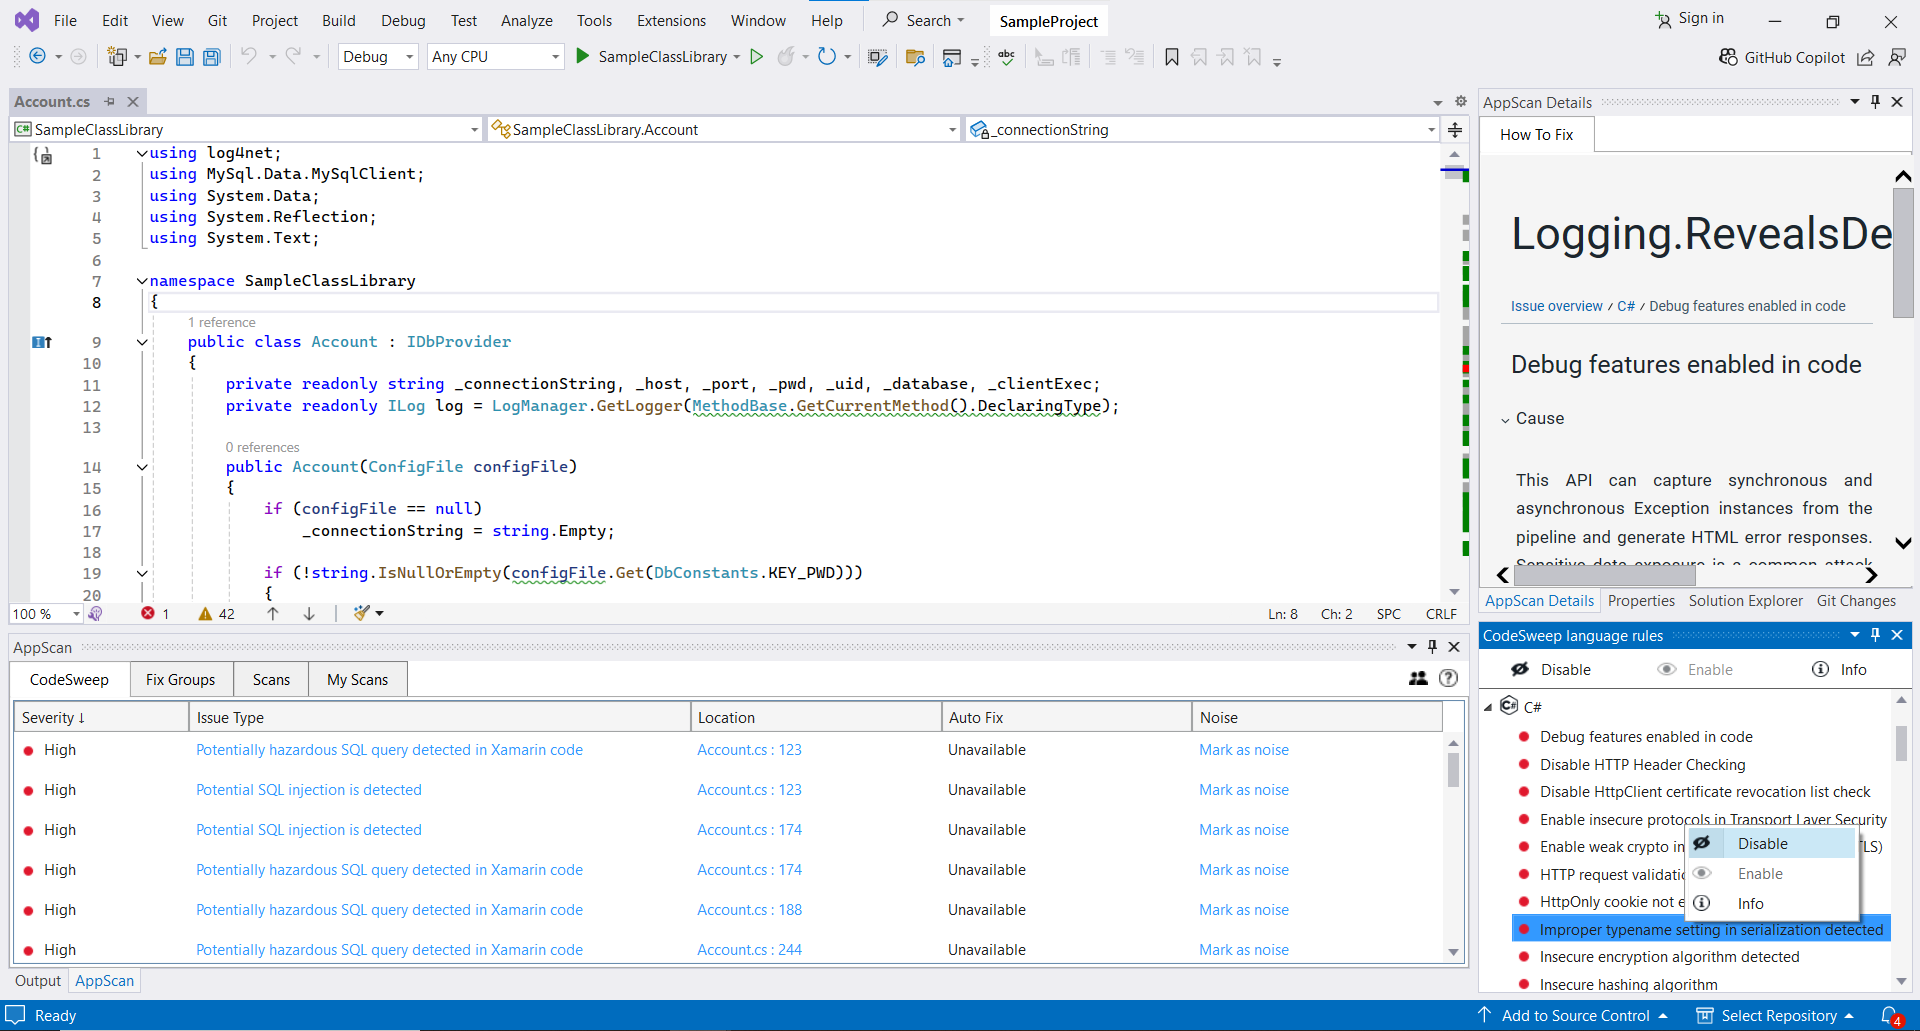
2. Enable Rule
Enabling a rule means that it will be considered for future scans. Enabling a rule will not display any issues belonging to that rule reported earlier in the same session; they are listed after you save a file which has issues corresponding to that rule.
To enable a rule, either:
- Select a single or multiple rules or single or multiple languages and click Enable.
- Right-click on rule and select Enable.
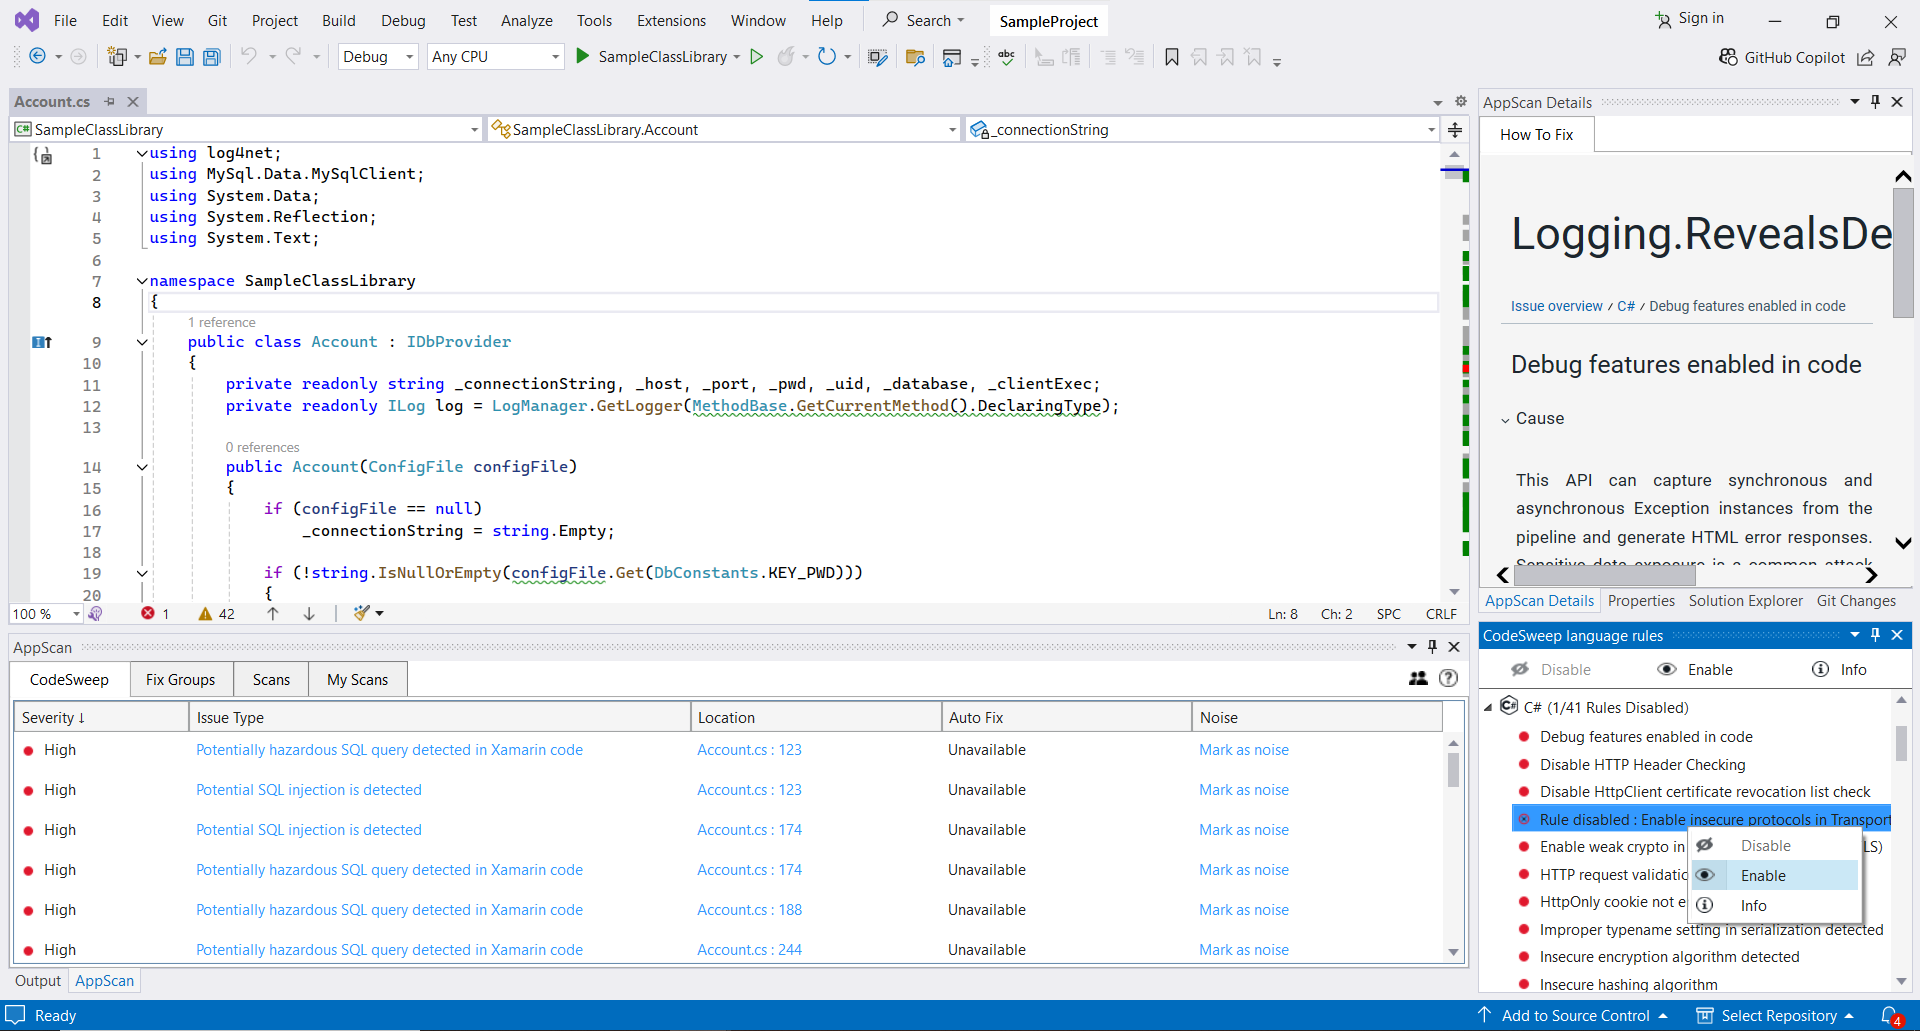
3. Rule Info
The AppScan Rule Info pane in Visual Studio displays relevant information both enabled and disabled rules.
To view the advisory and remediation information for a rule, either:
- Select a rule and click Info.
- Double-click on the rule.
- Right-click a rule and select Info.
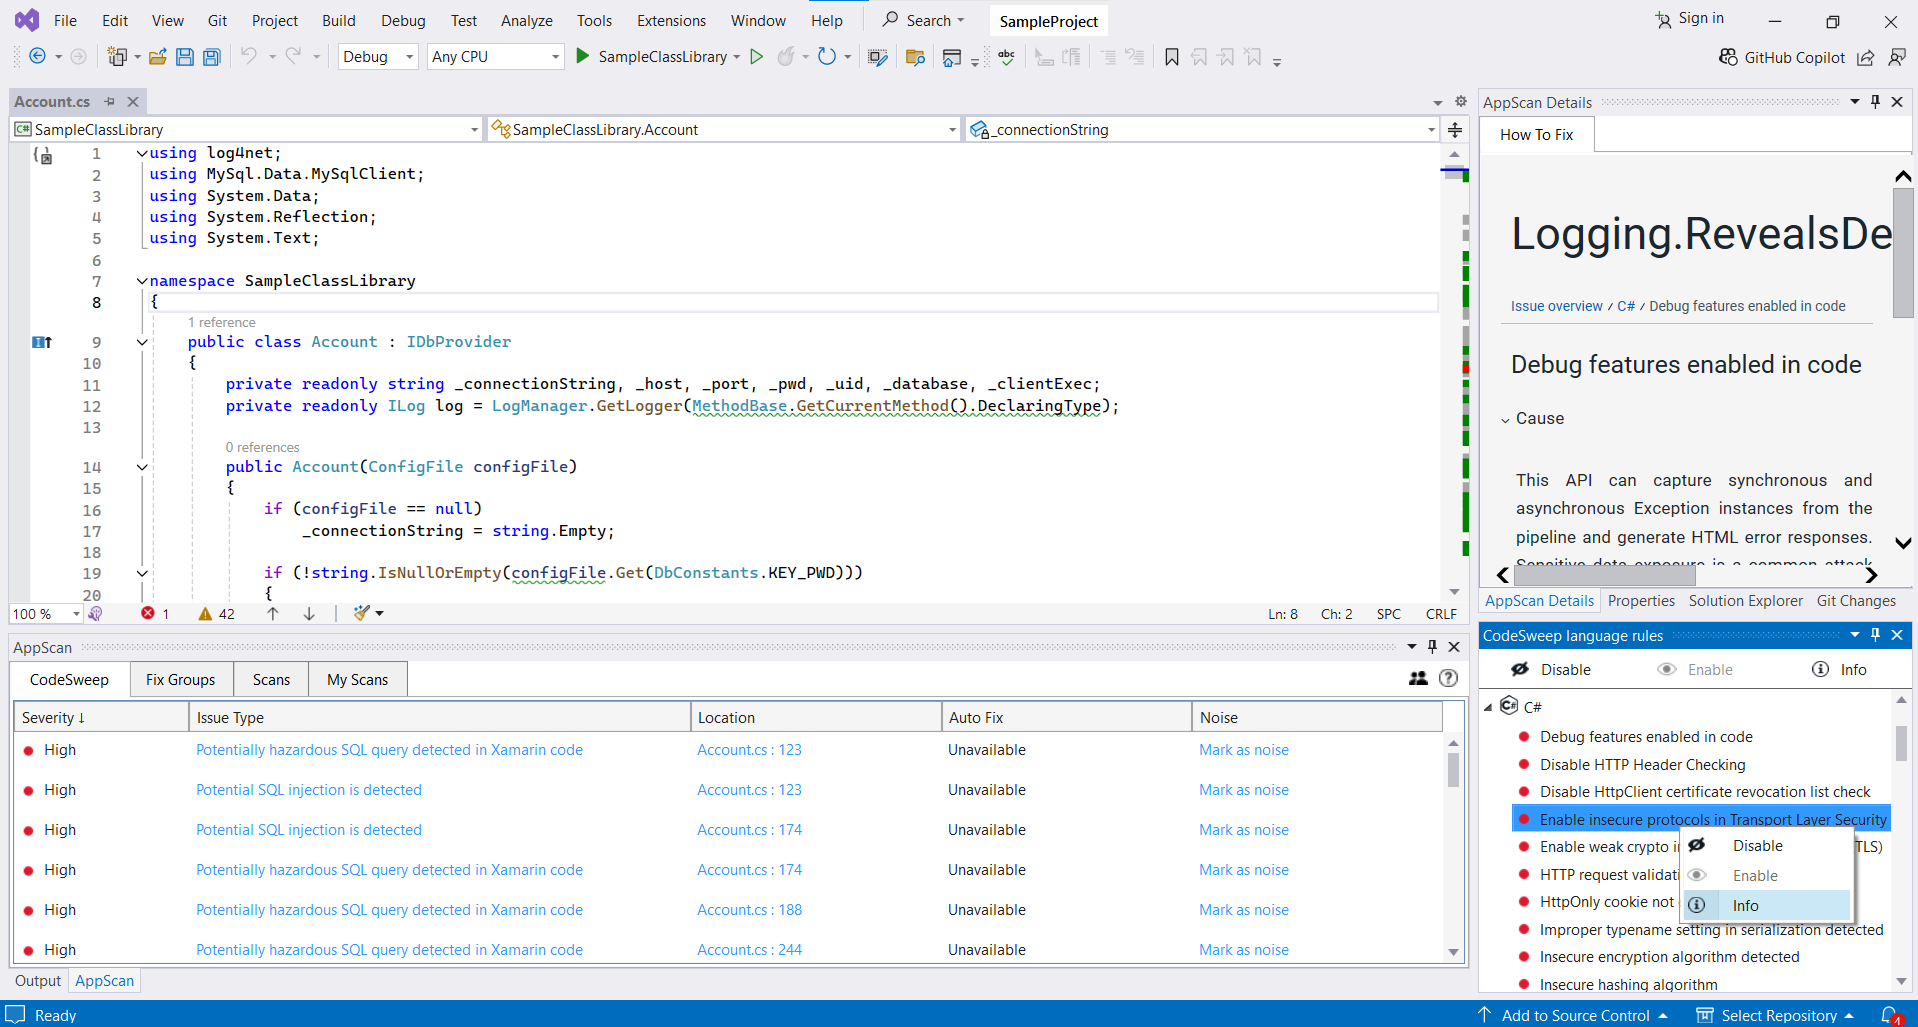
Working With Fix Groups, Scans And Issues
A fix group is a set of related issues that are grouped together based on common properties. Additional information about fix groups can be found here.
Once connected to HCL AppScan on Cloud, you can import fix groups and scans associated with selected application.
To view the issues within a fix group, click on the fix group entry on the Fix Groups tab. To view the issues within a scan, click on the scan entry and navigate to issues via the fix groups.
While viewing fix groups, the following links are available:
- Fix Group Type: Opens the Issues table
- Details: Opens the source file and moves the cursor to the line number for the given fix group. If the source file cannot be located in the currently open project, a browse dialog will be shown.
- Guidance: Provides details about the specific vulnerability and how to fix it in the code.
- Status: Modify the status of the fix group and optionally provide a comment. Status changes and comments are immediately reflected in AppScan on Cloud/AppScan 360°.
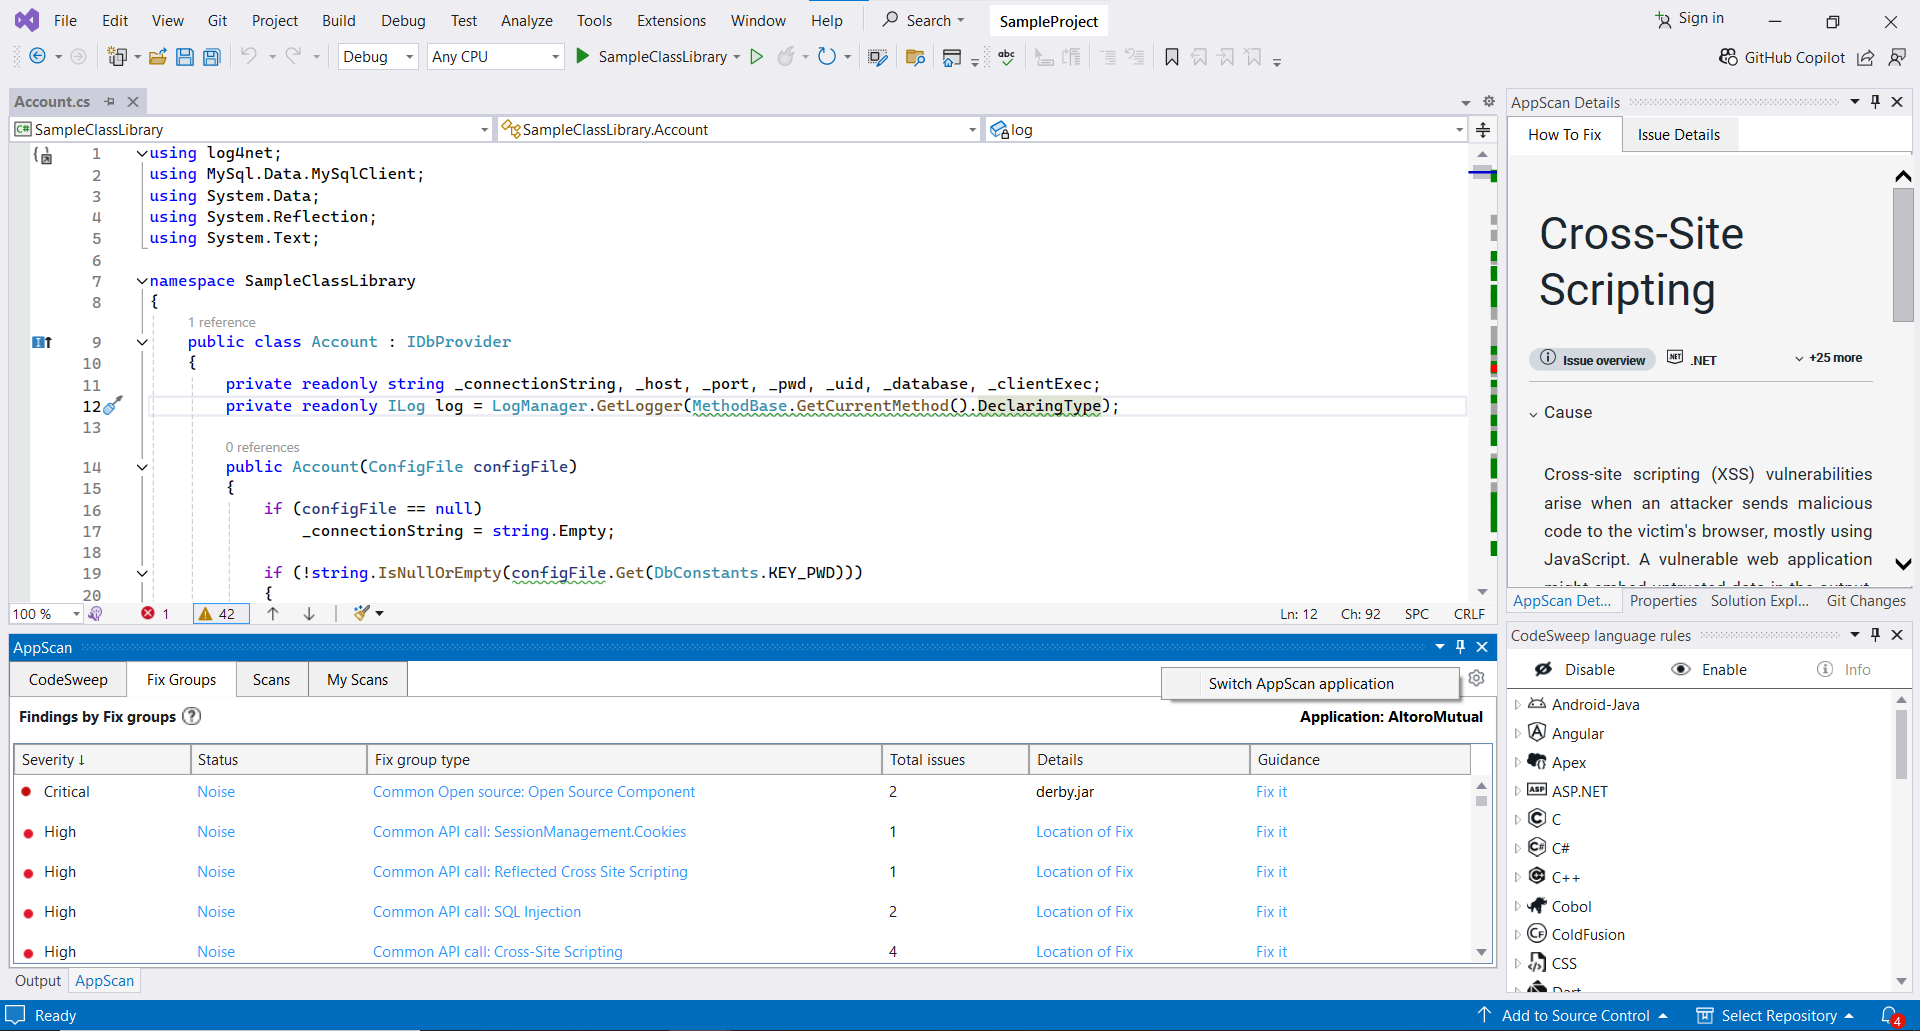
While editing fix group status, the following options are available:
- Status: Select the status to be updated. The available options are: Open, In Progress, Noise, Reopened, Passed, and Fixed.
- Comments: Add your comments for the status change
- Apply this to future issues automatically: Once checked the fix group status will automatically be applied to issues found in the future.
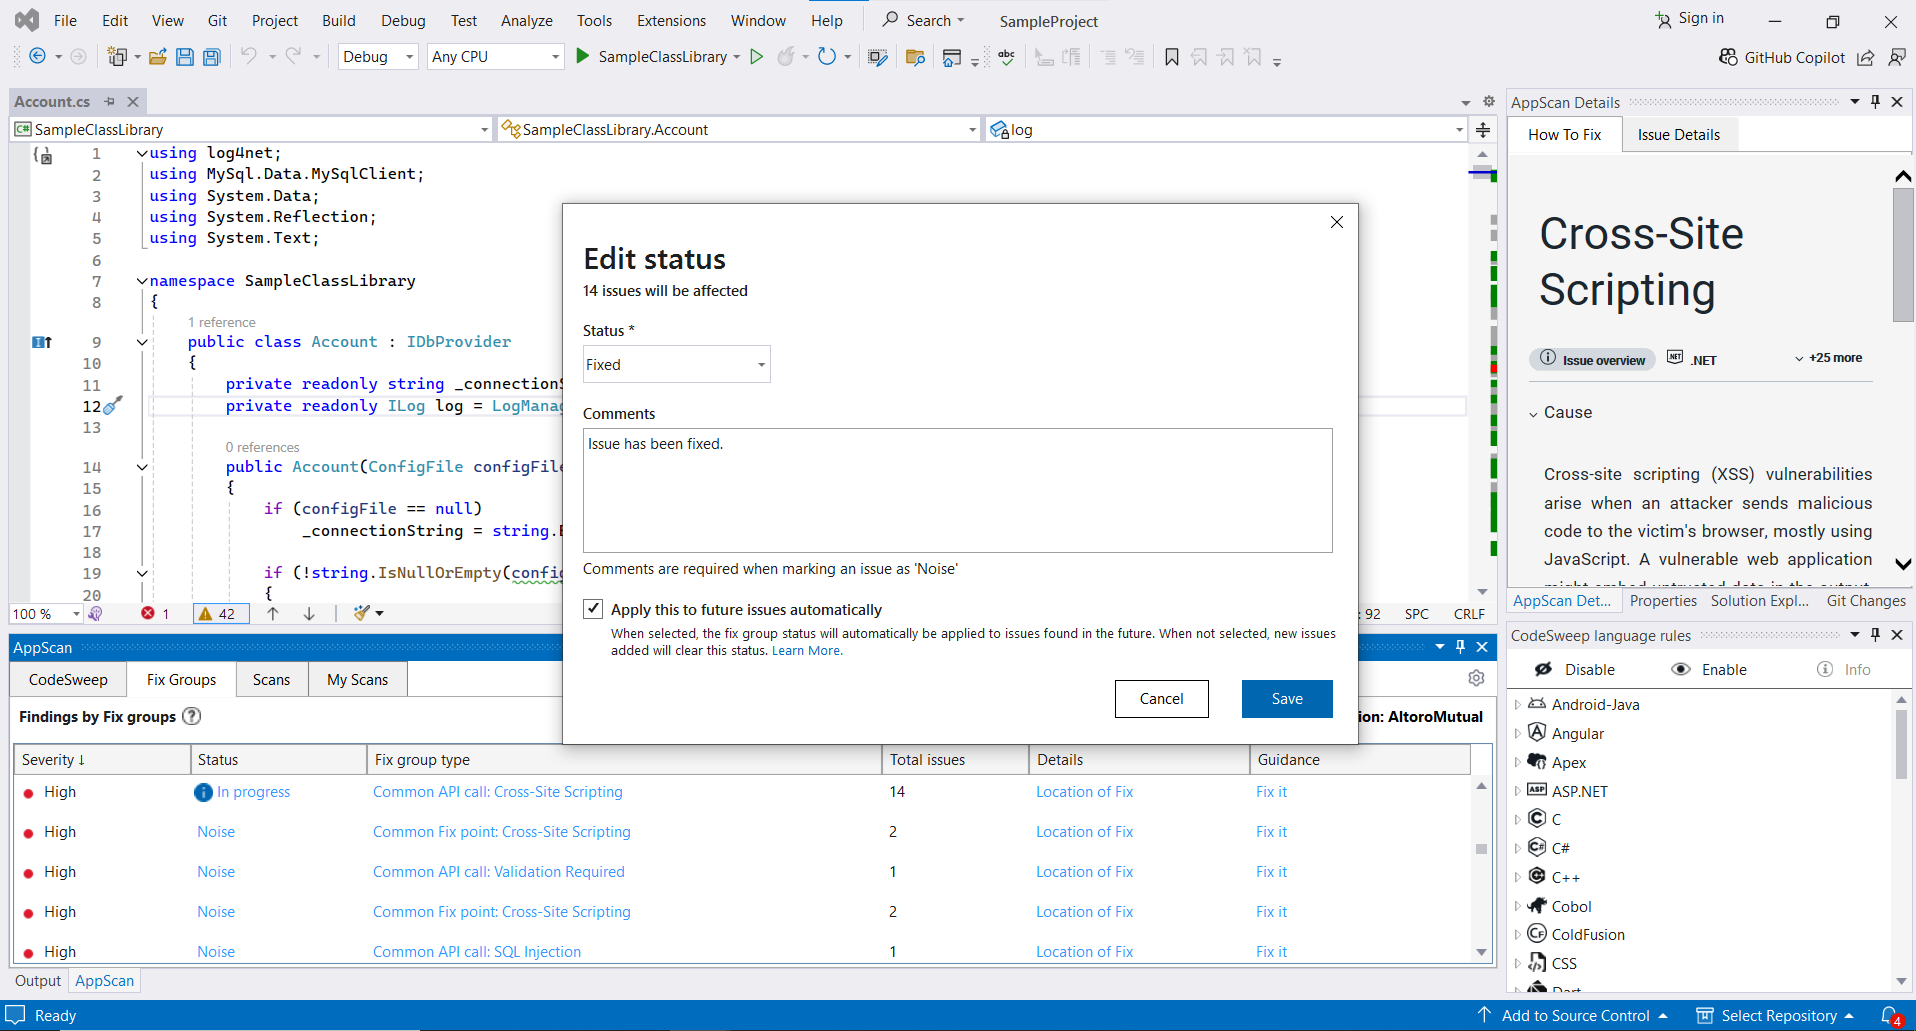
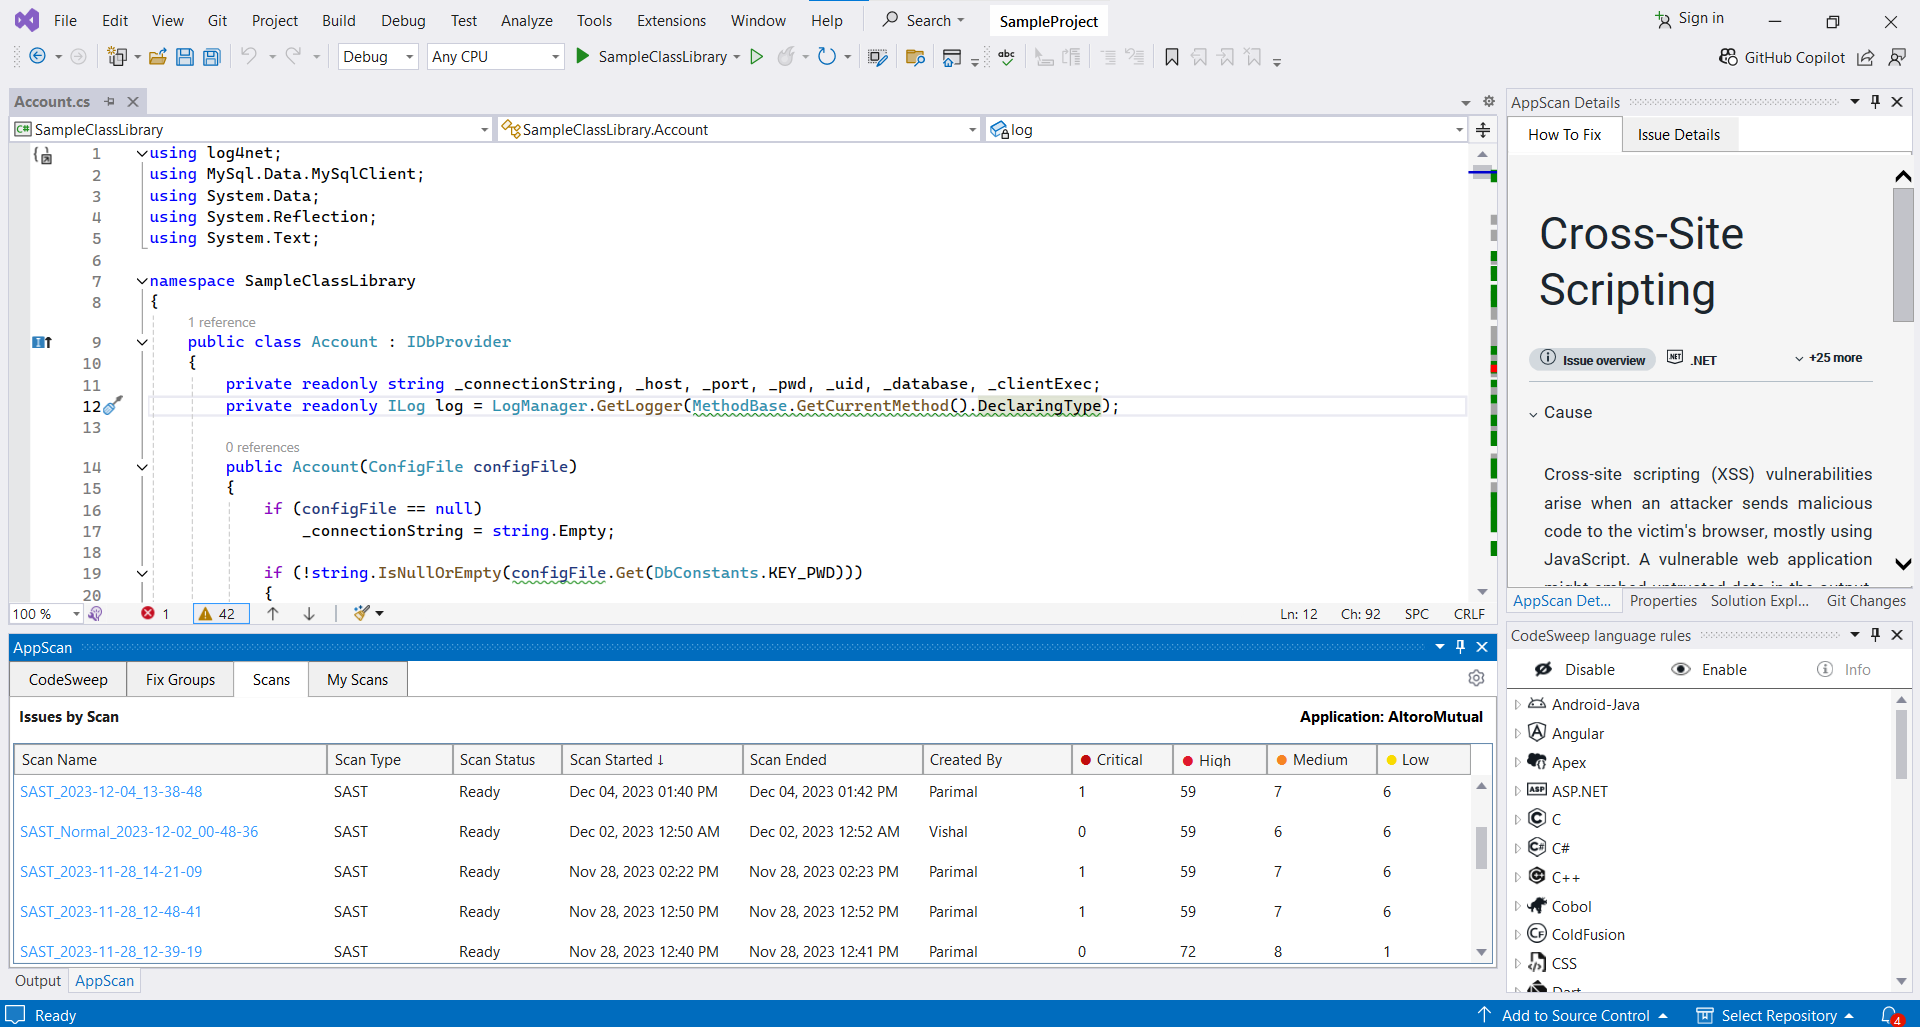
While viewing scans, the following links are available:
- Scan Name: Opens the Fix Group table.
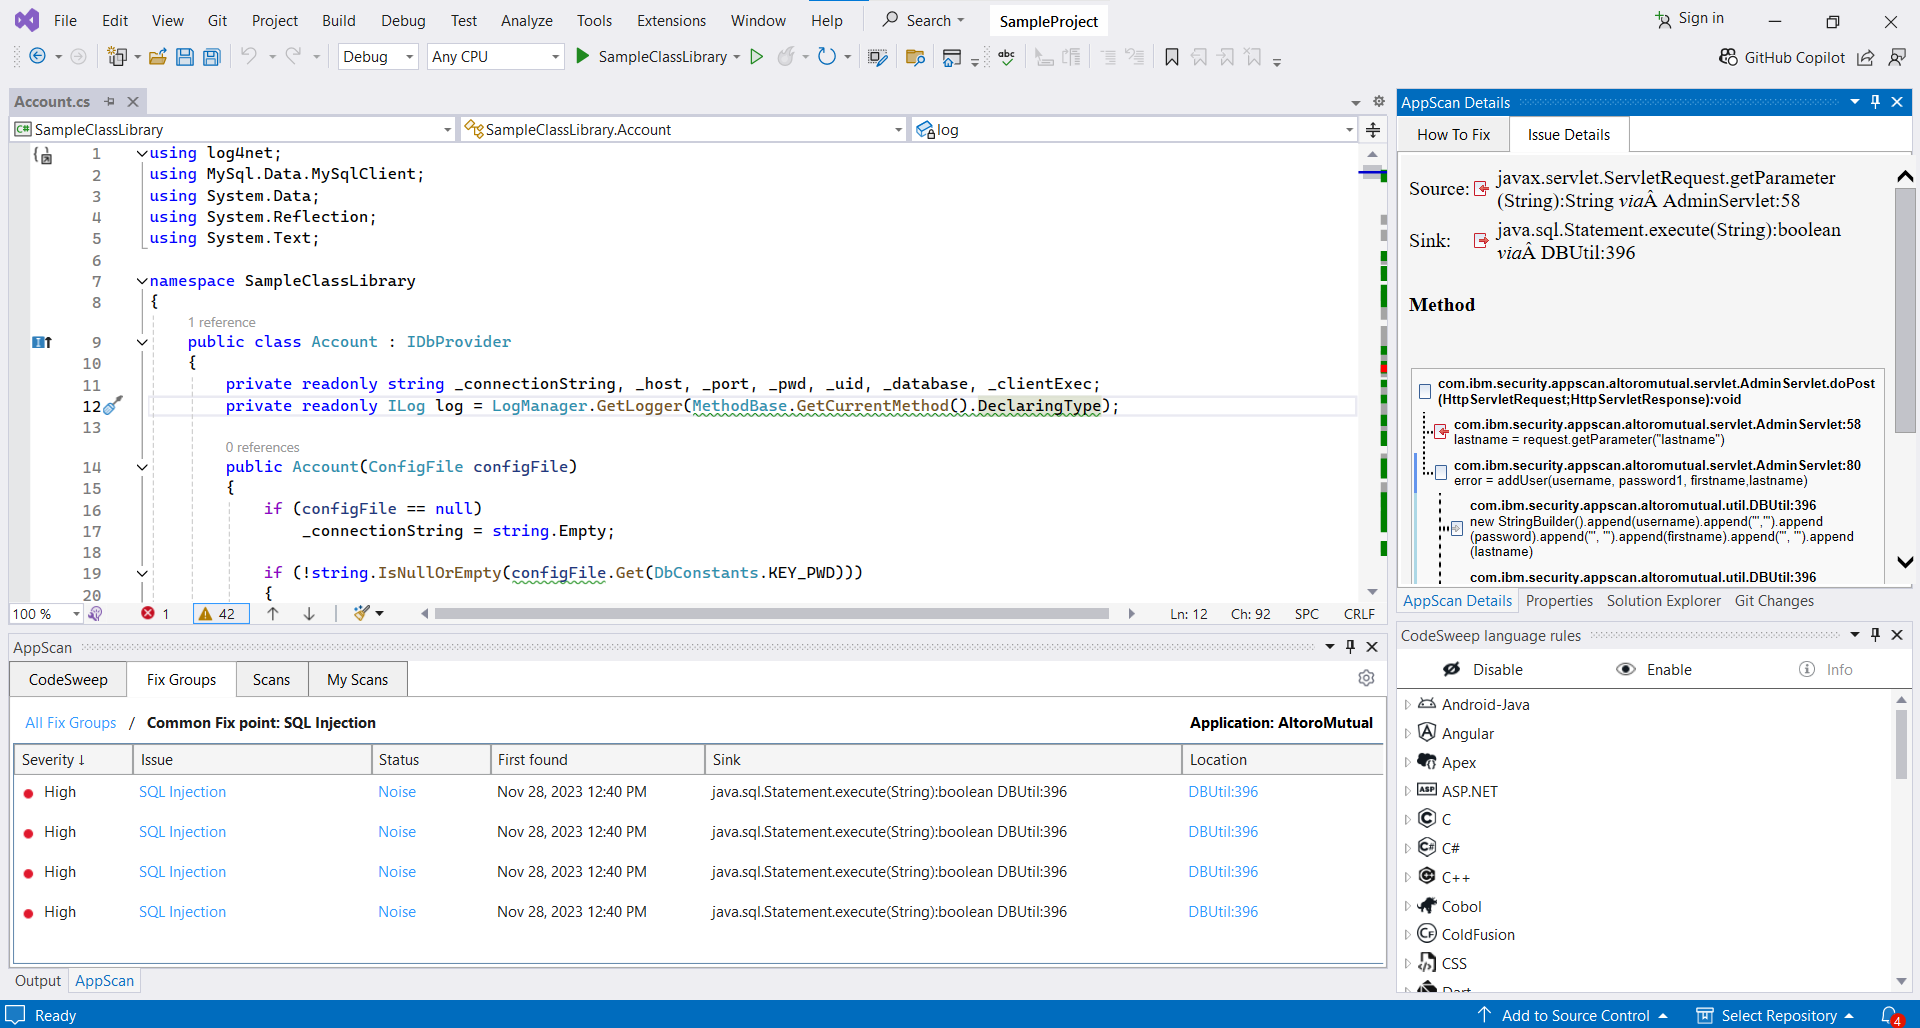
While viewing issues, the following links are available:
- Location: Opens the source file and moves the cursor to the line number for the given issue. If the source file cannot be located in the currently open project, a browse dialog will be shown.
- Issue: Opens the AppScan Details tool window. There are 2 tabs present:
- How To Fix: Provides details about the specific vulnerability and how to fix it in the code.
- Issue Details: Shows the path of tainted data through the application source code.
- Status: Modify the status of the issue and optionally provide a comment. Status changes and comments are immediately reflected in AppScan on Cloud/AppScan 360°.
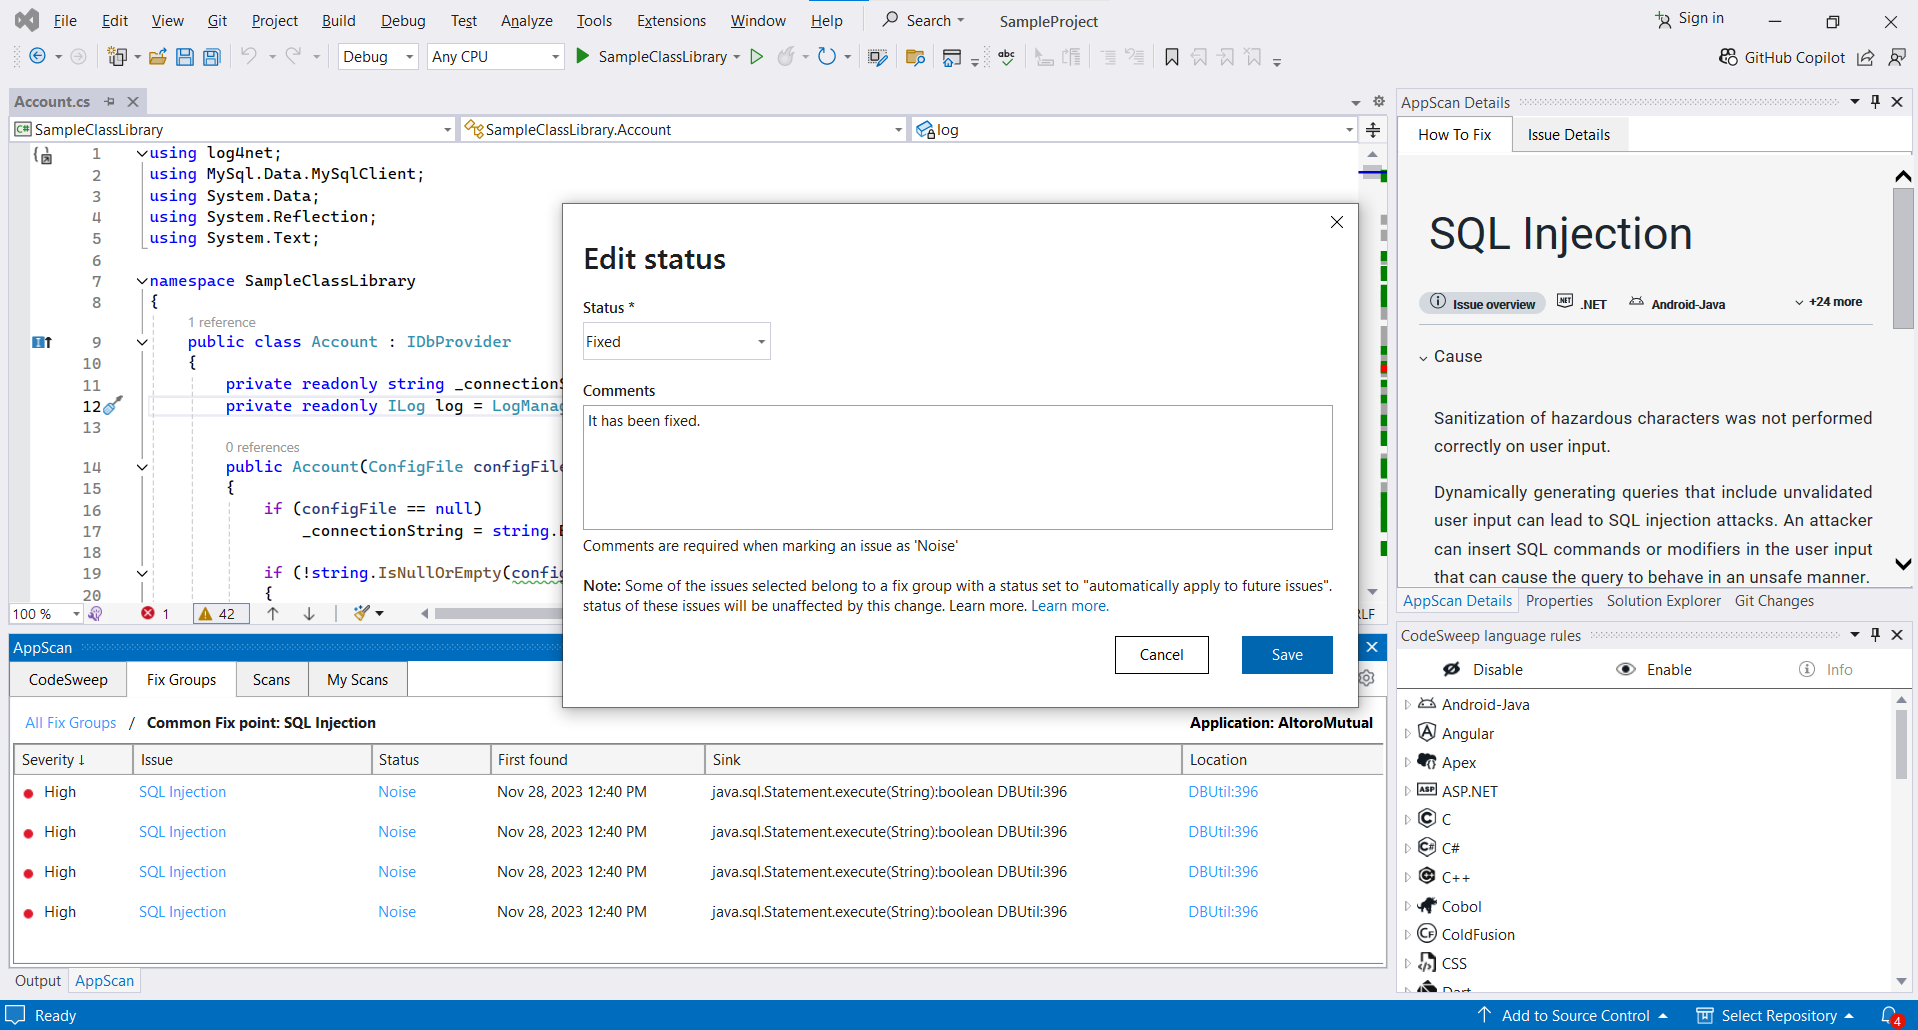
While editing issue status, the following options are available:
- Status: Select the status to be updated. The available options are: Open, In Progress, Noise, Reopened, Passed, and Fixed.
- Comments: Add your comments for the status change
Initiate Security Scan
A security scan can be initiated by selecting either a solution or specific project(s). This allows flexibility, as you can select one project or multiple projects to scan from the solution.
Below options are available to initiate a security scan:
Select menu option View > HCL AppScan > Initiate Security Scan
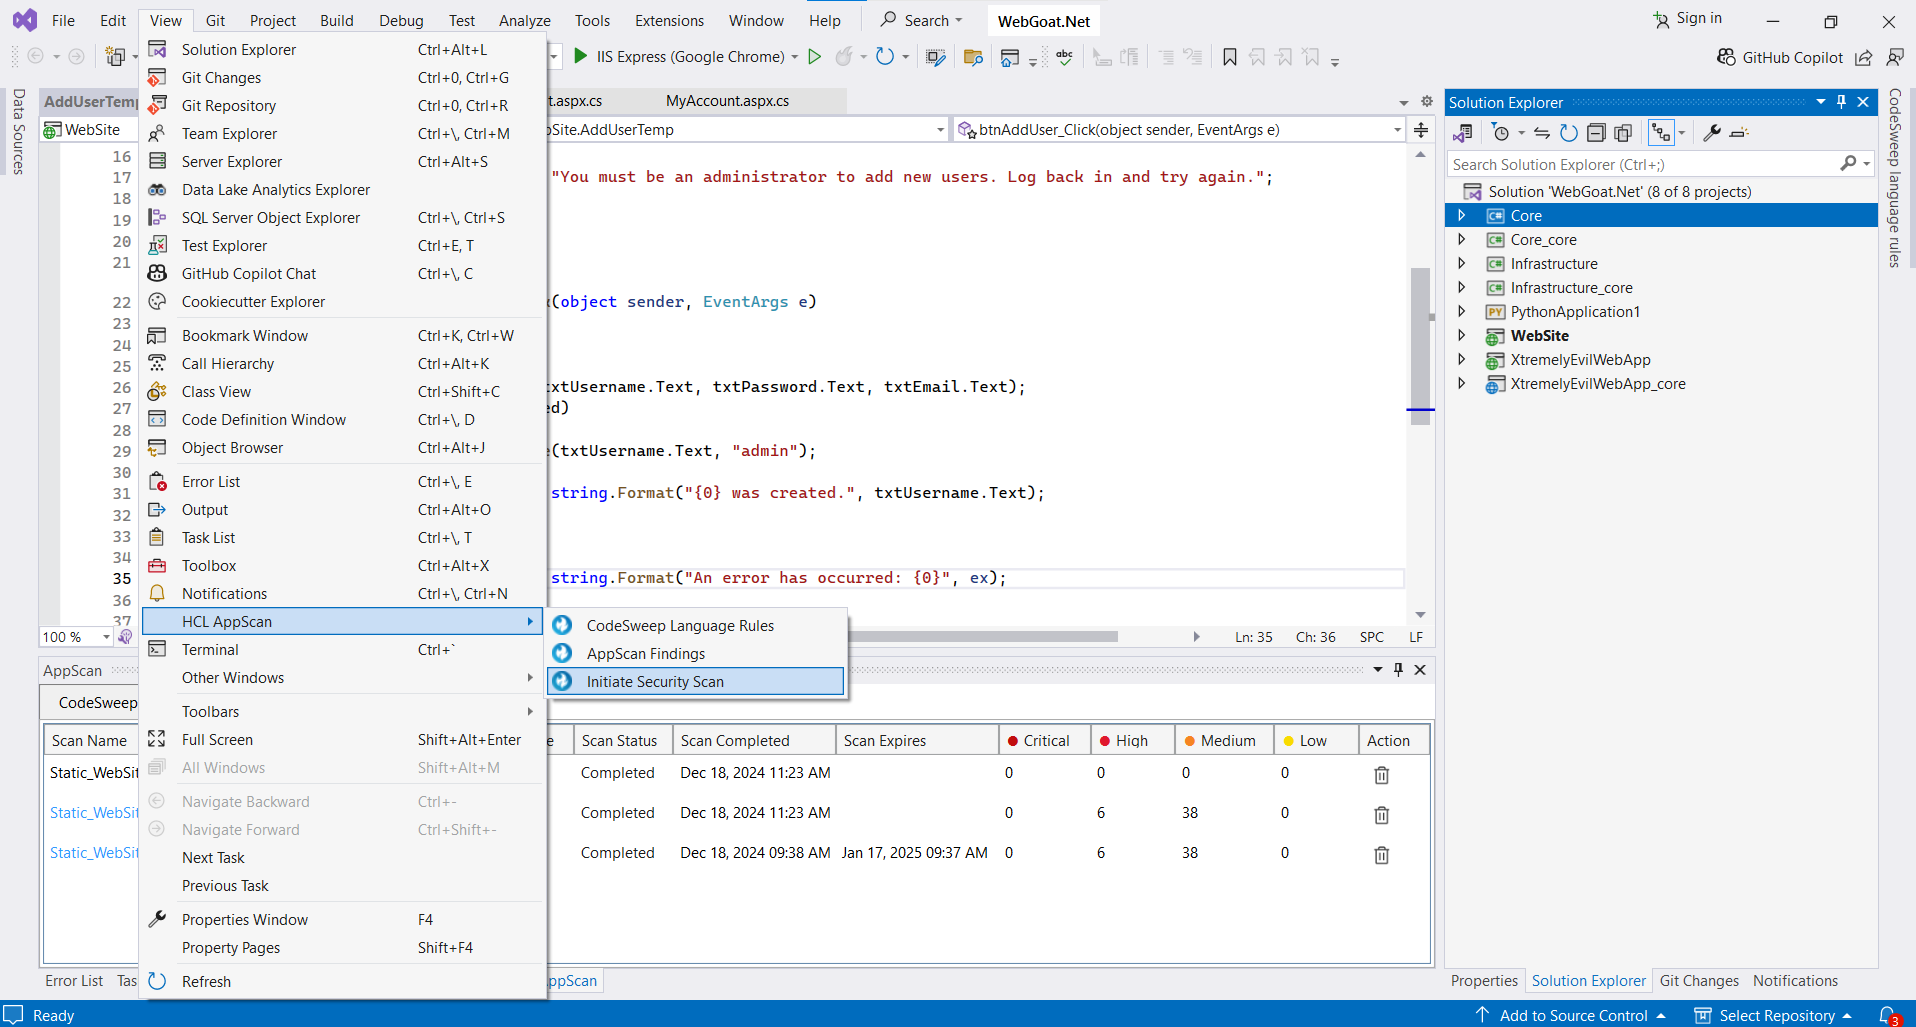
Right click on Solution/Project(s) > Initiate Security Scan
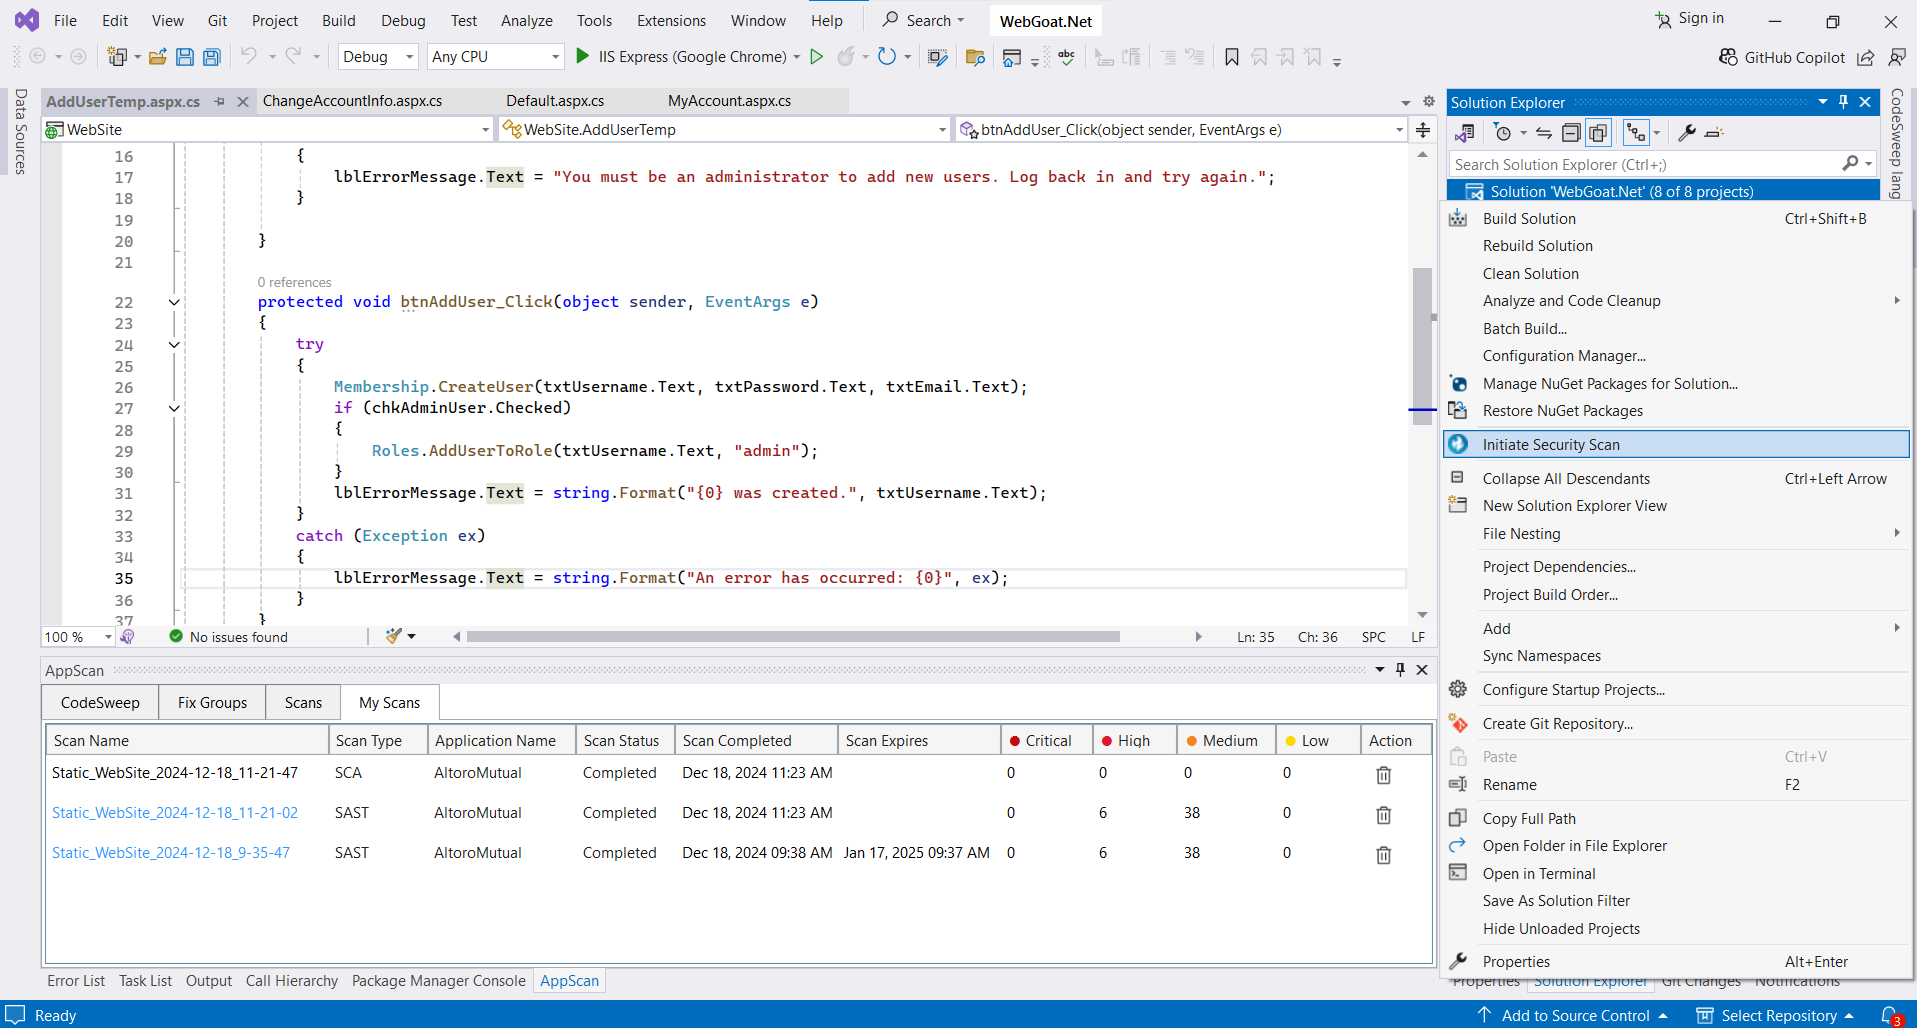
Below options are available to configure scan:
- Choose Scan Type: Static Analysis (SAST) or Software Composition Analysis (SCA)
- Enter a Scan Name.
- At Application Name, specify an application to associate with the scan.
By default, the previously selected application is chosen if a scan has already been initiated.
- Indicate whether to Run as a Personal Scan.
This option is selected by default and loads values from the Scan Settings.
- Specify Email Notification.
You can be notified by email when the scan complete.
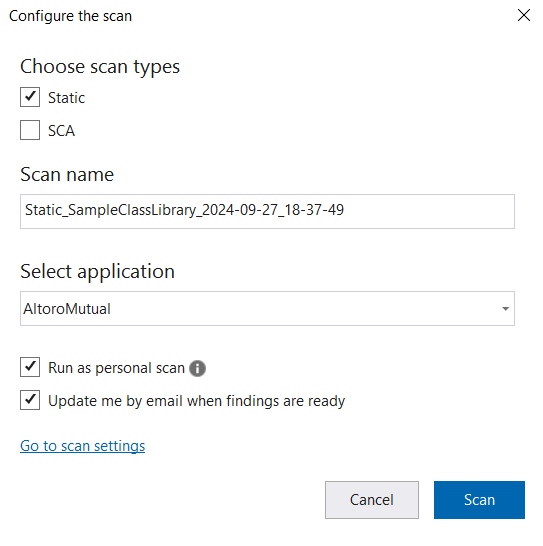
Security scan will be initiated once project(s) are built successfully.
My Scans
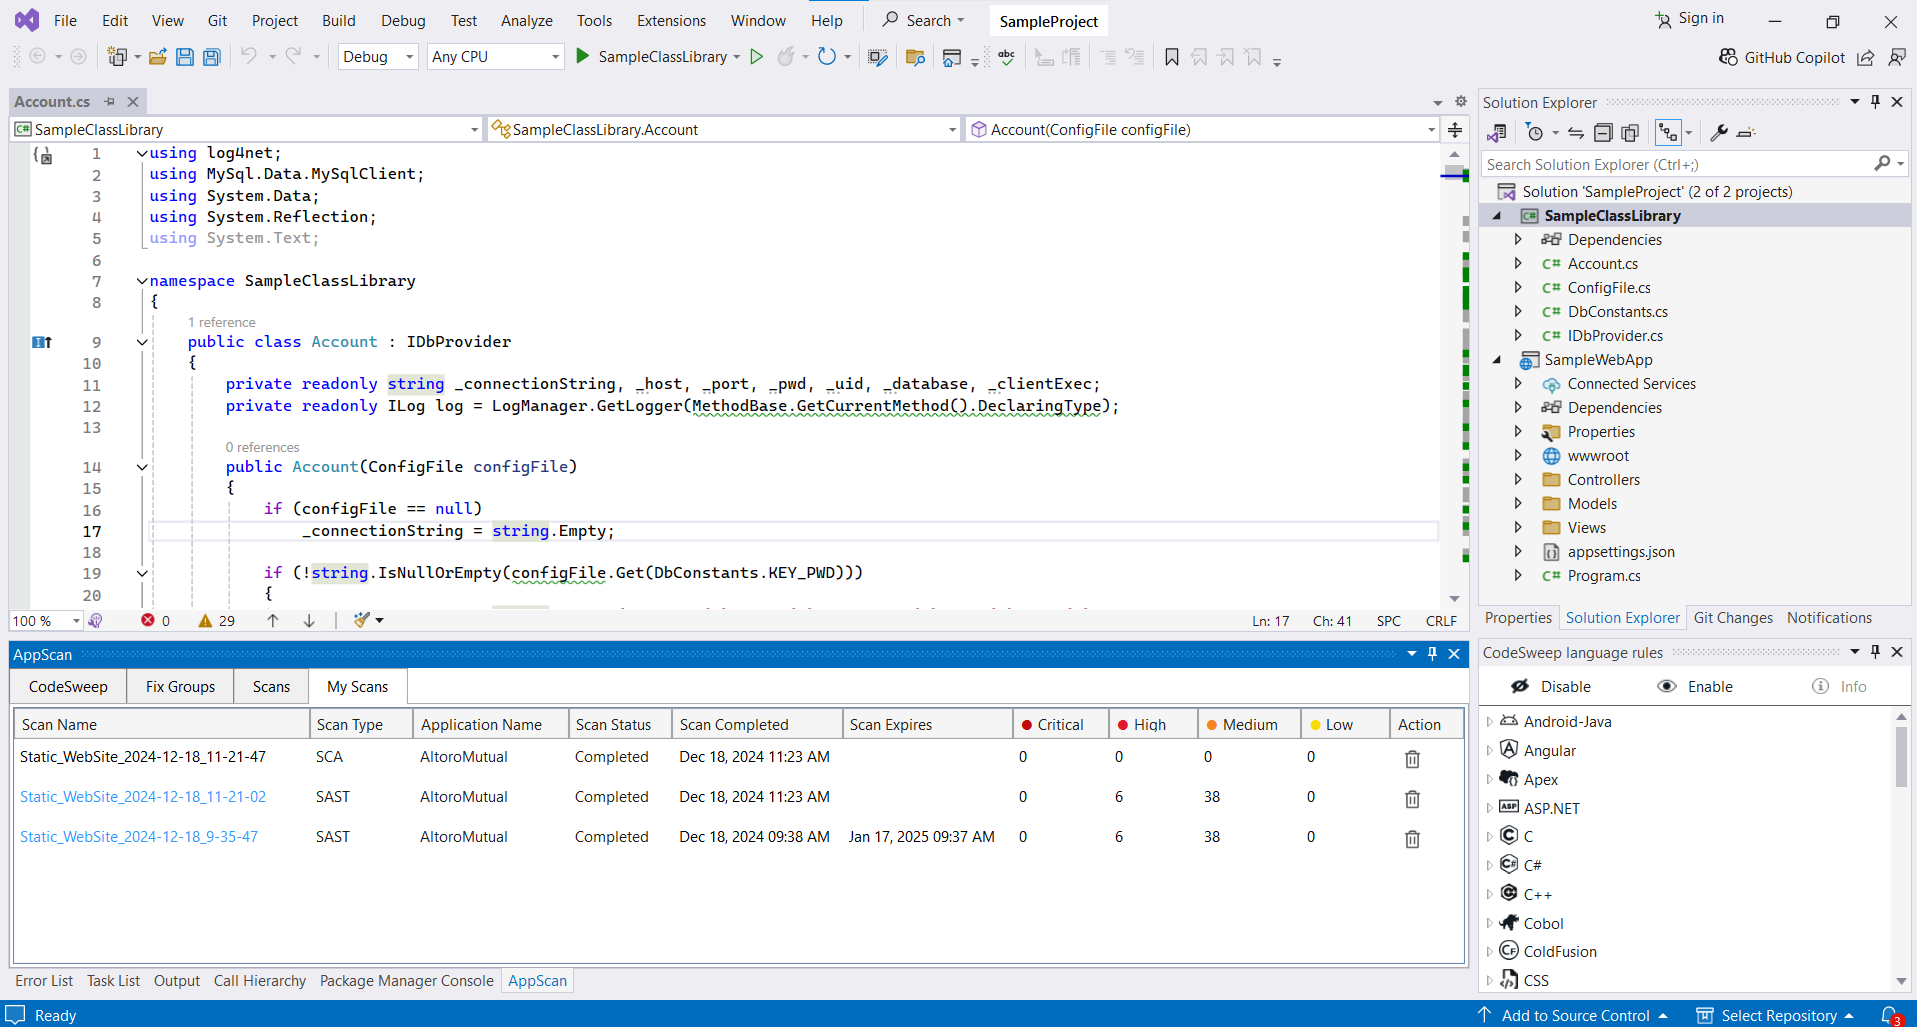
The My Scans tab displays the 20 most recent scans initiated in the current Visual Studio IDE project. Completed scans with vulnerabilities include clickable links to view detailed results in the Scans tab. The Delete option allows you to remove scan records from AppScan on Cloud or AppScan 360°.
Troubleshooting
- Unable to see HCL AppScan windows in the IDE. Go to View->HCL AppScan and click on AppScan Findings and CodeSweep Rules windows.
- If rules are not displayed in "CodeSweep language rules" view, close the view and reopen it from View->HCL AppScan->CodeSweep Language Rules.
Known issues
- Issues encountered in visual display of UI elements in HCL AppScan Extension in Dark theme are known bugs and will be fixed in upcoming releases.
Report feedback
Use the CodeSweep slack channel to report feedback or ask general questions about the extension.


