
LM LocalLM Local is an AI coding assistant for Visual Studio 2022/2026 with agentic capabilities. It works with local engines (LM Studio, Ollama, Jan, Llama.cpp, Unsloth) and cloud providers (OpenAI-compatible APIs). You can ask it to edit code, run builds/tests, and apply changes in ... |


🤖 LM LocalLM Local is an AI coding assistant for Visual Studio 2022/2026 with agentic capabilities. It works with local engines (LM Studio, Ollama, Jan, Llama.cpp, Unsloth) and cloud providers (OpenAI-compatible APIs). You can ask it to edit code, run builds/tests, and apply changes in a multi-turn conversational flow, with specialized subagents extending its capabilities for complex tasks.
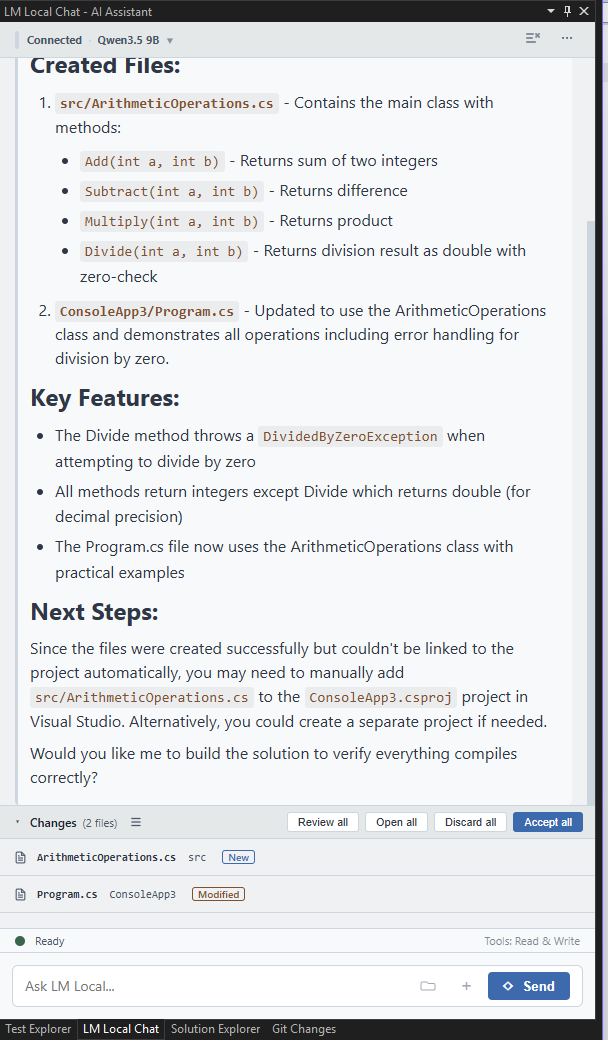
📸 Screenshots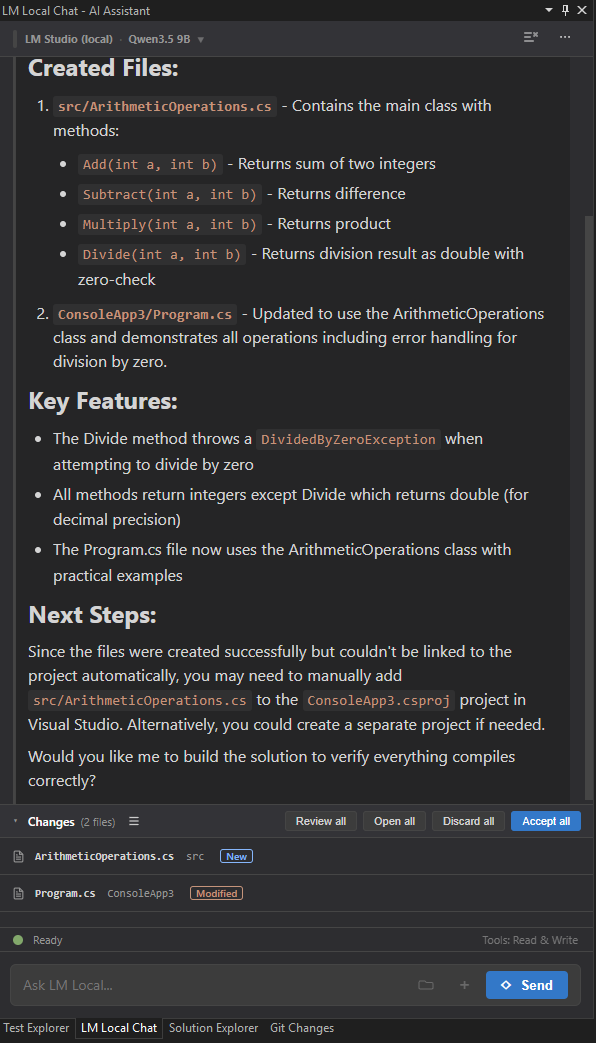
📖 Table of Contents
⚡ Core Features
🛠 RequirementsTo use LM Local, you need:
🚀 InstallationOption 1: Visual Studio Marketplace (Recommended)
Option 2: Manual VSIX
🏁 Getting StartedPart 1. Initial Setup (One-Time Configuration)
Part 2. How to Use the Chat
💡 Interface & Interaction Tips
✨ All featuresInterface & User Experience
Context & Solution Awareness
Efficiency & Token Management
Infrastructure & Settings
⚙️ ProvidersThe "Providers..." dialog allows you to create and save multiple provider profiles (servers) so you don't have to re-enter your API keys and base URLs every time. You can store as many profiles as you need, including both local servers (like Ollama running on your machine) and cloud remote services (like Groq, OpenAI, or Gemini).
Once configured, you can seamlessly switch between your saved profiles via the main settings.
Quick exampleHow to configure a custom remote endpoint and activate it inside the extension. Step 1: Create the Provider Profile
Step 2: Switch to the New Provider
Step 3: Select Your Model
🆓 Free to Try (Free Limited Tiers / Credits Available)
Limited availability
💳 Pay to Try (Commercial / Premium)
🗂️ ModelsThe Models dialog (menu
The Adjust Current button automatically finds or prepares a record for the currently active model. Additionally, you can configure the optional Instructions ( Built‑in AI ToolsThe built‑in tools let the AI read, edit, build, and test your code. You control which tools are enabled, can review all changes before accepting them and manually roll back any change. What you can controlIn Settings (two checkboxes):
In the Built‑in Tools… dialog (list of built‑in tools): Open edited files in editor (Beta)Settings > Open edited files in editor (Beta) - disabled by default. When enabled, Visual Studio activates the file that a tool has just created or modified, so you can review the result immediately.
List of built‑in tools
Changes panel – see what was changed and revert if neededWhen a tool edits a file, the changes are applied to the actual files in your solution. LM Local tracks all modified files and shows them in a collapsible Changes panel inside the chat window. This list persists across solution reloads and Visual Studio restarts, so you can always review what the AI did. The panel lets you:
🤖 Subagents (Beta, Advanced Users)Subagents are specialised AI "workers" that the main chat can invoke as tools. Each agent runs in an isolated loop with its own provider, model, system prompt, and toolset, returning a summary to the main conversation. Use subagents to:
Quick Start (Out of the Box)To start using subagents immediately:
Customization & Advanced Setup (Optional)If you want to customize your config or override the built-in defaults:
Predefined SubagentsOut of the box, LMLocal includes 7 predefined subagents optimized for different code-exploration and testing tasks:
Note / Troubleshooting
ConfigurationEdit Root-level fields ( Example (illustrative)ConfigurationUntil Root-level defaults (
|


| Field | Type | Required | Default | Notes |
|---|---|---|---|---|
id |
string | ✅ | — | unique, tool-name: [A-Za-z0-9_-]{1,64} |
displayName |
string | id |
shown in UI | |
description |
string | ✅ | — | shown to the model/user |
system |
string | — | overrides default system prompt | |
providerType |
string | root default | e.g. lmstudio |
|
customBaseUrl |
string | ✅ | root default | absolute URL; http://localhost:1234 for LM Studio |
customApiKey |
string | root default | ||
model |
string | ✅ | root default | required unless root model set |
temperature |
number [0..2] | root default | ||
timeoutSeconds |
int >=0 |
root default | 0 disables watchdog |
|
maxRounds |
int >=1 |
root default | tool-call loop cap | |
maxTokens |
int >=1 |
root default | output cap | |
reasoningEffort |
string | root default | none/low/medium/high |
|
parallel |
bool | false |
enable parallel grouping | |
maxParallel |
int >=1 |
root default | parallel width | |
enabled |
bool | true |
runtime gate | |
allowedTools[] |
string[] | [] |
built-in tool names; unknown → save rejected |
Common built-in tool names referenced by the default agents: get_solution_overview, list_directory, find_files, search_file_content, read_file_lines, get_active_document, get_symbol_info, get_symbol_info_js, inspect_type, build_solution, run_tests, search_chat_history, search_solution_knowledge.
Managing Agents
Open the Sub Agents dialog from the main menu.
- Enable / Disable – toggle individual agents or all at once.
- Use Active Model – copies the current main chat's model, provider, base URL, and API key into the root defaults. When clicked on an existing list, it overwrites every agent's
modeland updatesproviderType,customBaseUrl,customApiKeyonly on agents that already have those values. If the list is empty (no custom file), it first loads the 7 built-in defaults into the dialog. - Save behaves in two modes:
- Full replace – after loading built-ins into an empty list (Use Active Model on "No SubAgents configured"): the whole agent set is written, creating or replacing
subagents.json. - Partial update – when the dialog was opened from an existing custom file (flags toggled, or Use Active Model over existing agents): only the
enabledflags and root-level changes are written; all other JSON fields stay exactly as typed (inherited fields are not expanded).
- Full replace – after loading built-ins into an empty list (Use Active Model on "No SubAgents configured"): the whole agent set is written, creating or replacing
Enable subagent mode in the chat via the 's' toolbar icon or the "Enable Sub Agents" checkbox in Settings.
⚠️ Fine-Tuning & Reliability for Small Models (<8B)
Models under 8B parameters are often unreliable for complex multi-step tasks and tend to get stuck in loops or hallucinate tool arguments. If you want to configure and tune subagents yourself using a small model (<8B), keep these key points in mind:
- Defensive Prompting is Mandatory: You must use a strict system prompt with explicit planning steps and verification loops, or be prepared to switch to a larger model.
- Fine-Tuning Option: Fine-tuning the model (e.g., via LoRA/QLoRA) on task-specific function-calling datasets builds native adherence to tool schemas.
- Testing via Benchmark: You can clone the repository and run
Run_Full_Benchmarkin debug mode. The codebase includes minimal tests for the predefined read agents to check basic functionality.
⏱️ Important for models <8B: Because
Run_Full_Benchmarkexecutes against a livelmlocalsolution in real time, it runs relatively slowly. Run the benchmark multiple times rather than just once to account for model variance and verify how reliably your custom prompts or fine-tuned models handle real workloads across multiple attempts.
Beta note: schema may evolve.
🎭 AI Instructions & Modes
The "AI Instructions..." window allows you to define specialized System Prompts (roles) and creativity levels (temperature) for different development tasks. The extension comes with pre-configured behavior templates like Default, Improve, Review, Plan, Bugfix, Explain, Tests and allows you to create up to 50 custom modes
[!TIP] Prompt Caching Optimization: Select your desired mode (e.g., Bugfix, Review, Explain) before sending your message. Changing the mode mid-conversation modifies the system prompt, which invalidates the server's prompt cache, increasing token costs and latency.
Once configured, you can instantly switch between these system roles using the dropdown menu directly in the main chat bar. Selecting a preset updates the AI's system prompt and temperature for that conversation.
How to Customize Modes:
- Click the menu icon (
…) and select "AI Instructions...". - Select a target mode/role from the left panel (e.g.,
RevieworBugfix). - Configure its behavior in the right panel:
- Mode Toggle Checkbox: Check or uncheck this box to show or hide this specific mode in your main chat bar dropdown.
- Delete Custom Mode (✕): For custom modes, click the ✕ icon next to the toggle checkbox to remove the mode.
- System Prompt: Enter the base instructions that define the AI's role, processing rules, and operational constraints (e.g., telling the
Testsmode to act as a QA Engineer and strictly generate xUnit tests in C#). - Temperature: Set the randomness/creativity threshold. Use values closer to
0(e.g.,0.1or0.2) for rigid, deterministic tasks like compiling and bug fixing, and closer to1for architectural planning or brainstorming.
💡 Note: Always check your specific model's official documentation for recommended temperature settings, as some local models require strict defaults or a value of
0to function properly without breaking formatting or structure. - Click Save to apply the changes to your chat environment.
💬 Chat History Dialog
The Chat History dialog (accessible from the top‑right menu … → Chat History) lets you browse and restore past conversations from the local chat logs.
How it works
- The dialog lists the last 200 chat sessions found in the local
.jsonllog files (up to 50 hourly log files are scanned). - Each entry shows the first user message (truncated to 200 characters), a timestamp, and the total number of messages in that session.
- Click Load on any session to restore it into the chat window.
Important details
| Detail | Description |
|---|---|
| Save chat history must be ON | The dialog reads from %LOCALAPPDATA%\LMLocalChat\ChatHistory\. If Save chat history is turned off in Settings, no sessions will appear. |
| Loading a session forks it | When you load a past session, the extension creates a brand‑new session initialized with that session's message history. Your continuation is saved under a new session ID — the original session remains untouched. |
🖼️ Image Attachments (Multimodal Chat)
LM Local lets you attach images to a message so vision-capable models can "see" screenshots, diagrams, or designs. Paste (Ctrl+V) or drag-and-drop an image into the chat input — a thumbnail appears above the field, where you can review or remove it before sending.
How it works
Images are sent to the model in the OpenAI multimodal format (image_url with a base64 data URL), together with your text prompt.
⚠️ Limitations
| Limitation | Details |
|---|---|
| Vision model required | The active model must support vision (e.g. LLaVA, Qwen2-VL, GPT-4o, Claude 3+). Otherwise the API returns an error. |
| Max 3 images per message | A 4th image is rejected with a warning. |
| Max ~4 MB per image | Larger files are rejected. |
| Allowed formats | JPEG and PNG only. |
| Not saved in history | base64 payloads are never written to the .jsonl chat log. When a session is restored, images are not available — only a placeholder ([N images attached - not available in this session]) is shown and sent to the model. |
| Session restore | Restoring a session from history forks it into a new session; image attachments from the original session are not recoverable. |
| Consolidating an exchange loses images | The "Reset → consolidate last exchange" command rewrites the user message as plain text; attached images are dropped from the in-memory history after consolidation. |
| History compaction can drop images | When EnableHistoryCompaction is enabled, the early (summarized) portion of a long conversation is stripped of image attachments. |
[!TIP] Images live in memory only for the current session — they won't survive a restart or loading a session from history.
💡 Smart Workflows & Best Practices
🧠 Which model series are worth trying right now?
If you are new to local LLMs and don't know where to start, try these model families:
- Qwen 3.x series
- Gemma 4.x series
- Mistral 3.x series
- Nemotron 3.x series
- GPT OSS series
🤔 Model can't find what you're looking for?
The AI doesn't have a full filesystem index — it relies on the context you provide. If the model fails to find a specific file, class, or code block:
- Use the "+" button – Click the
+button to include the entire active document in the request. This gives the AI immediate access to the current file. - Use "Send to LM Local" – Right-click in the editor and select "Send to LM Local". If you highlight code, it sends only the selection; if nothing is highlighted, it sends the entire active document.
- Be specific in your prompt – Mention the exact file name and extension. For example:
"Find the CalculateTotal method in OrderService.cs"— this gives the AI a clear target, making it easier to locate the relevant code.
🎯 How can I improve my development plans by hot-swapping models?
LM Local allows you to switch the active LLM on the fly without clearing the chat. You can use this to pass the conversation history from one model to another sequentially – each model builds on or critiques the previous output, refining the plan step by step.
It's simple. Just ask one AI model to write a plan, then switch to a different model in the same chat and tell it: "Critique this and update the plan." The new model reads the whole conversation and gives you a fresh perspective, catching edge cases the first one missed.
Why it works: It’s like bringing in two experts one after another. The first drafts a strategy. The second walks into the room, reads the finished document, and says: "Here’s where you went wrong," without ever seeing the first expert’s rough drafts. By swapping models, you collect the best from each perspective — and you never have to copy-paste or start a new chat, because the entire history stays right there.
📉 Hitting Context Limits
Method 1: Use LM Local's UI cleanup If the chat history grows too long during this multi-model review loop and you start hitting token limits, use LM Local's cleanup feature instead of losing your work:
- Click the "Clear chat" button next to the menu.
- Choose "Summarize and move context" or "Consolidate last exchange" or Exact copy of the last exchange.
- This will automatically compress the entire debate or pull just your final refined plan into a fresh, clean chat session, resetting model context usage back to the baseline.
Method 2: Externalize state to a file (Requires built-in tools enabled)
- Tell the model:
"Save this finalized plan to docs/plan.md". - Clear the chat to reset the context window.
- In the new clean chat, ask the model to review or implement the plan:
- To refine:
"Read docs/plan.md, review it, and suggest improvements." - To implement:
"Read docs/plan.md and implement Phase 1."
- To refine:
💰 How can I reduce token usage and lower API costs?
Context window accumulation can lead to high API costs or local performance drops. You can optimize your budget by applying these patterns:
- The "Smart Context Collector" Tiering: Don't waste your expensive cloud tokens on reading massive files or building initial context. Instead, start the session with a lighter, cheaper model (like GPT-4o-mini or a local Ministral 3.x) to read your code files, list directories, and pull together the initial workspace data. Once the context is captured and a baseline draft is formed in the history, hot-swap to a premium OpenAI-compatible model (like DeepSeek or GPT) to run the high-level analysis and critical edits.
- Choose Providers with Prompt Caching: When working in the cloud, pick providers that natively support Prompt Caching (like DeepSeek or OpenRouter). Because LM Local continuously appends conversation history with each turn, prompt caching can slash your recurring token costs.
- Offload Context via RAG MCP Servers: Instead of attaching whole codebases or giant documents directly to the prompt, hook up an external RAG (Retrieval-Augmented Generation) MCP server. This allows LM Local to fetch only the highly relevant code snippets or documentation chunks dynamically when needed. You get full project awareness while keeping your active context window lean and cheap.
- Use a lightweight project map (no RAG): Create a context.md file (manually or ask the model to generate it) describing your project structure, main classes, and patterns. Attach it to the first message to give the model a "project map" without attaching the whole codebase. This saves tokens and reduces context size.
- Delegate tasks to Subagents: When performing extensive codebase searches or complex multi-step operations, enable Subagents. Instead of letting the main chat accumulate long chains of tool calls and raw file outputs (which quickly drains your context window), a subagent handles the task in its own isolated loop. It does the work in the background and returns only a concise summary to your main conversation, keeping your primary session lean and significantly reducing token costs.
- Disable Unused Tools (Built-in & MCP): Each active tool adds its JSON schema and prompt definitions to every API request. Turn off MCP servers or built-in tools you don't need for your current task to instantly shave off input tokens from every turn.
⚡ How do I maximize model speed (even with a quality drop)?
When you just need to generate straightforward boilerplate, repetitive CRUD methods, or standard unit tests at maximum speed:
- Hardware VRAM Optimization: Choose quantized weights (e.g.,
Q4_K_MGGUF formats) that fully fit into your GPU VRAM. As soon as layers spill over into system RAM (CPU fallback), streaming speed drops significantly. - Enable Speculative Decoding: If your local inference engine (such as vLLM, LM Studio, or llama.cpp) supports it, turn on Speculative Decoding. This technique pairs your main LLM with a tiny, ultra-fast "draft" model. The draft model rapidly guesses the next several tokens, and the target model verifies them in parallel. This drastically increases your tokens-per-second generation rate. For example, you can run the base model
google/gemma-4-e4balongside its dedicated draftergemma-4-e4b-it-assistant, which is optimized for fast speculative generation. - Tweak Backend Inference Settings: Open your server configurations and check the parameters that directly impact processing and generation speed. Pay close attention to:
- GPU Offload & CPU Thread Pool Size
- Flash Attention & Unified KV Cache
- K/V Cache Quantization Type & Offload KV Cache to GPU Memory
- Evaluation / Physical Batch Size
- Keep Model in Memory
- Drop the Temperature: Lower your active preset temperature closer to
0.0or0.1. This stops the model from creatively wandering around, forcing it to stream short, direct, and deterministic code structures. - Fine-Tune Small Models (<8B) for Structured Tasks: If small local models struggle with tool calling, looping, or complex JSON schema adherence, fine-tune them (e.g., via LoRA/QLoRA) on task-specific function-calling datasets. Fine-tuning builds native schema adherence into light models, making them faster and more reliable for background tasks and subagents without needing heavy system prompts.
Auto-Completions
Provides fast, single-line ghost completions (inline grey text code suggestions) that appear when your cursor is at the end of a line, powered by Fill-in-the-Middle (FIM) prompting on local base models.
How to Enable:
Click the ... menu in the extension panel and select Autocompletions... to open the configuration window. From there, check the enable box, select your provider, and assign a model.
⚠️ Conflict Warning: If you have another autocompletion extension active (e.g., GitHub Copilot), its suggestions may visually overlap with LM Local’s ghost text. To avoid a confusing double‑suggestion experience, it is recommended enabling only one autocompletion provider at a time – either the built‑in LM Local one or your external tool, but not both simultaneously.
Supported Providers & Models
Works with local providers: LM Studio, Ollama, llama.cpp, Jan.
For optimal results, use base models trained natively on Fill-in-the-Middle (FIM) tokens. The following models or series have been verified to work:
- Qwen2.5-Coder (1.5B)
- DeepSeek-Coder (1.3B-Base)
- CodeGemma (2B)
- StarCoderBase (1B)
- Refact (1.6B-FIM)
- Stable-Code (3B)
💡 Tip: After selecting your provider and model in the settings, you can click the Test button to easily verify the connection and ensure the model is responding correctly.
⚠️ Note: Make sure you are using the Base versions of these models rather than the Instruct/Chat versions, as base models are specifically optimized for raw code completion.
Context Menu Commands
LM Local adds two groups of commands to Visual Studio — in the code editor context menu and in the Solution Explorer context menu. All commands open the LM Local chat window (if not already visible) and inject the relevant content.
Editor Context Menu (right-click inside a code file)
| Command | Behavior |
|---|---|
| Send to LM Local | Injects the selected text (or the entire file if nothing is selected) into the chat input as a code-fenced markdown block. The prompt is not sent automatically — you can edit or add instructions before sending. |
| LM Local Commands → Review Code | Auto-sends the selected code with a review prompt: "Identify potential bugs, security issues, performance problems, and code smells. Provide specific, actionable recommendations." Selects the Review instruction tab. |
| LM Local Commands → BugFix Code | Auto-sends the selected code with a bugfix prompt. Selects the Bugfix instruction tab. |
| LM Local Commands → Add Unit Tests | Auto-sends the selected code with a test-generation prompt. Selects the Tests instruction tab. |
| LM Local Commands → Add Summary | Auto-sends the selected code with a prompt to add /// XML documentation comments. No instruction tab is selected. |
| LM Local Commands → Improve Code | Auto-sends the selected code with an improvement prompt focused on performance, readability, and C# best practices. Selects the Improve instruction tab. |
| LM Local Commands → Explain Code | Auto-sends the selected code with a detailed explanation prompt. Selects the Explain instruction tab. |
All editor commands are disabled while a chat session is running. If no text is selected, the entire document content is used.
Solution Explorer Context Menu (right-click any node)
| Selection | Command | What Gets Injected |
|---|---|---|
| 1 file | Send to LM Local | Full file content in a code fence with its absolute path |
| 2–10 files (Ctrl+Click) | Send to LM Local | Each file's content, up to 200 KB total |
| Folder (≤20 files recursively) | Send to LM Local Folder | Content of all files (recursively through subfolders) |
| Folder (>20 files recursively) | Send to LM Local Folder | Hierarchical tree of folders and files (no content) |
| Project node | Send to LM Local Project | Hierarchical tree of folders and files (no content) |
| Solution node | Send to LM Local Solution | Aggregated tree of all projects |
Limits & Safety
- Max 10 files with full content per operation
- Max 200 KB total content; excess files appear as
(content truncated) - Folder with ≤20 files (recursive count) → file contents are sent
- Folder with >20 files → hierarchical directory tree is sent instead (no content)
- Directories automatically excluded:
bin,obj,.vs,.git,CopilotBaseline,node_modules,packages - Binary / image files (
.exe,.dll,.pdb,.png,.jpg,.gif, etc.) are skipped - Button is disabled while a chat session is in progress
Note: Solution Explorer commands do not auto-send — content is injected into the chat input so you can review or add instructions before submitting. Files are read directly from disk and do not need to be open in the editor.
🌐 Model Context Protocol (MCP) Support
LM Local supports external tool integration via the Model Context Protocol (MCP). This allows you to hook up custom or third-party servers to give your local AI even more capabilities.
[!WARNING] Security Notice & Trusted Sources Only
- Trust Infrastructure: Only connect to MCP servers and URLs that you fully trust or host locally yourself.
- Review Third-Party Tools: Before enabling a public or third-party MCP endpoint, review its exposed tools and documentation to ensure it does not execute unauthorized commands or compromise sensitive project data.
- No Execution Restrictions: Currently, the extension does not restrict, sandbox, or prompt for manual confirmation when the AI invokes an MCP tool. Connected tools execute automatically when called by the model.
⚠️ Scope & Supported Transports
- Protocol Version: Compatible with the MCP
2025-11-25specification standard. - Tools-Only Support: LM Local exclusively loads and registers Tools exposed by your MCP servers. These are separate from the built‑in tools and are configured independently. Other MCP features like custom Prompts or Resources are currently ignored and will not be utilized by the assistant.
- Transports: Supports both local process-based (stdio) and network-based streamable (http) transports.
- NOT Supported: Legacy
sse(Server-Sent Events) transports are unsupported (no plans).
⚙️ How to Configure MCP Servers
You can set up and manage connections to external MCP servers directly inside the configuration dialog:
- Open the LM Local Chat tool window.
- Click the menu icon (
…) in the top-right corner. - Select "MCP Extensions..." from the dropdown menu.
- In the dialog:
- Check "Enable Model Context Protocol (MCP)" to turn the feature on.
- Paste or edit your JSON configuration directly into the built-in text editor.
- Click the "Discover Tools" button to validate your settings and instantly verify connection availability.
The extension saves your settings locally to %LOCALAPPDATA%\LMLocalChat\mcp.json.
📝 Configuration Examples
You can organize your configuration using either the servers or mcpServers root keys.
[!NOTE] LM Local Custom Extensions The following parameters are custom LM Local properties and are not part of the official MCP specification:
"disabled"(boolean): Temporarily deactivates an entire server process or HTTP connection without deleting its configuration block."permissions"(object): Used to mute specific tools discovered on the server.
Example 1: Public HTTP Server (with Tool Permissions)
{
  "mcpServers": {
    "microsoft-learn": {
      "type": "http",
      "url": "https://learn.microsoft.com/api/mcp",
      "permissions": {
        "microsoft_code_sample_search": "disable"
      }
    }
  }
}
Example 2: Demonstrates how to configure endpoints requiring a GitHub Personal Access Token (PAT).
{
  "servers": {
    "github-copilot": {
      "type": "http",
      "url": "https://api.githubcopilot.com/mcp/",
      "headers": {
        "Authorization": "Bearer ghp_your_personal_access_token_here"
      },
      "disabled": false
    }
  }
}
Example 3: Illustrates the required schema structure for connecting local executable-based MCP servers
{
  "servers": {
    "OmniToolBox": {
      "type": "stdio",
      "command": "C:\\MyMCP\\OmniToolBox.exe"
    }
  }
}
//or
{
  "mcpServers": {
    "OmniToolBox": {
      "type": "stdio",
      "command": "dotnet",
      "args": ["C:\\MyMCP\\bin\\Debug\\net10.0\\OmniToolBox.dll"]
    }
  }
}
🔗 Developer Resources
Model Context Protocol .NET SDK — Use this official Microsoft SDK to build and compile your own custom MCP servers compatible with LM Local.
https://github.com/modelcontextprotocol/csharp-sdk
🔧 Troubleshooting
| Issue | Solution |
|---|---|
| No model shown | Ensure a model is fully loaded in the LM Studio "Server" tab. |
| Connection Error | Check if the LM Studio Server is ON at http://127.0.0.1:1234. Click ↻ to retry. |
| UI Lag | Restart the tool window or check your local machine resources (CPU/GPU). |
| MCP server not detected | Verify that MCP is enabled in MCP Extensions… dialog, check your JSON configuration syntax, and ensure the server process or URL is accessible. |
| Autocompletions not showing | Make sure autocompletions are enabled in Autocompletions… dialog, and that you have selected a model that supports Fill‑in‑the‑Middle (FIM) – see the list of verified models in the Auto‑Completions section. |
| Built‑in tools not being invoked | Check that the global Enable built‑in AI tools (read‑only) and/or Enable built‑in AI tools (write/modify) checkboxes are ticked in Settings. Also verify that the specific tool is not disabled in the Built‑in Tools… dialog. |
| Response blocked by content filter | Rephrase the request. |
| Response truncated - token limit reached | Increase Context Length in LM Studio model settings or split the task into smaller parts. |
image_url variant error ("unknown variant image_url, expected text") |
The loaded model does not support vision/multimodal inputs – it only accepts text messages. Do not include image attachments in your request. If you need image understanding, switch to a multimodal model (e.g., LLaVA, Qwen-VL, or any model with vision capabilities). |
💾 Data & Configuration
LM Local keeps things simple and stores your preferences locally. Configuration files are maintained in:
The following configuration files are stored there:
| File | Purpose |
|---|---|
settings.json |
Main extension settings (provider, model, UI, timeouts, history). |
providers.json |
Saved provider profiles (see Providers). |
models.config.json |
Model records & overrides (see Models Dialog). |
subagents.json |
Subagent (worker agent) definitions. |
mcp.json |
MCP server configuration. |
ChatHistory\ |
Chat session logs (history dialog, session restore). |
SubAgentsLogs\ |
Sub Agent session logs. |
%LOCALAPPDATA%\LMLocalChat\
📜 License & Compliance & Third-Party
- License: MIT License. See LICENSE.txt for details.
- Compliance: See COMPLIANCE.md for EU AI Act and data handling information.
- Components:
markedv15.0.12 (MIT)highlight.jsv11.9.0 (BSD-3-Clause)Acornimav1.7.0 (BSD-3-Clause)